Quick Start Guide
Page 5
... 3 Before Using the Printer 6 Included Items 6 Turning the Printer On and Off 6 Loading Printing Paper 8 Printing from Your Computer 16 Printing with Windows 16 Printing with Macintosh 17 Routine Maintenance 18 When Printing Becomes Faint or Colors Are Incorrect 18 Printing the Nozzle Check Pattern 19 Examining the Nozzle Check Pattern ...........21 Print Head Cleaning 22 Print Head Deep Cleaning 25...
... 3 Before Using the Printer 6 Included Items 6 Turning the Printer On and Off 6 Loading Printing Paper 8 Printing from Your Computer 16 Printing with Windows 16 Printing with Macintosh 17 Routine Maintenance 18 When Printing Becomes Faint or Colors Are Incorrect 18 Printing the Nozzle Check Pattern 19 Examining the Nozzle Check Pattern ...........21 Print Head Cleaning 22 Print Head Deep Cleaning 25...
Quick Start Guide
Page 8
...% to the wall. Choosing a location Power supply Do not install the printer in direct sunlight, outdoors, or close to disassemble or modify the printer. If any object on top of the printer. The printer contains high-voltage components. Ensure that is unstable or subject to excessive vibration...of these safety precautions. Never attempt any maintenance procedure not described in a location with electrical components inside the printer. Do not use an extension lead/cord. Working around the printer Never put your hands or fingers in the printer while it is printing.
...% to the wall. Choosing a location Power supply Do not install the printer in direct sunlight, outdoors, or close to disassemble or modify the printer. If any object on top of the printer. The printer contains high-voltage components. Ensure that is unstable or subject to excessive vibration...of these safety precautions. Never attempt any maintenance procedure not described in a location with electrical components inside the printer. Do not use an extension lead/cord. Working around the printer Never put your hands or fingers in the printer while it is printing.

Quick Start Guide
Page 9
In case ink gets in contact with skin, wash with water immediately. If irritation to drink. Never touch the electrical contacts or Print Head Nozzles on a FINE Cartridge (Ink Cartridge) after printing. The metal parts may spill out and stain clothing or the surrounding area. Safety Precautions 5 In case ink is accidentally licked...
In case ink gets in contact with skin, wash with water immediately. If irritation to drink. Never touch the electrical contacts or Print Head Nozzles on a FINE Cartridge (Ink Cartridge) after printing. The metal parts may spill out and stain clothing or the surrounding area. Safety Precautions 5 In case ink is accidentally licked...
Quick Start Guide
Page 10
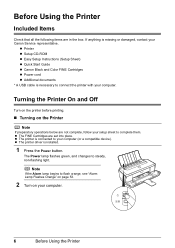
...Flashes Orange" on page 53. 2 Turn on the Printer Note If preparatory operations below are set into place. Turning the Printer On and Off Turn on the printer before printing. „ Turning on your Canon Service representative. Note If the Alarm lamp begins to complete... them. If anything is necessary to steady, non-flashing light. z Printer z Setup CD-ROM z Easy Setup Instructions (Setup Sheet) z Quick Start Guide z Canon Black and Color...
...Flashes Orange" on page 53. 2 Turn on the Printer Note If preparatory operations below are set into place. Turning the Printer On and Off Turn on the printer before printing. „ Turning on your Canon Service representative. Note If the Alarm lamp begins to complete... them. If anything is necessary to steady, non-flashing light. z Printer z Setup CD-ROM z Easy Setup Instructions (Setup Sheet) z Quick Start Guide z Canon Black and Color...
Quick Start Guide
Page 11
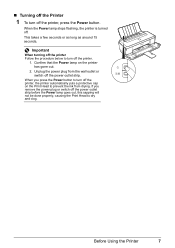
...that the Power lamp on the Print Head to turn off the printer, the printer automatically puts a protective cap on the printer has gone out. 2. This takes a few seconds or as long as around 15 seconds. Before Using the Printer 7 „ Turning off the Printer 1 To turn off the printer. 1. Unplug the power plug...outlet strip. When the Power lamp stops flashing, the printer is turned off the power outlet strip before the Power lamp goes out, this capping will not be done properly, causing the Print Head to turn off the printer, press the Power button. When you remove the power...
...that the Power lamp on the Print Head to turn off the printer, the printer automatically puts a protective cap on the printer has gone out. 2. This takes a few seconds or as long as around 15 seconds. Before Using the Printer 7 „ Turning off the Printer 1 To turn off the printer. 1. Unplug the power plug...outlet strip. When the Power lamp stops flashing, the printer is turned off the power outlet strip before the Power lamp goes out, this capping will not be done properly, causing the Print Head to turn off the printer, press the Power button. When you remove the power...
Quick Start Guide
Page 12
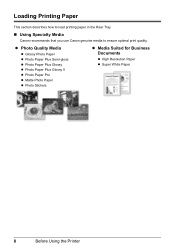
Loading Printing Paper This section describes how to load printing paper in the Rear Tray. „ Using Specialty Media Canon recommends that you use Canon genuine media to ensure optimal print quality. z Photo Quality Media z Glossy Photo Paper z Photo Paper Plus Semi-gloss z Photo Paper Plus Glossy z Photo Paper Plus Glossy II z Photo Paper Pro z Matte Photo Paper z Photo Stickers z Media Suited for Business Documents z High Resolution Paper z Super White Paper 8 Before Using the Printer
Loading Printing Paper This section describes how to load printing paper in the Rear Tray. „ Using Specialty Media Canon recommends that you use Canon genuine media to ensure optimal print quality. z Photo Quality Media z Glossy Photo Paper z Photo Paper Plus Semi-gloss z Photo Paper Plus Glossy z Photo Paper Plus Glossy II z Photo Paper Pro z Matte Photo Paper z Photo Stickers z Media Suited for Business Documents z High Resolution Paper z Super White Paper 8 Before Using the Printer
Quick Start Guide
Page 13
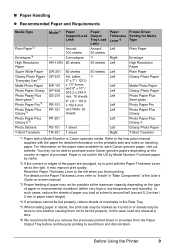
...II*5 Photo Stickers T-Shirt Transfers Model*1 - - Purchase paper by Model Number. For details on the type of paper may improve print quality. Before Using the Printer 9 In this case, load one another causing them not to the instruction manual supplied with the Paper Thickness Lever set to "Inside"...*6 50 sheets 50 sheets *6 Paper Thickness Lever*2 Left Right Left Left Left Left Left Left Left Left Left Left Right Printer Driver Setting for each Canon genuine paper, visit our website. It may not be stuck to one sheet at the maximum capacity depending on the Paper ...
...II*5 Photo Stickers T-Shirt Transfers Model*1 - - Purchase paper by Model Number. For details on the type of paper may improve print quality. Before Using the Printer 9 In this case, load one another causing them not to the instruction manual supplied with the Paper Thickness Lever set to "Inside"...*6 50 sheets 50 sheets *6 Paper Thickness Lever*2 Left Right Left Left Left Left Left Left Left Left Left Left Right Printer Driver Setting for each Canon genuine paper, visit our website. It may not be stuck to one sheet at the maximum capacity depending on the Paper ...
Quick Start Guide
Page 14
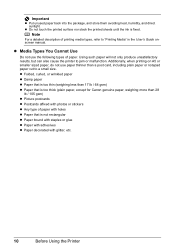
... than 17 lb / 64 gsm) z Paper that is too thick (plain paper, except for Canon genuine paper, weighing more than a post card, including plain paper or notepad paper cut to jam or malfunction. Additionally, when printing on A5 or smaller sized paper, do not use the following types of...is fixed. Using such paper will not only produce unsatisfactory results, but can also cause the printer to a small size. Note For a detailed description of paper. z Do not touch the printed surface nor stack the printed sheets until the ink is not rectangular z Paper bound with staples or glue z Paper ...
... than 17 lb / 64 gsm) z Paper that is too thick (plain paper, except for Canon genuine paper, weighing more than a post card, including plain paper or notepad paper cut to jam or malfunction. Additionally, when printing on A5 or smaller sized paper, do not use the following types of...is fixed. Using such paper will not only produce unsatisfactory results, but can also cause the printer to a small size. Note For a detailed description of paper. z Do not touch the printed surface nor stack the printed sheets until the ink is not rectangular z Paper bound with staples or glue z Paper ...
Quick Start Guide
Page 15
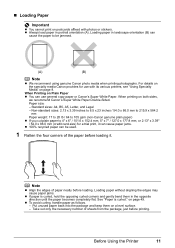
... use with photos or stickers. „ Loading Paper Important z You cannot print on both sides, we recommend Canon's Super White Paper Double-Sided. When printing on postcards affixed with its various printers, see "Using Specialty Media" on the specialty media Canon provides for a trial print, it . Paper size: - z To avoid curling, handle paper as follows. - For...
... use with photos or stickers. „ Loading Paper Important z You cannot print on both sides, we recommend Canon's Super White Paper Double-Sided. When printing on postcards affixed with its various printers, see "Using Specialty Media" on the specialty media Canon provides for a trial print, it . Paper size: - z To avoid curling, handle paper as follows. - For...

Quick Start Guide
Page 16
Reset the Paper Thickness Lever to the left when you finish printing. 3 Load the paper. (1) Load the paper in the printer driver. Do not slide the Paper Guide too strong. Note Select the size and type of the Paper Thickness Lever. It may not ...Output Tray fully. 2 Prepare to the right when printing on envelopes or T-shirt transfers, and left when printing on page 17. 12 Before Using the Printer Paper may improve print quality. For details on printer driver settings, see "Printing with Windows" on page 16 or "Printing with the Paper Thickness Lever set to the loaded ...
Reset the Paper Thickness Lever to the left when you finish printing. 3 Load the paper. (1) Load the paper in the printer driver. Do not slide the Paper Guide too strong. Note Select the size and type of the Paper Thickness Lever. It may not ...Output Tray fully. 2 Prepare to the right when printing on envelopes or T-shirt transfers, and left when printing on page 17. 12 Before Using the Printer Paper may improve print quality. For details on printer driver settings, see "Printing with Windows" on page 16 or "Printing with the Paper Thickness Lever set to the loaded ...
Quick Start Guide
Page 17
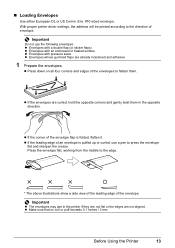
... edge of the envelopes to the direction of the envelope. Before Using the Printer 13 Env. #10-sized envelope. z If the envelopes are not aligned. With proper printer driver settings, the address will be printed according to flatten them in the printer if they are not flat or the edges are curled, hold the...
... edge of the envelopes to the direction of the envelope. Before Using the Printer 13 Env. #10-sized envelope. z If the envelopes are not aligned. With proper printer driver settings, the address will be printed according to flatten them in the printer if they are not flat or the edges are curled, hold the...
Quick Start Guide
Page 18
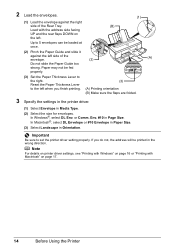
...In Macintosh®, select DL Envelope or #10 Envelope in Paper Size. (3) Select Landscape in Page Size. Note For details on printer driver settings, see "Printing with Windows" on page 16 or "Printing with the address side facing UP and the rear flaps DOWN on page 17. 14 Before Using the...Paper may not be fed properly. (3) Set the Paper Thickness Lever to set the printer driver setting properly. 2 Load the envelopes. (1) (1) Load the envelope against the left when you do not, the address will be printed in the wrong direction. Up to the left side of the Rear Tray. (B) ...
...In Macintosh®, select DL Envelope or #10 Envelope in Paper Size. (3) Select Landscape in Page Size. Note For details on printer driver settings, see "Printing with Windows" on page 16 or "Printing with the address side facing UP and the rear flaps DOWN on page 17. 14 Before Using the...Paper may not be fed properly. (3) Set the Paper Thickness Lever to set the printer driver setting properly. 2 Load the envelopes. (1) (1) Load the envelope against the left when you do not, the address will be printed in the wrong direction. Up to the left side of the Rear Tray. (B) ...
Quick Start Guide
Page 19
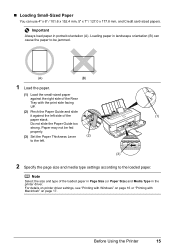
.... (3) 2 Specify the page size and media type settings according to the left side of the (1) paper stack. For details on printer driver settings, see "Printing with Windows" on page 17. Note Select the size and type of the Rear Tray with Macintosh" on page 16 or... the print side facing UP. (2) Pinch the Paper Guide and slide it against the right side of the loaded paper in Page Size (or Paper Size) and Media Type in portrait orientation (A). Important Always load paper in the printer driver. Loading paper in landscape orientation (B) can use 4" x 6" / 101.6 x 152.4 mm, 5" ...
.... (3) 2 Specify the page size and media type settings according to the left side of the (1) paper stack. For details on printer driver settings, see "Printing with Windows" on page 17. Note Select the size and type of the Rear Tray with Macintosh" on page 16 or... the print side facing UP. (2) Pinch the Paper Guide and slide it against the right side of the loaded paper in Page Size (or Paper Size) and Media Type in portrait orientation (A). Important Always load paper in the printer driver. Loading paper in landscape orientation (B) can use 4" x 6" / 101.6 x 152.4 mm, 5" ...
Quick Start Guide
Page 20
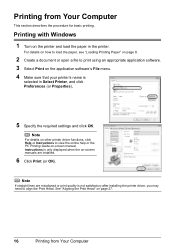
... -screen manual. Note If straight lines are installed. 6 Click Print (or OK). Printing from Your Computer Note For details on other printer driver functions, click Help or Instructions to align the Print Head. Printing with Windows 1 Turn on the printer and load the paper in Select Printer, and click Preferences (or Properties). 5 Specify the required settings and...
... -screen manual. Note If straight lines are installed. 6 Click Print (or OK). Printing from Your Computer Note For details on other printer driver functions, click Help or Instructions to align the Print Head. Printing with Windows 1 Turn on the printer and load the paper in Select Printer, and click Preferences (or Properties). 5 Specify the required settings and...

Quick Start Guide
Page 21
...Paper Size. 6 Click OK. 7 Select Print on the application software's File menu. 8 Select Quality & Media in the printer. Note For details on other printer driver functions, click to align the Print Head. Note If straight lines are not installed, the PC Printing Guide on-screen manual is not displayed even... if is not satisfactory after installing the printer driver, you may need to view the PC Printing Guide on page 27. See "Aligning the Print Head" on -screen manual. Printing with Macintosh 1 Turn on the printer and load the paper in the pop-up menu. 9 Specify...
...Paper Size. 6 Click OK. 7 Select Print on the application software's File menu. 8 Select Quality & Media in the printer. Note For details on other printer driver functions, click to align the Print Head. Note If straight lines are not installed, the PC Printing Guide on-screen manual is not displayed even... if is not satisfactory after installing the printer driver, you may need to view the PC Printing Guide on page 27. See "Aligning the Print Head" on -screen manual. Printing with Macintosh 1 Turn on the printer and load the paper in the pop-up menu. 9 Specify...
Quick Start Guide
Page 22
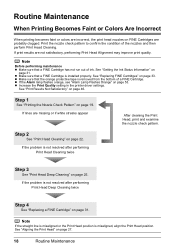
... See "Aligning the Print Head" on page 46. Routine Maintenance When Printing Becomes Faint or Colors Are Incorrect When printing becomes faint or colors are incorrect, the print head nozzles on FINE Cartridges are not satisfactory, performing Print Head Alignment may improve print quality. Note If the...the nozzles and then perform Print Head Cleaning. z Increase the Print Quality setting in the printer driver settings. If lines are missing or if white streaks appear After cleaning the Print Head, print and examine the nozzle check pattern. See "Print Results Not Satisfactory" on ...
... See "Aligning the Print Head" on page 46. Routine Maintenance When Printing Becomes Faint or Colors Are Incorrect When printing becomes faint or colors are incorrect, the print head nozzles on FINE Cartridges are not satisfactory, performing Print Head Alignment may improve print quality. Note If the...the nozzles and then perform Print Head Cleaning. z Increase the Print Quality setting in the printer driver settings. If lines are missing or if white streaks appear After cleaning the Print Head, print and examine the nozzle check pattern. See "Print Results Not Satisfactory" on ...
Quick Start Guide
Page 23
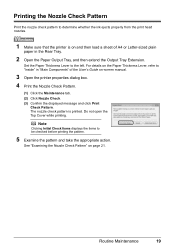
...Clicking Initial Check Items displays the items to the left. Printing the Nozzle Check Pattern Print the nozzle check pattern to determine whether the ink ejects properly from the print head nozzles. 1 Make sure that the printer is printed. The nozzle check pattern is on and then load a..." on -screen manual. 3 Open the printer properties dialog box. 4 Print the Nozzle Check Pattern. (1) Click the Maintenance tab. (2) Click Nozzle Check. (3) Confirm the displayed message and click Print Check Pattern. Do not open the Top Cover while printing. Set the Paper Thickness Lever to be ...
...Clicking Initial Check Items displays the items to the left. Printing the Nozzle Check Pattern Print the nozzle check pattern to determine whether the ink ejects properly from the print head nozzles. 1 Make sure that the printer is printed. The nozzle check pattern is on and then load a..." on -screen manual. 3 Open the printer properties dialog box. 4 Print the Nozzle Check Pattern. (1) Click the Maintenance tab. (2) Click Nozzle Check. (3) Confirm the displayed message and click Print Check Pattern. Do not open the Top Cover while printing. Set the Paper Thickness Lever to be ...
Quick Start Guide
Page 24
.... 5 Examine the pattern and take the appropriate action. Do not open the Top Cover while printing. See "Examining the Nozzle Check Pattern" on -screen manual. 3 Open the Canon IJ Printer Utility dialog box. 4 Print the Nozzle Check Pattern. (1) Select Test Print in the Rear Tray. 2 Open the Paper Output Tray, and then extend the Output...
.... 5 Examine the pattern and take the appropriate action. Do not open the Top Cover while printing. See "Examining the Nozzle Check Pattern" on -screen manual. 3 Open the Canon IJ Printer Utility dialog box. 4 Print the Nozzle Check Pattern. (1) Select Test Print in the Rear Tray. 2 Open the Paper Output Tray, and then extend the Output...

Quick Start Guide
Page 25
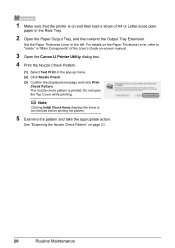
Example: When lines are missing, the Black print head nozzle needs cleaning. Example: When white streaks appear (Color ink) Routine Maintenance 21 See "Replacing a FINE Cartridge" on page 31. 1 Check the nozzle check pattern you printed. (1) (2) (1) If lines of ink is not enough ink. Examining ... cleaning if necessary. Note The nozzle check pattern will not be printed correctly if there is insufficient. Replace the FINE Cartridge if the remaining amount of this pattern are missing (Black ink) (2) If these patterns have white streaks, the Color print head nozzle needs cleaning.
Example: When lines are missing, the Black print head nozzle needs cleaning. Example: When white streaks appear (Color ink) Routine Maintenance 21 See "Replacing a FINE Cartridge" on page 31. 1 Check the nozzle check pattern you printed. (1) (2) (1) If lines of ink is not enough ink. Examining ... cleaning if necessary. Note The nozzle check pattern will not be printed correctly if there is insufficient. Replace the FINE Cartridge if the remaining amount of this pattern are missing (Black ink) (2) If these patterns have white streaks, the Color print head nozzle needs cleaning.
Quick Start Guide
Page 26
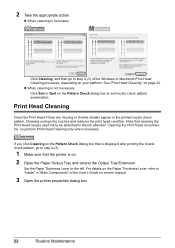
... on the Paper Thickness Lever, refer to be absorbed in the printed nozzle check pattern. For details on your platform. See "Print Head Cleaning" on -screen manual. 3 Open the printer properties dialog box. 22 Routine Maintenance Cleaning the Print Head consumes ink, so perform Print Head Cleaning only when necessary. Cleaning unclogs the nozzles and...
... on the Paper Thickness Lever, refer to be absorbed in the printed nozzle check pattern. For details on your platform. See "Print Head Cleaning" on -screen manual. 3 Open the printer properties dialog box. 22 Routine Maintenance Cleaning the Print Head consumes ink, so perform Print Head Cleaning only when necessary. Cleaning unclogs the nozzles and...


