
i9900 Quick Start Guide
Page 45
Do not touch the lock lever; Important Handle ink tanks carefully to the center. 2 Remove the empty ink tank. (1) Push the tab and remove the ink tank. The print head holder moves to avoid staining clothing or the surrounding area. Printing Maintenance Replacing Ink Tanks When an ink tank runs out of the ink tank and...
Do not touch the lock lever; Important Handle ink tanks carefully to the center. 2 Remove the empty ink tank. (1) Push the tab and remove the ink tank. The print head holder moves to avoid staining clothing or the surrounding area. Printing Maintenance Replacing Ink Tanks When an ink tank runs out of the ink tank and...
i9900 Quick Start Guide
Page 46
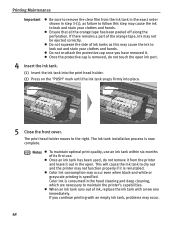
...properly if it is specified. The print head holder moves to follow this may not be ejected correctly. The ink tank installation process is consumed in the head cleaning and deep cleaning, which are necessary to maintain the printer's capabilities. If you have removed it. Ensure that all the ...orange tape has been peeled off along the perforation. Printing Maintenance Important Be sure to remove the clear film from the printer and leave it out in the open ink port. 4 Insert the ink tank. (1) Insert the ink tank into the print head holder. (2) Press on the "PUSH" mark until...
...properly if it is specified. The print head holder moves to follow this may not be ejected correctly. The ink tank installation process is consumed in the head cleaning and deep cleaning, which are necessary to maintain the printer's capabilities. If you have removed it. Ensure that all the ...orange tape has been peeled off along the perforation. Printing Maintenance Important Be sure to remove the clear film from the printer and leave it out in the open ink port. 4 Insert the ink tank. (1) Insert the ink tank into the print head holder. (2) Press on the "PUSH" mark until...
i9900 Quick Start Guide
Page 68
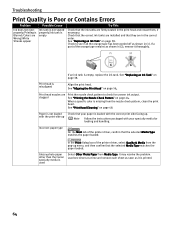
... Quality & Media from Media Type. Glossy photo paper other than the Canon specialty media is missing from the nozzle check pattern, clean the print head. If a part of the orange tape remains as shown in (2), remove it is empty Try This Check that the selected Media Type matches the.... If an ink tank is misaligned Align the print head. Load one sheet at a time and remove each sheet as soon as shown in the correct order. Print head is empty, replace the ink tank. See "Aligning the Print Head" on page 48. See "Printing the Nozzle Check Pattern" on page 44. Check...
... Quality & Media from Media Type. Glossy photo paper other than the Canon specialty media is missing from the nozzle check pattern, clean the print head. If a part of the orange tape remains as shown in (2), remove it is empty Try This Check that the selected Media Type matches the.... If an ink tank is misaligned Align the print head. Load one sheet at a time and remove each sheet as soon as shown in the correct order. Print head is empty, replace the ink tank. See "Aligning the Print Head" on page 48. See "Printing the Nozzle Check Pattern" on page 44. Check...
i9900 Quick Start Guide
Page 73
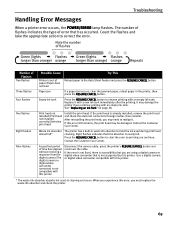
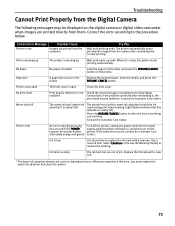
..., press the printer's RESUME/CANCEL button and reconnect the cable. Use a digital camera or digital video camcorder compatible with this absorber is already installed, remove the print head and check the electrical contacts for foreign matter, then reinstall. Count the flashes and take the appropriate action to hold the ink used at cleaning...
..., press the printer's RESUME/CANCEL button and reconnect the cable. Use a digital camera or digital video camcorder compatible with this absorber is already installed, remove the print head and check the electrical contacts for foreign matter, then reinstall. Count the flashes and take the appropriate action to hold the ink used at cleaning...
i9900 Quick Start Guide
Page 77
...is defective or not Install the print head again according to resume the printing. Printer error An error requiring servicing Turn off the printer, unplug the power cord from the power has occurred (The POWER supply, plug the power cord back in the printer Remove the jammed paper, load new... media, and press the RESUME/CANCEL button. Use a new ink tank. Correct the error according to clear the error so printing can continue. No print head Print head is open Close the front cover. If the problem ...
...is defective or not Install the print head again according to resume the printing. Printer error An error requiring servicing Turn off the printer, unplug the power cord from the power has occurred (The POWER supply, plug the power cord back in the printer Remove the jammed paper, load new... media, and press the RESUME/CANCEL button. Use a new ink tank. Correct the error according to clear the error so printing can continue. No print head Print head is open Close the front cover. If the problem ...
i9900 Quick Start Guide
Page 85
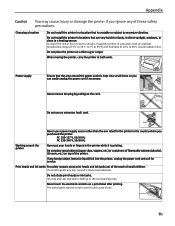
...Hz AC 220-240 V, 50/60 Hz Working around the power outlet is printing. Print heads and ink tanks For safety reasons store print heads and ink tanks out of the reach of 10% to excessive vibration. Do not shake print heads or ink tanks. Ink may be very hot and could cause burns. 81... in a location that are very humid or dusty, in the country where you ignore any of flammable solvents (alcohol, thinners, etc.) on a print head after printing. Never remove the plug by pulling on a thick rug or carpet. The metal parts may leak out and stain clothing or the surrounding area. Do not...
...Hz AC 220-240 V, 50/60 Hz Working around the power outlet is printing. Print heads and ink tanks For safety reasons store print heads and ink tanks out of the reach of 10% to excessive vibration. Do not shake print heads or ink tanks. Ink may be very hot and could cause burns. 81... in a location that are very humid or dusty, in the country where you ignore any of flammable solvents (alcohol, thinners, etc.) on a print head after printing. Never remove the plug by pulling on a thick rug or carpet. The metal parts may leak out and stain clothing or the surrounding area. Do not...

i9900 Easy Setup Instructions
Page 1
... the FireWire port on the print head holder). USB Ports: 1 TURN THE PRINTER OFF. 2 Connect one end of blank paper, then slide the paper guide toward the left . NOTE: The i9900 Series Photo Printer is ready. Wait until it to the right of the paper. 1 Unpack the Printer 1 Carefully remove all items from the...
... the FireWire port on the print head holder). USB Ports: 1 TURN THE PRINTER OFF. 2 Connect one end of blank paper, then slide the paper guide toward the left . NOTE: The i9900 Series Photo Printer is ready. Wait until it to the right of the paper. 1 Unpack the Printer 1 Carefully remove all items from the...


