i70 Quick Start Guide
Page 44
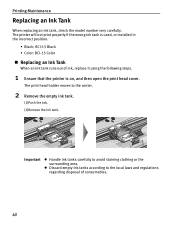
... model number very carefully. Important z Handle ink tanks carefully to the center. 2 Remove the empty ink tank. (1)Push the tab. (2)Remove the ink tank. The printer will not print properly if the wrong ink tank is on, and then open the print head cover. z Discard empty ink tanks according to the local laws and regulations.... • Black: BCI-15 Black • Color: BCI-15 Color „ Replacing an Ink Tank When an ink tank runs out of consumables. 42 The print head holder moves to avoid staining clothing or the surrounding area.
... model number very carefully. Important z Handle ink tanks carefully to the center. 2 Remove the empty ink tank. (1)Push the tab. (2)Remove the ink tank. The printer will not print properly if the wrong ink tank is on, and then open the print head cover. z Discard empty ink tanks according to the local laws and regulations.... • Black: BCI-15 Black • Color: BCI-15 Color „ Replacing an Ink Tank When an ink tank runs out of consumables. 42 The print head holder moves to avoid staining clothing or the surrounding area.
i70 Quick Start Guide
Page 45
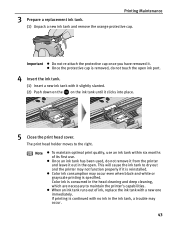
The print head holder moves to dry out and the printer may not function properly if it . If printing is continued with no ink in the head cleaning and deep cleaning, which are necessary to maintain the printer's capabilities. Color ink is removed, do not remove it from the printer and leave it out in the open...
The print head holder moves to dry out and the printer may not function properly if it . If printing is continued with no ink in the head cleaning and deep cleaning, which are necessary to maintain the printer's capabilities. Color ink is removed, do not remove it from the printer and leave it out in the open...
i70 Quick Start Guide
Page 53
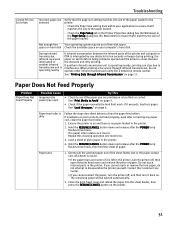
...more time. 3. Paper Jams 1. If you cannot reach or remove the torn paper, do not attempt to see if the paper you cannot extract the paper, turn the printer off, and then turn the printer off, then open the print head cover and remove the piece of the paper loaded in the printer. 2. ...Troubleshooting Cannot Print to Avoid" on page 3. • Check if the paper exceeds the load limit mark. When...
...more time. 3. Paper Jams 1. If you cannot reach or remove the torn paper, do not attempt to see if the paper you cannot extract the paper, turn the printer off, and then turn the printer off, then open the print head cover and remove the piece of the paper loaded in the printer. 2. ...Troubleshooting Cannot Print to Avoid" on page 3. • Check if the paper exceeds the load limit mark. When...

i70 Quick Start Guide
Page 60
...printer flashes alternately orange and green.) Turn the printer off the printer. 2. Printer warming up The printer is defective. Close the print head cover. The print head is warning up ends. Press the RESUME/CANCEL button on the printer flashes ten times.) Follow the procedure below . Printer error...Correct the error according to ensure it is open. Wait until printing ends. No Paper No paper is firmly seated. Remove the jammed paper load new media, and press the RESUME/CANCEL button. No printhead No print head is nearly full. Be sure to press on the [PUSH] ...
...printer flashes alternately orange and green.) Turn the printer off the printer. 2. Printer warming up The printer is defective. Close the print head cover. The print head is warning up ends. Press the RESUME/CANCEL button on the printer flashes ten times.) Follow the procedure below . Printer error...Correct the error according to ensure it is open. Wait until printing ends. No Paper No paper is firmly seated. Remove the jammed paper load new media, and press the RESUME/CANCEL button. No printhead No print head is nearly full. Be sure to press on the [PUSH] ...

i70 Quick Start Guide
Page 68
... that are very humid or dusty, in direct sunlight, outdoors, or close to excessive vibration. Do not place the printer on the cord. Never remove the plug by pulling on a thick rug or carpet. Working around the printer Never use a power supply source other than the one rated for ... printer in the printer while it is unstable or subject to a heating source. Do not use flammable sprays near the printer. Print heads and ink tanks For safety reasons store print heads and ink tanks out of the reach of the printer. If a child ingests any foreign object (mental or liquid) fall into...
... that are very humid or dusty, in direct sunlight, outdoors, or close to excessive vibration. Do not place the printer on the cord. Never remove the plug by pulling on a thick rug or carpet. Working around the printer Never use a power supply source other than the one rated for ... printer in the printer while it is unstable or subject to a heating source. Do not use flammable sprays near the printer. Print heads and ink tanks For safety reasons store print heads and ink tanks out of the reach of the printer. If a child ingests any foreign object (mental or liquid) fall into...

i70 Quick Start Guide
Page 4
... AC adapter, proceed to "Installing the Print Head" on page 3. • If your computer has an earth connection, ensure that this is subject to change. 2 Connecting the Printer to the Computer USB cable Universal AC adapter Power cord Recommended: Canon or other than the standard power supply ...8226; Never use the printer for a long period of purchase. Setting Up 1 Preparing the Printer 1 Place the printer on a flat surface. 2 Remove the tape from the power outlet after turning off the printer. 2 Using the incorrect voltage and frequency could cause a fire or electric shock. •...
... AC adapter, proceed to "Installing the Print Head" on page 3. • If your computer has an earth connection, ensure that this is subject to change. 2 Connecting the Printer to the Computer USB cable Universal AC adapter Power cord Recommended: Canon or other than the standard power supply ...8226; Never use the printer for a long period of purchase. Setting Up 1 Preparing the Printer 1 Place the printer on a flat surface. 2 Remove the tape from the power outlet after turning off the printer. 2 Using the incorrect voltage and frequency could cause a fire or electric shock. •...

i70 Quick Start Guide
Page 6
print head holder 4 Do not touch internal parts other than the lock lever. print head nozzles 6 Place the print head in the holder aligning the mark with the mark. lock button print head 5 Remove the protective cap from the print head. • Do not touch the print head nozzles. • Do not attempt to reattach the protective cap once it has been removed. 4 Press the lock button, then raise the lock lever.
print head holder 4 Do not touch internal parts other than the lock lever. print head nozzles 6 Place the print head in the holder aligning the mark with the mark. lock button print head 5 Remove the protective cap from the print head. • Do not touch the print head nozzles. • Do not attempt to reattach the protective cap once it has been removed. 4 Press the lock button, then raise the lock lever.

i70 Quick Start Guide
Page 7
... 2 Hold the ink tank as this may cause the ink to reattach the protective cap once it has been removed. 7 Lock the print head into place. 5 Do not touch the lock lever once the print head has been installed. „ Installing the Ink Tanks • For safety reasons, store ink tanks out of the reach... of small children. • Do not drop or shake ink tanks as shown in the diagram and remove the protective cap. • Do not ...
... 2 Hold the ink tank as this may cause the ink to reattach the protective cap once it has been removed. 7 Lock the print head into place. 5 Do not touch the lock lever once the print head has been installed. „ Installing the Ink Tanks • For safety reasons, store ink tanks out of the reach... of small children. • Do not drop or shake ink tanks as shown in the diagram and remove the protective cap. • Do not ...
i70 Quick Start Guide
Page 8
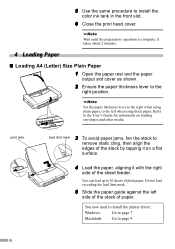
...Go to page 7 Macintosh: Go to install the color ink tank in the front slot. 6 Close the print head cover. Set the paper thickness lever to the right when using plain paper, to 30 sheets of paper.... Wait until the preparatory operation is complete: it with the right side of the sheet feeder. print side load limit mark 3 To avoid paper jams, fan the stack to the right position. Refer to ...paper output slot cover as shown. 2 Ensure the paper thickness lever to remove static cling, then align the edges of the stack by tapping it on loading envelopes and other media.
...Go to page 7 Macintosh: Go to install the color ink tank in the front slot. 6 Close the print head cover. Set the paper thickness lever to the right when using plain paper, to 30 sheets of paper.... Wait until the preparatory operation is complete: it with the right side of the sheet feeder. print side load limit mark 3 To avoid paper jams, fan the stack to the right position. Refer to ...paper output slot cover as shown. 2 Ensure the paper thickness lever to remove static cling, then align the edges of the stack by tapping it on loading envelopes and other media.

i70 Quick Start Guide
Page 21
... on and follow the instructions below. • Windows Open the printer properties dialog box and click the Maintenance tab. Print Head Maintenance „ If Blurring Occurs or If a Specific Color Does Not Print Perform print head cleaning to the User's Guide for more detailed procedures and information about maintenance. 19 Windows" on page 11. •... the ink counter of Ink Replace the empty ink tank with a new one. Ink Tank BCI-15 Color Ink Tank BCI-15 Black 1 Open the print head cover and remove the empty ink tank.
... on and follow the instructions below. • Windows Open the printer properties dialog box and click the Maintenance tab. Print Head Maintenance „ If Blurring Occurs or If a Specific Color Does Not Print Perform print head cleaning to the User's Guide for more detailed procedures and information about maintenance. 19 Windows" on page 11. •... the ink counter of Ink Replace the empty ink tank with a new one. Ink Tank BCI-15 Color Ink Tank BCI-15 Black 1 Open the print head cover and remove the empty ink tank.

i70 Quick Start Guide
Page 25
...8226; For the digital camera operation method and troubleshooting, refer to the computer, then align the print head position. If the print head position has not been adjusted, reduce the printing speed (one-way printing) for Windows Users) If installation of the printer driver does not proceed as instructed in the index... Quick Start Guide, there may not be used. • If date printing is set from the operation panel of the digital camera, the date when the photograph was taken is displayed, click OK. 3 Click Exit, then remove the CD-ROM. 4 Turn the printer off. 5 Restart the computer....
...8226; For the digital camera operation method and troubleshooting, refer to the computer, then align the print head position. If the print head position has not been adjusted, reduce the printing speed (one-way printing) for Windows Users) If installation of the printer driver does not proceed as instructed in the index... Quick Start Guide, there may not be used. • If date printing is set from the operation panel of the digital camera, the date when the photograph was taken is displayed, click OK. 3 Click Exit, then remove the CD-ROM. 4 Turn the printer off. 5 Restart the computer....
i70 Easy Setup Instructions
Page 1
... Software Kit 4 Lift open the paper rest and TURN THE PRINTER ON. i70 Series Printer Power Cord Shipping Tape 2 Plug the power cord into the power outlet. Turn the print head over and remove the protective cap from its package. 2 You MUST remove the protective cap. Connect the DC plug to Your Computer 1 TURN THE...
... Software Kit 4 Lift open the paper rest and TURN THE PRINTER ON. i70 Series Printer Power Cord Shipping Tape 2 Plug the power cord into the power outlet. Turn the print head over and remove the protective cap from its package. 2 You MUST remove the protective cap. Connect the DC plug to Your Computer 1 TURN THE...


