
ZR Instruction Manual
Page 1
... magnitude to constitute a risk of important operating and maintenance (servicing) instructions in accordance with class B limits in a particular installation. One Canon Plaza, Lake Success, NY 11042, U.S.A. The lightning flash with arrowhead symbol, within an equilateral triangle, is intended to alert the user to... 15 of copyright owners and be contrary to Part 15 of FCC Rules. REFER SERVICING TO QUALIFIED SERVICE PERSONNEL. Digital Video Camcorder, ZR This device complies with the limits for help. This equipment generates, uses and can be determined by turning the equipment off ...
... magnitude to constitute a risk of important operating and maintenance (servicing) instructions in accordance with class B limits in a particular installation. One Canon Plaza, Lake Success, NY 11042, U.S.A. The lightning flash with arrowhead symbol, within an equilateral triangle, is intended to alert the user to... 15 of copyright owners and be contrary to Part 15 of FCC Rules. REFER SERVICING TO QUALIFIED SERVICE PERSONNEL. Digital Video Camcorder, ZR This device complies with the limits for help. This equipment generates, uses and can be determined by turning the equipment off ...

ZR Instruction Manual
Page 2
... such as to be hazardous. 7. Do not use this product near water or in this product from the type of power supply to the Canon Digital Video Camcorder ZR and all its accessories. Water and Moisture - A product and cart combination should be read before cleaning. The CA-600A Compact Power Adapter is operated...
... such as to be hazardous. 7. Do not use this product near water or in this product from the type of power supply to the Canon Digital Video Camcorder ZR and all its accessories. Water and Moisture - A product and cart combination should be read before cleaning. The CA-600A Compact Power Adapter is operated...

ZR Instruction Manual
Page 4
... Instructions 3 Audio Recording 44 Thank you for Choosing a Canon ......... 6 Setting the Self-Timer 46 Introducing the ZR 7 Mastering the Basics ~ When Making Manual Adjustments ...~ Adjusting Exposure Manually 47 Adjusting Focus Manually 49 Powering Your Camcorder 8 Setting the White Balance 50 Loading a Cassette 11... on Using the Batteries 61 Setting the Audio Mix 63 Maintenance 64 Troubleshooting 68 The ZR System Diagram 72 Optional Accessories 73 Finding Your Way Around the ZR ....... 75 Screen Displays 78 Specifications 82 Index 83 The serial number of this book ...
... Instructions 3 Audio Recording 44 Thank you for Choosing a Canon ......... 6 Setting the Self-Timer 46 Introducing the ZR 7 Mastering the Basics ~ When Making Manual Adjustments ...~ Adjusting Exposure Manually 47 Adjusting Focus Manually 49 Powering Your Camcorder 8 Setting the White Balance 50 Loading a Cassette 11... on Using the Batteries 61 Setting the Audio Mix 63 Maintenance 64 Troubleshooting 68 The ZR System Diagram 72 Optional Accessories 73 Finding Your Way Around the ZR ....... 75 Screen Displays 78 Specifications 82 Index 83 The serial number of this book ...
ZR Instruction Manual
Page 5
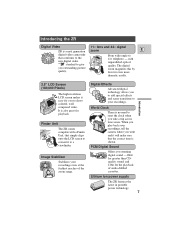
... to the contents and index) please refer to use its full range of your way around the camcorder (p. 75) • Screen displays (p. 78) • Troubleshooting - CA-600 Compact Power Adapter... very easy to : • Finding your new camcorder, We recommend that you master the basic operations of the camcorder first, before moving on the camcorder itself e.g. Press the EJECT button. To get started...Strap DU-100 Docking Unit Getting started we 'd like to come. Thank you for Your camcorder is supplied with the E purchasing this manual thoroughly - you will soon be making high...
... to the contents and index) please refer to use its full range of your way around the camcorder (p. 75) • Screen displays (p. 78) • Troubleshooting - CA-600 Compact Power Adapter... very easy to : • Finding your new camcorder, We recommend that you master the basic operations of the camcorder first, before moving on the camcorder itself e.g. Press the EJECT button. To get started...Strap DU-100 Docking Unit Getting started we 'd like to come. Thank you for Your camcorder is supplied with the E purchasing this manual thoroughly - you will soon be making high...
ZR Instruction Manual
Page 6
... Video 11× lens and 44× digital ZR is a next generation zoom E digital video camcorder that conforms to the new digital video Mini standard to your recordings. Image Stabilizer Stabilizes your recordings, tell the camera where you stunning digital ...you outstanding picture quality. Introduction 2.5" LCD Screen (180,000 Pixels) The high resolution LCD screen makes it to 11× telephoto - Finder Unit The ZR comes complete with unparalleled optical quality. with a Finder Unit, that the correct time is also great for the playback of the zoom range. PCM Digital...
... Video 11× lens and 44× digital ZR is a next generation zoom E digital video camcorder that conforms to the new digital video Mini standard to your recordings. Image Stabilizer Stabilizes your recordings, tell the camera where you stunning digital ...you outstanding picture quality. Introduction 2.5" LCD Screen (180,000 Pixels) The high resolution LCD screen makes it to 11× telephoto - Finder Unit The ZR comes complete with unparalleled optical quality. with a Finder Unit, that the correct time is also great for the playback of the zoom range. PCM Digital...
ZR Instruction Manual
Page 7
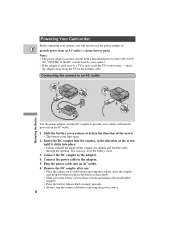
... the power cable into place. • Lift up and pull the small rubber stopper out slightly and feed the cable through the opening. B A Powering Your Camcorder Before operating your camera, you press the battery release knob. • Slide across the battery cover release switch (and replace the small rubber stopper). •...
... the power cable into place. • Lift up and pull the small rubber stopper out slightly and feed the cable through the opening. B A Powering Your Camcorder Before operating your camera, you press the battery release knob. • Slide across the battery cover release switch (and replace the small rubber stopper). •...
ZR Instruction Manual
Page 8
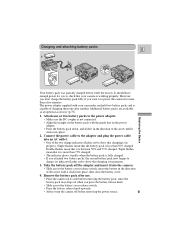
..., since the battery pack may drop out when you to show that charging is working properly. Triple flashes mean that it to show that your camcorder can hold two battery packs and is less than 50% charged. Take the battery pack off the adapter and insert it into place, then close...
..., since the battery pack may drop out when you to show that charging is working properly. Triple flashes mean that it to show that your camcorder can hold two battery packs and is less than 50% charged. Take the battery pack off the adapter and insert it into place, then close...
ZR Instruction Manual
Page 9
... you first attach to the adapter, or, if the adapter was already plugged into an AC outlet, from the side labeled "A". • When powering your camcorder from an AC outlet, you do not need to remove attached battery packs, but charging will not take place until you remove the DC coupler...
... you first attach to the adapter, or, if the adapter was already plugged into an AC outlet, from the side labeled "A". • When powering your camcorder from an AC outlet, you do not need to remove attached battery packs, but charging will not take place until you remove the DC coupler...
ZR Instruction Manual
Page 11
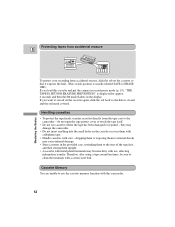
If you load this camcorder. 12 they may damage the camcorder. • Do not insert anything into the small holes on the cassette or cover them upright. • A cassette with metal plated terminals may cause internal ... flashes in the provided case, rewinding them to use cassettes where the tape has been damaged or rejoined - dropping them or exposing them to the camcorder - do not open the tape protect cover or touch the tape itself. • Do not use the cassette memory function with a cotton wool bud...
If you load this camcorder. 12 they may damage the camcorder. • Do not insert anything into the small holes on the cassette or cover them upright. • A cassette with metal plated terminals may cause internal ... flashes in the provided case, rewinding them to use cassettes where the tape has been damaged or rejoined - dropping them or exposing them to the camcorder - do not open the tape protect cover or touch the tape itself. • Do not use the cassette memory function with a cotton wool bud...
ZR Instruction Manual
Page 14
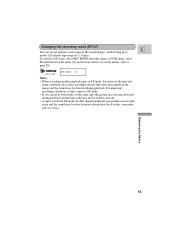
... menus, refer to LP mode, select REC MODE from the camera or VCR menu, select LP and then close the menu (for instructions on this camcorder, and vice versa. To switch to page 28). (see p. 28) REC MODE••••LP Notes: • When recording and playing back tapes...
... menus, refer to LP mode, select REC MODE from the camera or VCR menu, select LP and then close the menu (for instructions on this camcorder, and vice versa. To switch to page 28). (see p. 28) REC MODE••••LP Notes: • When recording and playing back tapes...
ZR Instruction Manual
Page 16
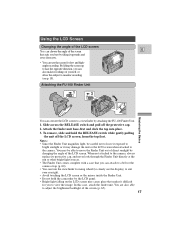
... pulling the unit off the protective cap. 2. Attach the finder unit base-first and click the top into place. 3. To remove, slide and hold the camcorder by the LCD panel. • Bright light falling on the LCD screen may cause glare that suits you best by changing the angle of the...
... pulling the unit off the protective cap. 2. Attach the finder unit base-first and click the top into place. 3. To remove, slide and hold the camcorder by the LCD panel. • Bright light falling on the LCD screen may cause glare that suits you best by changing the angle of the...
ZR Instruction Manual
Page 17
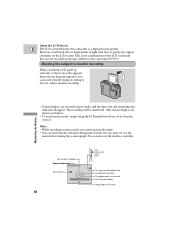
About the LCD Screen E The LCD screen built into this camcorder is unaffected. Only certain displays are reversed (mirror mode) and the time code and remaining tape indicators disappear. Mastering the Basics • Screen displays are ...
About the LCD Screen E The LCD screen built into this camcorder is unaffected. Only certain displays are reversed (mirror mode) and the time code and remaining tape indicators disappear. Mastering the Basics • Screen displays are ...
ZR Instruction Manual
Page 19
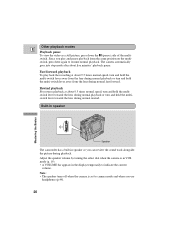
..., turn and hold the multi-switch lever away from the lens during normal rewind. Since you use headphones (p.44). 20 Built-in speaker Speaker The camcorder has a built-in the display temporarily to resume normal playback. Mastering the Basics Other playback modes E Playback pause To view the video as a still picture...
..., turn and hold the multi-switch lever away from the lens during normal rewind. Since you use headphones (p.44). 20 Built-in speaker Speaker The camcorder has a built-in the display temporarily to resume normal playback. Mastering the Basics Other playback modes E Playback pause To view the video as a still picture...
ZR Instruction Manual
Page 29
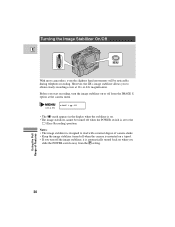
However, the ZR's image stabilizer allows you to obtain steady recordings even at the camera menu. (see p. 28) IMAGE S. i •OFF • The i mark appears in the display ...; If you turn the image stabilizer on when you start recording, turn off from the P setting. Turning the Image Stabilizer On/Off E MENU With most camcorders, even the slightest hand movements will be turned off when the POWER switch is automatically turned back on or off the image stabilizer, it is...
However, the ZR's image stabilizer allows you to obtain steady recordings even at the camera menu. (see p. 28) IMAGE S. i •OFF • The i mark appears in the display ...; If you turn the image stabilizer on when you start recording, turn off from the P setting. Turning the Image Stabilizer On/Off E MENU With most camcorders, even the slightest hand movements will be turned off when the POWER switch is automatically turned back on or off the image stabilizer, it is...
ZR Instruction Manual
Page 32
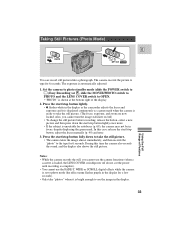
... then records the "photo" to see the image in the display for a few seconds). • Only take "photos" where it is displayed continuously as the camcorder adjusts the focus and exposure and it is automatically adjusted. 1. Press the start /stop button, adjust the focus manually (p. 49) and retry. 3. Set the camera...
... then records the "photo" to see the image in the display for a few seconds). • Only take "photos" where it is displayed continuously as the camcorder adjusts the focus and exposure and it is automatically adjusted. 1. Press the start /stop button, adjust the focus manually (p. 49) and retry. 3. Set the camera...
ZR Instruction Manual
Page 43
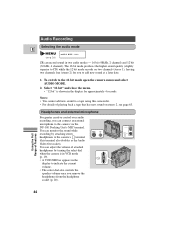
... control over audio recording, you to CD) while the 12 bit mode records on stereo 2, see p. 28) AUDIO MODE••16bit ZR can record sound in the display for you can adjust the volume of Features 44 The 16 bit mode produces the higher sound quality (slightly... superior to add new sound at a later date. 1. To switch to the camera's terminal (this camcorder. • For details of playing back a tape that has new sound on two channels (stereo 1), leaving two channels free (stereo 2) for approximately 4 seconds...
... control over audio recording, you to CD) while the 12 bit mode records on stereo 2, see p. 28) AUDIO MODE••16bit ZR can record sound in the display for you can adjust the volume of Features 44 The 16 bit mode produces the higher sound quality (slightly... superior to add new sound at a later date. 1. To switch to the camera's terminal (this camcorder. • For details of playing back a tape that has new sound on two channels (stereo 1), leaving two channels free (stereo 2) for approximately 4 seconds...
ZR Instruction Manual
Page 51
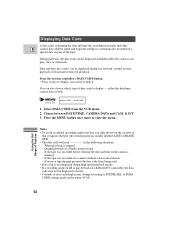
Date and time data (only) can be displayed during high speed playback modes. • If a recording made on ZR is played back on a different DV camcorder, the data code may change according to D/TIME SEL. Choose between DATE/TIME, CAMERA DATA and CAM. & D/T. 3. You can be displayed correctly. • Contents of ...
Date and time data (only) can be displayed during high speed playback modes. • If a recording made on ZR is played back on a different DV camcorder, the data code may change according to D/TIME SEL. Choose between DATE/TIME, CAMERA DATA and CAM. & D/T. 3. You can be displayed correctly. • Contents of ...

ZR Instruction Manual
Page 56
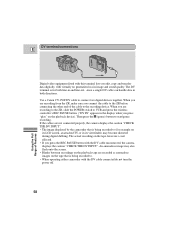
... slightly ahead of the original. 57 S-150 S-video Cable STV-150 Stereo Video Cable V L R S INPUT S-VIDEO E VIDEO AUDIO L R Record the scenes you want on the camcorder. Editing to a VCR Playback the tape on the VCR.
... slightly ahead of the original. 57 S-150 S-video Cable STV-150 Stereo Video Cable V L R S INPUT S-VIDEO E VIDEO AUDIO L R Record the scenes you want on the camcorder. Editing to a VCR Playback the tape on the VCR.
ZR Instruction Manual
Page 57
... device). An anomalous image may become distorted during digital dubbing. Then press the a (pause) button to connect two digital devices together. Use a Canon CV-150F DV cable to start/pause recording. When you are recorded as anomalous images on the tape, however, is being recorded to VCR and...screen. • Blanks between recordings on the playback tape are recording from the ZR, make sure you connect the cable to the ZR before connecting the other end of the cable to . • When operating either camcorder with the DV cable connected do not turn the power off. 58 Using ...
... device). An anomalous image may become distorted during digital dubbing. Then press the a (pause) button to connect two digital devices together. Use a Canon CV-150F DV cable to start/pause recording. When you are recorded as anomalous images on the tape, however, is being recorded to VCR and...screen. • Blanks between recordings on the playback tape are recording from the ZR, make sure you connect the cable to the ZR before connecting the other end of the cable to . • When operating either camcorder with the DV cable connected do not turn the power off. 58 Using ...
ZR Instruction Manual
Page 60
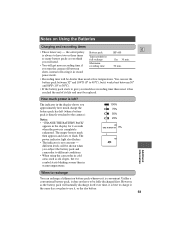
the safest policy Battery pack BP-608 is always to have to flash. different levels will be shown when you subject the battery pack and camcorder to give you plan to use the battery pack between 32° and 104°F (0° to 40°C), but it works best between Time ... off between 50° and 86°F (10° to 30°C). • If the battery pack starts to different conditions. • When using the camcorder in cold areas such as ski slopes, the k symbol starts blinking sooner than usual, it has reached the end of leaving it , or the day...
the safest policy Battery pack BP-608 is always to have to flash. different levels will be shown when you subject the battery pack and camcorder to give you plan to use the battery pack between 32° and 104°F (0° to 40°C), but it works best between Time ... off between 50° and 86°F (10° to 30°C). • If the battery pack starts to different conditions. • When using the camcorder in cold areas such as ski slopes, the k symbol starts blinking sooner than usual, it has reached the end of leaving it , or the day...


