

ZR Instruction Manual
Page 4
... Important Safety Instructions 3 Audio Recording 44 Thank you for Choosing a Canon ......... 6 Setting the Self-Timer 46 Introducing the ZR 7 Mastering the Basics ~ When Making Manual Adjustments ...~ Adjusting Exposure Manually 47 Adjusting Focus Manually 49 Powering Your Camcorder 8 Setting the White Balance 50 Loading a Cassette 11 Basic Recording 13 Zooming 16 Using the LCD Screen 17...
... Important Safety Instructions 3 Audio Recording 44 Thank you for Choosing a Canon ......... 6 Setting the Self-Timer 46 Introducing the ZR 7 Mastering the Basics ~ When Making Manual Adjustments ...~ Adjusting Exposure Manually 47 Adjusting Focus Manually 49 Powering Your Camcorder 8 Setting the White Balance 50 Loading a Cassette 11 Basic Recording 13 Zooming 16 Using the LCD Screen 17...
ZR Instruction Manual
Page 10
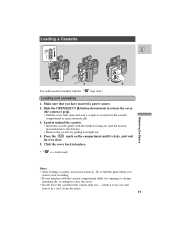
...want to start recording. • Do not interfere with the cassette compartment while it is a trade mark. Load or unload the cassette. • Insert the cassette gently with the Mini logo only.* Loading and unloading 1. Press the PUSH mark on the compartment until it...where you have inserted a power source. 2. Mastering the Basics Notes: • After loading a cassette, use - Click the cover back into place. * Mini is opening or closing automatically, or attempt to close . 5. Loading a Cassette 2 OPEN/ E EJECT 4 3 5 Use videocassettes marked with the window facing out (...
...want to start recording. • Do not interfere with the cassette compartment while it is a trade mark. Load or unload the cassette. • Insert the cassette gently with the Mini logo only.* Loading and unloading 1. Press the PUSH mark on the compartment until it...where you have inserted a power source. 2. Mastering the Basics Notes: • After loading a cassette, use - Click the cover back into place. * Mini is opening or closing automatically, or attempt to close . 5. Loading a Cassette 2 OPEN/ E EJECT 4 3 5 Use videocassettes marked with the window facing out (...
ZR Instruction Manual
Page 11
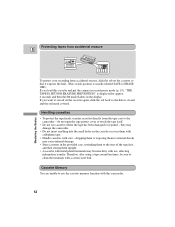
... or exposing them to external shocks may cause internal damage. • Store cassettes in the provided case, rewinding them to record on the cassette or cover them upright. • A cassette with metal plated terminals may damage the camcorder. • Do not insert anything into the small holes on the... erasure E REC SAVE REC SAVE Mastering the Basics To protect your recording from the tape case to use the cassette memory function with use cassettes where the tape has been damaged or rejoined - If you load this camcorder. 12 Cassette Memory You are unable to the...
... or exposing them to external shocks may cause internal damage. • Store cassettes in the provided case, rewinding them to record on the cassette or cover them upright. • A cassette with metal plated terminals may damage the camcorder. • Do not insert anything into the small holes on the... erasure E REC SAVE REC SAVE Mastering the Basics To protect your recording from the tape case to use the cassette memory function with use cassettes where the tape has been damaged or rejoined - If you load this camcorder. 12 Cassette Memory You are unable to the...
ZR Instruction Manual
Page 12
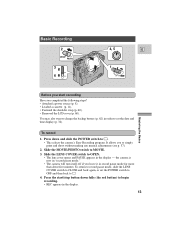
... and PAUSE appears in record pause mode for more than about five minutes. It allows you completed the following steps? • Attached a power source (p. 8). • Loaded a cassette (p. 11). • Fastened the shoulder strap (p. 60). • Removed the LCD cover (p. 60). Slide the LENS COVER switch to CLOSE and back again, or set...
... and PAUSE appears in record pause mode for more than about five minutes. It allows you completed the following steps? • Attached a power source (p. 8). • Loaded a cassette (p. 11). • Fastened the shoulder strap (p. 60). • Removed the LCD cover (p. 60). Slide the LENS COVER switch to CLOSE and back again, or set...
ZR Instruction Manual
Page 17
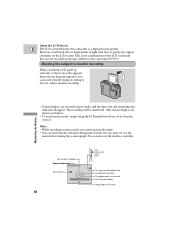
...timer during recording or let your subject monitor recording. The recording itself is exhausted Self-Timer countdown Photo mode AF/AE mark No Cassette is loaded Exposure Adjustment Manual focus AF OFF 18 REC REC PAUSE EJECT STOP The tape has reached the end Condensation warning The battery pack... displays are reversed (mirror mode) and the time code and remaining tape indicators disappear. About the LCD Screen E The LCD screen built into this camcorder is not a malfunction of light (red, blue or green) may appear constantly on the tape. (Effective dots: more than 99.99%) Allowing...
...timer during recording or let your subject monitor recording. The recording itself is exhausted Self-Timer countdown Photo mode AF/AE mark No Cassette is loaded Exposure Adjustment Manual focus AF OFF 18 REC REC PAUSE EJECT STOP The tape has reached the end Condensation warning The battery pack... displays are reversed (mirror mode) and the time code and remaining tape indicators disappear. About the LCD Screen E The LCD screen built into this camcorder is not a malfunction of light (red, blue or green) may appear constantly on the tape. (Effective dots: more than 99.99%) Allowing...
ZR Instruction Manual
Page 18
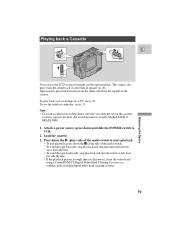
... it exposes the hole (the switch position is rough (mosaic-like noise), clean the video heads using a Canon DVM-CL Digital Video Head Cleaning Cassette or a commercially available digital video head cleaning cassette. 19 Playing back a Cassette FOCUS EXP E OFF VCR POWER Mastering the Basics OPEN CLOSE You can use the wireless controller, see... the multi-switch to start playback. • To end playback, press down and slide the POWER switch to VCR. 2. To play ) side of the camera. Load the cassette. 3.
... it exposes the hole (the switch position is rough (mosaic-like noise), clean the video heads using a Canon DVM-CL Digital Video Head Cleaning Cassette or a commercially available digital video head cleaning cassette. 19 Playing back a Cassette FOCUS EXP E OFF VCR POWER Mastering the Basics OPEN CLOSE You can use the wireless controller, see... the multi-switch to start playback. • To end playback, press down and slide the POWER switch to VCR. 2. To play ) side of the camera. Load the cassette. 3.
ZR Instruction Manual
Page 32
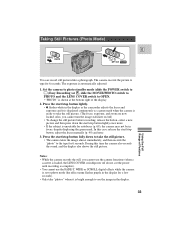
... turn the image stabilizer on /off do not cut the power until recording is complete). • You cannot use the camera functions (when a cassette is loaded, the LENS COVER switch/power off ) • To change the still picture before recording: release the button, select a new picture and then press... • The camera takes the image almost immediately, and then records the "photo" to take "photos" where it is displayed continuously as the camcorder adjusts the focus and exposure and it is ready to the tape for 6 seconds. Press the start /stop button lightly once more. • If...
... turn the image stabilizer on /off do not cut the power until recording is complete). • You cannot use the camera functions (when a cassette is loaded, the LENS COVER switch/power off ) • To change the still picture before recording: release the button, select a new picture and then press... • The camera takes the image almost immediately, and then records the "photo" to take "photos" where it is displayed continuously as the camcorder adjusts the focus and exposure and it is ready to the tape for 6 seconds. Press the start /stop button lightly once more. • If...

ZR Instruction Manual
Page 33
... in mirror mode (with the LCD screen facing the same direction as the lens), or without a tape loaded. 34 Using the Full Range of Features Turn the select dial upwards to a previously used cassette. This is useful when you want to start or restart recording. Press in the select dial to leave...
... in mirror mode (with the LCD screen facing the same direction as the lens), or without a tape loaded. 34 Using the Full Range of Features Turn the select dial upwards to a previously used cassette. This is useful when you want to start or restart recording. Press in the select dial to leave...

ZR Instruction Manual
Page 56
... on your own video productions. or combine different shots to 4 until your TV and VCR instruction manuals for Playback on a TV screen" on p. 22. 2. Load a blank cassette, and put the VCR in order to remove unwanted scenes - Start recording on the VCR as soon as the section you want on the VCR...; The quality of the edited tape will be slightly lower than that of Features By connecting the camera to a VCR Playback the tape on the camcorder. Editing to another VCR, you monitor the picture on the TV. 3. Using the Full Range of the original. 57
... on your own video productions. or combine different shots to 4 until your TV and VCR instruction manuals for Playback on a TV screen" on p. 22. 2. Load a blank cassette, and put the VCR in order to remove unwanted scenes - Start recording on the VCR as soon as the section you want on the VCR...; The quality of the edited tape will be slightly lower than that of Features By connecting the camera to a VCR Playback the tape on the camcorder. Editing to another VCR, you monitor the picture on the TV. 3. Using the Full Range of the original. 57

ZR Instruction Manual
Page 66
... is displayed for 10 to a warm, humid place Protecting the camera from an airconditioned room to 15 minutes. • You cannot load a cassette when condensation is detected. After the condensation warning stops flashing, wait at least another hour before you bring the camera from a cold ...• Before you take it in the display. Condensation E Condensation may form on the camera when it stops automatically and "REMOVE THE CASSETTE" is displayed for approximately 4 seconds and then EJECT is shown in the display. • The camera may not detect the condensation immediately...
... is displayed for 10 to a warm, humid place Protecting the camera from an airconditioned room to 15 minutes. • You cannot load a cassette when condensation is detected. After the condensation warning stops flashing, wait at least another hour before you bring the camera from a cold ...• Before you take it in the display. Condensation E Condensation may form on the camera when it stops automatically and "REMOVE THE CASSETTE" is displayed for approximately 4 seconds and then EJECT is shown in the display. • The camera may not detect the condensation immediately...
ZR Instruction Manual
Page 67
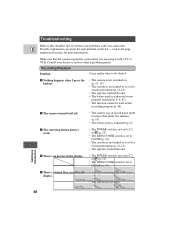
... not loaded or is exhausted or not properly attached (p. 8, 9, 61). • The function cannot be used in that the camera is set to [ or P (p. 13). • The LENS COVER switch is properly connected if you have any problems with a TV or VCR. Consult your camcorder. The start/stop button... end. F32 1/2000 12:00:00 AM • The tape heads are given for each problem on (p. 13, 19). • The cassette is not loaded or is set for more information. F32 F32 1/2000 • You1/a20r0e0attempting toJApN.la1y,19b9a8 ck or record from a copyright protected cassF13/e22t0t0e0 ...
... not loaded or is exhausted or not properly attached (p. 8, 9, 61). • The function cannot be used in that the camera is set to [ or P (p. 13). • The LENS COVER switch is properly connected if you have any problems with a TV or VCR. Consult your camcorder. The start/stop button... end. F32 1/2000 12:00:00 AM • The tape heads are given for each problem on (p. 13, 19). • The cassette is not loaded or is set for more information. F32 F32 1/2000 • You1/a20r0e0attempting toJApN.la1y,19b9a8 ck or record from a copyright protected cassF13/e22t0t0e0 ...
ZR Instruction Manual
Page 69
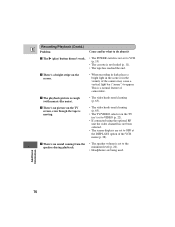
... screen displays are being used. The e (play) button doesn't work. • The POWER switch is not set to VCR (p. 19) • The cassette is set to appear. There's no picture on the screen. • When recording in dark places a bright light in the scene or in the vicinity... of the camera may cause a vertical light bar ("smear") to OFF at the DISPLAYS option of camcorders. ? There's no sound coming from the • The speaker volume is not loaded (p. 11). • The tape has reached the end. ? This is moving. • The video heads need cleaning ...
... screen displays are being used. The e (play) button doesn't work. • The POWER switch is not set to VCR (p. 19) • The cassette is set to appear. There's no picture on the screen. • When recording in dark places a bright light in the scene or in the vicinity... of the camera may cause a vertical light bar ("smear") to OFF at the DISPLAYS option of camcorders. ? There's no sound coming from the • The speaker volume is not loaded (p. 11). • The tape has reached the end. ? This is moving. • The video heads need cleaning ...
ZR Instruction Manual
Page 77
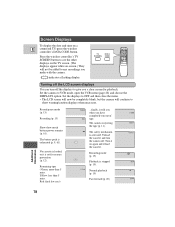
...mechanism is stopped (p. 19). 5min Normal playback (p. 19) Fast forward (p. 20) END EJECT EJECT SP STOP FF Additional Information 78 Unload the cassette and turn off . TV DATA SCREEN CODE Turning off the LCD screen displays You can turn the camera off the displays to any recordings you... PAUSE ...finally, it on a E connected TV, press the wireless controller's DATA CODE button. Recording mode (p. 15) Playback is activated. No cassette is loaded, or it is set for playback. Set the displays to OFF and then close the menu. • The LCD screen will continue to VCR ...
...mechanism is stopped (p. 19). 5min Normal playback (p. 19) Fast forward (p. 20) END EJECT EJECT SP STOP FF Additional Information 78 Unload the cassette and turn off . TV DATA SCREEN CODE Turning off the LCD screen displays You can turn the camera off the displays to any recordings you... PAUSE ...finally, it on a E connected TV, press the wireless controller's DATA CODE button. Recording mode (p. 15) Playback is activated. No cassette is loaded, or it is set for playback. Set the displays to OFF and then close the menu. • The LCD screen will continue to VCR ...
ZR Instruction Manual
Page 80
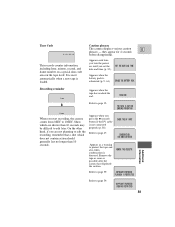
...tape itself. Refer to page 59. TAPE END THE TAPE IS SET FOR ERASURE PREVENTION CHECK THE DV INPUT CONDENSATION HAS BEEN DETECTED REMOVE THE CASSETTE Refer to page 67. Appears each time you are shorter than 10 seconds. SET THE DATE AND TIME Appears when the battery pack is detected... as a warning to page 12. CHANGE THE BATTERY PACK Recording reminder 0sec 10sec When you press the 2 (record) button if the DV cable is loaded. Appears when the tape has reached the end. Appears when you start recording, the camera counts from 0SEC to page 59. COPYRIGHT PROTECTED PLAYBACK IS...
...tape itself. Refer to page 59. TAPE END THE TAPE IS SET FOR ERASURE PREVENTION CHECK THE DV INPUT CONDENSATION HAS BEEN DETECTED REMOVE THE CASSETTE Refer to page 67. Appears each time you are shorter than 10 seconds. SET THE DATE AND TIME Appears when the battery pack is detected... as a warning to page 12. CHANGE THE BATTERY PACK Recording reminder 0sec 10sec When you press the 2 (record) button if the DV cable is loaded. Appears when the tape has reached the end. Appears when you start recording, the camera counts from 0SEC to page 59. COPYRIGHT PROTECTED PLAYBACK IS...
ZR Instruction Manual
Page 82
..., 20 Autofocus, 49 Finder Unit, 17 Finding Your Way Around the ZR, 75 B Focusing, 49 Backup Battery, 62 Basic Recording, 13 H Battery Pack, 9 Head Cleaning, 65 Black and White, 40 Headphones, 44 C Cables, 6, 22 Cassettes, 11 Charging the Battery Pack, 9 Choosing a Recording Program, 36 ...Coupler, 8 Digital Effects, 40 Digital Video, 7 Digital Zoom, 16 DV terminal, 58 I Image Stabilizer, 30 Introducing the ZR, 7 L LANC, 59 LCD Cover, 60 LCD Screen, 17 Loading Cassettes, 11 Low Light, 39 LP Modes, 15 M Maintenance, 64 Making Better Videos, 26 Manual Exposure Control, 47 Manual ...
..., 20 Autofocus, 49 Finder Unit, 17 Finding Your Way Around the ZR, 75 B Focusing, 49 Backup Battery, 62 Basic Recording, 13 H Battery Pack, 9 Head Cleaning, 65 Black and White, 40 Headphones, 44 C Cables, 6, 22 Cassettes, 11 Charging the Battery Pack, 9 Choosing a Recording Program, 36 ...Coupler, 8 Digital Effects, 40 Digital Video, 7 Digital Zoom, 16 DV terminal, 58 I Image Stabilizer, 30 Introducing the ZR, 7 L LANC, 59 LCD Cover, 60 LCD Screen, 17 Loading Cassettes, 11 Low Light, 39 LP Modes, 15 M Maintenance, 64 Making Better Videos, 26 Manual Exposure Control, 47 Manual ...


