ZR850 ZR830 Manuals
Page 28
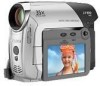
28 Recording Basic Functions Recording Recording TO REVIEW THE LAST SCENE RECORDED Recording Movies Before You Begin Recording Make a test recording first to begin recording. If necessary, clean the video heads ( 2). ( 10) EXP 1 ... switch to . 2 If the joystick guide does not appear on screen, press ( ) to display it. 3 Push the joystick ( ) momentarily towards and release it. • The camcorder will play back a few seconds of the last recording made and return to record pause mode. • You can also hold the joystick pressed ( ) towards...
28 Recording Basic Functions Recording Recording TO REVIEW THE LAST SCENE RECORDED Recording Movies Before You Begin Recording Make a test recording first to begin recording. If necessary, clean the video heads ( 2). ( 10) EXP 1 ... switch to . 2 If the joystick guide does not appear on screen, press ( ) to display it. 3 Push the joystick ( ) momentarily towards and release it. • The camcorder will play back a few seconds of the last recording made and return to record pause mode. • You can also hold the joystick pressed ( ) towards...

ZR850 ZR830 Manuals
Page 38
... pause mode. Transfer Order ( 71) Adjust ( ) the volume with the joystick. Press ( ) to search. SLIDESHOW ( 35) Press ( ) to [ OFF]). within the time set for the [REVIEW] option (or immediately after recording the still image, if set to start. 38 Menu Options Lists Still image size/quality ( 52) Still Image Protect ( 61...
... pause mode. Transfer Order ( 71) Adjust ( ) the volume with the joystick. Press ( ) to search. SLIDESHOW ( 35) Press ( ) to [ OFF]). within the time set for the [REVIEW] option (or immediately after recording the still image, if set to start. 38 Menu Options Lists Still image size/quality ( 52) Still Image Protect ( 61...
ZR850 ZR830 Manuals
Page 39
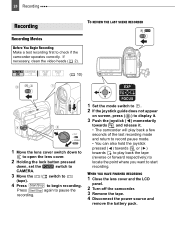
... 46) Mode switch: Recording program: [ PROGRAM AE] [ AUTO], [1/60], [1/100], [1/250], [1/500], [1/1000] [1/2000] When activated, the camcorder will switch automatically to 1/30 (1/15 in mode). With the digital zoom the image is the fastest and [ SPEED 1] the slowest. Among the fixed ...VARIABLE]. The camcorder uses shutter speeds down to the digital zoom when you operate the zoom lever: Press lightly for a slow zoom; press harder for example, by mounting it has been recorded. FOCUS PRI. ( 54) Mode switch: [ ON:AiAF], [ [ OFF] ON:CENTER], D.ZOOM REVIEW Advanced Functions...
... 46) Mode switch: Recording program: [ PROGRAM AE] [ AUTO], [1/60], [1/100], [1/250], [1/500], [1/1000] [1/2000] When activated, the camcorder will switch automatically to 1/30 (1/15 in mode). With the digital zoom the image is the fastest and [ SPEED 1] the slowest. Among the fixed ...VARIABLE]. The camcorder uses shutter speeds down to the digital zoom when you operate the zoom lever: Press lightly for a slow zoom; press harder for example, by mounting it has been recorded. FOCUS PRI. ( 54) Mode switch: [ ON:AiAF], [ [ OFF] ON:CENTER], D.ZOOM REVIEW Advanced Functions...
ZR850 ZR830 Manuals
Page 40
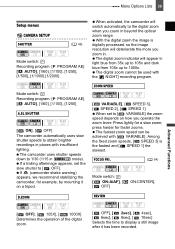
...61) the image if you may notice some problems in the playback picture or the sound may stop briefly. WIDESCREEN [ ON], [ OFF] The camcorder uses the full width of the TV manually. Otherwise, change the [TV TYPE] setting accordingly ( 40). Audio cannot be effective when recording in ... recorded in LP mode extends the available recording time on the same tape, during playback you are reviewing the image (or immediately after recording it, if set to compensate for camcorder shake even at the point where the recording mode changes. SELF TIMER ( 56) Mode switch: [ ON], [ ...
...61) the image if you may notice some problems in the playback picture or the sound may stop briefly. WIDESCREEN [ ON], [ OFF] The camcorder uses the full width of the TV manually. Otherwise, change the [TV TYPE] setting accordingly ( 40). Audio cannot be effective when recording in ... recorded in LP mode extends the available recording time on the same tape, during playback you are reviewing the image (or immediately after recording it, if set to compensate for camcorder shake even at the point where the recording mode changes. SELF TIMER ( 56) Mode switch: [ ON], [ ...
ZR850 ZR830 Manuals
Page 60
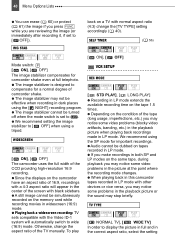
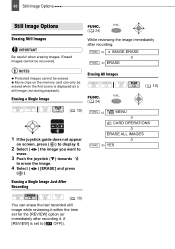
...Protected images cannot be erased when the first scene is set to erase the image. 4 Select ( ) [ERASE] and press ( ). FUNC. ( 24) While reviewing the image immediately after recording it . 2 Select ( ) the image you want to erase. 3 Push the joystick ( ) towards to [ OFF]). Erasing a ...Single Image Erasing All Images FUNC. ( 24) ( 10) ( 10) FUNC. Movie clips on screen, press ( ) to display it , if [REVIEW] is displayed as a still image (not during playback). ERASE ALL IMAGES YES ( 10) You can only be erased. Erased images cannot be recovered. IMAGE ERASE...
...Protected images cannot be erased when the first scene is set to erase the image. 4 Select ( ) [ERASE] and press ( ). FUNC. ( 24) While reviewing the image immediately after recording it . 2 Select ( ) the image you want to erase. 3 Push the joystick ( ) towards to [ OFF]). Erasing a ...Single Image Erasing All Images FUNC. ( 24) ( 10) ( 10) FUNC. Movie clips on screen, press ( ) to display it , if [REVIEW] is displayed as a still image (not during playback). ERASE ALL IMAGES YES ( 10) You can only be erased. Erased images cannot be recovered. IMAGE ERASE...
ZR850 ZR830 Manuals
Page 61
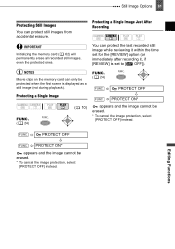
... Initializing the memory card ( 62) will permanently erase all recorded still images, even the protected ones. You can protect the last recorded still image while reviewing it within the time set for the [REVIEW] option (or immediately after recording it, if [REVIEW] is displayed as a still image (not during playback). PROTECT OFF FUNC.
... Initializing the memory card ( 62) will permanently erase all recorded still images, even the protected ones. You can protect the last recorded still image while reviewing it within the time set for the [REVIEW] option (or immediately after recording it, if [REVIEW] is displayed as a still image (not during playback). PROTECT OFF FUNC.

ZR850 ZR830 Manuals
Page 95
... 34 Portrait (recording program 45 Power save 43 Print order 75 Printing still images 72 Protecting still images/movie clips . . . . 61 R Recording - Movies (Record review) . . 28 Reviewing - Additional Information Movies 28 Recording - Still images 39 S Screen displays 15 Screen markers 42 SD/SDHC card 22, 84 Selecting the on-screen displays . . . . . 55... 31 Zoom speed 31, 39 * only. Still images 29 Recording mode 40 Recording programs 45 Recording reminder 16 Remaining tape indicator 16 Remote sensor 23 Reviewing - Movie clips 34 Playback -
... 34 Portrait (recording program 45 Power save 43 Print order 75 Printing still images 72 Protecting still images/movie clips . . . . 61 R Recording - Movies (Record review) . . 28 Reviewing - Additional Information Movies 28 Recording - Still images 39 S Screen displays 15 Screen markers 42 SD/SDHC card 22, 84 Selecting the on-screen displays . . . . . 55... 31 Zoom speed 31, 39 * only. Still images 29 Recording mode 40 Recording programs 45 Recording reminder 16 Remaining tape indicator 16 Remote sensor 23 Reviewing - Movie clips 34 Playback -
Digital Video Software (Windows) Ver.24 Instruction Manual
Page 3
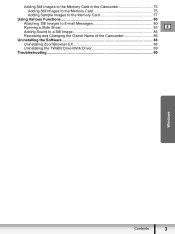
Adding Still Images to the Memory Card in the Camcorder 75 Adding Still Images to the Memory Card 75 Adding Sample Images to the Memory Card 77 Using Various Functions 80 Attaching Still Images to E-mail Messages 80 Running a Slide Show 83 E Adding Sound to a Still Image 85 Reviewing and Changing the Owner Name of the Camcorder 86 Uninstalling the Software 88 Uninstalling ZoomBrowser EX 88 Uninstalling the TWAIN Driver/WIA Driver 89 Troubleshooting ...90 Windows Contents 3
Adding Still Images to the Memory Card in the Camcorder 75 Adding Still Images to the Memory Card 75 Adding Sample Images to the Memory Card 77 Using Various Functions 80 Attaching Still Images to E-mail Messages 80 Running a Slide Show 83 E Adding Sound to a Still Image 85 Reviewing and Changing the Owner Name of the Camcorder 86 Uninstalling the Software 88 Uninstalling ZoomBrowser EX 88 Uninstalling the TWAIN Driver/WIA Driver 89 Troubleshooting ...90 Windows Contents 3

Digital Video Software (Windows) Ver.24 Instruction Manual
Page 22
... WIA Driver • Windows XP: No driver is used only for downloading still images from the Canon EOS Digital SLR Cameras) will be installed. 7 Review the installation settings and click [Install]. When installing the software on your computer. When you have selected [Custom Installation], depending on the Windows OS,... to have one of the following USB drivers installed on Windows 2000 or XP by selecting [Easy Installation], EOS Utility (a software for compatible Canon EOS Digital SLR Cameras, and the camcorder does not support this software. 22 Installing the Digital Video Software
... WIA Driver • Windows XP: No driver is used only for downloading still images from the Canon EOS Digital SLR Cameras) will be installed. 7 Review the installation settings and click [Install]. When installing the software on your computer. When you have selected [Custom Installation], depending on the Windows OS,... to have one of the following USB drivers installed on Windows 2000 or XP by selecting [Easy Installation], EOS Utility (a software for compatible Canon EOS Digital SLR Cameras, and the camcorder does not support this software. 22 Installing the Digital Video Software
Digital Video Software (Windows) Ver.24 Instruction Manual
Page 86
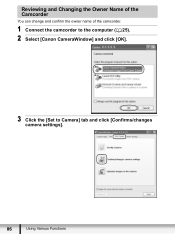
Reviewing and Changing the Owner Name of the Camcorder You can change and confirm the owner name of the camcorder. 1 Connect the camcorder to the computer ( 25). 2 Select [Canon CameraWindow] and click [OK]. 3 Click the [Set to Camera] tab and click [Confirms/changes camera settings]. 86 Using Various Functions
Reviewing and Changing the Owner Name of the Camcorder You can change and confirm the owner name of the camcorder. 1 Connect the camcorder to the computer ( 25). 2 Select [Canon CameraWindow] and click [OK]. 3 Click the [Set to Camera] tab and click [Confirms/changes camera settings]. 86 Using Various Functions
Digital Video Software (Macintosh) Ver.24 Instruction Manual
Page 3
Playing Back Movies 58 Exporting Images ...59 Changing the File Type and Save 59 Extracting Still Images from Movies (MovieFrame Task 62 Adding Still Images to the Memory Card in the Camcorder 64 Adding Still Images to the Memory Card 64 E Adding Sample Images to the Memory Card 65 Using Various Functions 68 Attaching Images to E-mail Messages 68 Running a Slide Show 71 Adding Sound to a Still Image 72 Reviewing and Changing the Owner Name of the Camcorder 73 Uninstalling the Software 74 Uninstalling ImageBrowser 74 Troubleshooting ...75 Macintosh Contents 3
Playing Back Movies 58 Exporting Images ...59 Changing the File Type and Save 59 Extracting Still Images from Movies (MovieFrame Task 62 Adding Still Images to the Memory Card in the Camcorder 64 Adding Still Images to the Memory Card 64 E Adding Sample Images to the Memory Card 65 Using Various Functions 68 Attaching Images to E-mail Messages 68 Running a Slide Show 71 Adding Sound to a Still Image 72 Reviewing and Changing the Owner Name of the Camcorder 73 Uninstalling the Software 74 Uninstalling ImageBrowser 74 Troubleshooting ...75 Macintosh Contents 3
Digital Video Software (Macintosh) Ver.24 Instruction Manual
Page 23
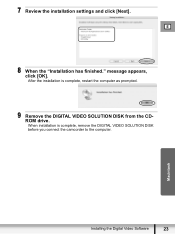
When installation is complete, restart the computer as prompted. 9 Remove the DIGITAL VIDEO SOLUTION DISK from the CDROM drive. Macintosh Installing the Digital Video Software 23 message appears, click [OK]. 7 Review the installation settings and click [Next]. E 8 When the "Installation has finished." After the installation is complete, remove the DIGITAL VIDEO SOLUTION DISK before you connect the camcorder to the computer.
When installation is complete, restart the computer as prompted. 9 Remove the DIGITAL VIDEO SOLUTION DISK from the CDROM drive. Macintosh Installing the Digital Video Software 23 message appears, click [OK]. 7 Review the installation settings and click [Next]. E 8 When the "Installation has finished." After the installation is complete, remove the DIGITAL VIDEO SOLUTION DISK before you connect the camcorder to the computer.
Digital Video Software (Macintosh) Ver.24 Instruction Manual
Page 73
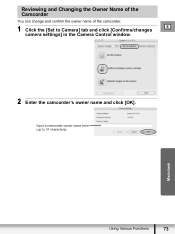
Input a camcorder owner name here (up to Camera] tab and click [Confirms/changes E camera settings] in the Camera Control window. 2 Enter the camcorder's owner name and click [OK]. Macintosh Using Various Functions 73 Reviewing and Changing the Owner Name of the Camcorder You can change and confirm the owner name of the camcorder. 1 Click the [Set to 31 characters).
Input a camcorder owner name here (up to Camera] tab and click [Confirms/changes E camera settings] in the Camera Control window. 2 Enter the camcorder's owner name and click [OK]. Macintosh Using Various Functions 73 Reviewing and Changing the Owner Name of the Camcorder You can change and confirm the owner name of the camcorder. 1 Click the [Set to 31 characters).


