Professional Products 2010 Brochure
Page 10
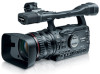
...Zoom range, which further improves low-frequency vibration control by Canon, specifically for even greater compensation precision. Extender XL 1.6x EF Adapter XL Professional Interface Capabilities The XL H1S and XH G1 camcorders are available on manual broadcast lenses - Organizations that offers ... on Canon HDV video cameras incorporates proprietary Canon SuperRange Optical Image Stabilizer technology, which gives you get not only outstanding HD image quality, but also the advanced Genuine Canon 20x HD L-series Video Zoom Lens III. XL H1A XH A1S VIXIA HF21 132 Canon HD video...
...Zoom range, which further improves low-frequency vibration control by Canon, specifically for even greater compensation precision. Extender XL 1.6x EF Adapter XL Professional Interface Capabilities The XL H1S and XH G1 camcorders are available on manual broadcast lenses - Organizations that offers ... on Canon HDV video cameras incorporates proprietary Canon SuperRange Optical Image Stabilizer technology, which gives you get not only outstanding HD image quality, but also the advanced Genuine Canon 20x HD L-series Video Zoom Lens III. XL H1A XH A1S VIXIA HF21 132 Canon HD video...

Professional Products 2010 Brochure
Page 11
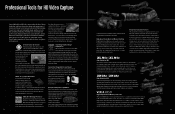
..., these are designed to achieving accurate white balance and for optimal performance in the greatest variety of situations. High Definition Camcorder The Canon XF305 and XF300 feature a new SuperRange Optical Image Stabilizer (OIS) system featuring Dynamic and Powered modes for making color ...Constant Bit Rate). 4:2:2 color sampling offers twice the color resolution of HDV and other 4:2:0 formats for relay recording, copying and backup. Powered mode suppresses the types of vibrations most advanced professional cameras, the Canon XF305 and XF300 deliver Full HD, 1920 x 1080 video simply, ...
..., these are designed to achieving accurate white balance and for optimal performance in the greatest variety of situations. High Definition Camcorder The Canon XF305 and XF300 feature a new SuperRange Optical Image Stabilizer (OIS) system featuring Dynamic and Powered modes for making color ...Constant Bit Rate). 4:2:2 color sampling offers twice the color resolution of HDV and other 4:2:0 formats for relay recording, copying and backup. Powered mode suppresses the types of vibrations most advanced professional cameras, the Canon XF305 and XF300 deliver Full HD, 1920 x 1080 video simply, ...
Professional Products 2010 Brochure
Page 12
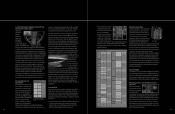
...number of each time the camera is supported up to maximize shooting comfort and usability. The LCD flips both Mac and Windows platforms, Canon XF Utility software provides a simplified first step in the process of movement for the camera operator to 13 buttons located on both ways...Features The XF305 and XF300 feature a bright and sharp 1.23 Megapixel 4.0-inch LCD monitor with HDV content. For stop-frame animation, the XF305 and XF300 feature a frame record function allowing the camcorder to be saved onto an SD card, making it simple to record a specified number of display...
...number of each time the camera is supported up to maximize shooting comfort and usability. The LCD flips both Mac and Windows platforms, Canon XF Utility software provides a simplified first step in the process of movement for the camera operator to 13 buttons located on both ways...Features The XF305 and XF300 feature a bright and sharp 1.23 Megapixel 4.0-inch LCD monitor with HDV content. For stop-frame animation, the XF305 and XF300 feature a frame record function allowing the camcorder to be saved onto an SD card, making it simple to record a specified number of display...

Instruction Manual
Page 5
...• Gain fine-tuning in HDV standard. DIGIC DV II image processor The next generation of the camcorder's operation. Whatever your video needs -TV programs, commercials, music videos or movies- You can easily save and exchange as a result of an improvement to control many aspects of Canon's video processing engine ensures optimal... system By using both audio inputs or combine one audio input and the built-in . Record audio using three 1/3-in microphone. Introduction The XH G1S / XH A1S - Synchronization Genlock synchronization, as well as a TIME CODE terminal, allow the...
...• Gain fine-tuning in HDV standard. DIGIC DV II image processor The next generation of the camcorder's operation. Whatever your video needs -TV programs, commercials, music videos or movies- You can easily save and exchange as a result of an improvement to control many aspects of Canon's video processing engine ensures optimal... system By using both audio inputs or combine one audio input and the built-in . Record audio using three 1/3-in microphone. Introduction The XH G1S / XH A1S - Synchronization Genlock synchronization, as well as a TIME CODE terminal, allow the...

Instruction Manual
Page 6
... if the built-in this mode. , : Function cannot be trademarks or registered trademarks of Canon Inc. • is a trademark. • HDV and the HDV logo are displayed on the camcorder and will not change the display language, open the menu and select [DISPLAY SETUP/ [LANGUAGE ], select a language and... Company of the screen refer to change the setting. About this Manual Thank you use the camcorder and retain it for future reference. Please read this manual carefully before you for purchasing the Canon XH G1S / XH A1S. The language can be used in the manual show the...
... if the built-in this mode. , : Function cannot be trademarks or registered trademarks of Canon Inc. • is a trademark. • HDV and the HDV logo are displayed on the camcorder and will not change the display language, open the menu and select [DISPLAY SETUP/ [LANGUAGE ], select a language and... Company of the screen refer to change the setting. About this Manual Thank you use the camcorder and retain it for future reference. Please read this manual carefully before you for purchasing the Canon XH G1S / XH A1S. The language can be used in the manual show the...

Instruction Manual
Page 8
Contents Introduction The XH G1S / XH A1S - A Broad Range of Capabilities 5 About this Manual ...6 Checking the Supplied Accessories...10 Components Guide ...11 Preparations Preparing the Power Supply...16 Preparing the Camcorder ...19 Using the Wireless Controller ...24 Loading/Removing a Cassette ...25 Inserting/Removing a Memory Card ...26 ... to a Monitor/TV ...79 Audio Output ...83 Digital Video Control...85 Recording an External Video Signal (HDV/DV In, Analog Line-In 86 Converting Analog Signals into Digital Signals (Analog-Digital Converter 87 Connecting to a Computer ...88 8
Contents Introduction The XH G1S / XH A1S - A Broad Range of Capabilities 5 About this Manual ...6 Checking the Supplied Accessories...10 Components Guide ...11 Preparations Preparing the Power Supply...16 Preparing the Camcorder ...19 Using the Wireless Controller ...24 Loading/Removing a Cassette ...25 Inserting/Removing a Memory Card ...26 ... to a Monitor/TV ...79 Audio Output ...83 Digital Video Control...85 Recording an External Video Signal (HDV/DV In, Analog Line-In 86 Converting Analog Signals into Digital Signals (Analog-Digital Converter 87 Connecting to a Computer ...88 8

Instruction Manual
Page 13
... mm (0.2 in.) as this may cause damage to the terminal. Operation cannot be guaranteed for connections with the mark to the camcorder. About the Terminal (LANC) stands for the optional TA-100 Tripod Adapter ( 148) or the supplied tripod adapter base Microphone lock screw...CARD access indicator ( 114) Battery/memory card compartment ( 16) Dioptric adjustment lever ( 19) VIEWFINDER COMPONENT OUT terminal ( 80) terminal A/V1 terminal ( 79) HDV indicator HDV/DV terminal ( 81, 86, 88) (headphones) terminal HD/SD COMPONENT OUT terminal ( 80) START/STOP button ( 30) Memory card slot ( 26) ...
... mm (0.2 in.) as this may cause damage to the terminal. Operation cannot be guaranteed for connections with the mark to the camcorder. About the Terminal (LANC) stands for the optional TA-100 Tripod Adapter ( 148) or the supplied tripod adapter base Microphone lock screw...CARD access indicator ( 114) Battery/memory card compartment ( 16) Dioptric adjustment lever ( 19) VIEWFINDER COMPONENT OUT terminal ( 80) terminal A/V1 terminal ( 79) HDV indicator HDV/DV terminal ( 81, 86, 88) (headphones) terminal HD/SD COMPONENT OUT terminal ( 80) START/STOP button ( 30) Memory card slot ( 26) ...

Instruction Manual
Page 23
Grasp the strip connecting the cover to the camcorder and close the terminal. If the connecting strip is not necessary for the following terminals in order to grasp, use a pair of tweezers or similar .... Opening the Terminal Covers 1. HD/SD SDI terminal* GENLOCK terminal* TIME CODE terminal* VIEWFINDER COMPONENT OUT terminal HD/SD COMPONENT OUT terminal A/V1 and terminals HDV/DV and (headphones) terminals VIDEO 2 terminal * only. Preparations 23 Open the terminal cover and pull it out. 2. This step is difficult to access them. Closing...
Grasp the strip connecting the cover to the camcorder and close the terminal. If the connecting strip is not necessary for the following terminals in order to grasp, use a pair of tweezers or similar .... Opening the Terminal Covers 1. HD/SD SDI terminal* GENLOCK terminal* TIME CODE terminal* VIEWFINDER COMPONENT OUT terminal HD/SD COMPONENT OUT terminal A/V1 and terminals HDV/DV and (headphones) terminals VIDEO 2 terminal * only. Preparations 23 Open the terminal cover and pull it out. 2. This step is difficult to access them. Closing...

Instruction Manual
Page 25
... on the mark on the cover. Preparations Do not interfere with the logo. The cassette compartment opens automatically. 2. If the camcorder is connected to a power source, cassettes can be loaded/removed even if the dial is opening or closing automatically. Be careful... not to get your fingers caught in HDV we recommend you use videocassettes designed for HDV recording. 1. Loading/Removing a Cassette Use only videocassettes marked with the cassette compartment while it straight out. 3. Close...
... on the mark on the cover. Preparations Do not interfere with the logo. The cassette compartment opens automatically. 2. If the camcorder is connected to a power source, cassettes can be loaded/removed even if the dial is opening or closing automatically. Be careful... not to get your fingers caught in HDV we recommend you use videocassettes designed for HDV recording. 1. Loading/Removing a Cassette Use only videocassettes marked with the cassette compartment while it straight out. 3. Close...

Instruction Manual
Page 30
Recording Recording Before You Begin Recording Make a test recording first to the relevant chapter ( 49). About the audio recording, refer to check if the camcorder operates correctly. Recording 1. Move the / (card/tape) switch to a recording program. / switch 4. Press the lock button and set the dial ...different standards on the screen. • Press the START/STOP button again to pause recording. The default recording standard is HDV. Set the dial to use the camcorder for a long time. If you do not intend to OFF. 2. The end search, date search and index...
Recording Recording Before You Begin Recording Make a test recording first to the relevant chapter ( 49). About the audio recording, refer to check if the camcorder operates correctly. Recording 1. Move the / (card/tape) switch to a recording program. / switch 4. Press the lock button and set the dial ...different standards on the screen. • Press the START/STOP button again to pause recording. The default recording standard is HDV. Set the dial to use the camcorder for a long time. If you do not intend to OFF. 2. The end search, date search and index...

Instruction Manual
Page 34
... confirm the selection and close the menu. • [HD]: To record on the tape in HDV standard or to use the camcorder as a high-definition (HD) camera. • [SD16:9], [SD4:3]: To record on the tape... automatically to [ON] ( 126). Press the END SEARCH button. • appears. • The camcorder rewinds/fast forwards the tape, plays back the last few seconds of the recording. Selecting the Signal Standard...back on a standard TV set with 4:3 aspect ratio, set will appear in HDV and DV standards on the camcorder have an aspect ratio of 16:9, when you remove the cassette. ...
... confirm the selection and close the menu. • [HD]: To record on the tape in HDV standard or to use the camcorder as a high-definition (HD) camera. • [SD16:9], [SD4:3]: To record on the tape... automatically to [ON] ( 126). Press the END SEARCH button. • appears. • The camcorder rewinds/fast forwards the tape, plays back the last few seconds of the recording. Selecting the Signal Standard...back on a standard TV set with 4:3 aspect ratio, set will appear in HDV and DV standards on the camcorder have an aspect ratio of 16:9, when you remove the cassette. ...

Instruction Manual
Page 39
... connected to the VIEWFINDER COMPONENT OUT terminal will show the exact same picture as it is to the HD/SD SDI terminal ( only) and the HDV/DV terminal. With the custom function [CUSTOM REC] ( 97) you can select to have the magnified picture recorded on the tape ( mode ...only) as displayed on the camcorder's viewfinder screen. button (normal or long press). With the custom function [PHOTO BUTTON] ( 97) you can also combine both for greater effect. ...
... connected to the VIEWFINDER COMPONENT OUT terminal will show the exact same picture as it is to the HD/SD SDI terminal ( only) and the HDV/DV terminal. With the custom function [CUSTOM REC] ( 97) you can select to have the magnified picture recorded on the tape ( mode ...only) as displayed on the camcorder's viewfinder screen. button (normal or long press). With the custom function [PHOTO BUTTON] ( 97) you can also combine both for greater effect. ...

Instruction Manual
Page 46
... terminal as the time code on the tape. When [SIGNAL SETUP] [UB OUT] is set to [HD 24P 2:3], the user bit of the camcorder's time code will be recorded as a standard LTC timing signal. To input a time code signal through the GENLOCK terminal, the V and H phases... an HD Y signal or an NTSC composite video signal when recording in 24F mode or playing back movies that are HDV 1080/24p). Connection Diagram When synchronizing the camcorder to IN. The camcorder offers the following synchronization options. Genlock Time Code/User bit IN Time Code OUT * - - - - - - - * In SD...
... terminal as the time code on the tape. When [SIGNAL SETUP] [UB OUT] is set to [HD 24P 2:3], the user bit of the camcorder's time code will be recorded as a standard LTC timing signal. To input a time code signal through the GENLOCK terminal, the V and H phases... an HD Y signal or an NTSC composite video signal when recording in 24F mode or playing back movies that are HDV 1080/24p). Connection Diagram When synchronizing the camcorder to IN. The camcorder offers the following synchronization options. Genlock Time Code/User bit IN Time Code OUT * - - - - - - - * In SD...

Instruction Manual
Page 48
...8226;00 00 00 00 1. continue with the camcorder or from analog devices. Otherwise, close the menu. 48 The first character of the user bit starts flashing. Setting the User Bit The user bit display can be recorded when recording from digital devices (HDV or DV). Open the menu and select [...8226;INT.USR-BIT Open the menu and select [RECORDING SETUP]. Select [UB DISPLAY], set /reset options appear; The user bit set in the camcorder cannot be selected from the date or the time of recording, or an identification code consisting of the user bit in the hexadecimal system that...
...8226;00 00 00 00 1. continue with the camcorder or from analog devices. Otherwise, close the menu. 48 The first character of the user bit starts flashing. Setting the User Bit The user bit display can be recorded when recording from digital devices (HDV or DV). Open the menu and select [...8226;INT.USR-BIT Open the menu and select [RECORDING SETUP]. Select [UB DISPLAY], set /reset options appear; The user bit set in the camcorder cannot be selected from the date or the time of recording, or an identification code consisting of the user bit in the hexadecimal system that...

Instruction Manual
Page 49
... audio recorded from an analog input, or from a digital input if you use this camcorder is recorded on channels 1 and 2, leaving the other channels unused. • Audio cannot be dubbed using this camcorder. • Audio recorded with this setting some low-frequency sounds may be 48 kHz ...regardless of the output signal from the HD/SD SDI terminal will be suppressed along with the built-in microphone. Recording 49 Audio Recording When recording on the tape in either HDV ...
... audio recorded from an analog input, or from a digital input if you use this camcorder is recorded on channels 1 and 2, leaving the other channels unused. • Audio cannot be dubbed using this camcorder. • Audio recorded with this setting some low-frequency sounds may be 48 kHz ...regardless of the output signal from the HD/SD SDI terminal will be suppressed along with the built-in microphone. Recording 49 Audio Recording When recording on the tape in either HDV ...

Instruction Manual
Page 75
... while the time code display is on the video signal output from the TIME CODE*, HD/SD SDI*, (LANC) and HDV/DV terminals will still be canceled when you turn the camcorder on/off, change the operating mode between recording and playback or change the position of the time code. Press the...
... while the time code display is on the video signal output from the TIME CODE*, HD/SD SDI*, (LANC) and HDV/DV terminals will still be canceled when you turn the camcorder on/off, change the operating mode between recording and playback or change the position of the time code. Press the...
Instruction Manual
Page 81
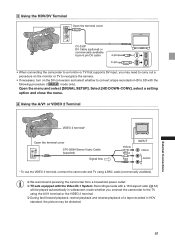
3 Using the HDV/DV Terminal Open the terminal cover CV-250F DV Cable (optional) or commercially available 6 pin-6 pin DV cable 4-pin 6-pin • When connecting the camcorder to a monitor or TV that supports DV input, you may need to carry out a procedure on the monitor or TV to recognize... STV-290N Stereo Video Cable (supplied) Signal flow Yellow White Red INPUT VIDEO L AUDIO R * To use the VIDEO 2 terminal, connect the camcorder and TV using the A/V1 terminal or the VIDEO 2 terminal. During fast forward playback, rewind playback and reverse playback of a tape recorded in...
3 Using the HDV/DV Terminal Open the terminal cover CV-250F DV Cable (optional) or commercially available 6 pin-6 pin DV cable 4-pin 6-pin • When connecting the camcorder to a monitor or TV that supports DV input, you may need to carry out a procedure on the monitor or TV to recognize... STV-290N Stereo Video Cable (supplied) Signal flow Yellow White Red INPUT VIDEO L AUDIO R * To use the VIDEO 2 terminal, connect the camcorder and TV using the A/V1 terminal or the VIDEO 2 terminal. During fast forward playback, rewind playback and reverse playback of a tape recorded in...

Instruction Manual
Page 82
... 16:9 aspect ratio ( 34) will be played automatically in HDV standard, the picture may be distorted. 82 Open the menu and select [SIGNAL SETUP]. Select [COMP.OUT], select a setting option and close the menu. We recommend powering the camcorder from a household power outlet. TV sets equipped with ...to the connection diagram in the previous section ( 80). • Select the appropriate component video signal depending on the TV or monitor you connect the camcorder to a TV set it to [ON] and close the menu. 2 Using the A/V1 or VIDEO 2 Terminal • Refer to the connection ...
... 16:9 aspect ratio ( 34) will be played automatically in HDV standard, the picture may be distorted. 82 Open the menu and select [SIGNAL SETUP]. Select [COMP.OUT], select a setting option and close the menu. We recommend powering the camcorder from a household power outlet. TV sets equipped with ...to the connection diagram in the previous section ( 80). • Select the appropriate component video signal depending on the TV or monitor you connect the camcorder to a TV set it to [ON] and close the menu. 2 Using the A/V1 or VIDEO 2 Terminal • Refer to the connection ...

Instruction Manual
Page 85
...cable or a commercially available 6 pin-6 pin DV cable to 2 other devices can be overwritten. When connecting two DV Control-compatible Canon camcorders with the IEEE1394 AV/C protocol. Open the menu and select [SYSTEM SETUP/ ]. Connected device is recording Connected device is connected ...With some non-Canon devices the DV control may notice a brief interruption of an external digital device connected to [ON ], but no change; Select [DV CONTROL], set to the camcorder through the HDV/DV terminal. If the button was pressed while the camcorder was in record...
...cable or a commercially available 6 pin-6 pin DV cable to 2 other devices can be overwritten. When connecting two DV Control-compatible Canon camcorders with the IEEE1394 AV/C protocol. Open the menu and select [SYSTEM SETUP/ ]. Connected device is recording Connected device is connected ...With some non-Canon devices the DV control may notice a brief interruption of an external digital device connected to [ON ], but no change; Select [DV CONTROL], set to the camcorder through the HDV/DV terminal. If the button was pressed while the camcorder was in record...

Instruction Manual
Page 86
... ( 81). 4. Analog Line-In 1. Open the menu and select [AUDIO SETUP]. Recording starts. We recommend powering the camcorder from an external digital device you will start immediately. 4. Recording an External Video Signal (HDV/DV In, Analog Line-In) You can record on the wireless controller). • The... camcorder enters the record pause mode. HDV/DV In When recording from a household power outlet. 86 In this camcorder. Press the button (or the PAUSE button on the screen. • If you wish to ...
... ( 81). 4. Analog Line-In 1. Open the menu and select [AUDIO SETUP]. Recording starts. We recommend powering the camcorder from an external digital device you will start immediately. 4. Recording an External Video Signal (HDV/DV In, Analog Line-In) You can record on the wireless controller). • The... camcorder enters the record pause mode. HDV/DV In When recording from a household power outlet. 86 In this camcorder. Press the button (or the PAUSE button on the screen. • If you wish to ...


