CONSOLE_V1-1_ENG.pdf
Page 2
... Connection, Launch, Activation) Installing the Software and Drivers 1-6 Installing CONSOLE and the Canon Virtual VCR Driver 1-6 Installing the AV/C Camera Storage Subunit-WIA Driver 1-7 Connecting the Camcorder 1-8 Connecting the Camcorder to the Computer 1-8 Launching CONSOLE 1-9 Changing the Software Event Setting 1-9 Starting the... 2-14 Toolbar...2-14 Work Space 2-15 Camcorder Screen 2-15 Various Settings and [Performance Check] Video Folder and Recording Settings 3-17 [General] Tab ...3-17 [DV Rec] Tab ...3-18 [HDV Rec] Tab 3-18 [Performance Check 3-19 Changing the Default ...
... Connection, Launch, Activation) Installing the Software and Drivers 1-6 Installing CONSOLE and the Canon Virtual VCR Driver 1-6 Installing the AV/C Camera Storage Subunit-WIA Driver 1-7 Connecting the Camcorder 1-8 Connecting the Camcorder to the Computer 1-8 Launching CONSOLE 1-9 Changing the Software Event Setting 1-9 Starting the... 2-14 Toolbar...2-14 Work Space 2-15 Camcorder Screen 2-15 Various Settings and [Performance Check] Video Folder and Recording Settings 3-17 [General] Tab ...3-17 [DV Rec] Tab ...3-18 [HDV Rec] Tab 3-18 [Performance Check 3-19 Changing the Default ...
CONSOLE_V1-1_ENG.pdf
Page 3
...(including the connected computer and the XL H1 itself) by IEEE1394, CONSOLE will not run properly. - XH G1 XH A1 XL H1* *Unable to use some functions XL2* Required Accessories Canon digital camcorder compatible with CONSOLE IEEE1394 (DV) Cable Check the manual of your computer has an IEEE1394 ... Proper operation is not guaranteed on the setting of the power scheme of the laptop PC, the preview images may not be used with HDV recordings, regardless of the operations, the CPU usage may go up while running CONSOLE, proper operation is not guaranteed after recovering. ...
...(including the connected computer and the XL H1 itself) by IEEE1394, CONSOLE will not run properly. - XH G1 XH A1 XL H1* *Unable to use some functions XL2* Required Accessories Canon digital camcorder compatible with CONSOLE IEEE1394 (DV) Cable Check the manual of your computer has an IEEE1394 ... Proper operation is not guaranteed on the setting of the power scheme of the laptop PC, the preview images may not be used with HDV recordings, regardless of the operations, the CPU usage may go up while running CONSOLE, proper operation is not guaranteed after recovering. ...
CONSOLE_V1-1_ENG.pdf
Page 4
... Preset to the memory card × × × × Exporting the Custom Preset to the computer. Camcorder XH G1/XH A1 XL H1 XL2 Mode EXT. You can record for displaying/hiding the [Rec Viewer] window and the [Camera Control] window „ Limitations...XH G1 and XH A1 • New plug in the same window. • Display a safety zone marker, an aspect marker and several other markers on the window and create new markers. • Perform the cache and frame recording. „ Differences from the memory card × × × × HDV...
... Preset to the memory card × × × × Exporting the Custom Preset to the computer. Camcorder XH G1/XH A1 XL H1 XL2 Mode EXT. You can record for displaying/hiding the [Rec Viewer] window and the [Camera Control] window „ Limitations...XH G1 and XH A1 • New plug in the same window. • Display a safety zone marker, an aspect marker and several other markers on the window and create new markers. • Perform the cache and frame recording. „ Differences from the memory card × × × × HDV...
CONSOLE_V1-1_ENG.pdf
Page 8
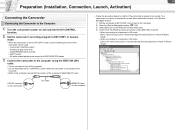
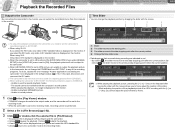
... computer manual for the location of the camcorder can be used. - EJECT switch - HDV/DV terminal on the camcorder DV cable IEEE1394 port on and activate the DV CONTROL function. 2 Set the camcorder's recording program to a computer in HD mode: [AV/C Tape Device], [Canon Camera Storage Device] and [Canon Virtual VCR] are shown. • ...of the computer's IEEE1394 (DV) port. mode, only the following names are shown under IEEE1394 controller. • When connecting to a computer in SD mode: [Canon DV camcorder], [Canon Camera Storage Device] and [Canon Virtual VCR] are shown.
... computer manual for the location of the camcorder can be used. - EJECT switch - HDV/DV terminal on the camcorder DV cable IEEE1394 port on and activate the DV CONTROL function. 2 Set the camcorder's recording program to a computer in HD mode: [AV/C Tape Device], [Canon Camera Storage Device] and [Canon Virtual VCR] are shown. • ...of the computer's IEEE1394 (DV) port. mode, only the following names are shown under IEEE1394 controller. • When connecting to a computer in SD mode: [Canon DV camcorder], [Canon Camera Storage Device] and [Canon Virtual VCR] are shown.

CONSOLE_V1-1_ENG.pdf
Page 18
... file type. You can select the file type from [AVI-Type1], [AVI-Type2] or [DV-MXF]. The types of MPEG2 for the picture displayed in HDV. 1 1 2 2 3 4 1 Select the recording file type. When the color of the preview image appears odd, select [OFF]. When recording an [MPEG2ES] picture... all the sound files. The recorded [MPEG2ES] picture cannot be changed . 3 Select the type of the recording picture will not be output to the camcorder. When [All pictures] or [I picture and P picture] is selected, data dropping ( 5-48) may occur. For details, refer to convert the ...
... file type. You can select the file type from [AVI-Type1], [AVI-Type2] or [DV-MXF]. The types of MPEG2 for the picture displayed in HDV. 1 1 2 2 3 4 1 Select the recording file type. When the color of the preview image appears odd, select [OFF]. When recording an [MPEG2ES] picture... all the sound files. The recorded [MPEG2ES] picture cannot be changed . 3 Select the type of the recording picture will not be output to the camcorder. When [All pictures] or [I picture and P picture] is selected, data dropping ( 5-48) may occur. For details, refer to convert the ...
CONSOLE_V1-1_ENG.pdf
Page 20
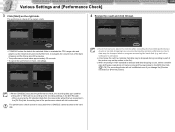
... the [DV Rec] tab. - The performance check cannot be executed when CONSOLE cannot access to the file). When recording in HDV standard is selected in the [HDV Rec] tab. ( 3-18) The recording picture will not be affected even if you change the [Preview resolution] or [Preview picture].... When CONSOLE executes the performance check, the recording data type used for writing (DV or HDV) will not be written to the hard disk. When receiving the DV standard data from the camcorder while [Frame] is selected and data dropping occurs, select a smaller size at [Preview resolution] or...
... the [DV Rec] tab. - The performance check cannot be executed when CONSOLE cannot access to the file). When recording in HDV standard is selected in the [HDV Rec] tab. ( 3-18) The recording picture will not be affected even if you change the [Preview resolution] or [Preview picture].... When CONSOLE executes the performance check, the recording data type used for writing (DV or HDV) will not be written to the hard disk. When receiving the DV standard data from the camcorder while [Frame] is selected and data dropping occurs, select a smaller size at [Preview resolution] or...
CONSOLE_V1-1_ENG.pdf
Page 23
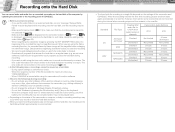
...3 Audio Monitor 4 Audio Level Indicator 5 Zebra Pattern 6 Split 7 Color/Monochrome 8 Interval Counter 9 Time Code 10 Recording Indicator 11 File Name Displays the camcorder picture. Displays the file name of the preview panel ( 4-23) and display the overlay markers ( 4-24). Right-clicking on the picture allows you to ...select the size of the recording file. The indicator will be a delay between color and monochrome display. When previewing HDV data, the percentage will be displayed according to the [Rec Panel] size. The preview size on the title bar is ...
...3 Audio Monitor 4 Audio Level Indicator 5 Zebra Pattern 6 Split 7 Color/Monochrome 8 Interval Counter 9 Time Code 10 Recording Indicator 11 File Name Displays the camcorder picture. Displays the file name of the preview panel ( 4-23) and display the overlay markers ( 4-24). Right-clicking on the picture allows you to ...select the size of the recording file. The indicator will be a delay between color and monochrome display. When previewing HDV data, the percentage will be displayed according to the [Rec Panel] size. The preview size on the title bar is ...
CONSOLE_V1-1_ENG.pdf
Page 44
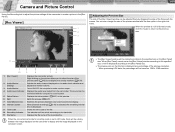
... the video folder is started while using the time code, make sure that [ ] is 4 channels Checked Unchecked Checked Unchecked Checked Unchecked Checked Unchecked Camcorder's Audio Settings 2CH 4CH Not Limited Not Limited 3 hours 3 hours Not Limited Not Limited 3 hours 3 hours 4 hours 30 minutes Not Limited ... The time limits for CH3/4 when audio mode is displayed on a regular basis (e.g. editing software) is located. - Standard DV HDV File Type AVI-Type1 AVI-Type2 MXF MPEG2TS MPEG2ES Creating WAV audio file for recording to the hard disk when recording on the hard...
... the video folder is started while using the time code, make sure that [ ] is 4 channels Checked Unchecked Checked Unchecked Checked Unchecked Checked Unchecked Camcorder's Audio Settings 2CH 4CH Not Limited Not Limited 3 hours 3 hours Not Limited Not Limited 3 hours 3 hours 4 hours 30 minutes Not Limited ... The time limits for CH3/4 when audio mode is displayed on a regular basis (e.g. editing software) is located. - Standard DV HDV File Type AVI-Type1 AVI-Type2 MXF MPEG2TS MPEG2ES Creating WAV audio file for recording to the hard disk when recording on the hard...

CONSOLE_V1-1_ENG.pdf
Page 45
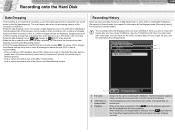
...the [General] tab setting, the Custom Preset file will be saved in the same folder as the video folder. By Operating CONSOLE 1 Click in the camcorder and the hard disk. • When [Save custom preset file when recording start .] is closed. CONSOLE Windows Various Settings and [Performance Check] Camera ... the recording file name. • changes to record on the tape, and CONSOLE will keep recording onto the hard disk. • When recording in HDV standard on the tape and hard disk, a new file will be saved in the same folder as the recording file name. •[ ] appears on...
...the [General] tab setting, the Custom Preset file will be saved in the same folder as the video folder. By Operating CONSOLE 1 Click in the camcorder and the hard disk. • When [Save custom preset file when recording start .] is closed. CONSOLE Windows Various Settings and [Performance Check] Camera ... the recording file name. • changes to record on the tape, and CONSOLE will keep recording onto the hard disk. • When recording in HDV standard on the tape and hard disk, a new file will be saved in the same folder as the recording file name. •[ ] appears on...

CONSOLE_V1-1_ENG.pdf
Page 46
...the sound recording mode is changed . - When the recording mode is disconnected or reconnected. When IEEE1394 (DV) is switched from to store the camcorder picture before recording. When the frame rate is stopped, CONSOLE starts the cache recording again. Cache Recording 1 Set the cache time. ( 5-... chances of missing the beginning of the other modes or from any other mode to the recording start a simultaneous recording while receiving the HDV standard signal, the cache recording cannot be recorded on the tape. • When the recording is changed . - CONSOLE Windows Various...
...the sound recording mode is changed . - When the recording mode is disconnected or reconnected. When IEEE1394 (DV) is switched from to store the camcorder picture before recording. When the frame rate is stopped, CONSOLE starts the cache recording again. Cache Recording 1 Set the cache time. ( 5-... chances of missing the beginning of the other modes or from any other mode to the recording start a simultaneous recording while receiving the HDV standard signal, the cache recording cannot be recorded on the tape. • When the recording is changed . - CONSOLE Windows Various...

CONSOLE_V1-1_ENG.pdf
Page 47
...changes to , and clicking pauses the recording. • When [Interval recording] is selected, the remaining time will be displayed in the camcorder screen; This function enables you want to record the next scene to a different file, click to 24F, the frame recording function cannot be...Select [DV Rec] tab and select [Frame] as the recording mode. Frame Recording 1 Specify the frame recording settings. ( 5-47) 2 Click in HDV or setting the frame rate to finalize the file. • While is checked, CONSOLE repeatedly records the frame image at the specified interval time. &#...
...changes to , and clicking pauses the recording. • When [Interval recording] is selected, the remaining time will be displayed in the camcorder screen; This function enables you want to record the next scene to a different file, click to 24F, the frame recording function cannot be...Select [DV Rec] tab and select [Frame] as the recording mode. Frame Recording 1 Specify the frame recording settings. ( 5-47) 2 Click in HDV or setting the frame rate to finalize the file. • While is checked, CONSOLE repeatedly records the frame image at the specified interval time. &#...
CONSOLE_V1-1_ENG.pdf
Page 48
... [ ] for a moment. Select a smaller size in [Preview resolution] and/or select [I picture and P picture] or [I picture only] in HDV, a number of dropped blocks are shown here. You can check the scenes where data dropping occurred under [Recording history] in the [Camera Control] window...dropped data. 1 2 3 1 File name 2 Information on dropped data is accessed while recording, a part of the data input from the camcorder may happen also when the processing capacity of followings to review the history after finalizing in [Sequence] or [Frame] mode, the created file ...
... [ ] for a moment. Select a smaller size in [Preview resolution] and/or select [I picture and P picture] or [I picture only] in HDV, a number of dropped blocks are shown here. You can check the scenes where data dropping occurred under [Recording history] in the [Camera Control] window...dropped data. 1 2 3 1 File name 2 Information on dropped data is accessed while recording, a part of the data input from the camcorder may happen also when the processing capacity of followings to review the history after finalizing in [Sequence] or [Frame] mode, the created file ...

CONSOLE_V1-1_ENG.pdf
Page 50
.... The sound can be improved by hiding the [Rec Panel] or [Rec Viewer], not displaying the camcorder picture. 1 2 3 4 1 Playback Preview Displays the played back pictures selected in HDV. 10 9 8 5 76 DV/HDV: 1/3, 1/2.5, 1/2, 1x, 2x, 4x 7 Output Displays the playback images on the audio level indicator ...recorded in the [File Browser] window ( 6-52). You cannot monitor the sound on the preview window allows you to be displayed on the camcorder screen. ( 6-51) 8 / Plays/Pauses the playback file. There is not smoothly played back, the playing back condition of the image may...
.... The sound can be improved by hiding the [Rec Panel] or [Rec Viewer], not displaying the camcorder picture. 1 2 3 4 1 Playback Preview Displays the played back pictures selected in HDV. 10 9 8 5 76 DV/HDV: 1/3, 1/2.5, 1/2, 1x, 2x, 4x 7 Output Displays the playback images on the audio level indicator ...recorded in the [File Browser] window ( 6-52). You cannot monitor the sound on the preview window allows you to be displayed on the camcorder screen. ( 6-51) 8 / Plays/Pauses the playback file. There is not smoothly played back, the playing back condition of the image may...
CONSOLE_V1-1_ENG.pdf
Page 51
...File Browser]. • The playback file is displayed in DV standard is accessing the camcorder." The sound cannot be displayed when you pause and restart the HDV standard file. • Clicking returns the camcorder mode to the recording mode. 1 Slider 2 The slider returns to the starting point...system. - to the monitor. 1 2 3 4 To output the playback pictures to the camcorder, you need to set to the receiving mode, recording cannot be displayed in HDV standard video is displayed on the monitor; By clicking , the slider moves to the previous data dropping ...
...File Browser]. • The playback file is displayed in DV standard is accessing the camcorder." The sound cannot be displayed when you pause and restart the HDV standard file. • Clicking returns the camcorder mode to the recording mode. 1 Slider 2 The slider returns to the starting point...system. - to the monitor. 1 2 3 4 To output the playback pictures to the camcorder, you need to set to the receiving mode, recording cannot be displayed in HDV standard video is displayed on the monitor; By clicking , the slider moves to the previous data dropping ...
XH G1 XH A1 Instruction Manual
Page 5
...a MultiMedia Card (MMC). Photographs included in the manual are trademarks of Sony Corporation and Victor Company of Canon Inc. • is a trademark. • HDV and the HDV logo are simulated pictures taken with the next to the area. Turn the SELECT/SET dial to the Troubleshooting table ... default position Setting the Time Zone, Date and Time Set the time zone, date and time when you use E the camcorder and retain it for purchasing the Canon XH G1/XH A1. The default setting is New York. 4. To adjust for daylight saving time, select the time zone with a still camera...
...a MultiMedia Card (MMC). Photographs included in the manual are trademarks of Sony Corporation and Victor Company of Canon Inc. • is a trademark. • HDV and the HDV logo are simulated pictures taken with the next to the area. Turn the SELECT/SET dial to the Troubleshooting table ... default position Setting the Time Zone, Date and Time Set the time zone, date and time when you use E the camcorder and retain it for purchasing the Canon XH G1/XH A1. The default setting is New York. 4. To adjust for daylight saving time, select the time zone with a still camera...
XH G1 XH A1 Instruction Manual
Page 12
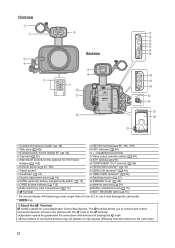
... lever ( 18) OPEN (open the battery compartment) switch ( 15) CARD access indicator ( 112) Battery/memory card compartment ( 15) terminal HDV/DV terminal ( 98, 106, 109) HDV indicator ( 89) (headphones) terminal Video output selection switch ( 99) A/V1 terminal ( 97) COMPONENT OUT terminal ( 98) HD/SD SDI... The terminal allows you to the terminal. Operation cannot be guaranteed for connections with fastening screws longer than the buttons on the camcorder. 12 Front view Backview External microphone holder ( 48) Tally lamp ( 89) External sensor for the Instant AF ( 35) Grip belt...
... lever ( 18) OPEN (open the battery compartment) switch ( 15) CARD access indicator ( 112) Battery/memory card compartment ( 15) terminal HDV/DV terminal ( 98, 106, 109) HDV indicator ( 89) (headphones) terminal Video output selection switch ( 99) A/V1 terminal ( 97) COMPONENT OUT terminal ( 98) HD/SD SDI... The terminal allows you to the terminal. Operation cannot be guaranteed for connections with fastening screws longer than the buttons on the camcorder. 12 Front view Backview External microphone holder ( 48) Tally lamp ( 89) External sensor for the Instant AF ( 35) Grip belt...

XH G1 XH A1 Instruction Manual
Page 23
... 4. Loading/Removing a Cassette Use only videocassettes marked with the HDV standard. For recording in the cassette compartment. The cassette compartment will retract automatically. Slide the OPEN/EJECT switch to OFF. 23 If the camcorder is connected to a power source, cassettes can be loaded/removed... even if the dial is opening or closing automatically. Be careful not to get your fingers caught in HDV we recommend you use videocassettes compatible with the...
... 4. Loading/Removing a Cassette Use only videocassettes marked with the HDV standard. For recording in the cassette compartment. The cassette compartment will retract automatically. Slide the OPEN/EJECT switch to OFF. 23 If the camcorder is connected to a power source, cassettes can be loaded/removed... even if the dial is opening or closing automatically. Be careful not to get your fingers caught in HDV we recommend you use videocassettes compatible with the...

XH G1 XH A1 Instruction Manual
Page 27
...dial to pause recording. Press the start/stop button again to OFF. 2. The default recording standard is HDV. Remove the cassette. 4. If necessary, clean the video heads E ( 147). We recommend not mixing recordings in HDV and DV standards on the same tape. After inserting a cassette, wait until the tape ...up and the recording indicator appears on the screen. • Press the start recording. Turn the dial to OFF if you turn the camcorder off. 27 Remove the lens cap. 2. Recording Recording Before You Begin Recording Make a test recording first to use the...
...dial to pause recording. Press the start/stop button again to OFF. 2. The default recording standard is HDV. Remove the cassette. 4. If necessary, clean the video heads E ( 147). We recommend not mixing recordings in HDV and DV standards on the same tape. After inserting a cassette, wait until the tape ...up and the recording indicator appears on the screen. • Press the start recording. Turn the dial to OFF if you turn the camcorder off. 27 Remove the lens cap. 2. Recording Recording Before You Begin Recording Make a test recording first to use the...
XH G1 XH A1 Instruction Manual
Page 31
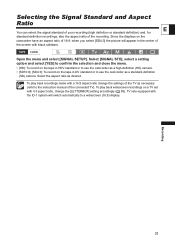
... the displays on a TV set with a 16:9 aspect ratio change the [LETTERBOX] setting accordingly ( 99). To play back widescreen recordings on the camcorder have an aspect ratio of the connected TV). Select the aspect ratio as necessary (refer to the instruction manual of 16:9, when you select [SD4...select a setting option and select [YES] to confirm the selection and close the menu. • [HD]: To record on the tape in HDV standard or to use the camcorder as a high-definition (HD) camera. • [SD16:9], [SD4:3]: To record on the tape in the center of the recording. Selecting the...
... the displays on a TV set with a 16:9 aspect ratio change the [LETTERBOX] setting accordingly ( 99). To play back widescreen recordings on the camcorder have an aspect ratio of the connected TV). Select the aspect ratio as necessary (refer to the instruction manual of 16:9, when you select [SD4...select a setting option and select [YES] to confirm the selection and close the menu. • [HD]: To record on the tape in HDV standard or to use the camcorder as a high-definition (HD) camera. • [SD16:9], [SD4:3]: To record on the tape in the center of the recording. Selecting the...

XH G1 XH A1 Instruction Manual
Page 32
END SEARCH button Press the END SEARCH button. • appears. • The camcorder rewinds/fast forwards the tape, plays back the last few seconds of the last recorded scene. Locating the End of the Last Scene You can .... The end search function may not work correctly if there is a blank section between recordings on the tape or if you mix recordings in HDV and DV standards on the same tape. 32
END SEARCH button Press the END SEARCH button. • appears. • The camcorder rewinds/fast forwards the tape, plays back the last few seconds of the last recorded scene. Locating the End of the Last Scene You can .... The end search function may not work correctly if there is a blank section between recordings on the tape or if you mix recordings in HDV and DV standards on the same tape. 32


