CONSOLE_V1-1_ENG.pdf
Page 8
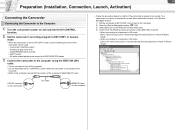
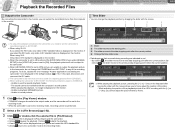
... shown under IEEE1394 controller. • When connecting to a computer in HD mode: [AV/C Tape Device], [Canon Camera Storage Device] and [Canon Virtual VCR] are shown. HDV/DV terminal on the camcorder DV cable IEEE1394 port on and activate the DV CONTROL function. 2 Set the camcorder's recording program to EXT.CONT. 1-8 Preparation (Installation, Connection, Launch, Activation...
... shown under IEEE1394 controller. • When connecting to a computer in HD mode: [AV/C Tape Device], [Canon Camera Storage Device] and [Canon Virtual VCR] are shown. HDV/DV terminal on the camcorder DV cable IEEE1394 port on and activate the DV CONTROL function. 2 Set the camcorder's recording program to EXT.CONT. 1-8 Preparation (Installation, Connection, Launch, Activation...
CONSOLE_V1-1_ENG.pdf
Page 23
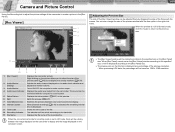
...ON/OFF the computer's audio monitor output. Displays the audio level output from the camcorder. Splits the preview ( 4-27). When [Interval recording] ( 3-18) is selected, the remaining interval time is set to HD mode, there will be a delay between color and monochrome display. Displays the file... 4 Audio Level Indicator 5 Zebra Pattern 6 Split 7 Color/Monochrome 8 Interval Counter 9 Time Code 10 Recording Indicator 11 File Name Displays the camcorder picture. When previewing HDV data, the percentage will turn while recording on the title bar is in [Full Screen] mode, click the mouse to...
...ON/OFF the computer's audio monitor output. Displays the audio level output from the camcorder. Splits the preview ( 4-27). When [Interval recording] ( 3-18) is selected, the remaining interval time is set to HD mode, there will be a delay between color and monochrome display. Displays the file... 4 Audio Level Indicator 5 Zebra Pattern 6 Split 7 Color/Monochrome 8 Interval Counter 9 Time Code 10 Recording Indicator 11 File Name Displays the camcorder picture. When previewing HDV data, the percentage will turn while recording on the title bar is in [Full Screen] mode, click the mouse to...
CONSOLE_V1-1_ENG.pdf
Page 42
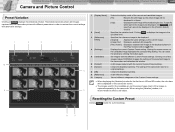
... of the images makes CONSOLE to apply the settings of the selected image to original settings. Tabs of different categories of the camcorder returns to the camcorder, and refreshes the window. Resetting the Custom Preset Clicking resets the current settings. 8 7 To specify which part in the ... in a frame. The setting of the Custom Preset settings. When displaying the [Variation] window for the first time in HD and SD modes, the color bars will be displayed on the candidate image highlights the corresponding setting. Displays the still image without adjusting ...
... of the images makes CONSOLE to apply the settings of the selected image to original settings. Tabs of different categories of the camcorder returns to the camcorder, and refreshes the window. Resetting the Custom Preset Clicking resets the current settings. 8 7 To specify which part in the ... in a frame. The setting of the Custom Preset settings. When displaying the [Variation] window for the first time in HD and SD modes, the color bars will be displayed on the candidate image highlights the corresponding setting. Displays the still image without adjusting ...
CONSOLE_V1-1_ENG.pdf
Page 51
...When using XL2: Only video in DV standard is displayed on the monitor. When the camcorder is set to HD mode and the [HD DOWN-CONV] menu under [SIGNAL SETUP] in [Play Viewer] and the camcorder. • Clicking pauses the playback. The sound cannot be displayed when you pause and restart the ... set to [ON] and you are indicated in DV standard video is set to the receiving mode, recording cannot be output to the camcorder. When [HD DOWN-CONV] is displayed on the keyboard after the current position. if you select the SD mode, only video in red. - CONSOLE Windows ...
...When using XL2: Only video in DV standard is displayed on the monitor. When the camcorder is set to HD mode and the [HD DOWN-CONV] menu under [SIGNAL SETUP] in [Play Viewer] and the camcorder. • Clicking pauses the playback. The sound cannot be displayed when you pause and restart the ... set to [ON] and you are indicated in DV standard video is set to the receiving mode, recording cannot be output to the camcorder. When [HD DOWN-CONV] is displayed on the keyboard after the current position. if you select the SD mode, only video in red. - CONSOLE Windows ...
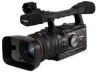
XH G1 XH A1 Instruction Manual
Page 3
... stops, excessive force, and uneven surfaces may fall into such power lines or circuits. Power Sources - Polarization - If you are unable to the Canon HD Video Camera Recorder XH G1 A/XH A1 A and all servicing to overturn. 10. Power Cord Protection - See figure 1. Servicing - IMPORTANT SAFETY INSTRUCTIONS In these safety instructions the word "product" refers...
... stops, excessive force, and uneven surfaces may fall into such power lines or circuits. Power Sources - Polarization - If you are unable to the Canon HD Video Camera Recorder XH G1 A/XH A1 A and all servicing to overturn. 10. Power Cord Protection - See figure 1. Servicing - IMPORTANT SAFETY INSTRUCTIONS In these safety instructions the word "product" refers...
XH G1 XH A1 Instruction Manual
Page 6
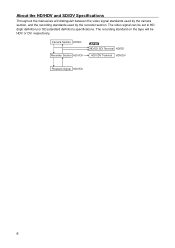
Camera Section HD/SD Recorder Section HDV/DV HD/SD SDI Terminal HD/SD HDV/DV Terminal HDV/DV Playback Signal HDV/DV 6 The video signal can be HDV or DV, respectively. About the HD/HDV and SD/DV Specifications Throughout the manual we will be set to HD (high definition) or SD (standard definition) specifications. The recording standard on the tape will distinguish between the video signal standards used by the camera section, and the recording standards used by the recorder section.
Camera Section HD/SD Recorder Section HDV/DV HD/SD SDI Terminal HD/SD HDV/DV Terminal HDV/DV Playback Signal HDV/DV 6 The video signal can be HDV or DV, respectively. About the HD/HDV and SD/DV Specifications Throughout the manual we will be set to HD (high definition) or SD (standard definition) specifications. The recording standard on the tape will distinguish between the video signal standards used by the camera section, and the recording standards used by the recorder section.
XH G1 XH A1 Instruction Manual
Page 12
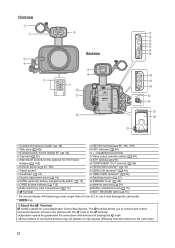
...to connect and control connected devices. About the Terminal (LANC) stands for connections with fastening screws longer than the buttons on the camcorder. 12 The terminal allows you to the terminal. Operation cannot be guaranteed for Local Application Control Bus System. Front view .../DV terminal ( 98, 106, 109) HDV indicator ( 89) (headphones) terminal Video output selection switch ( 99) A/V1 terminal ( 97) COMPONENT OUT terminal ( 98) HD/SD SDI terminal** ( 97) GENLOCK terminal** ( 44) TIME CODE terminal** ( 44) Start/stop button ( 27) STANDBY lever ( 28) Memory card slot ( 24)...
...to connect and control connected devices. About the Terminal (LANC) stands for connections with fastening screws longer than the buttons on the camcorder. 12 The terminal allows you to the terminal. Operation cannot be guaranteed for Local Application Control Bus System. Front view .../DV terminal ( 98, 106, 109) HDV indicator ( 89) (headphones) terminal Video output selection switch ( 99) A/V1 terminal ( 97) COMPONENT OUT terminal ( 98) HD/SD SDI terminal** ( 97) GENLOCK terminal** ( 44) TIME CODE terminal** ( 44) Start/stop button ( 27) STANDBY lever ( 28) Memory card slot ( 24)...
XH G1 XH A1 Instruction Manual
Page 31
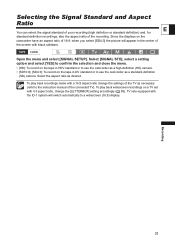
... camera. To play back widescreen recordings on the camcorder have an aspect ratio of the recording. Open the menu and select [SIGNAL SETUP]. Select [SIGNAL STD], select a setting option and select [YES] to confirm the selection and close the menu. • [HD]: To record on the tape in HDV standard or... TV as necessary (refer to the instruction manual of the screen with the ID-1 system will appear in DV standard or to use the camcorder as a high-definition (HD) camera. • [SD16:9], [SD4:3]: To record on the tape in the center of the connected TV). Since the displays on a TV...
... camera. To play back widescreen recordings on the camcorder have an aspect ratio of the recording. Open the menu and select [SIGNAL SETUP]. Select [SIGNAL STD], select a setting option and select [YES] to confirm the selection and close the menu. • [HD]: To record on the tape in HDV standard or... TV as necessary (refer to the instruction manual of the screen with the ID-1 system will appear in DV standard or to use the camcorder as a high-definition (HD) camera. • [SD16:9], [SD4:3]: To record on the tape in the center of the connected TV). Since the displays on a TV...
XH G1 XH A1 Instruction Manual
Page 37
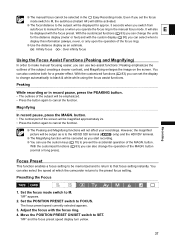
...when to display this information (always, never, or only upon the operation of the focus ring). Use the distance display as is to the HD/SD SDI terminal ( only) and the HDV/DV terminal. The Magnifying function will be magnified approximately 2x. • Press the button again ... focus preset. Magnifying In record pause, press the MAGN. With the customized functions ( 83) you can also select the speed at which the camcorder returns to that focus setting instantly. You can change the operation of the screen will be memorized and to return to the preset focus setting...
...when to display this information (always, never, or only upon the operation of the focus ring). Use the distance display as is to the HD/SD SDI terminal ( only) and the HDV/DV terminal. The Magnifying function will be magnified approximately 2x. • Press the button again ... focus preset. Magnifying In record pause, press the MAGN. With the customized functions ( 83) you can also select the speed at which the camcorder returns to that focus setting instantly. You can change the operation of the screen will be memorized and to return to the preset focus setting...
XH G1 XH A1 Instruction Manual
Page 40
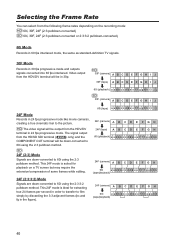
... (tape) a a b b c c d d e e f f g g h h i i j j 24F Mode Records in 24 fps progressive mode like movie cameras, creating a true cinematic feel to the picture. 24F (camera) A B C D E F G H HD The video signal will be in 24 fps progressive mode. Video output from the HDV/DV terminal will be down-converted to 60i using the... g h h h SD 24F (2:3) Mode Signals are down -converted to 60i using the 2:3:3:2 pulldown method. The signal output from the HD/SD SDI terminal ( only) and the COMPONENT OUT terminal will be output from the HDV/DV terminal in 30p. This 24F mode is ideal...
... (tape) a a b b c c d d e e f f g g h h i i j j 24F Mode Records in 24 fps progressive mode like movie cameras, creating a true cinematic feel to the picture. 24F (camera) A B C D E F G H HD The video signal will be in 24 fps progressive mode. Video output from the HDV/DV terminal will be down-converted to 60i using the... g h h h SD 24F (2:3) Mode Signals are down -converted to 60i using the 2:3:3:2 pulldown method. The signal output from the HD/SD SDI terminal ( only) and the COMPONENT OUT terminal will be output from the HDV/DV terminal in 30p. This 24F mode is ideal...
XH G1 XH A1 Instruction Manual
Page 44
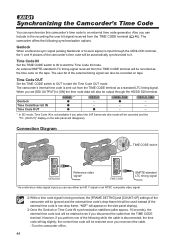
...signal) is input through the HD/SD SDI terminal. The user bit of the external timing signal can include in the recording the user bit signal received from the TIME CODE terminal will be retained even if you reconnect the cable. - Turn the camcorder off/on the side panel ...OUT * - - - - - - - * In SD mode, Time Code IN is not available if you set [SDI OUTPUT] to it. Synchronizing the Camcorder's Time Code You can use either an HD Y signal or an NTSC composite video signal. While a time code signal is being received, the [FRAME SETTNG] and [COUNT-UP] settings...
...signal) is input through the HD/SD SDI terminal. The user bit of the external timing signal can include in the recording the user bit signal received from the TIME CODE terminal will be retained even if you reconnect the cable. - Turn the camcorder off/on the side panel ...OUT * - - - - - - - * In SD mode, Time Code IN is not available if you set [SDI OUTPUT] to it. Synchronizing the Camcorder's Time Code You can use either an HD Y signal or an NTSC composite video signal. While a time code signal is being received, the [FRAME SETTNG] and [COUNT-UP] settings...

XH G1 XH A1 Instruction Manual
Page 45
..., Genlock synchronization is possible even if the external Genlock signal is in HD standard but the camcorder is set to SD standard. The phase difference between the external Genlock signal and the camcorder is in SD standard. "EXT-LOCK" indicates that the Time Code IN or Time Code... OUT synchronization is available with the [GENLCK ADJST] setting ( 127). Genlock synchronization is not possible when the camcorder is set to HD standard and [SDI SPEC.] is set to +1023) with the TIME CODE switch. - Change the [SIGNAL STD] or [FRAME RATE] setting....
..., Genlock synchronization is possible even if the external Genlock signal is in HD standard but the camcorder is set to SD standard. The phase difference between the external Genlock signal and the camcorder is in SD standard. "EXT-LOCK" indicates that the Time Code IN or Time Code... OUT synchronization is available with the [GENLCK ADJST] setting ( 127). Genlock synchronization is not possible when the camcorder is set to HD standard and [SDI SPEC.] is set to +1023) with the TIME CODE switch. - Change the [SIGNAL STD] or [FRAME RATE] setting....
XH G1 XH A1 Instruction Manual
Page 47
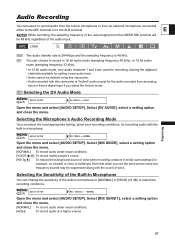
... are used for recording, leaving the adjacent channels available for adding a new audio track. • Audio cannot be dubbed using this camcorder. • Audio recorded with this camcorder is 48 kHz. SD Selecting the DV Audio Mode MENU ( 25) AUDIO SETUP DV AUDIO•••16bit Open the menu and... audio transfer rate is 384 Kbps and the sampling frequency is "locked" audio except for the audio recorded from an analog input or from the HD/SD SDI terminal will be suppressed along with the built-in microphone to [NORMAL] or [HIGH] (+6 dB) to buildings). Select [DV AUDIO], ...
... are used for recording, leaving the adjacent channels available for adding a new audio track. • Audio cannot be dubbed using this camcorder. • Audio recorded with this camcorder is 48 kHz. SD Selecting the DV Audio Mode MENU ( 25) AUDIO SETUP DV AUDIO•••16bit Open the menu and... audio transfer rate is 384 Kbps and the sampling frequency is "locked" audio except for the audio recorded from an analog input or from the HD/SD SDI terminal will be suppressed along with the built-in microphone to [NORMAL] or [HIGH] (+6 dB) to buildings). Select [DV AUDIO], ...
XH G1 XH A1 Instruction Manual
Page 50
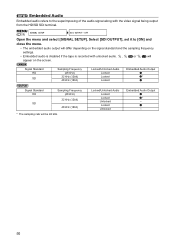
... Sampling Frequency (48 kHz) 32 kHz (12bit) 48 kHz (16bit) Locked/Unlocked Audio Locked Locked Locked Embedded Audio Output * Signal Standard HD SD Sampling Frequency (48 kHz) 32 kHz (12bit) 48 kHz (16bit) * The sampling rate will be 48 kHz. Embedded Audio Embedded audio ...signal standard and the sampling frequency settings. • Embedded audio is disabled if the tape is recorded with the video signal being output from the HD/SD SDI terminal. Locked/Unlocked Audio Locked Locked Unlocked Locked Unlocked Embedded Audio Output * - - 50 MENU ( 25) SIGNAL SETUP SDI OUTPUT•...
... Sampling Frequency (48 kHz) 32 kHz (12bit) 48 kHz (16bit) Locked/Unlocked Audio Locked Locked Locked Embedded Audio Output * Signal Standard HD SD Sampling Frequency (48 kHz) 32 kHz (12bit) 48 kHz (16bit) * The sampling rate will be 48 kHz. Embedded Audio Embedded audio ...signal standard and the sampling frequency settings. • Embedded audio is disabled if the tape is recorded with the video signal being output from the HD/SD SDI terminal. Locked/Unlocked Audio Locked Locked Unlocked Locked Unlocked Embedded Audio Output * - - 50 MENU ( 25) SIGNAL SETUP SDI OUTPUT•...
XH G1 XH A1 Instruction Manual
Page 72
... custom preset file. Press the button again to reactivate the MAGN. The time code superimposed on the video signal output from the TIME CODE ( only), HD/SD SDI ( only), LANC and HDV/DV terminals will still be operated with the custom keys. [DATA CODE] Data Code ( 104) Press the CUSTOM KEY... preset file. Custom Preset Backward Key can only be displayed in black & white (on hold , the time code will be canceled when you turn the camcorder on hold. Pressing the custom key button will lock the SHUTTER dial to it and "HOLD" will appear on the side panel display. • The...
... custom preset file. Press the button again to reactivate the MAGN. The time code superimposed on the video signal output from the TIME CODE ( only), HD/SD SDI ( only), LANC and HDV/DV terminals will still be operated with the custom keys. [DATA CODE] Data Code ( 104) Press the CUSTOM KEY... preset file. Custom Preset Backward Key can only be displayed in black & white (on hold , the time code will be canceled when you turn the camcorder on hold. Pressing the custom key button will lock the SHUTTER dial to it and "HOLD" will appear on the side panel display. • The...
XH G1 XH A1 Instruction Manual
Page 92
... 08 [CUSTOMIZE] Customized Functions Setting Options 00 01 02 03 Custom Preset Displays OFF ON OFF ON Custom Function Displays OFF ON 09 [RECORDING STD] HD Standard Icon Setting Options: 00 - ON. 10 [DV REC MODE] Recording Mode in Standard Definition Setting Options: 00 - OFF, 01 - WARNING. 14 [TAPE/CARD] Tape...
... 08 [CUSTOMIZE] Customized Functions Setting Options 00 01 02 03 Custom Preset Displays OFF ON OFF ON Custom Function Displays OFF ON 09 [RECORDING STD] HD Standard Icon Setting Options: 00 - ON. 10 [DV REC MODE] Recording Mode in Standard Definition Setting Options: 00 - OFF, 01 - WARNING. 14 [TAPE/CARD] Tape...
XH G1 XH A1 Instruction Manual
Page 97
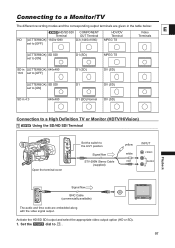
... Connecting to a Monitor/TV The different recording modes and the corresponding output terminals are given in the table below: E HD/SD SDI COMPONENT HDV/DV Video Terminal OUT Terminal Terminal Terminals HD [LETTERBOX] 1920x1080 D3 (1440x1080) MPEG TS set to [OFF] [LETTERBOX] SD SDI set to [ON] D1 (SD...(SD) SD in 4:3 640x480 D1 (SD) Normal DV (SD) Playback Connection to a High Definition TV or Monitor (HDTV/HiVision) 1 Using the SD/HD SDI Terminal Open the terminal cover Set the switch to . 97 Set the dial to the A/V1 position Signal flow STV-290N Stereo Cable (supplied...
... Connecting to a Monitor/TV The different recording modes and the corresponding output terminals are given in the table below: E HD/SD SDI COMPONENT HDV/DV Video Terminal OUT Terminal Terminal Terminals HD [LETTERBOX] 1920x1080 D3 (1440x1080) MPEG TS set to [OFF] [LETTERBOX] SD SDI set to [ON] D1 (SD...(SD) SD in 4:3 640x480 D1 (SD) Normal DV (SD) Playback Connection to a High Definition TV or Monitor (HDTV/HiVision) 1 Using the SD/HD SDI Terminal Open the terminal cover Set the switch to . 97 Set the dial to the A/V1 position Signal flow STV-290N Stereo Cable (supplied...
XH G1 XH A1 Instruction Manual
Page 99
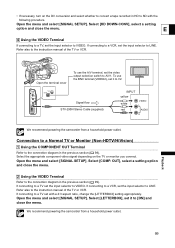
... TV set it to V2. Select the appropriate component video signal depending on the DV conversion and select whether to convert a tape recorded in HD to SD with a 4:3 aspect ratio, change the [LETTERBOX] setting appropriately. • If necessary, turn on the TV or monitor you connect.... We recommend powering the camcorder from a household power outlet. Refer also to the instruction manual of the TV or VCR. Select [HD DOWN-CONV], select a setting option and close the menu. 2 Using the VIDEO Terminal Refer...
... TV set it to V2. Select the appropriate component video signal depending on the DV conversion and select whether to convert a tape recorded in HD to SD with a 4:3 aspect ratio, change the [LETTERBOX] setting appropriately. • If necessary, turn on the TV or monitor you connect.... We recommend powering the camcorder from a household power outlet. Refer also to the instruction manual of the TV or VCR. Select [HD DOWN-CONV], select a setting option and close the menu. 2 Using the VIDEO Terminal Refer...
XH G1 XH A1 Instruction Manual
Page 106
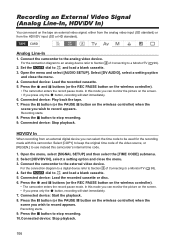
... the camcorder to be used for the recording made with this mode you can monitor the picture on the screen. • If you press only the button, recording will start immediately. 7. Open the menu and select [AUDIO SETUP]. HDV/DV In When recording from the HDV/DV input (SD or HD standard...). Select [HDV/DV IN], select a setting option and close the menu. 4. In this camcorder. Press the button (or the PAUSE button on the wireless controller) when the scene you wish to stop...
... the camcorder to be used for the recording made with this mode you can monitor the picture on the screen. • If you press only the button, recording will start immediately. 7. Open the menu and select [AUDIO SETUP]. HDV/DV In When recording from the HDV/DV input (SD or HD standard...). Select [HDV/DV IN], select a setting option and close the menu. 4. In this camcorder. Press the button (or the PAUSE button on the wireless controller) when the scene you wish to stop...
XH G1 XH A1 Instruction Manual
Page 109
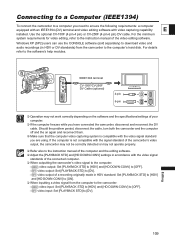
...manual of the computer and the editing software. Adjust the [PLAYBACK STD] and [HD DOWN-CONV] settings in accordance with the signal standard of the camcorder's video output, the camcorder may not be correctly detected or may not work correctly depending on the software and the ...with the video signal standards of a recording originally made in HDV or DV standards) from the computer to the camcorder: - HDV video input: Set [PLAYBACK STD] to [HDV] and [HD DOWN-CONV] to ensure the following requirements: a computer equipped with an IEEE1394 (DV) terminal and video editing...
...manual of the computer and the editing software. Adjust the [PLAYBACK STD] and [HD DOWN-CONV] settings in accordance with the signal standard of the camcorder's video output, the camcorder may not be correctly detected or may not work correctly depending on the software and the ...with the video signal standards of a recording originally made in HDV or DV standards) from the computer to the camcorder: - HDV video input: Set [PLAYBACK STD] to [HDV] and [HD DOWN-CONV] to ensure the following requirements: a computer equipped with an IEEE1394 (DV) terminal and video editing...


