XA10 Instruction Manual
Page 5
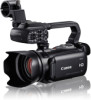
....4 mm (35 mm equivalent), the camcorder has superb wide-angle shooting capability. With the built-in microphone, MIC audio input terminal or the two XLR audio input terminals when recording. Highlights of the XA10 The Canon XA10 HD Camcorder is a high-performance camcorder whose compact size makes it when you need improved portability and...
....4 mm (35 mm equivalent), the camcorder has superb wide-angle shooting capability. With the built-in microphone, MIC audio input terminal or the two XLR audio input terminals when recording. Highlights of the XA10 The Canon XA10 HD Camcorder is a high-performance camcorder whose compact size makes it when you need improved portability and...
XA10 Instruction Manual
Page 8
...Scene Recording Programs 69 Image Effects 71 Self Timer 72 Recording Audio 73 Using the Built-in Microphone or an External Microphone Connected to the MIC Terminal 73 Using Line Input or an External Microphone Connected to an XLR Terminal 74 Audio Recording Level 76 Using the Built-in Microphone ...or Microphone Connected to the MIC Terminal 76 Using a Microphone or Audio Source Connected to an XLR Terminal 77 Built-In Microphone Directionality 78 Audio Equalizer 79 Audio Mix 80...
...Scene Recording Programs 69 Image Effects 71 Self Timer 72 Recording Audio 73 Using the Built-in Microphone or an External Microphone Connected to the MIC Terminal 73 Using Line Input or an External Microphone Connected to an XLR Terminal 74 Audio Recording Level 76 Using the Built-in Microphone ...or Microphone Connected to the MIC Terminal 76 Using a Microphone or Audio Source Connected to an XLR Terminal 77 Built-In Microphone Directionality 78 Audio Equalizer 79 Audio Mix 80...

XA10 Instruction Manual
Page 16
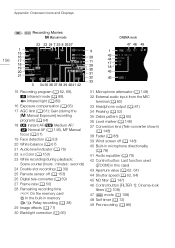
Names of Parts Right side view 1 16 10 9 2 8 76 5 1 XLR terminals for CH1 and CH2 (0 75) 2 Built-in microphone (0 78) 3 MIC terminal (0 73) 4 Grip belt (0 27) 5 USB terminal (0 124, 126, 137) 43 6 HDMI OUT terminal (0 124, 125) 7 REMOTE terminal (0 82) 8 Built-in speaker (0 94) 9 ACCESS indicator (0 41) 10 Zoom lever (0 56)
Names of Parts Right side view 1 16 10 9 2 8 76 5 1 XLR terminals for CH1 and CH2 (0 75) 2 Built-in microphone (0 78) 3 MIC terminal (0 73) 4 Grip belt (0 27) 5 USB terminal (0 124, 126, 137) 43 6 HDMI OUT terminal (0 124, 125) 7 REMOTE terminal (0 82) 8 Built-in speaker (0 94) 9 ACCESS indicator (0 41) 10 Zoom lever (0 56)
XA10 Instruction Manual
Page 73
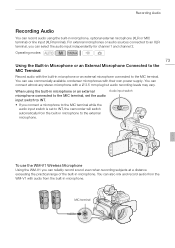
... Recording Audio You can record audio using the built-in microphone or an external microphone connected to the MIC terminal, set the audio input switch to INT. • If you connect a microphone to the MIC terminal while the audio input switch is set to INT, the camcorder will switch automatically from the...sound even when recording subjects at a distance exceeding the practical range of the built-in microphone. For external microphones or audio sources connected to the MIC Terminal Record audio with audio from the WM-V1 with the built-in microphone, optional external microphone (XLR or...
... Recording Audio You can record audio using the built-in microphone or an external microphone connected to the MIC terminal, set the audio input switch to INT. • If you connect a microphone to the MIC terminal while the audio input switch is set to INT, the camcorder will switch automatically from the...sound even when recording subjects at a distance exceeding the practical range of the built-in microphone. For external microphones or audio sources connected to the MIC Terminal Record audio with audio from the WM-V1 with the built-in microphone, optional external microphone (XLR or...

XA10 Instruction Manual
Page 74
Recording Audio 1 Attach the receiver to the camcorder's grip belt. 2 Connect the receiver to the camcorder's MIC terminal. 3 If necessary, activate the audio mix function (0 80) and adjust the audio mix balance. 4 Attach the microphone (transmitter) to the subject. &#...8226; When using the WM-V1, refer to the instruction manual supplied with the microphone. 74 To use the XLR terminals to the MIC terminal. 2 Open the [MIC Terminal Input] screen. [FUNC.] [MENU] 7 [MIC Terminal Input] 3 Touch [Microphone] and then touch [a]. • If necessary, activate and adjust the audio mix balance (0 80...
Recording Audio 1 Attach the receiver to the camcorder's grip belt. 2 Connect the receiver to the camcorder's MIC terminal. 3 If necessary, activate the audio mix function (0 80) and adjust the audio mix balance. 4 Attach the microphone (transmitter) to the subject. &#...8226; When using the WM-V1, refer to the instruction manual supplied with the microphone. 74 To use the XLR terminals to the MIC terminal. 2 Open the [MIC Terminal Input] screen. [FUNC.] [MENU] 7 [MIC Terminal Input] 3 Touch [Microphone] and then touch [a]. • If necessary, activate and adjust the audio mix balance (0 80...
XA10 Instruction Manual
Page 75
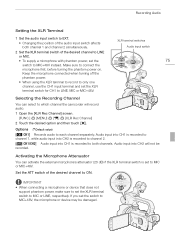
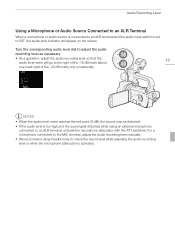
...IMPORTANT • When connecting a microphone or device that does not support phantom power, make sure to set the XLR terminal switch for CH1 to LINE, MIC or MIC+48V. Audio input into CH1 is recorded to channel 1, while audio input into CH2 is recorded to channel 2. [ CH1/CH2] Audio input into CH2... the XLR terminal switch of the desired channel to ON. Audio input into CH1 is set the switch to MIC+48V, the microphone or device may be recorded. If you set to MIC or MIC+48V. Recording Audio Setting the XLR Terminal 1 Set the audio input switch to EXT. • Changing the...
...IMPORTANT • When connecting a microphone or device that does not support phantom power, make sure to set the XLR terminal switch for CH1 to LINE, MIC or MIC+48V. Audio input into CH1 is recorded to channel 1, while audio input into CH2 is recorded to channel 2. [ CH1/CH2] Audio input into CH2... the XLR terminal switch of the desired channel to ON. Audio input into CH1 is set the switch to MIC+48V, the microphone or device may be recorded. If you set to MIC or MIC+48V. Recording Audio Setting the XLR Terminal 1 Set the audio input switch to EXT. • Changing the...
XA10 Instruction Manual
Page 76
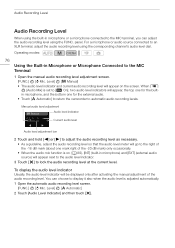
...is adjusted automatically. 1 Open the automatic audio recording level screen. [FUNC.] [c Mic. panel. Audio Recording Level Audio Recording Level When using the built-in microphone or a microphone connected to the MIC terminal, you can choose to display it also when the audio level is on ...level so that the audio level meter will appear next to the audio level indicator. 3 Touch [a] to the MIC Terminal 1 Open the manual audio recording level adjustment screen. [FUNC.] [c Mic. Level] [z Automatic] 2 Touch [Audio Level Indicator] and then touch [a]. To display the audio level indicator ...
...is adjusted automatically. 1 Open the automatic audio recording level screen. [FUNC.] [c Mic. panel. Audio Recording Level Audio Recording Level When using the built-in microphone or a microphone connected to the MIC terminal, you can choose to display it also when the audio level is on ...level so that the audio level meter will appear next to the audio level indicator. 3 Touch [a] to the MIC Terminal 1 Open the manual audio recording level adjustment screen. [FUNC.] [c Mic. Level] [z Automatic] 2 Touch [Audio Level Indicator] and then touch [a]. To display the audio level indicator ...
XA10 Instruction Manual
Page 77
... necessary. • As a guideline, adjust the audio recording level so that the audio level meter will appear on the screen. For a microphone connected to the MIC terminal, adjust the audio recording level manually. • We recommend using an external microphone connected to the right of the -18 dB mark (about 77...
... necessary. • As a guideline, adjust the audio recording level so that the audio level meter will appear on the screen. For a microphone connected to the MIC terminal, adjust the audio recording level manually. • We recommend using an external microphone connected to the right of the -18 dB mark (about 77...
XA10 Instruction Manual
Page 78
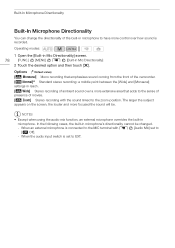
...camcorder. [ Normal] Standard stereo recording; NOTES • Except when using the audio mix function, an external microphone overrides the built-in Mic Directionality] 2 Touch the desired option and then touch [a]. In the following cases, the built-in microphone's directionality cannot be . Options (.... [ Zoom] Stereo recording with 7 [Audio Mix] set to EXT. When the audio input switch is connected to the MIC terminal with the sound linked to the zoom position. Built-In Microphone Directionality Built-In Microphone Directionality You can change the directionality...
...camcorder. [ Normal] Standard stereo recording; NOTES • Except when using the audio mix function, an external microphone overrides the built-in Mic Directionality] 2 Touch the desired option and then touch [a]. In the following cases, the built-in microphone's directionality cannot be . Options (.... [ Zoom] Stereo recording with 7 [Audio Mix] set to EXT. When the audio input switch is connected to the MIC terminal with the sound linked to the zoom position. Built-In Microphone Directionality Built-In Microphone Directionality You can change the directionality...

XA10 Instruction Manual
Page 79
or lowfrequency range. Response] screen. 79 [FUNC.] [MENU] 7 [Built-in Mic Freq. Response] 2 Touch the desired option and then touch [a]. Options ( Default value) [ Normal] Appropriate for balanced sound under most normal recording conditions. .... [ Low Cut Filter] Filters the low-frequency range to adjust sound levels by specifically targeting the high- Operating modes: 1 Open the [Built-in Mic Freq. The audio equalizer settings are only available when recording sound using the builtin microphone. Audio Equalizer Audio Equalizer You can use the audio equalizer...
or lowfrequency range. Response] screen. 79 [FUNC.] [MENU] 7 [Built-in Mic Freq. Response] 2 Touch the desired option and then touch [a]. Options ( Default value) [ Normal] Appropriate for balanced sound under most normal recording conditions. .... [ Low Cut Filter] Filters the low-frequency range to adjust sound levels by specifically targeting the high- Operating modes: 1 Open the [Built-in Mic Freq. The audio equalizer settings are only available when recording sound using the builtin microphone. Audio Equalizer Audio Equalizer You can use the audio equalizer...
XA10 Instruction Manual
Page 80
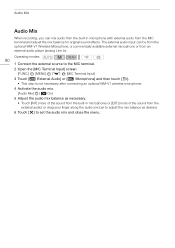
... external audio) or drag your finger along the audio mix bar to adjust the mix balance as desired. 6 Touch [a] to the MIC terminal. 2 Open the [MIC Terminal Input] screen. [FUNC.] [MENU] 7 [MIC Terminal Input] 3 Touch [ External Audio] or [ Microphone] and then touch [f]. • This step is not necessary after connecting an optional WM...] [A On] 5 Adjust the audio mix balance as necessary. • Touch [INT] (more of the sound from the built-in microphone with external audio from the MIC terminal and adjust the mix balance for original sound effects.
... external audio) or drag your finger along the audio mix bar to adjust the mix balance as desired. 6 Touch [a] to the MIC terminal. 2 Open the [MIC Terminal Input] screen. [FUNC.] [MENU] 7 [MIC Terminal Input] 3 Touch [ External Audio] or [ Microphone] and then touch [f]. • This step is not necessary after connecting an optional WM...] [A On] 5 Adjust the audio mix balance as necessary. • Touch [INT] (more of the sound from the built-in microphone with external audio from the MIC terminal and adjust the mix balance for original sound effects.
XA10 Instruction Manual
Page 119
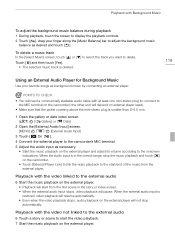
... with the video not linked to the external audio 6 Touch a story or scene to the onscreen indications. Playback with the video linked to the MIC terminal on the external player. • Playback will pause. Playback with at least one mini-stereo plug (to connect to the external audio 6...from the external player. To delete a music track In the [Select Music] screen, touch [Z] or [O] to select the track you want to the camcorder's MIC terminal. 5 Adjust the audio input as desired and touch [f]. When the external audio input is smaller than ∅ 9.5 mm. 1 Open the gallery or ...
... with the video not linked to the external audio 6 Touch a story or scene to the onscreen indications. Playback with the video linked to the MIC terminal on the external player. • Playback will pause. Playback with at least one mini-stereo plug (to connect to the external audio 6...from the external player. To delete a music track In the [Select Music] screen, touch [Z] or [O] to select the track you want to the camcorder's MIC terminal. 5 Adjust the audio input as desired and touch [f]. When the external audio input is smaller than ∅ 9.5 mm. 1 Open the gallery or ...
XA10 Instruction Manual
Page 144
...], [y Manual] [Audio Level Indicator]: Toggle on - [ ] (waveform monitor), exposure adjustment dial [ZOOM] Zoom controls, [START]/[STOP] control (for movies) and [PHOTO] control (for photos)1 z z z 58 [c Mic. Panel FUNC. z z 65 [5] (settings); [AE Lock (touch)], [Zebra Pattern]; [a] or [b] (zebra pattern) When [y] is on - [ ] (return to +2) - Panel - z z 88 Menu options without a reference page are...
...], [y Manual] [Audio Level Indicator]: Toggle on - [ ] (waveform monitor), exposure adjustment dial [ZOOM] Zoom controls, [START]/[STOP] control (for movies) and [PHOTO] control (for photos)1 z z z 58 [c Mic. Panel FUNC. z z 65 [5] (settings); [AE Lock (touch)], [Zebra Pattern]; [a] or [b] (zebra pattern) When [y] is on - [ ] (return to +2) - Panel - z z 88 Menu options without a reference page are...
XA10 Instruction Manual
Page 147
...Gray)], [g Grid (White)], [h Grid (Gray)] [Camcorder Shake Indicator] [A On], [B Off] [IR Light] [A On], [B Off] [IR Rec Color] [Wind Screen]1 [Microphone Attenuator]1 [MIC Terminal Input]1 [Audio Mix]1 [ White], [ Green] [O Automatic], [B Off Z] [O Automatic], [A On V] [ External Audio], [ Microphone] [B Off], [A On] When [A On] is ... screen next to the aperture value. 147 z z 89 z z 89 zz - Optical zoom White Up to digital zoom when you zoom in Mic Directionality]1 [ [XLR Rec Channel]1 [ Normal], [ Boost LF Range], [ Low Cut Filter], Boost MF Range], [ Boost HF+LF Range]...
...Gray)], [g Grid (White)], [h Grid (Gray)] [Camcorder Shake Indicator] [A On], [B Off] [IR Light] [A On], [B Off] [IR Rec Color] [Wind Screen]1 [Microphone Attenuator]1 [MIC Terminal Input]1 [Audio Mix]1 [ White], [ Green] [O Automatic], [B Off Z] [O Automatic], [A On V] [ External Audio], [ Microphone] [B Off], [A On] When [A On] is ... screen next to the aperture value. 147 z z 89 z z 89 zz - Optical zoom White Up to digital zoom when you zoom in Mic Directionality]1 [ [XLR Rec Channel]1 [ Normal], [ Boost LF Range], [ Low Cut Filter], Boost MF Range], [ Boost HF+LF Range]...
XA10 Instruction Manual
Page 156
... the built-in memory 3/5 Relay recording (0 38) 29 Image effects (0 71) 30 Backlight correction (0 66) 31 Microphone attenuator (0 148) 32 External audio input from the MIC terminal (0 80) 33 Headphone output (0 81) 34 Peaking (0 52) 35 Zebra pattern (0 65) 36 Level marker (0 148) 37 Conversion lens (Tele-converter shown) (0 148) 38...
... the built-in memory 3/5 Relay recording (0 38) 29 Image effects (0 71) 30 Backlight correction (0 66) 31 Microphone attenuator (0 148) 32 External audio input from the MIC terminal (0 80) 33 Headphone output (0 81) 34 Peaking (0 52) 35 Zebra pattern (0 65) 36 Level marker (0 148) 37 Conversion lens (Tele-converter shown) (0 148) 38...
XA10 Instruction Manual
Page 162
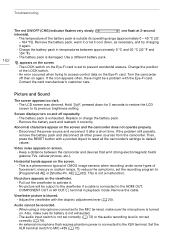
...This is damaged. To reduce the symptoms, set correctly (0 76). - No picture appears on screen. - When using a microphone connected to the MIC terminal, make sure its battery is blurred. - An external microphone that emit strong electromagnetic fields (plasma TVs, cellular phones, etc.). Troubleshooting 162 The... or AV OUT/X terminal in temperatures between the camcorder and devices that requires phantom power is not set the recording program to MIC+48V (0 75). No picture will be output to the viewfinder if a cable is outside its previous brightness setting. Adjust the...
...This is damaged. To reduce the symptoms, set correctly (0 76). - No picture appears on screen. - When using a microphone connected to the MIC terminal, make sure its battery is blurred. - An external microphone that emit strong electromagnetic fields (plasma TVs, cellular phones, etc.). Troubleshooting 162 The... or AV OUT/X terminal in temperatures between the camcorder and devices that requires phantom power is not set the recording program to MIC+48V (0 75). No picture will be output to the viewfinder if a cable is outside its previous brightness setting. Adjust the...
XA10 Instruction Manual
Page 183
... center, full scale -18 dB) / 600 Ω For line input: 4 dBu (manual volume center, full scale -18 dB) / 10 kΩ Microphone attenuator: 20 dB • MIC Terminal ∅ 3.5 mm stereo minijack (unbalanced) Sensitivity: For microphone input: -65 dBV (auto volume, full scale -12 dB) / 5 kΩ For line input: -30 dBV (auto...
... center, full scale -18 dB) / 600 Ω For line input: 4 dBu (manual volume center, full scale -18 dB) / 10 kΩ Microphone attenuator: 20 dB • MIC Terminal ∅ 3.5 mm stereo minijack (unbalanced) Sensitivity: For microphone input: -65 dBV (auto volume, full scale -12 dB) / 5 kΩ For line input: -30 dBV (auto...
XA10 Instruction Manual
Page 187
M M (Manual) mode 46 Maintenance 174 Manual exposure 64 Manual focus 51 Markers 148 Memory card 36, 172 Menu settings, saving and loading 92 MIC terminal 73 Microphone attenuator 148 Microphone directionality 78 Mode switch 31 N ND filter 147 Night scene (recording program 69 Notification sounds 152 O Onscreen display selection ...
M M (Manual) mode 46 Maintenance 174 Manual exposure 64 Manual focus 51 Markers 148 Memory card 36, 172 Menu settings, saving and loading 92 MIC terminal 73 Microphone attenuator 148 Microphone directionality 78 Mode switch 31 N ND filter 147 Night scene (recording program 69 Notification sounds 152 O Onscreen display selection ...


