User Manual
Page 2
... of Cisco in this manual signifies Wi-Fi Protected Setup. • The Wi-Fi Protected Setup Identifier Mark is a mark of the Wi-Fi Alliance. • The N-Mark is a trademark of Toshiba Corporation. • Other names and products not mentioned above may infringe on the camcorder's settings, onscreen displays and in the U.S. Important Usage Instructions WARNING TO REDUCE...
... of Cisco in this manual signifies Wi-Fi Protected Setup. • The Wi-Fi Protected Setup Identifier Mark is a mark of the Wi-Fi Alliance. • The N-Mark is a trademark of Toshiba Corporation. • Other names and products not mentioned above may infringe on the camcorder's settings, onscreen displays and in the U.S. Important Usage Instructions WARNING TO REDUCE...
User Manual
Page 4
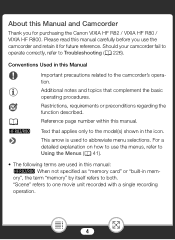
... how to use the camcorder and retain it for purchasing the Canon VIXIA HF R82 / VIXIA HF R80 / VIXIA HF R800. Please read this manual carefully before you for future reference. This arrow is used in this manual: b When not specified as "memory card" or "built-in this Manual A b > Important precautions related to the camcorder's operation. Restrictions, requirements or preconditions regarding the function described. About this Manual and Camcorder Thank you use the...
... how to use the camcorder and retain it for purchasing the Canon VIXIA HF R82 / VIXIA HF R80 / VIXIA HF R800. Please read this manual carefully before you for future reference. This arrow is used in this manual: b When not specified as "memory card" or "built-in this Manual A b > Important precautions related to the camcorder's operation. Restrictions, requirements or preconditions regarding the function described. About this Manual and Camcorder Thank you use the...
User Manual
Page 8
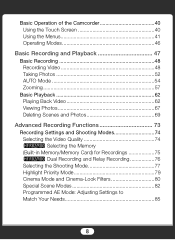
Basic Operation of the Camcorder 40 Using the Touch Screen 40 Using the Menus 41 Operating Modes 46 Basic Recording and Playback 47 Basic Recording 48 Recording Video 48 Taking Photos 52 AUTO Mode 54 Zooming 57 Basic Playback 62 Playing Back Video 62 Viewing Photos 67 Deleting Scenes and Photos 69 Advanced Recording Functions 73 Recording Settings and Shooting Modes 74 Selecting the Video Quality 74 b Selecting the Memory (Built-in Memory/Memory Card) for Recordings 75 b Dual Recording and Relay Recording 76 Selecting the Shooting Mode 77 Highlight...
Basic Operation of the Camcorder 40 Using the Touch Screen 40 Using the Menus 41 Operating Modes 46 Basic Recording and Playback 47 Basic Recording 48 Recording Video 48 Taking Photos 52 AUTO Mode 54 Zooming 57 Basic Playback 62 Playing Back Video 62 Viewing Photos 67 Deleting Scenes and Photos 69 Advanced Recording Functions 73 Recording Settings and Shooting Modes 74 Selecting the Video Quality 74 b Selecting the Memory (Built-in Memory/Memory Card) for Recordings 75 b Dual Recording and Relay Recording 76 Selecting the Shooting Mode 77 Highlight...
User Manual
Page 23
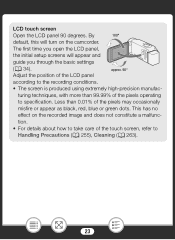
... appear and guide you open the LCD panel, the initial setup screens will turn on the recorded image and does not constitute a malfunc- Less than 99.99% of the touch screen, refer to specification. tion. • For details about how to take care of the pixels operating to Handling Precautions (A 255), Cleaning (A 263). 23 The first time you through the basic settings (A 34). turing...
... appear and guide you open the LCD panel, the initial setup screens will turn on the recorded image and does not constitute a malfunc- Less than 99.99% of the touch screen, refer to specification. tion. • For details about how to take care of the pixels operating to Handling Precautions (A 255), Cleaning (A 263). 23 The first time you through the basic settings (A 34). turing...
User Manual
Page 74
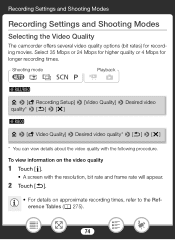
Recording Settings and Shooting Modes Recording Settings and Shooting Modes Selecting the Video Quality The camcorder offers several video quality options (bit rates) for longer recording times. To view information on approximate recording times, refer to the Reference Tables (A 275). 74 Shooting mode N †ƒ ' Playback y} b 0 > [3 Recording Setup] > [Video Quality] > Desired video quality* > [K] > [X] ` 0 > [3 Video Quality] > Desired video quality* > [K] > [X] * You can view details about the video quality with the resolution, bit rate and frame rate will appear. ...
Recording Settings and Shooting Modes Recording Settings and Shooting Modes Selecting the Video Quality The camcorder offers several video quality options (bit rates) for longer recording times. To view information on approximate recording times, refer to the Reference Tables (A 275). 74 Shooting mode N †ƒ ' Playback y} b 0 > [3 Recording Setup] > [Video Quality] > Desired video quality* > [K] > [X] ` 0 > [3 Video Quality] > Desired video quality* > [K] > [X] * You can view details about the video quality with the resolution, bit rate and frame rate will appear. ...

User Manual
Page 87
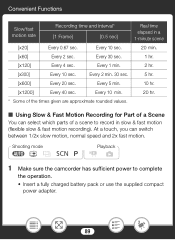
Convenient Functions 2 Set the video quality. b 0 > [3 Recording Setup] > [Video Quality] > Desired video quality > [K] > [X] ` 0 > [3 Video Quality] > Desired video quality > [K] > [X] • The video quality must be set to 24 Mbps or 17 Mbps for fast motion recording, or 17 Mbps for slow motion recording. 3 Select the slow/fast motion rate. [2] > [ Slow & Fast Motion] > [Entire Scene] > Desired slow/fast motion rate* > [X] * When you select a fast motion rate between [x10] and [x1200], you can select the desired recording time with...
Convenient Functions 2 Set the video quality. b 0 > [3 Recording Setup] > [Video Quality] > Desired video quality > [K] > [X] ` 0 > [3 Video Quality] > Desired video quality > [K] > [X] • The video quality must be set to 24 Mbps or 17 Mbps for fast motion recording, or 17 Mbps for slow motion recording. 3 Select the slow/fast motion rate. [2] > [ Slow & Fast Motion] > [Entire Scene] > Desired slow/fast motion rate* > [X] * When you select a fast motion rate between [x10] and [x1200], you can select the desired recording time with...
User Manual
Page 89
... of the times given are approximate rounded values. ■ Using Slow & Fast Motion Recording for Part of a scene to complete the operation. • Insert a fully charged battery pack or use the supplied compact power adapter. 89 Every 10 sec. 20 min. [x60] Every 2 sec. Every 1 min. 2 hr. [x300] Every 10 sec. Every 30 sec. 1 hr. [x120] Every 4 sec. Shooting mode N †ƒ' Playback y} 1 Make sure...
... of the times given are approximate rounded values. ■ Using Slow & Fast Motion Recording for Part of a scene to complete the operation. • Insert a fully charged battery pack or use the supplied compact power adapter. 89 Every 10 sec. 20 min. [x60] Every 2 sec. Every 1 min. 2 hr. [x300] Every 10 sec. Every 30 sec. 1 hr. [x120] Every 4 sec. Shooting mode N †ƒ' Playback y} 1 Make sure...
User Manual
Page 122
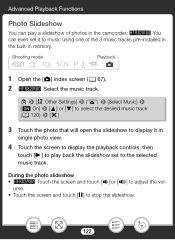
...;] or [Ù] to stop the slideshow. 122 b You can play back the slideshow set it in single photo view. 4 Touch the screen to display the playback controls, then touch [Ð] to play a slideshow of the 3 music tracks pre-installed in the built-in the camcorder. ume. • Touch the screen and touch [Ý] to adjust the vol- Shooting mode N †ƒ ' Playback y} 1 Open the [}] index screen (A 67). 2 b Select the...
...;] or [Ù] to stop the slideshow. 122 b You can play back the slideshow set it in single photo view. 4 Touch the screen to display the playback controls, then touch [Ð] to play a slideshow of the 3 music tracks pre-installed in the built-in the camcorder. ume. • Touch the screen and touch [Ý] to adjust the vol- Shooting mode N †ƒ ' Playback y} 1 Open the [}] index screen (A 67). 2 b Select the...

User Manual
Page 146
...Shooting mode N †ƒ ' Playback y} 1 Power the camcorder using the compact power adapter. 2 Press ] to set the camcorder to playback mode. 3 Select the USB connection type. 0 > [1 Other Settings] > q > [USB Connection Type] > [ Connect Station] or [ Connect and Set] > [X] 4 Connect the camcorder to Connection Diagrams (A 138). • If a device selection screen appears, select [Connect Station]. • When the connection is correctly established, the transfer of the CS100. b only: You can easily save all the movies and photos you recorded onto the optional CS100 Connect...
...Shooting mode N †ƒ ' Playback y} 1 Power the camcorder using the compact power adapter. 2 Press ] to set the camcorder to playback mode. 3 Select the USB connection type. 0 > [1 Other Settings] > q > [USB Connection Type] > [ Connect Station] or [ Connect and Set] > [X] 4 Connect the camcorder to Connection Diagrams (A 138). • If a device selection screen appears, select [Connect Station]. • When the connection is correctly established, the transfer of the CS100. b only: You can easily save all the movies and photos you recorded onto the optional CS100 Connect...
User Manual
Page 175
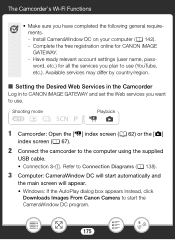
... and the main screen will appear. • Windows: If the AutoPlay dialog box appears instead, click Downloads Images From Canon Camera to the computer using the supplied USB cable. • Connection 3-ቢ. The Camcorder's Wi-Fi Functions • Make sure you want to use (YouTube, etc.). Have ready relevant account settings (user name, password, etc.) for CANON iMAGE GATEWAY. - Complete the free registration online for all the services you plan to...
... and the main screen will appear. • Windows: If the AutoPlay dialog box appears instead, click Downloads Images From Canon Camera to the computer using the supplied USB cable. • Connection 3-ቢ. The Camcorder's Wi-Fi Functions • Make sure you want to use (YouTube, etc.). Have ready relevant account settings (user name, password, etc.) for CANON iMAGE GATEWAY. - Complete the free registration online for all the services you plan to...
User Manual
Page 176
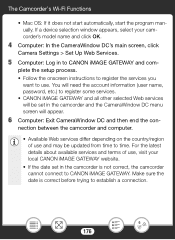
... instructions to register the services you want to use , visit your camcorder's model name and click OK. 4 Computer: In the CameraWindow DC's main screen, click Camera Settings > Set Up Web Services. 5 Computer: Log in the camcorder is correct before trying to CANON iMAGE GATEWAY. If a device selection window appears, select your local CANON iMAGE GATEWAY website. • If the date set in the camcorder and the CameraWindow DC menu screen will be updated...
... instructions to register the services you want to use , visit your camcorder's model name and click OK. 4 Computer: In the CameraWindow DC's main screen, click Camera Settings > Set Up Web Services. 5 Computer: Log in the camcorder is correct before trying to CANON iMAGE GATEWAY. If a device selection window appears, select your local CANON iMAGE GATEWAY website. • If the date set in the camcorder and the CameraWindow DC menu screen will be updated...

User Manual
Page 177
... set the maximum number of Web services in Wi-Fi Connection Using an Access Point (A 180)) before continuing with family and friends using Web services. The Camcorder's Wi-Fi Functions • Once you have been saved in the camcorder, the message [Save the access point] will appear on the screen. Continue to step 2. • If no connections to the first access point registered. Shooting mode N †ƒ ' Playback y} 1 From any additional services...
... set the maximum number of Web services in Wi-Fi Connection Using an Access Point (A 180)) before continuing with family and friends using Web services. The Camcorder's Wi-Fi Functions • Once you have been saved in the camcorder, the message [Save the access point] will appear on the screen. Continue to step 2. • If no connections to the first access point registered. Shooting mode N †ƒ ' Playback y} 1 From any additional services...
User Manual
Page 186
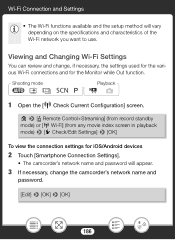
... review and change, if necessary, the settings used for the various Wi-Fi connections and for iOS/Android devices 2 Touch [Smartphone Connection Settings]. • The camcorder's network name and password will vary depending on the specifications and characteristics of the Wi-Fi network you want to use. Shooting mode N †ƒ ' Playback y} 1 Open the [- Wi-Fi] (from record standby mode) or [- Check Current Configuration] screen. 0 > [ Remote Control+Streaming] (from any movie index screen in playback mode) > [w Check...
... review and change, if necessary, the settings used for the various Wi-Fi connections and for iOS/Android devices 2 Touch [Smartphone Connection Settings]. • The camcorder's network name and password will vary depending on the specifications and characteristics of the Wi-Fi network you want to use. Shooting mode N †ƒ ' Playback y} 1 Open the [- Wi-Fi] (from record standby mode) or [- Check Current Configuration] screen. 0 > [ Remote Control+Streaming] (from any movie index screen in playback mode) > [w Check...
User Manual
Page 192
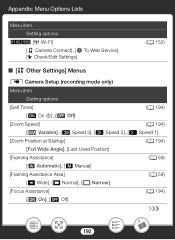
Wi-Fi] [6 Camera Connect], [7 To Web Service], [w Check/Edit Settings] (A 152) ■ [1 Other Settings] Menus p Camera Setup (recording mode only) Menu item Setting options [Self Timer] (A 194) [i On Appendix: Menu Options Lists Menu item Setting options b [-
Wi-Fi] [6 Camera Connect], [7 To Web Service], [w Check/Edit Settings] (A 152) ■ [1 Other Settings] Menus p Camera Setup (recording mode only) Menu item Setting options [Self Timer] (A 194) [i On Appendix: Menu Options Lists Menu item Setting options b [-
User Manual
Page 206
...- This setting determines how files are numbered. [m Reset]: File numbers will restart from 100 to use for each file and can range from 100-0001 every time you record on the memory as a percentage) and the remaining recording time (during recording mode) or playback time (during manual focus. [File Numbering]: Movies and photos are saved on a memory that has been initialized. [n Continuous]: File numbers will be displayed. [Displayed Units]: In recording mode, this option displays a screen where you can verify the battery charge (as files in...
...- This setting determines how files are numbered. [m Reset]: File numbers will restart from 100 to use for each file and can range from 100-0001 every time you record on the memory as a percentage) and the remaining recording time (during recording mode) or playback time (during manual focus. [File Numbering]: Movies and photos are saved on a memory that has been initialized. [n Continuous]: File numbers will be displayed. [Displayed Units]: In recording mode, this option displays a screen where you can verify the battery charge (as files in...
User Manual
Page 233
... settings. b Video and audio will not be able to [Reset]. The computer does not recognize the camcorder even though the camcorder is connected to which you connected the camcorder. The image on the TV screen. - Trouble? - Turn up the brightness of the TV, computer screen or device used to be output from the camcorder while Wi-Fi functions are in use one of the TV. Disconnect the supplied High Speed HDMI cable. - A compatible memory card...
... settings. b Video and audio will not be able to [Reset]. The computer does not recognize the camcorder even though the camcorder is connected to which you connected the camcorder. The image on the TV screen. - Trouble? - Turn up the brightness of the TV, computer screen or device used to be output from the camcorder while Wi-Fi functions are in use one of the TV. Disconnect the supplied High Speed HDMI cable. - A compatible memory card...
User Manual
Page 245
... different file control information. The camcorder is recommended to use a video quality setting other devices or image files created or edited on this memory card, it is updating the memory. Wait until the operation ends and do not remove the battery pack. Some scenes could not be displayed - To record video on this memory card, it is recommended to use [Long Play] video quality. - Trouble? A number of scenes. Task in the area of the international date line. This photo...
... different file control information. The camcorder is recommended to use a video quality setting other devices or image files created or edited on this memory card, it is updating the memory. Wait until the operation ends and do not remove the battery pack. Some scenes could not be displayed - To record video on this memory card, it is recommended to use [Long Play] video quality. - Trouble? A number of scenes. Task in the area of the international date line. This photo...
User Manual
Page 253
... and use the dedicated software to set them again in the camcorder the settings saved on the CANON iMAGE GATEWAY server. Check the settings saved on server - Insufficient space on CANON iMAGE GATEWAY and set up This service may not be less than X min. - Connect to a computer and use Web services, set again - Delete some data to free some space. You have exceeded the amount of Messages for Web Services Check network settings - Shorten the movie and...
... and use the dedicated software to set them again in the camcorder the settings saved on the CANON iMAGE GATEWAY server. Check the settings saved on server - Insufficient space on CANON iMAGE GATEWAY and set up This service may not be less than X min. - Connect to a computer and use Web services, set again - Delete some data to free some space. You have exceeded the amount of Messages for Web Services Check network settings - Shorten the movie and...
User Manual
Page 256
...clean running water. Do not expose the power plug and terminals to a power source for use leaking batteries/battery packs. Do not damage, break or modify the power cord. - Do not wrap the product in temperature. - When disposing of young children. • Use only power sources specified in this instruction manual... instructions when using a battery charger or AC adapter. - If a battery/battery pack leaks and the material contacts your skin or clothing, flush the exposed area thoroughly with tape or other means. Do not plug in use or shortly after use the product if the power plug ...
...clean running water. Do not expose the power plug and terminals to a power source for use leaking batteries/battery packs. Do not damage, break or modify the power cord. - Do not wrap the product in temperature. - When disposing of young children. • Use only power sources specified in this instruction manual... instructions when using a battery charger or AC adapter. - If a battery/battery pack leaks and the material contacts your skin or clothing, flush the exposed area thoroughly with tape or other means. Do not plug in use or shortly after use the product if the power plug ...
User Manual
Page 277
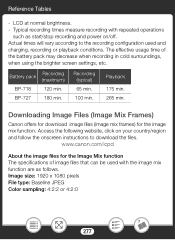
... time of image files that can be used and charging, recording or playback conditions. www.canon.com/icpd About the image files for the image mix function. Image size: 1920 x 1080 pixels File type: Baseline JPEG Color sampling: 4:2:2 or 4:2:0 277 BP-727 180 min. Downloading Image Files (Image Mix Frames) Canon offers for download image files (image mix frames) for the Image Mix function The specifications of the battery pack may decrease when recording in cold surroundings, when using the brighter screen settings, etc. Recording...
... time of image files that can be used and charging, recording or playback conditions. www.canon.com/icpd About the image files for the image mix function. Image size: 1920 x 1080 pixels File type: Baseline JPEG Color sampling: 4:2:2 or 4:2:0 277 BP-727 180 min. Downloading Image Files (Image Mix Frames) Canon offers for download image files (image mix frames) for the Image Mix function The specifications of the battery pack may decrease when recording in cold surroundings, when using the brighter screen settings, etc. Recording...


