Getting Started Guide
Page 1
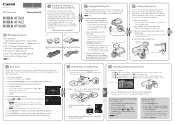
... camcorder. 6 Playing Back Video and Viewing Photos 1. Touch [&] (built-in Asia) IFC-300PCU/S USB Cable [] HTC-100/S High Speed HDMI Cable [] Transfer Utility LE Startup Guide *E only. 1 Installing the Camcorder's Instruction Manual (PDF File) This guide only introduces the most basic functions of the basic setup will turn on and the first screen of the camcorder to start when the camcorder is off Lens Memory Card Top view 4 Basic Setup The first time you started. Video...
... camcorder. 6 Playing Back Video and Viewing Photos 1. Touch [&] (built-in Asia) IFC-300PCU/S USB Cable [] HTC-100/S High Speed HDMI Cable [] Transfer Utility LE Startup Guide *E only. 1 Installing the Camcorder's Instruction Manual (PDF File) This guide only introduces the most basic functions of the basic setup will turn on and the first screen of the camcorder to start when the camcorder is off Lens Memory Card Top view 4 Basic Setup The first time you started. Video...
Getting Started Guide
Page 2
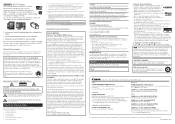
... video that produce heat. 8 Protect the power cord from Microsoft. • "Full HD 1080" refers to Canon camcorders compliant with the radio signal regulations of the regions listed below. Many studies of low-level RF exposures have fallen into an outlet on a circuit different from Dolby Laboratories. REGIONS OF USE The VIXIA HF R62 and VIXIA HF R60 are subject to change the camcorder's shooting mode...
... video that produce heat. 8 Protect the power cord from Microsoft. • "Full HD 1080" refers to Canon camcorders compliant with the radio signal regulations of the regions listed below. Many studies of low-level RF exposures have fallen into an outlet on a circuit different from Dolby Laboratories. REGIONS OF USE The VIXIA HF R62 and VIXIA HF R60 are subject to change the camcorder's shooting mode...
Instruction Manual
Page 4
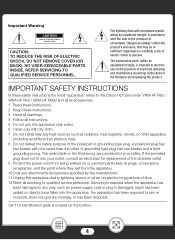
... from the apparatus. 10 Only use this apparatus during lightning storms or when unused for replacement of important operating and maintenance (servicing) instructions in any heat sources such as power-supply cord or plug is intended to alert the user to the Canon HD Camcorder VIXIA HF R62 / VIXIA HF R60 / VIXIA HF R600 and all servicing to qualified service personnel. REFER SERVICING TO QUALIFIED SERVICE PERSONNEL. Important Warning CAUTION RISK OF ELECTRIC SHOCK...
... from the apparatus. 10 Only use this apparatus during lightning storms or when unused for replacement of important operating and maintenance (servicing) instructions in any heat sources such as power-supply cord or plug is intended to alert the user to the Canon HD Camcorder VIXIA HF R62 / VIXIA HF R60 / VIXIA HF R600 and all servicing to qualified service personnel. REFER SERVICING TO QUALIFIED SERVICE PERSONNEL. Important Warning CAUTION RISK OF ELECTRIC SHOCK...
Instruction Manual
Page 6
...used on the camcorder's settings, onscreen displays and in this manual signifies Wi-Fi Protected Setup. • The Wi-Fi Protected Setup Identifier Mark is a mark of the Wi-Fi Alliance. • The N-Mark is granted or implied for any other use for a personal and non-commercial purpose or (2) by a video provider licensed under the AT&T patents to Canon camcorders...; Google, Android, Google Play, YouTube are trademarks of Apple...Windows are trademarks or registered trademarks of Microsoft Corporation in the United States and/or other countries. • App Store, iPad, iPhone, iTunes and Mac...
...used on the camcorder's settings, onscreen displays and in this manual signifies Wi-Fi Protected Setup. • The Wi-Fi Protected Setup Identifier Mark is a mark of the Wi-Fi Alliance. • The N-Mark is granted or implied for any other use for a personal and non-commercial purpose or (2) by a video provider licensed under the AT&T patents to Canon camcorders...; Google, Android, Google Play, YouTube are trademarks of Apple...Windows are trademarks or registered trademarks of Microsoft Corporation in the United States and/or other countries. • App Store, iPad, iPhone, iTunes and Mac...
Instruction Manual
Page 12
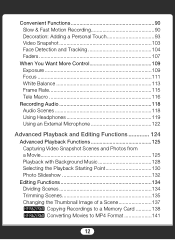
... White Balance 113 Frame Rate 115 Tele Macro 116 Recording Audio 118 Audio Scenes 118 Using Headphones 119 Using an External Microphone 122 Advanced Playback and Editing Functions 124 Advanced Playback Functions 125 Capturing Video Snapshot Scenes and Photos from a Movie 125 Playback with Background Music 128 Selecting the Playback Starting Point 130 Photo Slideshow 132 Editing Functions 134 Dividing Scenes 134 Trimming Scenes 135 Changing the Thumbnail Image of a Scene 137 D Copying Recordings to a Memory Card...
... White Balance 113 Frame Rate 115 Tele Macro 116 Recording Audio 118 Audio Scenes 118 Using Headphones 119 Using an External Microphone 122 Advanced Playback and Editing Functions 124 Advanced Playback Functions 125 Capturing Video Snapshot Scenes and Photos from a Movie 125 Playback with Background Music 128 Selecting the Playback Starting Point 130 Photo Slideshow 132 Editing Functions 134 Dividing Scenes 134 Trimming Scenes 135 Changing the Thumbnail Image of a Scene 137 D Copying Recordings to a Memory Card...

Instruction Manual
Page 18
... focus and the exposure optimized while shooting a moving subject. X Playback with background music. X Capturing Photos/Video Snapshot Scenes (A 125) D Convert your recordings on a TV. X Converting Movies to the Web. X Memory Save (A 161) Lock your video as photos or short video snapshot scenes. X Locking Files from Editing (A 69) Play back scenes or a slideshow of your files to avoid inadvertently deleting or changing them. Keep the subject in a memory directly onto an external hard disk...
... focus and the exposure optimized while shooting a moving subject. X Playback with background music. X Capturing Photos/Video Snapshot Scenes (A 125) D Convert your recordings on a TV. X Converting Movies to the Web. X Memory Save (A 161) Lock your video as photos or short video snapshot scenes. X Locking Files from Editing (A 69) Play back scenes or a slideshow of your files to avoid inadvertently deleting or changing them. Keep the subject in a memory directly onto an external hard disk...
Instruction Manual
Page 26
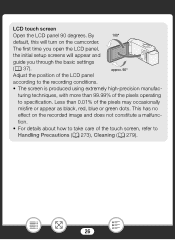
.... The first time you through the basic settings (A 37). This has no effect on the camcorder. tion. • For details about how to take care of the LCD panel according to Handling Precautions (A 273), Cleaning (A 279). 26 By 180° default, this will appear and guide you open the LCD panel, the initial setup screens will turn on the recorded image and does...
.... The first time you through the basic settings (A 37). This has no effect on the camcorder. tion. • For details about how to take care of the LCD panel according to Handling Precautions (A 273), Cleaning (A 279). 26 By 180° default, this will appear and guide you open the LCD panel, the initial setup screens will turn on the recorded image and does...
Instruction Manual
Page 79
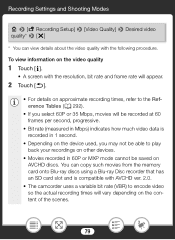
... not be saved on the content of the scenes. 79 You can view details about the video quality with AVCHD ver. 2.0. • The camcorder uses a variable bit rate (VBR) to encode video so the actual recording times will vary depending on AVCHD discs. Recording Settings and Shooting Modes 0 > [3 Recording Setup] > [Video Quality] > Desired video quality* > [X] * You can copy such movies from the memory card onto Blu-ray discs using a Blu-ray Disc recorder that has...
... not be saved on the content of the scenes. 79 You can view details about the video quality with AVCHD ver. 2.0. • The camcorder uses a variable bit rate (VBR) to encode video so the actual recording times will vary depending on AVCHD discs. Recording Settings and Shooting Modes 0 > [3 Recording Setup] > [Video Quality] > Desired video quality* > [X] * You can copy such movies from the memory card onto Blu-ray discs using a Blu-ray Disc recorder that has...

Instruction Manual
Page 155
... to download the compressed installation file. http://pixela.jp/cetule_dl 2 Uncompress the file. • The compressed file contains the installer (setup.exe) and the Software Guide (PDF file). 3 Install the software as explained in the PDF Software Guide. ies (A 65). 3 Connect the camcorder to a Computer Format Shooting mode 9N † ƒ ' Playback y} 1 Camcorder: Power the camcorder using the supplied USB cable. • Connection 3-ቢ. Connecting the Camcorder to the computer using the compact power adapter. 2 Camcorder: Open the desired index screen for AVCHD...
... to download the compressed installation file. http://pixela.jp/cetule_dl 2 Uncompress the file. • The compressed file contains the installer (setup.exe) and the Software Guide (PDF file). 3 Install the software as explained in the PDF Software Guide. ies (A 65). 3 Connect the camcorder to a Computer Format Shooting mode 9N † ƒ ' Playback y} 1 Camcorder: Power the camcorder using the supplied USB cable. • Connection 3-ቢ. Connecting the Camcorder to the computer using the compact power adapter. 2 Camcorder: Open the desired index screen for AVCHD...

Instruction Manual
Page 156
The auto-update function of the software may make sure your computer is correctly established, [USB Connection] will appear on the screen. • Windows computers: If the AutoPlay dialog box appears, close it. 4 Computer: Double-click the icon shown on the right. 5 Computer: Save your recordings as explained in the PDF Software Guide. ■ Saving MP4 Movies and Photos (Windows/Mac OS) With the software CameraWindow you have a different version...
The auto-update function of the software may make sure your computer is correctly established, [USB Connection] will appear on the screen. • Windows computers: If the AutoPlay dialog box appears, close it. 4 Computer: Double-click the icon shown on the right. 5 Computer: Save your recordings as explained in the PDF Software Guide. ■ Saving MP4 Movies and Photos (Windows/Mac OS) With the software CameraWindow you have a different version...
Instruction Manual
Page 161
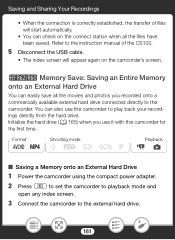
... drive connected directly to the camcorder. D Memory Save: Saving an Entire Memory onto an External Hard Drive You can also use it with this camcorder for the first time. Format Shooting mode 9N † ƒ ' Playback y} ■ Saving a Memory onto an External Hard Drive 1 Power the camcorder using the compact power adapter. 2 Press ] to set the camcorder to playback mode and open any index screen. 3 Connect the camcorder to the instruction manual of files will appear again on the connect station when all the movies and photos you use the camcorder to play back your recordings...
... drive connected directly to the camcorder. D Memory Save: Saving an Entire Memory onto an External Hard Drive You can also use it with this camcorder for the first time. Format Shooting mode 9N † ƒ ' Playback y} ■ Saving a Memory onto an External Hard Drive 1 Power the camcorder using the compact power adapter. 2 Press ] to set the camcorder to playback mode and open any index screen. 3 Connect the camcorder to the instruction manual of files will appear again on the connect station when all the movies and photos you use the camcorder to play back your recordings...
Instruction Manual
Page 166
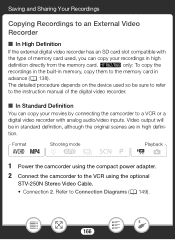
... External Video Recorder ■ In High Definition If the external digital video recorder has an SD card slot compatible with analog audio/video inputs. The detailed procedure depends on the device used , you can copy your recordings in memory, copy them to the VCR using the optional STV-250N Stereo Video Cable. • Connection 2. Video output will be sure to refer to the instruction manual of the digital video recorder. ■ In Standard Definition You can copy your movies by connecting the camcorder to Connection...
... External Video Recorder ■ In High Definition If the external digital video recorder has an SD card slot compatible with analog audio/video inputs. The detailed procedure depends on the device used , you can copy your recordings in memory, copy them to the VCR using the optional STV-250N Stereo Video Cable. • Connection 2. Video output will be sure to refer to the instruction manual of the digital video recorder. ■ In Standard Definition You can copy your movies by connecting the camcorder to Connection...
Instruction Manual
Page 194
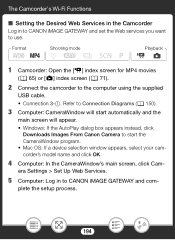
era Settings > Set Up Web Services. 5 Computer: Log in to CANON iMAGE GATEWAY and set the Web services you want to use. Format Shooting mode 9N † ƒ ' Playback y} 1 Camcorder: Open the [y] index screen for MP4 movies (A 65) or [}] index screen (A 71). 2 Connect the camcorder to start the CameraWindow program. • Mac OS: If a device selection window appears, select your camcorder's model name and click OK. 4 Computer: In the CameraWindow's main screen, click Cam- Refer to Connection Diagrams...
era Settings > Set Up Web Services. 5 Computer: Log in to CANON iMAGE GATEWAY and set the Web services you want to use. Format Shooting mode 9N † ƒ ' Playback y} 1 Camcorder: Open the [y] index screen for MP4 movies (A 65) or [}] index screen (A 71). 2 Connect the camcorder to start the CameraWindow program. • Mac OS: If a device selection window appears, select your camcorder's model name and click OK. 4 Computer: In the CameraWindow's main screen, click Cam- Refer to Connection Diagrams...
Instruction Manual
Page 195
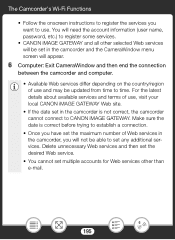
... CANON iMAGE GATEWAY. The Camcorder's Wi-Fi Functions • Follow the onscreen instructions to register the services you want to use , visit your local CANON iMAGE GATEWAY Web site. • If the date set in the camcorder, you have set the maximum number of use and may be able to set in the camcorder and the CameraWindow menu screen will need the account information (user name, password, etc.) to register some services. • CANON iMAGE...
... CANON iMAGE GATEWAY. The Camcorder's Wi-Fi Functions • Follow the onscreen instructions to register the services you want to use , visit your local CANON iMAGE GATEWAY Web site. • If the date set in the camcorder, you have set the maximum number of use and may be able to set in the camcorder and the CameraWindow menu screen will need the account information (user name, password, etc.) to register some services. • CANON iMAGE...
Instruction Manual
Page 208
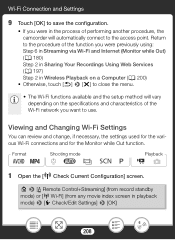
..., the settings used for the various Wi-Fi connections and for the Monitor while Out function. Wi-Fi Connection and Settings 9 Touch [OK] to save the configuration. • If you were in the process of performing another procedure, the camcorder will vary depending on the specifications and characteristics of the function you want to the access point. Format Shooting mode 9N † ƒ ' Playback y} 1 Open the...
..., the settings used for the various Wi-Fi connections and for the Monitor while Out function. Wi-Fi Connection and Settings 9 Touch [OK] to save the configuration. • If you were in the process of performing another procedure, the camcorder will vary depending on the specifications and characteristics of the function you want to the access point. Format Shooting mode 9N † ƒ ' Playback y} 1 Open the...
Instruction Manual
Page 227
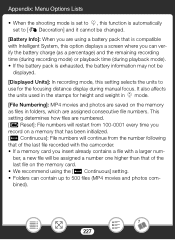
... playback time (during manual focus. It also affects the units used in the stamps for height and weight in 9 mode. [File Numbering]: MP4 movies and photos are saved on a memory that has been initialized. [n Continuous]: File numbers will be displayed. [Displayed Units]: In recording mode, this option displays a screen where you insert already contains a file with the camcorder. • If a memory card you can contain up to use for the focusing distance display during playback mode). • If the battery...
... playback time (during manual focus. It also affects the units used in the stamps for height and weight in 9 mode. [File Numbering]: MP4 movies and photos are saved on a memory that has been initialized. [n Continuous]: File numbers will be displayed. [Displayed Units]: In recording mode, this option displays a screen where you insert already contains a file with the camcorder. • If a memory card you can contain up to use for the focusing distance display during playback mode). • If the battery...

Instruction Manual
Page 247
... as movies and photos are recorded/deleted over time. If the camcorder becomes unusually hot or it becomes hot after using another device. Also, you cannot capture video snapshot scenes from scenes recorded or edited using it continuously for a short while, it becomes hot. - Save your recordings (A 153) and initialize the memory (A 41). You cannot capture video snapshot scenes from MP4 movies. 247 Changing the operating mode between recording (Ü)/recording standby (Ñ)/playback...
... as movies and photos are recorded/deleted over time. If the camcorder becomes unusually hot or it becomes hot after using another device. Also, you cannot capture video snapshot scenes from scenes recorded or edited using it continuously for a short while, it becomes hot. - Save your recordings (A 153) and initialize the memory (A 41). You cannot capture video snapshot scenes from MP4 movies. 247 Changing the operating mode between recording (Ü)/recording standby (Ñ)/playback...
Instruction Manual
Page 252
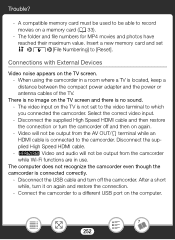
... USB port on again and restore the connection. - Disconnect the supplied High Speed HDMI cable. - Connections with External Devices Video noise appears on again. - Select the correct video input. - D Video and audio will not be output from the camcorder while Wi-Fi functions are in a room where a TV is no image on the TV is not set 1 >q>[File Numbering] to the camcorder. Connect the camcorder to record movies on a memory card (A 33). - After a short while, turn the camcorder...
... USB port on again and restore the connection. - Disconnect the supplied High Speed HDMI cable. - Connections with External Devices Video noise appears on again. - Select the correct video input. - D Video and audio will not be output from the camcorder while Wi-Fi functions are in a room where a TV is no image on the TV is not set 1 >q>[File Numbering] to the camcorder. Connect the camcorder to record movies on a memory card (A 33). - After a short while, turn the camcorder...

Instruction Manual
Page 264
... option other devices or image files created or edited on a computer. Do not disconnect the power source. - To record video on the computer screen, close it is recommended to fewer than LP or 4 Mbps. Disconnect the USB cable, and restore the connection after a short while. 264 Disconnect the USB cable. This photo cannot be able to record movies using a card reader. - To record video on the memory card to use [Long Play] video quality. - Trouble?
... option other devices or image files created or edited on a computer. Do not disconnect the power source. - To record video on the computer screen, close it is recommended to fewer than LP or 4 Mbps. Disconnect the USB cable, and restore the connection after a short while. 264 Disconnect the USB cable. This photo cannot be able to record movies using a card reader. - To record video on the memory card to use [Long Play] video quality. - Trouble?
Instruction Manual
Page 271
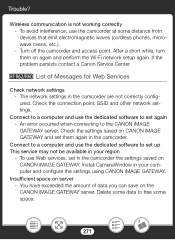
... CANON iMAGE GATEWAY. The network settings in the camcorder the settings saved on server - To avoid interference, use Web services, set again - D List of data you can save on the CANON iMAGE GATEWAY server. If the problem persists contact a Canon Service Center. You have exceeded the amount of Messages for Web Services Check network settings - Wireless communication is not working correctly - Check the connection point, SSID and other network settings. Trouble? An error occurred when connecting to set...
... CANON iMAGE GATEWAY. The network settings in the camcorder the settings saved on server - To avoid interference, use Web services, set again - D List of data you can save on the CANON iMAGE GATEWAY server. If the problem persists contact a Canon Service Center. You have exceeded the amount of Messages for Web Services Check network settings - Wireless communication is not working correctly - Check the connection point, SSID and other network settings. Trouble? An error occurred when connecting to set...


