
Instruction Manual
Page 5
... or registered trademark of Cisco in the U.S. For details on the camcorder's settings, onscreen displays and in this instruction manual. and other countries. • HDMI, the HDMI logo and High...Canon camcorders compliant with high-definition video composed of 1,080 vertical pixels (scanning lines). • This product is licensed under AT&T patents for the MPEG-4 standard and may be used for encoding MPEG-4 compliant video and/or decoding MPEG-4 compliant video that was encoded only (1) for MPEG-4 standard. 5 REGIONS OF USE VIXIA HF R52 and VIXIA HF R50 are in compliance (as used...
... or registered trademark of Cisco in the U.S. For details on the camcorder's settings, onscreen displays and in this instruction manual. and other countries. • HDMI, the HDMI logo and High...Canon camcorders compliant with high-definition video composed of 1,080 vertical pixels (scanning lines). • This product is licensed under AT&T patents for the MPEG-4 standard and may be used for encoding MPEG-4 compliant video and/or decoding MPEG-4 compliant video that was encoded only (1) for MPEG-4 standard. 5 REGIONS OF USE VIXIA HF R52 and VIXIA HF R50 are in compliance (as used...
Instruction Manual
Page 19
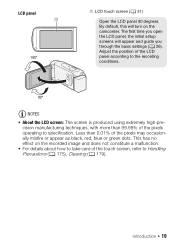
By default, this will appear and guide you through the basic settings (A 26). The first time you open the LCD panel, the initial setup screens will turn on the recorded image and does not constitute a malfunction. • For details about how to take care of the touch screen, refer to specification. LCD panel Sd 180° S d LCD touch screen (A 31) Open the LCD panel 90 degrees. Less than...
By default, this will appear and guide you through the basic settings (A 26). The first time you open the LCD panel, the initial setup screens will turn on the recorded image and does not constitute a malfunction. • For details about how to take care of the touch screen, refer to specification. LCD panel Sd 180° S d LCD touch screen (A 31) Open the LCD panel 90 degrees. Less than...

Instruction Manual
Page 38
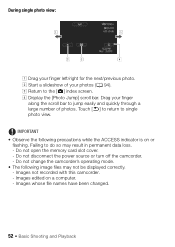
2 Slide the lens cover switch down. 3 Press Y to begin recording. • Press Y again to stop recording. • The ACCESS indicator will flash from time to time while the scene is off. 2 Close the LCD panel to the memory. 38 Š Basic Shooting and Playback Shooting mode (A 59) " Number of scenes recorded # Scene counter (hours : minutes : seconds) $ Video format (A 56) % Remaining recording time on the memory & Remaining battery charge ' Video quality (A 56) When you are not recording. •...
2 Slide the lens cover switch down. 3 Press Y to begin recording. • Press Y again to stop recording. • The ACCESS indicator will flash from time to time while the scene is off. 2 Close the LCD panel to the memory. 38 Š Basic Shooting and Playback Shooting mode (A 59) " Number of scenes recorded # Scene counter (hours : minutes : seconds) $ Video format (A 56) % Remaining recording time on the memory & Remaining battery charge ' Video quality (A 56) When you are not recording. •...
Instruction Manual
Page 52
... been changed. 52 Š Basic Shooting and Playback " Start a slideshow of your photos (A 94). # Return to jump easily and quickly through a large number of photos. During single photo view: ! IMPORTANT • Observe the following image files may result in permanent data loss. - Do not change the camcorder's operating mode. • The following precautions while the ACCESS indicator is on a computer. - Do not disconnect the power source or turn off the camcorder. -
... been changed. 52 Š Basic Shooting and Playback " Start a slideshow of your photos (A 94). # Return to jump easily and quickly through a large number of photos. During single photo view: ! IMPORTANT • Observe the following image files may result in permanent data loss. - Do not change the camcorder's operating mode. • The following precautions while the ACCESS indicator is on a computer. - Do not disconnect the power source or turn off the camcorder. -

Instruction Manual
Page 57
.... 2.0 specifications to copy those movies onto Blu-ray discs. • The camcorder uses a variable bit rate (VBR) to , recording in 60P or 35 Mbps is not available. When the shooting mode is set to encode video so the actual recording times will vary depending on the subject. • The following procedure. Scenes recorded at 35 Mbps exceeding 30 minutes. - 0 > [3 Recording Setup] > [Video Quality] > Desired video quality* > [K] > [X] * You can view...
.... 2.0 specifications to copy those movies onto Blu-ray discs. • The camcorder uses a variable bit rate (VBR) to , recording in 60P or 35 Mbps is not available. When the shooting mode is set to encode video so the actual recording times will vary depending on the subject. • The following procedure. Scenes recorded at 35 Mbps exceeding 30 minutes. - 0 > [3 Recording Setup] > [Video Quality] > Desired video quality* > [K] > [X] * You can view...
Instruction Manual
Page 105
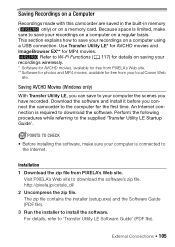
... Software Guide' (PDF file). Installation 1 Download the zip file from your recordings on a computer on saving your recordings wirelessly. * Software for AVCHD movies, available for free from PIXELA's Web site. ** Software for photos and MP4 movies, available for MP4 movies. This section explains how to download the software's zip file. Visit PIXELA's Web site to save to your recordings on a memory card. Saving AVCHD Movies (Windows only) With Transfer Utility LE, you can save your computer the scenes you connect...
... Software Guide' (PDF file). Installation 1 Download the zip file from your recordings on a computer on saving your recordings wirelessly. * Software for AVCHD movies, available for free from PIXELA's Web site. ** Software for photos and MP4 movies, available for MP4 movies. This section explains how to download the software's zip file. Visit PIXELA's Web site to save to your recordings on a memory card. Saving AVCHD Movies (Windows only) With Transfer Utility LE, you can save your computer the scenes you connect...

Instruction Manual
Page 109
... camcorder's operating mode. • If you wish to do not remove the memory card. - When saving recordings on a computer, we recommend using the supplied USB cable, without having to play back movies. • The following precautions while the ACCESS indicator is equipped with the standard Picture Transfer Protocol (PTP) allowing you may not be able to install ImageBrowser EX. Do not change or delete any of the camcorder's folders or files directly...
... camcorder's operating mode. • If you wish to do not remove the memory card. - When saving recordings on a computer, we recommend using the supplied USB cable, without having to play back movies. • The following precautions while the ACCESS indicator is equipped with the standard Picture Transfer Protocol (PTP) allowing you may not be able to install ImageBrowser EX. Do not change or delete any of the camcorder's folders or files directly...

Instruction Manual
Page 114
...camcorder using the compact power adapter. 2 Open the desired index screen (A 46). 3 Connect the camcorder to the instruction manual of the digital video recorder. 114 Š External Connections Recording Details will permanently erase all the data on the screen. If the external digital video recorder has an SD memory card slot*, you want to make perfect copies of memory card used. Make sure to copy in advance important data to copy your movies without connecting the camcorder. * Make sure the external device is successfully established, [USB Connection] appears on the hard drive...
...camcorder using the compact power adapter. 2 Open the desired index screen (A 46). 3 Connect the camcorder to the instruction manual of the digital video recorder. 114 Š External Connections Recording Details will permanently erase all the data on the screen. If the external digital video recorder has an SD memory card slot*, you want to make perfect copies of memory card used. Make sure to copy in advance important data to copy your movies without connecting the camcorder. * Make sure the external device is successfully established, [USB Connection] appears on the hard drive...

Instruction Manual
Page 115
... the desired scene. 5 Camcorder: Resume playback. Recording 1 Power the camcorder using Connection ". stop recording when it ends. 7 Camcorder: Stop playback. You can copy your movies by connecting the camcorder to a VCR or a digital video recorder with analog audio/video inputs. Operating modes: SCN Connecting Connect the camcorder to the VCR using the compact power adapter. 2 Open the [y] index screen that 1 > q > [AV/Headphones] is set to [Ò AV]. 3 External recorder: Load a blank cassette or disc and set the recorder to record pause mode. 4 Camcorder: Locate the scene you...
... the desired scene. 5 Camcorder: Resume playback. Recording 1 Power the camcorder using Connection ". stop recording when it ends. 7 Camcorder: Stop playback. You can copy your movies by connecting the camcorder to a VCR or a digital video recorder with analog audio/video inputs. Operating modes: SCN Connecting Connect the camcorder to the VCR using the compact power adapter. 2 Open the [y] index screen that 1 > q > [AV/Headphones] is set to [Ò AV]. 3 External recorder: Load a blank cassette or disc and set the recorder to record pause mode. 4 Camcorder: Locate the scene you...

Instruction Manual
Page 116
... Mac OS operating systems. Refer to Saving MP4 Movies and Photos (Windows/Mac OS) (A 106). Installation Install the software before you can also upload your MP4 movies to YouTube and photos to Facebook from your computer. The software is compatible with AVCHD ver. 2.0 specifications to make photo albums and more. * This service may not be accessed through the ? This PDF file can use CANON iMAGE GATEWAY* to copy onto Blu-Ray discs movies recorded in the 'ImageBrowser EX User Guide' (PDF file...
... Mac OS operating systems. Refer to Saving MP4 Movies and Photos (Windows/Mac OS) (A 106). Installation Install the software before you can also upload your MP4 movies to YouTube and photos to Facebook from your computer. The software is compatible with AVCHD ver. 2.0 specifications to make photo albums and more. * This service may not be accessed through the ? This PDF file can use CANON iMAGE GATEWAY* to copy onto Blu-Ray discs movies recorded in the 'ImageBrowser EX User Guide' (PDF file...
Instruction Manual
Page 129
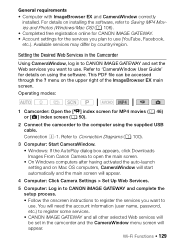
This PDF file can be set the Web services you want to use. Refer to 'CameraWindow User Guide' for details on installing the software, refer to Saving MP4 Movies and Photos (Windows/Mac OS) (A 106). • Completed free registration online for CANON iMAGE GATEWAY. • Account settings for MP4 movies (A 46) or [}] index screen (A 50). 2 Connect the camcorder to CANON iMAGE GATEWAY and set in to the computer using the software. For details on using the supplied USB cable. Refer to Connection Diagrams...
This PDF file can be set the Web services you want to use. Refer to 'CameraWindow User Guide' for details on installing the software, refer to Saving MP4 Movies and Photos (Windows/Mac OS) (A 106). • Completed free registration online for CANON iMAGE GATEWAY. • Account settings for MP4 movies (A 46) or [}] index screen (A 50). 2 Connect the camcorder to CANON iMAGE GATEWAY and set in to the computer using the software. For details on using the supplied USB cable. Refer to Connection Diagrams...
Instruction Manual
Page 130
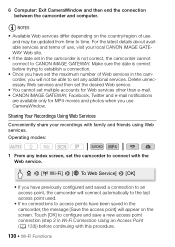
... set the camcorder to time. Touch [OK] to configure and save a new access point connection (step 2 in the camcorder, you use , visit your recordings with family and friends using Web services. Delete unnecessary Web services and then set the desired Web service. • You cannot set multiple accounts for Web services other than e-mail. • CANON iMAGE GATEWAY, Facebook, Twitter and e-mail notifications are available only for MP4 movies and photos...
... set the camcorder to time. Touch [OK] to configure and save a new access point connection (step 2 in the camcorder, you use , visit your recordings with family and friends using Web services. Delete unnecessary Web services and then set the desired Web service. • You cannot set multiple accounts for Web services other than e-mail. • CANON iMAGE GATEWAY, Facebook, Twitter and e-mail notifications are available only for MP4 movies and photos...
Instruction Manual
Page 137
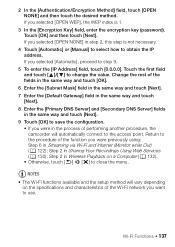
...Manual] to select how to the procedure of the function you were previously using: Step 6 in Wireless Playback on the specifications and characteristics of the Wi-Fi network you selected [OPEN WEP], the WEP index is 1. 3 In the [Encryption Key] field, enter the encryption key (password...[Next]. 9 Touch [OK] to save the configuration. • If you selected [Automatic], proceed to close the menu. Wi-Fi Functions Š 137 If you were in Sharing Your Recordings Using Web Services (A 130); Change the rest of performing another procedure, the camcorder will vary depending on a Computer ...
...Manual] to select how to the procedure of the function you were previously using: Step 6 in Wireless Playback on the specifications and characteristics of the Wi-Fi network you selected [OPEN WEP], the WEP index is 1. 3 In the [Encryption Key] field, enter the encryption key (password...[Next]. 9 Touch [OK] to save the configuration. • If you selected [Automatic], proceed to close the menu. Wi-Fi Functions Š 137 If you were in Sharing Your Recordings Using Web Services (A 130); Change the rest of performing another procedure, the camcorder will vary depending on a Computer ...
Instruction Manual
Page 153
... weight in mode. [File Numbering]: MP4 movies and photos are saved as files in the [2 Main Functions] panel, is displayed on the memory card. • We recommend using a battery pack that of the last file recorded with a larger num- This setting determines how files are numbered. [m Reset]: File numbers will restart from 100-0001 every time you record on a memory that has been initialized. [n Continuous]: File numbers will continue from the number following that is compatible with Intelligent...
... weight in mode. [File Numbering]: MP4 movies and photos are saved as files in the [2 Main Functions] panel, is displayed on the memory card. • We recommend using a battery pack that of the last file recorded with a larger num- This setting determines how files are numbered. [m Reset]: File numbers will restart from 100-0001 every time you record on a memory that has been initialized. [n Continuous]: File numbers will continue from the number following that is compatible with Intelligent...
Instruction Manual
Page 160
... quickly in front of the lens, the image appears slightly bent. - Save your recordings (A 105), set 1 > q > [File Numbering] to [Reset] and initialize the memory (A 29). After using it only for a long time, it becomes hot. - The battery may indicate a problem with the camcorder. Wait until the camcorder has finished. - The lens is not a malfunction. When a subject flits across in or fading out a scene (A 74). This is dirty. Movies...
... quickly in front of the lens, the image appears slightly bent. - Save your recordings (A 105), set 1 > q > [File Numbering] to [Reset] and initialize the memory (A 29). After using it only for a long time, it becomes hot. - The battery may indicate a problem with the camcorder. Wait until the camcorder has finished. - The lens is not a malfunction. When a subject flits across in or fading out a scene (A 74). This is dirty. Movies...

Instruction Manual
Page 161
... Photos] option instead of the memory card used is full. Replace or charge the battery pack. The memory card is exhausted. This can occur when you cannot capture video snapshot scenes from MP4 movies. - Music tracks will not play back correctly if the connection was interrupted while transferring the music files to normal. 8 and [End] appear in red on the screen. - A memory card error occurred. Replace the memory card or delete some recordings (A 53) to free some...
... Photos] option instead of the memory card used is full. Replace or charge the battery pack. The memory card is exhausted. This can occur when you cannot capture video snapshot scenes from MP4 movies. - Music tracks will not play back correctly if the connection was interrupted while transferring the music files to normal. 8 and [End] appear in red on the screen. - A memory card error occurred. Replace the memory card or delete some recordings (A 53) to free some...
Instruction Manual
Page 170
... recording date but different file control information. Scenes that were not recorded with this camcorder. - The data transfer rate was stopped due to use [Long Play] video quality. - Scene recorded using another device. This photo cannot be copied or divided. Scenes that were edited using software cannot be displayed - Recording was too high for example when you record movies in the area of the international date line. After repeatedly recording, deleting and editing scenes (fragmented memory), it is updating...
... recording date but different file control information. Scenes that were not recorded with this camcorder. - The data transfer rate was stopped due to use [Long Play] video quality. - Scene recorded using another device. This photo cannot be copied or divided. Scenes that were edited using software cannot be displayed - Recording was too high for example when you record movies in the area of the international date line. After repeatedly recording, deleting and editing scenes (fragmented memory), it is updating...
Instruction Manual
Page 171
... with other devices you turn on the memory card to external hard drive - If a dialog box appeared on the screen of the Wi-Fi device. The camcorder cannot play back scenes recorded using a memory card reader or decrease the number of your recordings (A 105) and initialize the memory (A 29). Quickly erases all data it . B List of Messages for Wi-Fi Functions Refer also to the instruction manual of photos and MP4 movies on the camcorder if power supply was...
... with other devices you turn on the memory card to external hard drive - If a dialog box appeared on the screen of the Wi-Fi device. The camcorder cannot play back scenes recorded using a memory card reader or decrease the number of your recordings (A 105) and initialize the memory (A 29). Quickly erases all data it . B List of Messages for Wi-Fi Functions Refer also to the instruction manual of photos and MP4 movies on the camcorder if power supply was...
Instruction Manual
Page 174
... exceeded the amount of recording or a file with the wireless signal. Turn off the camcorder and access point. If the problem persists contact a Canon Service Center. Try again - Delete some data to a high number of Messages for Web Services Check network settings - Shorten the movie and try again. 174 Š Additional Information Check the recording before sending. Connect to a computer and use the dedicated software to send a movie whose length exceeds the...
... exceeded the amount of recording or a file with the wireless signal. Turn off the camcorder and access point. If the problem persists contact a Canon Service Center. Try again - Delete some data to a high number of Messages for Web Services Check network settings - Shorten the movie and try again. 174 Š Additional Information Check the recording before sending. Connect to a computer and use the dedicated software to send a movie whose length exceeds the...
Instruction Manual
Page 195
... Scene mode) . . . . 63 Power saving 39 Powered IS 143 Pre-recording 144 R Recording Movies 37 Photos 40 Recording time 188 Reference tables (charging, usage, recording times, etc 188 Relay recording 58 Remote Browse 125 Remote Control+Streaming* . . . . 120 Resetting all camcorder settings 154 S Saving recordings 103 Transferring to a computer 105 Using external video recorders 114 Scene (shooting mode 62 SCN (Special Scene shooting mode 62 Selecting the memory* for playback 46 for recording 58 Self timer 146 Serial number 18 Shooting mode 59 Shooting mode button 59...
... Scene mode) . . . . 63 Power saving 39 Powered IS 143 Pre-recording 144 R Recording Movies 37 Photos 40 Recording time 188 Reference tables (charging, usage, recording times, etc 188 Relay recording 58 Remote Browse 125 Remote Control+Streaming* . . . . 120 Resetting all camcorder settings 154 S Saving recordings 103 Transferring to a computer 105 Using external video recorders 114 Scene (shooting mode 62 SCN (Special Scene shooting mode 62 Selecting the memory* for playback 46 for recording 58 Self timer 146 Serial number 18 Shooting mode 59 Shooting mode button 59...


