
Instruction Manual
Page 2
The lightning flash with a piece of batteries. • Do not expose batteries or product to excessive heat such as the disconnect device. Use only the same type of cloth, and do not place it in confined narrow ... is intended to alert the user to the presence of electric shock to constitute a risk of important operating and maintenance (servicing) instructions in case of batteries are attached. CAUTION RISK OF ELECTRIC SHOCK DO NOT OPEN CAUTION: TO REDUCE THE RISK OF ELECTRIC SHOCK, DO NOT REMOVE COVER (OR BACK).
The lightning flash with a piece of batteries. • Do not expose batteries or product to excessive heat such as the disconnect device. Use only the same type of cloth, and do not place it in confined narrow ... is intended to alert the user to the presence of electric shock to constitute a risk of important operating and maintenance (servicing) instructions in case of batteries are attached. CAUTION RISK OF ELECTRIC SHOCK DO NOT OPEN CAUTION: TO REDUCE THE RISK OF ELECTRIC SHOCK, DO NOT REMOVE COVER (OR BACK).
Instruction Manual
Page 11
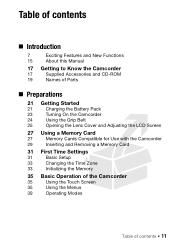
... Manual 17 Getting to Know the Camcorder 17 Supplied Accessories and CD-ROM 19 Names of Parts „ Preparations 21 Getting Started 21 Charging the Battery Pack 23 Turning On the Camcorder 24 Using the Grip Belt 25 Opening the Lens Cover and Adjusting the LCD Screen 27 Using a Memory Card...
... Manual 17 Getting to Know the Camcorder 17 Supplied Accessories and CD-ROM 19 Names of Parts „ Preparations 21 Getting Started 21 Charging the Battery Pack 23 Turning On the Camcorder 24 Using the Grip Belt 25 Opening the Lens Cover and Adjusting the LCD Screen 27 Using a Memory Card...
Instruction Manual
Page 17
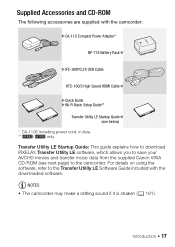
... guide explains how to download PIXELA's Transfer Utility LE software, which allows you to save your AVCHD movies and transfer music data from the supplied Canon VIXIA CD-ROM (see below) * CA-110E including power cord, in Asia. ** 6/4 only. For details on using the software, refer to the Transfer ...Utility LE Software Guide included with the camcorder: XCA-110 Compact Power Adapter* BP-718 Battery PackW XIFC-300PCU/S USB Cable HTC-100/S High Speed HDMI CableW XQuick Guide XWi-Fi Basic Setup Guide** Transfer Utility LE Startup GuideW (see...
... guide explains how to download PIXELA's Transfer Utility LE software, which allows you to save your AVCHD movies and transfer music data from the supplied Canon VIXIA CD-ROM (see below) * CA-110E including power cord, in Asia. ** 6/4 only. For details on using the software, refer to the Transfer ...Utility LE Software Guide included with the camcorder: XCA-110 Compact Power Adapter* BP-718 Battery PackW XIFC-300PCU/S USB Cable HTC-100/S High Speed HDMI CableW XQuick Guide XWi-Fi Basic Setup Guide** Transfer Utility LE Startup GuideW (see...

Instruction Manual
Page 20
On Red - Top view Af Ag A f Speaker (A 52) A g Zoom lever (A 47) A h LCD touch screen (A 25, 35) A j ACCESS indicator (A 41) A k 64Wi-Fi antenna (A 124) LCD panel Ah Back view Aj Ak Al Ak A l POWER/CHG (charge) indicator: Green - Charging (A 21) S q Battery attachment unit (A 21) S a Serial number Sq Bottom view Sa Ss Sd S s Tripod socket (A 175) S d BATTERY RELEASE switch (A 22) 20 Š Introduction
On Red - Top view Af Ag A f Speaker (A 52) A g Zoom lever (A 47) A h LCD touch screen (A 25, 35) A j ACCESS indicator (A 41) A k 64Wi-Fi antenna (A 124) LCD panel Ah Back view Aj Ak Al Ak A l POWER/CHG (charge) indicator: Green - Charging (A 21) S q Battery attachment unit (A 21) S a Serial number Sq Bottom view Sa Ss Sd S s Tripod socket (A 175) S d BATTERY RELEASE switch (A 22) 20 Š Introduction

Instruction Manual
Page 21
... softly into a power outlet. Getting Started Charging the Battery Pack The camcorder can be powered with a fully charged battery pack, refer to Charging, Recording and Playback Times (A 181). 1 Plug the power cord into the battery attachment unit and slide it up until it clicks in place....5443; ᕄ DC IN terminal For Asia only: Preparations Š 21 For approximate charging times and recording/playback times with a battery pack or directly using the touch panel, navigating the menus, and first time settings to the camcorder. Preparations This chapter describes basic operations...
... softly into a power outlet. Getting Started Charging the Battery Pack The camcorder can be powered with a fully charged battery pack, refer to Charging, Recording and Playback Times (A 181). 1 Plug the power cord into the battery attachment unit and slide it up until it clicks in place....5443; ᕄ DC IN terminal For Asia only: Preparations Š 21 For approximate charging times and recording/playback times with a battery pack or directly using the touch panel, navigating the menus, and first time settings to the camcorder. Preparations This chapter describes basic operations...

Instruction Manual
Page 22
... the camcorder was on, the green POWER/CHG indicator will turn off . 4 Charging will go out when you turn on in red (battery pack charging). After turning off the camcorder before connecting or disconnecting the compact power adapter. Be sure to wait until the green POWER/CHG ... any electrical equipment that is updated in the direction of the arrow and hold it pressed down. ᕄ 2 Slide the battery pack and then pull it out. ᕃ BATTERY RELEASE switch IMPORTANT • Turn off the camcorder, important data is not expressly recommended for 22 Š Preparations
... the camcorder was on, the green POWER/CHG indicator will turn off . 4 Charging will go out when you turn on in red (battery pack charging). After turning off the camcorder before connecting or disconnecting the compact power adapter. Be sure to wait until the green POWER/CHG ... any electrical equipment that is updated in the direction of the arrow and hold it pressed down. ᕄ 2 Slide the battery pack and then pull it out. ᕃ BATTERY RELEASE switch IMPORTANT • Turn off the camcorder, important data is not expressly recommended for 22 Š Preparations
Instruction Manual
Page 23
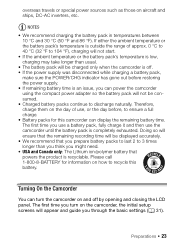
... Š 23 overseas travels or special power sources such as those on how to recycle this camcorder can display the remaining battery time. Therefore, charge them on the camcorder, the initial setup screens will appear and guide you turn the camcorder on and off . • If ... so will ensure that powers the product is completely exhausted. The first time you through the basic settings (A 31). NOTES • We recommend charging the battery pack in temperatures between 10 °C and 30 °C (50 °F and 86 °F). Turning On the Camcorder You can power the camcorder using...
... Š 23 overseas travels or special power sources such as those on how to recycle this camcorder can display the remaining battery time. Therefore, charge them on the camcorder, the initial setup screens will appear and guide you turn the camcorder on and off . • If ... so will ensure that powers the product is completely exhausted. The first time you through the basic settings (A 31). NOTES • We recommend charging the battery pack in temperatures between 10 °C and 30 °C (50 °F and 86 °F). Turning On the Camcorder You can power the camcorder using...
Instruction Manual
Page 32
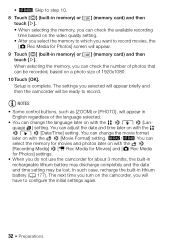
... selected will appear briefly and then the camcorder will be ready to record movies, the [{ Rec Media for about 3 months, the built-in rechargeable lithium battery may discharge completely and the date and time setting may be recorded, based on with the > [Recording Media] > [v Rec Media for Movies] and [{ Rec Media... change the language later on the camcorder, you turn on with the > q > [Date/Time] setting. The next time you will appear. 9 Touch [&] (built-in lithium battery (A 177).
... selected will appear briefly and then the camcorder will be ready to record movies, the [{ Rec Media for about 3 months, the built-in rechargeable lithium battery may discharge completely and the date and time setting may be recorded, based on with the > [Recording Media] > [v Rec Media for Movies] and [{ Rec Media... change the language later on the camcorder, you turn on with the > q > [Date/Time] setting. The next time you will appear. 9 Touch [&] (built-in lithium battery (A 177).
Instruction Manual
Page 45
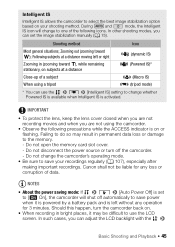
... toward S), while remaining stationary, on subjects at a distance Close-up of a subject When using the camcorder. • Observe the following icons. Canon shall not be difficult to use the > p > [Intelligent IS] setting to change whether Powered IS is available when Intelligent IS is set the.... Do not disconnect the power source or turn the camcorder back on. • When recording in bright places, it is powered by a battery pack and is left or right Zooming in permanent data loss or damage to the memory. - Shooting method Icon Most general situations; Intelligent IS...
... toward S), while remaining stationary, on subjects at a distance Close-up of a subject When using the camcorder. • Observe the following icons. Canon shall not be difficult to use the > p > [Intelligent IS] setting to change whether Powered IS is available when Intelligent IS is set the.... Do not disconnect the power source or turn the camcorder back on. • When recording in bright places, it is powered by a battery pack and is left or right Zooming in permanent data loss or damage to the memory. - Shooting method Icon Most general situations; Intelligent IS...

Instruction Manual
Page 46
... backgrounds, the Sunset or one of the LCD screen with the > > [LCD Brightness] setting. • If you use the camcorder. 4 Touch [PHOTO] to conserve the battery's power.
... backgrounds, the Sunset or one of the LCD screen with the > > [LCD Brightness] setting. • If you use the camcorder. 4 Touch [PHOTO] to conserve the battery's power.
Instruction Manual
Page 112
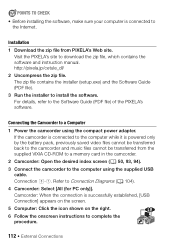
Installation 1 Download the zip file from the supplied VIXIA CD-ROM to a memory card in the camcorder. 2 Camcorder: Open the desired index screen (A 50, 93, 94). 3 Connect the camcorder to the computer using the ... Guide (PDF file) of the PIXELA's software. Connection #-1. Visit the PIXELA's site to install the software. Camcorder: When the connection is powered only by the battery pack, previously saved video files cannot be transferred from PIXELA's Web site. Connecting the Camcorder to the camcorder and music files cannot be transferred back...
Installation 1 Download the zip file from the supplied VIXIA CD-ROM to a memory card in the camcorder. 2 Camcorder: Open the desired index screen (A 50, 93, 94). 3 Connect the camcorder to the computer using the ... Guide (PDF file) of the PIXELA's software. Connection #-1. Visit the PIXELA's site to install the software. Camcorder: When the connection is powered only by the battery pack, previously saved video files cannot be transferred from PIXELA's Web site. Connecting the Camcorder to the camcorder and music files cannot be transferred back...

Instruction Manual
Page 149
... of your recordings or the brightness of the playback image on a TV. • Using the bright setting will shorten the effective usage time of the battery pack. [LCD Mirror Image]: When set to [i On], this to . [LCD Brightness]: Adjusts the brightness of the LCD screen. • Changing the brightness of three...
... of your recordings or the brightness of the playback image on a TV. • Using the bright setting will shorten the effective usage time of the battery pack. [LCD Mirror Image]: When set to [i On], this to . [LCD Brightness]: Adjusts the brightness of the LCD screen. • Changing the brightness of three...

Instruction Manual
Page 151
... [Headphones]: , Ö z z z 89 [Notification Sounds] [÷ High Volume], [ø Low Volume], [j Off] zzz - [Custom Control Button] Same as the [ Main Functions] panel z - - - (Default: [Ò Decoration]) [Battery Info] - zzz - [Displayed Units] [. z z 118 [Reset All] [No], [Yes] zzz - * Option available only after connecting an external hard drive to the camcorder. [Available Space in...
... [Headphones]: , Ö z z z 89 [Notification Sounds] [÷ High Volume], [ø Low Volume], [j Off] zzz - [Custom Control Button] Same as the [ Main Functions] panel z - - - (Default: [Ò Decoration]) [Battery Info] - zzz - [Displayed Units] [. z z 118 [Reset All] [No], [Yes] zzz - * Option available only after connecting an external hard drive to the camcorder. [Available Space in...
Instruction Manual
Page 152
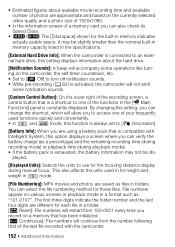
...its Speed Class. • 6/4 The [Total space] shown for the built-in memory indicates actually usable space. You can verify the battery charge (as a percentage) and the remaining recording time (during recording mode) or playback time (during manual focus. By changing this setting,... in folders. played. [Displayed Units]: Selects the units to use for the focusing distance display during playback mode). • If the battery pack is constantly displayed. • Estimated figures about the hard drive. [Notification Sounds]: A beep will accompany some operations like turning on...
...its Speed Class. • 6/4 The [Total space] shown for the built-in memory indicates actually usable space. You can verify the battery charge (as a percentage) and the remaining recording time (during recording mode) or playback time (during manual focus. By changing this setting,... in folders. played. [Displayed Units]: Selects the units to use for the focusing distance display during playback mode). • If the battery pack is constantly displayed. • Estimated figures about the hard drive. [Notification Sounds]: A beep will accompany some operations like turning on...

Instruction Manual
Page 153
...). • Folders can verify the current version of the camcorder's settings. In the same example, a recording with a file number of "101-0107" is powered by a battery pack, it off. Set to [Off] to save power when the camcorder is saved in a format such as "101_0501". Operating any operation for 3 minutes. •...
...). • Folders can verify the current version of the camcorder's settings. In the same example, a recording with a file number of "101-0107" is powered by a battery pack, it off. Set to [Off] to save power when the camcorder is saved in a format such as "101_0501". Operating any operation for 3 minutes. •...

Instruction Manual
Page 154
Appendix: Onscreen Icons and Displays Recording Movies and modes (with the zoom control displayed) 1 Control button [PHOTO]: Take a photo (A 41, 93) 2 Smart AUTO* (A 43) 3 Zoom controls (A 48) 4 Total number of scenes / Total recording time 5 Memory operation (A 157) 6 Intelligent IS (A 45) 7 Remaining battery charge (A 157) * Available only in mode. 8 Control button [START]: Start recording a movie (A 41) 9 Face detection frame (A 76) A q Tracking frame (A 76) 154 Š Additional Information
Appendix: Onscreen Icons and Displays Recording Movies and modes (with the zoom control displayed) 1 Control button [PHOTO]: Take a photo (A 41, 93) 2 Smart AUTO* (A 43) 3 Zoom controls (A 48) 4 Total number of scenes / Total recording time 5 Memory operation (A 157) 6 Intelligent IS (A 45) 7 Remaining battery charge (A 157) * Available only in mode. 8 Control button [START]: Start recording a movie (A 41) 9 Face detection frame (A 76) A q Tracking frame (A 76) 154 Š Additional Information

Instruction Manual
Page 157
... in memory, 6/ 4 only) or [ End] (memory card) will stop. Depending on the condition of the battery pack. • When the battery charge becomes low, replace or charge the battery pack. Additional Information Š 157 5 Memory operation Ü Record, Û Record pause, Ð Playback, ... playback, Ø Fast reverse playback, Õ Slow playback, Ö Slow reverse playback, Ó Frame advance, Ô Frame reverse. 7 Remaining battery charge • The icon shows a rough estimate of the remaining charge as a 100% 75% 50% 25% 0% percentage of the full charge of the...
... in memory, 6/ 4 only) or [ End] (memory card) will stop. Depending on the condition of the battery pack. • When the battery charge becomes low, replace or charge the battery pack. Additional Information Š 157 5 Memory operation Ü Record, Û Record pause, Ð Playback, ... playback, Ø Fast reverse playback, Õ Slow playback, Ö Slow reverse playback, Ó Frame advance, Ô Frame reverse. 7 Remaining battery charge • The icon shows a rough estimate of the remaining charge as a 100% 75% 50% 25% 0% percentage of the full charge of the...
Instruction Manual
Page 158
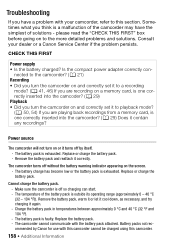
... °C and 40 °C (32 °F and 104 °F). - The camcorder cannot communicate with your dealer or a Canon Service Center if the problem persists. Remove the battery pack and reattach it again. - Sometimes what you are recording on a memory card, is one correctly inserted into the camcoder? ... • Did you turn the camcorder on and correctly set it turns off by Canon for use with this camcorder cannot be charged using this section. Make sure the camcorder is off without the battery warning indicator appearing on or it to a recording mode? (A 41, 46) If...
... °C and 40 °C (32 °F and 104 °F). - The camcorder cannot communicate with your dealer or a Canon Service Center if the problem persists. Remove the battery pack and reattach it again. - Sometimes what you are recording on a memory card, is one correctly inserted into the camcoder? ... • Did you turn the camcorder on and correctly set it turns off by Canon for use with this camcorder cannot be charged using this section. Make sure the camcorder is off without the battery warning indicator appearing on or it to a recording mode? (A 41, 46) If...

Instruction Manual
Page 159
... of AVCHD movies (3,999 scenes). This is on the subject. Save your recordings (A 111) and initialize the memory using a battery pack recommended by Canon for use tissue paper to free some operations may occur as movies and photos are using the [Complete Initialization] option (A 33).... and the actual start recording. - Wait until the camcorder has finished. - Focus manually (A 81). - The lens is not a malfunction. The battery may have reached the end of the camcorder, the image may be heard from the compact power adapter. - The point where Y was pressed does...
... of AVCHD movies (3,999 scenes). This is on the subject. Save your recordings (A 111) and initialize the memory using a battery pack recommended by Canon for use tissue paper to free some operations may occur as movies and photos are using the [Complete Initialization] option (A 33).... and the actual start recording. - Wait until the camcorder has finished. - Focus manually (A 81). - The lens is not a malfunction. The battery may have reached the end of the camcorder, the image may be heard from the compact power adapter. - The point where Y was pressed does...

Instruction Manual
Page 161
... Displays lights up in temperatures between approximately 0 °C and 40 °C (32 °F and 104 °F). - Battery pack is full. Replace or charge the battery pack. appears on the screen. - Turn off . - Remove and reinsert the memory card. The memory card is exhausted....The scene is not a malfunction. This is being recorded in red. - The battery pack is faulty. Charging has stopped because the compact power adapter or the battery pack is damaged. sult a Canon Service Center. The screen appears too dark. - The LCD screen was dimmed. ...
... Displays lights up in temperatures between approximately 0 °C and 40 °C (32 °F and 104 °F). - Battery pack is full. Replace or charge the battery pack. appears on the screen. - Turn off . - Remove and reinsert the memory card. The memory card is exhausted....The scene is not a malfunction. This is being recorded in red. - The battery pack is faulty. Charging has stopped because the compact power adapter or the battery pack is damaged. sult a Canon Service Center. The screen appears too dark. - The LCD screen was dimmed. ...


