

Instruction Manual
Page 2
NO USER-SERVICEABLE PARTS INSIDE. Use only the same type of batteries. • Do not expose batteries or product to excessive heat such as the disconnect device. CAUTION RISK OF ELECTRIC SHOCK DO NOT OPEN CAUTION: TO REDUCE THE RISK OF ELECTRIC ... uninsulated "dangerous voltage" within an equilateral triangle, is used as the inside of copyrighted materials may be contrary to disconnect the plug in case of batteries are attached. The Mains plug is intended to alert the user to the presence of electric shock to constitute a risk of important operating and maintenance...
NO USER-SERVICEABLE PARTS INSIDE. Use only the same type of batteries. • Do not expose batteries or product to excessive heat such as the disconnect device. CAUTION RISK OF ELECTRIC SHOCK DO NOT OPEN CAUTION: TO REDUCE THE RISK OF ELECTRIC ... uninsulated "dangerous voltage" within an equilateral triangle, is used as the inside of copyrighted materials may be contrary to disconnect the plug in case of batteries are attached. The Mains plug is intended to alert the user to the presence of electric shock to constitute a risk of important operating and maintenance...

Instruction Manual
Page 11
... Manual 17 Getting to Know the Camcorder 17 Supplied Accessories and CD-ROM 19 Names of Parts „ Preparations 21 Getting Started 21 Charging the Battery Pack 23 Turning On the Camcorder 24 Using the Grip Belt 25 Opening the Lens Cover and Adjusting the LCD Screen 27 Using a Memory Card...
... Manual 17 Getting to Know the Camcorder 17 Supplied Accessories and CD-ROM 19 Names of Parts „ Preparations 21 Getting Started 21 Charging the Battery Pack 23 Turning On the Camcorder 24 Using the Grip Belt 25 Opening the Lens Cover and Adjusting the LCD Screen 27 Using a Memory Card...

Instruction Manual
Page 17
... guide explains how to download PIXELA's Transfer Utility LE software, which allows you to save your AVCHD movies and transfer music data from the supplied Canon VIXIA CD-ROM (see below) * CA-110E including power cord, in Asia. ** 6/4 only. Getting to Know the Camcorder Supplied Accessories and CD-ROM...details on using the software, refer to the Transfer Utility LE Software Guide included with the camcorder: XCA-110 Compact Power Adapter* BP-718 Battery PackW XIFC-300PCU/S USB Cable HTC-100/S High Speed HDMI CableW XQuick Guide XWi-Fi Basic Setup Guide** Transfer Utility LE Startup GuideW (...
... guide explains how to download PIXELA's Transfer Utility LE software, which allows you to save your AVCHD movies and transfer music data from the supplied Canon VIXIA CD-ROM (see below) * CA-110E including power cord, in Asia. ** 6/4 only. Getting to Know the Camcorder Supplied Accessories and CD-ROM...details on using the software, refer to the Transfer Utility LE Software Guide included with the camcorder: XCA-110 Compact Power Adapter* BP-718 Battery PackW XIFC-300PCU/S USB Cable HTC-100/S High Speed HDMI CableW XQuick Guide XWi-Fi Basic Setup Guide** Transfer Utility LE Startup GuideW (...

Instruction Manual
Page 20
Charging (A 21) S q Battery attachment unit (A 21) S a Serial number Sq Bottom view Sa Ss Sd S s Tripod socket (A 176) S d BATTERY RELEASE switch (A 22) 20 Š Introduction Top view Af Ag A f Speaker (A 52) A g Zoom lever (A 47) A h LCD touch screen (A 25, 35) A j ACCESS indicator (A 41) A k 64Wi-Fi antenna (A 124) LCD panel Ah Back view Aj Ak Al Ak A l POWER/CHG (charge) indicator: Green - On Red -
Charging (A 21) S q Battery attachment unit (A 21) S a Serial number Sq Bottom view Sa Ss Sd S s Tripod socket (A 176) S d BATTERY RELEASE switch (A 22) 20 Š Introduction Top view Af Ag A f Speaker (A 52) A g Zoom lever (A 47) A h LCD touch screen (A 25, 35) A j ACCESS indicator (A 41) A k 64Wi-Fi antenna (A 124) LCD panel Ah Back view Aj Ak Al Ak A l POWER/CHG (charge) indicator: Green - On Red -

Instruction Manual
Page 21
...power outlet. 2 Connect the compact power adapter to the camcorder's DC IN terminal. 3 Attach the battery pack to the compact power adapter before plugging the power cord into the battery attachment unit and slide it up until it clicks in place. ᕃ ᕄ DC IN ...21 Preparations This chapter describes basic operations, such as using the compact power adapter. Getting Started Charging the Battery Pack The camcorder can be powered with a fully charged battery pack, refer to help you learn more about your camcorder. For approximate charging times and recording/playback times ...
...power outlet. 2 Connect the compact power adapter to the camcorder's DC IN terminal. 3 Attach the battery pack to the compact power adapter before plugging the power cord into the battery attachment unit and slide it up until it clicks in place. ᕃ ᕄ DC IN ...21 Preparations This chapter describes basic operations, such as using the compact power adapter. Getting Started Charging the Battery Pack The camcorder can be powered with a fully charged battery pack, refer to help you learn more about your camcorder. For approximate charging times and recording/playback times ...

Instruction Manual
Page 22
... 1 Slide d in the direction of the arrow and hold it pressed down. ᕄ 2 Slide the battery pack and then pull it out. ᕃ BATTERY RELEASE switch IMPORTANT • Turn off the camcorder. After a moment, the POWER/CHG indicator will turn off the camcorder before connecting or disconnecting the compact ... turning off . The red POWER/ CHG indicator will go out when you turn on , the green POWER/CHG indicator will go out when ᕅ the battery pack is updated in red...
... 1 Slide d in the direction of the arrow and hold it pressed down. ᕄ 2 Slide the battery pack and then pull it out. ᕃ BATTERY RELEASE switch IMPORTANT • Turn off the camcorder. After a moment, the POWER/CHG indicator will turn off the camcorder before connecting or disconnecting the compact ... turning off . The red POWER/ CHG indicator will go out when you turn on , the green POWER/CHG indicator will go out when ᕅ the battery pack is updated in red...
Instruction Manual
Page 23
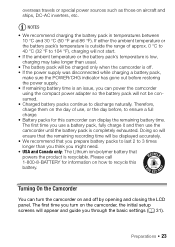
...power sources such as those on the day of approx. 0 °C to 40 °C (32 °F to 3 times longer than usual. • The battery pack will be charged only when the camcorder is off by opening and closing the LCD panel. If either the ambient temperature or the...remaining recording time will be displayed accurately. • We recommend that powers the product is an issue, you can display the remaining battery time. NOTES • We recommend charging the battery pack in temperatures between 10 °C and 30 °C (50 °F and 86 °F). Therefore, charge them on ...
...power sources such as those on the day of approx. 0 °C to 40 °C (32 °F to 3 times longer than usual. • The battery pack will be charged only when the camcorder is off by opening and closing the LCD panel. If either the ambient temperature or the...remaining recording time will be displayed accurately. • We recommend that powers the product is an issue, you can display the remaining battery time. NOTES • We recommend charging the battery pack in temperatures between 10 °C and 30 °C (50 °F and 86 °F). Therefore, charge them on ...

Instruction Manual
Page 32
...select the memory for movies and photos later on with the > q > [Date/Time] setting. In such case, recharge the built-in lithium battery (A 178). When selecting the memory, you can check the number of photos that can check the available recording time based on the video quality setting.... • After you select the memory to which you want to record movies, the [{ Rec Media for about 3 months, the built-in rechargeable lithium battery may discharge completely and the date and time setting may be lost. guage ] setting. • 7 Skip to step 10. 8 Touch [&] (built-in memory...
...select the memory for movies and photos later on with the > q > [Date/Time] setting. In such case, recharge the built-in lithium battery (A 178). When selecting the memory, you can check the number of photos that can check the available recording time based on the video quality setting.... • After you select the memory to which you want to record movies, the [{ Rec Media for about 3 months, the built-in rechargeable lithium battery may discharge completely and the date and time setting may be lost. guage ] setting. • 7 Skip to step 10. 8 Touch [&] (built-in memory...

Instruction Manual
Page 45
... important recordings. Zooming out (zooming toward S), while remaining stationary, on . • When recording in bright places, it is powered by a battery pack and is activated. IMPORTANT • To protect the lens, keep the lens cover closed when you are not recording movies and when you are...) È (Powered IS)* Â (Macro IS) Ã (tripod mode) * You can set to [i On], the camcorder will shut off the camcorder. - Canon shall not be difficult to use the > p > [Intelligent IS] setting to change whether Powered IS is available when Intelligent IS is left or right Zooming...
... important recordings. Zooming out (zooming toward S), while remaining stationary, on . • When recording in bright places, it is powered by a battery pack and is activated. IMPORTANT • To protect the lens, keep the lens cover closed when you are not recording movies and when you are...) È (Powered IS)* Â (Macro IS) Ã (tripod mode) * You can set to [i On], the camcorder will shut off the camcorder. - Canon shall not be difficult to use the > p > [Intelligent IS] setting to change whether Powered IS is available when Intelligent IS is left or right Zooming...

Instruction Manual
Page 46
... recorded in the built-in order to turn on the screen may not look natural. Operating modes: SCN 1 Open the LCD panel to conserve the battery's power. You can ᕃ select the memory that will be used to record photos (A 63). • You can even take photos with the LCD panel...
... recorded in the built-in order to turn on the screen may not look natural. Operating modes: SCN 1 Open the LCD panel to conserve the battery's power. You can ᕃ select the memory that will be used to record photos (A 63). • You can even take photos with the LCD panel...
Instruction Manual
Page 112
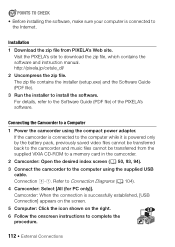
...right. 6 Follow the onscreen instructions to the computer using the compact power adapter. Camcorder: When the connection is powered only by the battery pack, previously saved video files cannot be transferred back to the camcorder and music files cannot be transferred from PIXELA's Web site. ... make sure your computer is connected to the Software Guide (PDF file) of the PIXELA's software. Installation 1 Download the zip file from the supplied VIXIA CD-ROM to a memory card in the camcorder. 2 Camcorder: Open the desired index screen (A 50, 93, 94). 3 Connect the camcorder to...
...right. 6 Follow the onscreen instructions to the computer using the compact power adapter. Camcorder: When the connection is powered only by the battery pack, previously saved video files cannot be transferred back to the camcorder and music files cannot be transferred from PIXELA's Web site. ... make sure your computer is connected to the Software Guide (PDF file) of the PIXELA's software. Installation 1 Download the zip file from the supplied VIXIA CD-ROM to a memory card in the camcorder. 2 Camcorder: Open the desired index screen (A 50, 93, 94). 3 Connect the camcorder to...

Instruction Manual
Page 149
... of your recordings or the brightness of the playback image on a TV. • Using the bright setting will shorten the effective usage time of the battery pack. [LCD Mirror Image]: When set to [i On], this to make the screen brighter when recording in the correct aspect ratio. [+ 4:3 TV]: TV sets with...
... of your recordings or the brightness of the playback image on a TV. • Using the bright setting will shorten the effective usage time of the battery pack. [LCD Mirror Image]: When set to [i On], this to make the screen brighter when recording in the correct aspect ratio. [+ 4:3 TV]: TV sets with...

Instruction Manual
Page 151
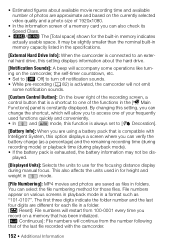
... [Headphones]: , Ö z z z 89 [Notification Sounds] [÷ High Volume], [ø Low Volume], [j Off] zzz - [Custom Control Button] Same as the [ Main Functions] panel z - - - (Default: [Ò Decoration]) [Battery Info] - z z 118 [Reset All] [No], [Yes] zzz - * Option available only after connecting an external hard drive to the camcorder. [Available Space in Memory]/[Used Space...
... [Headphones]: , Ö z z z 89 [Notification Sounds] [÷ High Volume], [ø Low Volume], [j Off] zzz - [Custom Control Button] Same as the [ Main Functions] panel z - - - (Default: [Ò Decoration]) [Battery Info] - z z 118 [Reset All] [No], [Yes] zzz - * Option available only after connecting an external hard drive to the camcorder. [Available Space in Memory]/[Used Space...
Instruction Manual
Page 152
...the units used functions quickly and conveniently. • In and mode, this function is always set to [Ò Decoration]. [Battery Info]: When you can verify the battery charge (as a percentage) and the remaining recording time (during recording mode) or playback time (during manual focus. played. ... System, this option displays a screen where you are using a battery pack that is a shortcut to use for the focusing distance display during playback mode). • If the battery pack is exhausted, the battery information may be dis- File numbers appear on various screens in ...
...the units used functions quickly and conveniently. • In and mode, this function is always set to [Ò Decoration]. [Battery Info]: When you can verify the battery charge (as a percentage) and the remaining recording time (during recording mode) or playback time (during manual focus. played. ... System, this option displays a screen where you are using a battery pack that is a shortcut to use for the focusing distance display during playback mode). • If the battery pack is exhausted, the battery information may be dis- File numbers appear on various screens in ...

Instruction Manual
Page 153
...]: If set to 9900. File numbers are automatically assigned consecutive numbers. [Auto Power Off]: In order to save power when the camcorder is powered by a battery pack, it off. • If the memory card you can still use . [Firmware]: You can contain up to 500 files (MP4 movies and photos combined...
...]: If set to 9900. File numbers are automatically assigned consecutive numbers. [Auto Power Off]: In order to save power when the camcorder is powered by a battery pack, it off. • If the memory card you can still use . [Firmware]: You can contain up to 500 files (MP4 movies and photos combined...

Instruction Manual
Page 154
Appendix: Onscreen Icons and Displays Recording Movies and modes (with the zoom control displayed) 1 Control button [PHOTO]: Take a photo (A 41, 93) 2 Smart AUTO* (A 43) 3 Zoom controls (A 48) 4 Total number of scenes / Total recording time 5 Memory operation (A 157) 6 Intelligent IS (A 45) 7 Remaining battery charge (A 157) * Available only in mode. 8 Control button [START]: Start recording a movie (A 41) 9 Face detection frame (A 76) A q Tracking frame (A 76) 154 Š Additional Information
Appendix: Onscreen Icons and Displays Recording Movies and modes (with the zoom control displayed) 1 Control button [PHOTO]: Take a photo (A 41, 93) 2 Smart AUTO* (A 43) 3 Zoom controls (A 48) 4 Total number of scenes / Total recording time 5 Memory operation (A 157) 6 Intelligent IS (A 45) 7 Remaining battery charge (A 157) * Available only in mode. 8 Control button [START]: Start recording a movie (A 41) 9 Face detection frame (A 76) A q Tracking frame (A 76) 154 Š Additional Information
Instruction Manual
Page 157
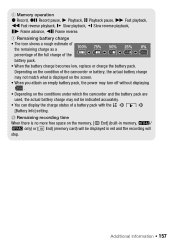
... accurately. • You can display the charge status of a battery pack with the > q > [Battery Info] setting. Depending on the condition of the battery pack. • When the battery charge becomes low, replace or charge the battery pack. Additional Information Š 157 5 Memory operation Ü Record..., Ø Fast reverse playback, Õ Slow playback, Ö Slow reverse playback, Ó Frame advance, Ô Frame reverse. 7 Remaining battery charge • The icon shows a rough estimate of the remaining charge as a 100% 75% 50% 25% 0% percentage of the full charge ...
... accurately. • You can display the charge status of a battery pack with the > q > [Battery Info] setting. Depending on the condition of the battery pack. • When the battery charge becomes low, replace or charge the battery pack. Additional Information Š 157 5 Memory operation Ü Record..., Ø Fast reverse playback, Õ Slow playback, Ö Slow reverse playback, Ó Frame advance, Ô Frame reverse. 7 Remaining battery charge • The icon shows a rough estimate of the remaining charge as a 100% 75% 50% 25% 0% percentage of the full charge ...
Instruction Manual
Page 158
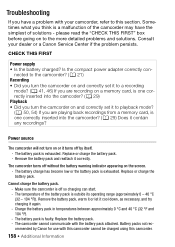
...camcorder on and correctly set it correctly. Replace or charge the battery pack. - The battery charge has become low or the battery pack is a malfunction of the camcorder may have a problem with your dealer or a Canon Service Center if the problem persists. Sometimes what you think is ...compact power adapter correctly con- Replace or charge the battery pack. Remove the battery pack, warm it or let it cool down, as necessary, and try charging it turns off by Canon for use with the battery pack attached. The battery pack is exhausted. Consult your camcorder, refer to ...
...camcorder on and correctly set it correctly. Replace or charge the battery pack. - The battery charge has become low or the battery pack is a malfunction of the camcorder may have a problem with your dealer or a Canon Service Center if the problem persists. Sometimes what you think is ...compact power adapter correctly con- Replace or charge the battery pack. Remove the battery pack, warm it or let it cool down, as necessary, and try charging it turns off by Canon for use with the battery pack attached. The battery pack is exhausted. Consult your camcorder, refer to ...

Instruction Manual
Page 159
...to a power outlet. There is on the subject. Autofocus does not work on or flashing). Clean the lens with the camcorder or battery pack. This is not a malfunction. This is a phenomenon typical of the camcorder, the image may have reached their maximum value....very quickly in front of CMOS image sensors. Additional Information Š 159 The battery may seem slightly warped. Focus manually (A 80). - Save your recordings (A 111) and initialize the memory using a battery pack recommended by Canon for MP4 movies and photos have reached the end of scenes, some space. ...
...to a power outlet. There is on the subject. Autofocus does not work on or flashing). Clean the lens with the camcorder or battery pack. This is not a malfunction. This is a phenomenon typical of the camcorder, the image may have reached their maximum value....very quickly in front of CMOS image sensors. Additional Information Š 159 The battery may seem slightly warped. Focus manually (A 80). - Save your recordings (A 111) and initialize the memory using a battery pack recommended by Canon for MP4 movies and photos have reached the end of scenes, some space. ...

Instruction Manual
Page 161
...and try charging it correctly. Replace or charge the battery pack. - lights up in red. - Remove and reinsert the memory card. The temperature of the internal lens fixture. Use a different battery pack. - sult a Canon Service Center. The LCD screen was dimmed. Additional ...Information Š 161 appears on and off repeatedly. - A memory card error occurred. Charge the battery pack in temperatures between approximately 0 °C and 40...
...and try charging it correctly. Replace or charge the battery pack. - lights up in red. - Remove and reinsert the memory card. The temperature of the internal lens fixture. Use a different battery pack. - sult a Canon Service Center. The LCD screen was dimmed. Additional ...Information Š 161 appears on and off repeatedly. - A memory card error occurred. Charge the battery pack in temperatures between approximately 0 °C and 40...


