
User Guide
Page 1
Camera User Guide ENGLISH • Make sure you read this guide before using the camera. • Store this guide safely so that you can use it in the future.
Camera User Guide ENGLISH • Make sure you read this guide before using the camera. • Store this guide safely so that you can use it in the future.
User Guide
Page 2
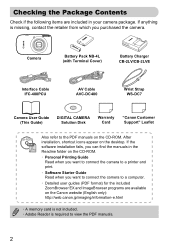
... Charger CB-2LV/CB-2LVE Interface Cable IFC-400PCU AV Cable AVC-DC400 Wrist Strap WS-DC7 Camera User Guide (This Guide) DIGITAL CAMERA Solution Disk Warranty Card "Canon Customer Support" Leaflet Also refer to the PDF manuals on the desktop. After installation, shortcut icons... appear on the CD-ROM. If the software installation fails, you can find the manuals in your camera package. If anything...
... Charger CB-2LV/CB-2LVE Interface Cable IFC-400PCU AV Cable AVC-DC400 Wrist Strap WS-DC7 Camera User Guide (This Guide) DIGITAL CAMERA Solution Disk Warranty Card "Canon Customer Support" Leaflet Also refer to the PDF manuals on the desktop. After installation, shortcut icons... appear on the CD-ROM. If the software installation fails, you can find the manuals in your camera package. If anything...
User Guide
Page 3
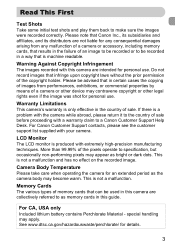
...without the prior permission of sale before proceeding with this camera are collectively referred to specification, but occasionally non-performing pixels may appear as the camera body may apply. Do not record images that Canon Inc., its subsidiaries and affiliates, and its distributors are... intended for details. 3 Warranty Limitations This camera's warranty is a problem with the camera while abroad, please return it to the country of the copyright holder. For Canon Customer Support contacts, please see the customer support list supplied with extremely...
...without the prior permission of sale before proceeding with this camera are collectively referred to specification, but occasionally non-performing pixels may appear as the camera body may apply. Do not record images that Canon Inc., its subsidiaries and affiliates, and its distributors are... intended for details. 3 Warranty Limitations This camera's warranty is a problem with the camera while abroad, please return it to the country of the copyright holder. For Canon Customer Support contacts, please see the customer support list supplied with extremely...

User Guide
Page 4
... time into my shots 62 ● Take close-up pictures of subjects (macro shooting 68 ● Take close-up pictures of subjects using the zoom (digital macro shooting 69 ● Take sepia toned or black and white pictures 75 ● Change the size of picture I want to take (recording pixels) . . .... . 70 ● Take pictures continuously 74 ● Shoot without the effects of camera shake (image stabilization 133 ● Shoot without the effects of camera shake even in low light conditions (High ISO Auto 58, 72 4
... time into my shots 62 ● Take close-up pictures of subjects (macro shooting 68 ● Take close-up pictures of subjects using the zoom (digital macro shooting 69 ● Take sepia toned or black and white pictures 75 ● Change the size of picture I want to take (recording pixels) . . .... . 70 ● Take pictures continuously 74 ● Shoot without the effects of camera shake (image stabilization 133 ● Shoot without the effects of camera shake even in low light conditions (High ISO Auto 58, 72 4

User Guide
Page 5
...; View movies 34 2 Print ● Easily print pictures 30 Save ● Save images to a computer 35 3 Other ● Turn off sounds 49 ● Use the camera abroad 15, 127 5
...; View movies 34 2 Print ● Easily print pictures 30 Save ● Save images to a computer 35 3 Other ● Turn off sounds 49 ● Use the camera abroad 15, 127 5

User Guide
Page 6
... 52 Power Saving Function (Auto Power Down 53 Clock Functions 53 3 Shooting in Special Conditions and Commonly Used Functions 55 Shooting in this camera. Checking the Package Contents .......2 Read This First 3 What Do You Want to Do 4 Conventions Used in Various Conditions ....... 56 !...to a Computer.35 Accessories 38 Separately Sold Accessories ...........40 2 Learning More 41 Components Guide 42 Information Displayed on Close Subjects (Digital Macro 69 Changing the Recording Pixels....... 70 Changing the Compression Ratio (Image Quality 70 6 Turning the Flash Off 59 Zooming ...
... 52 Power Saving Function (Auto Power Down 53 Clock Functions 53 3 Shooting in Special Conditions and Commonly Used Functions 55 Shooting in this camera. Checking the Package Contents .......2 Read This First 3 What Do You Want to Do 4 Conventions Used in Various Conditions ....... 56 !...to a Computer.35 Accessories 38 Separately Sold Accessories ...........40 2 Learning More 41 Components Guide 42 Information Displayed on Close Subjects (Digital Macro 69 Changing the Recording Pixels....... 70 Changing the Compression Ratio (Image Quality 70 6 Turning the Flash Off 59 Zooming ...

User Guide
Page 7
...-Timer 76 $ Customizing the Self-Timer ........ 77 Shooting Using a TV Monitor .......... 78 Changing the Composition with the Focus Lock 78 5 Getting More Out of Your Camera 79 Changing the AF Frame Mode........ 80 Magnifying the Focal Point 81 % Shooting with the AF Lock ........ 82 Shooting with Servo AF 82 Changing the...
...-Timer 76 $ Customizing the Self-Timer ........ 77 Shooting Using a TV Monitor .......... 78 Changing the Composition with the Focus Lock 78 5 Getting More Out of Your Camera 79 Changing the AF Frame Mode........ 80 Magnifying the Focal Point 81 % Shooting with the AF Lock ........ 82 Shooting with Servo AF 82 Changing the...
User Guide
Page 8
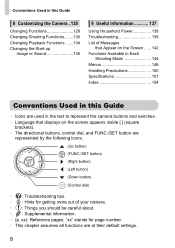
... Changing Playback Functions .......134 Changing the Start-up Image or Sound 135 9 Useful Information 137 Using Household Power 138 Troubleshooting 139 List of your camera. • : Things you should be careful about. • : Supplemental information. • (p. "xx" stands for page number. •...146 Handling Precautions 150 Specifications 151 Index 154 Conventions Used in this Guide • Icons are used in the text to represent the camera buttons and switches. • Language that displays on the screen appears inside [ ] (square brackets). • The directional buttons, ...
... Changing Playback Functions .......134 Changing the Start-up Image or Sound 135 9 Useful Information 137 Using Household Power 138 Troubleshooting 139 List of your camera. • : Things you should be careful about. • : Supplemental information. • (p. "xx" stands for page number. •...146 Handling Precautions 150 Specifications 151 Index 154 Conventions Used in this Guide • Icons are used in the text to represent the camera buttons and switches. • Language that displays on the screen appears inside [ ] (square brackets). • The directional buttons, ...
User Guide
Page 9
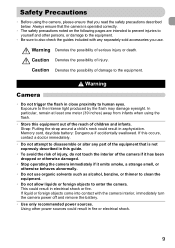
...using the flash. • Store this guide. • To avoid the risk of injury, do not touch the interior of children and infants. Warning Camera • Do not trigger the flash in close proximity to the intense light produced by the flash may damage eyesight. In particular, remain at least... one meter (39 inches) away from infants when using the camera, please ensure that you use organic solvents such as alcohol, benzine, or thinner to clean the equipment. • Do not allow liquids or foreign...
...using the flash. • Store this guide. • To avoid the risk of injury, do not touch the interior of children and infants. Warning Camera • Do not trigger the flash in close proximity to the intense light produced by the flash may damage eyesight. In particular, remain at least... one meter (39 inches) away from infants when using the camera, please ensure that you use organic solvents such as alcohol, benzine, or thinner to clean the equipment. • Do not allow liquids or foreign...

User Guide
Page 10
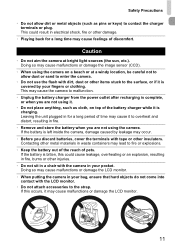
...water and seek medical assistance. Places subject to severe impacts. sea water) or other injuries. Caution • Be careful not to bang the camera or subject it to strong impacts or shocks when hanging it from listening with water (e.g. Safety Precautions Battery, Battery Charger • Use only ... It is also possible to suffer hearing loss from the outlet and consult your camera distributor or the closest Canon Customer Support Help Desk. • Use only the specified battery charger to injury or damage the camera. • Do not use if the power cord or plug are damaged, ...
...water and seek medical assistance. Places subject to severe impacts. sea water) or other injuries. Caution • Be careful not to bang the camera or subject it to strong impacts or shocks when hanging it from listening with water (e.g. Safety Precautions Battery, Battery Charger • Use only ... It is also possible to suffer hearing loss from the outlet and consult your camera distributor or the closest Canon Customer Support Help Desk. • Use only the specified battery charger to injury or damage the camera. • Do not use if the power cord or plug are damaged, ...
User Guide
Page 11
...Remove and store the battery when you discard batteries, cover the terminals with tape or other injuries. • Do not sit in a chair with the camera in your fingers or clothing. If the battery is charging. If the battery is bitten, this occurs, it may occur. • Before you are not... using the camera on top of discomfort. Doing so may cause feelings of the battery charger while it . • Do not place anything, such as pins or keys...
...Remove and store the battery when you discard batteries, cover the terminals with tape or other injuries. • Do not sit in a chair with the camera in your fingers or clothing. If the battery is charging. If the battery is bitten, this occurs, it may occur. • Before you are not... using the camera on top of discomfort. Doing so may cause feelings of the battery charger while it . • Do not place anything, such as pins or keys...

User Guide
Page 13
Be sure that your body while holding the camera firmly by the sides. The latter part of this chapter explains how to shoot and view movies and transfer images to view, erase and print the images you take. 1 Getting Started This chapter explains preparations before shooting, how to shoot in A mode, and then how to a computer. Attaching the Strap/Holding the Camera • Attach the included strap and place it around your wrist to avoid dropping the camera during use. • Keep your arms tight against your fingers do not block the flash. Strap 13
Be sure that your body while holding the camera firmly by the sides. The latter part of this chapter explains how to shoot and view movies and transfer images to view, erase and print the images you take. 1 Getting Started This chapter explains preparations before shooting, how to shoot in A mode, and then how to a computer. Attaching the Strap/Holding the Camera • Attach the included strap and place it around your wrist to avoid dropping the camera during use. • Keep your arms tight against your fingers do not block the flash. Strap 13
User Guide
Page 14
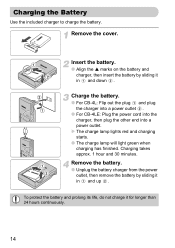
Charging the Battery Use the included charger to charge the battery. The charge lamp lights red and charging starts. ● The charge lamp will light green when charging has finished. Charge the battery. ● For CB-4L: Flip out the plug and plug the charger into a power outlet . ● For CB-4LE: Plug the power cord into the charger, then plug the other end into a power outlet. Charging takes approx. 1 hour and 30 minutes. Remove the battery. ● Unplug the battery charger from the power outlet, then remove the battery by sliding it in and up . Remove the cover. Insert ...
Charging the Battery Use the included charger to charge the battery. The charge lamp lights red and charging starts. ● The charge lamp will light green when charging has finished. Charge the battery. ● For CB-4L: Flip out the plug and plug the charger into a power outlet . ● For CB-4LE: Plug the power cord into the charger, then plug the other end into a power outlet. Charging takes approx. 1 hour and 30 minutes. Remove the battery. ● Unplug the battery charger from the power outlet, then remove the battery by sliding it in and up . Remove the cover. Insert ...
User Guide
Page 15
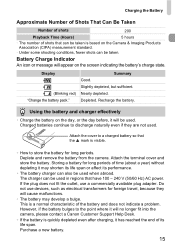
... the battery. Using the battery and charger effectively • Charge the battery on the day, or the day before, it will appear on the Camera & Imaging Products Association (CIPA) measurement standard. • Under some shooting conditions, fewer shots can be used . However, if the battery bulges to... 100 - 240 V (50/60 Hz) AC power. Attach the cover to discharge naturally even if they will no longer fit into the camera, please contact a Canon Customer Support Help Desk. • If the battery is visible. • How to the point where it may develop a bulge. Slightly depleted...
... the battery. Using the battery and charger effectively • Charge the battery on the day, or the day before, it will appear on the Camera & Imaging Products Association (CIPA) measurement standard. • Under some shooting conditions, fewer shots can be used . However, if the battery bulges to... 100 - 240 V (50/60 Hz) AC power. Attach the cover to discharge naturally even if they will no longer fit into the camera, please contact a Canon Customer Support Help Desk. • If the battery is visible. • How to the point where it may develop a bulge. Slightly depleted...

User Guide
Page 16
... it will not be able to record images if the tab is oriented correctly. Inserting the memory card in the wrong direction could damage the camera. 16 Terminals Terminals Insert the memory card. ● Insert the memory card as shown until it locks into place. Inserting the Battery and ...a click. ● Be sure the memory card is in the locked position. Open the cover. ● Slide the cover , and open it locks into the camera. Check the card's write-protect tab. ● If the memory card has a write-protect tab, you hear a click. Insert the battery. ● Insert the...
... it will not be able to record images if the tab is oriented correctly. Inserting the memory card in the wrong direction could damage the camera. 16 Terminals Terminals Insert the memory card. ● Insert the memory card as shown until it locks into place. Inserting the Battery and ...a click. ● Be sure the memory card is in the locked position. Open the cover. ● Slide the cover , and open it locks into the camera. Check the card's write-protect tab. ● If the memory card has a write-protect tab, you hear a click. Insert the battery. ● Insert the...

User Guide
Page 17
until you hear a click, then slowly release it. The battery will pop up . Remove the memory card. ● Push the memory card in until it locks into place with a click. The memory card will pop up . 17 Inserting the Battery and Memory Card Close the cover. ● Close the cover , and slide it Removing the Battery and Memory Card Remove the battery. ● Open the cover and press the battery lock in the direction of the arrow.
until you hear a click, then slowly release it. The battery will pop up . Remove the memory card. ● Push the memory card in until it locks into place with a click. The memory card will pop up . 17 Inserting the Battery and Memory Card Close the cover. ● Close the cover , and slide it Removing the Battery and Memory Card Remove the battery. ● Open the cover and press the battery lock in the direction of the arrow.
User Guide
Page 18
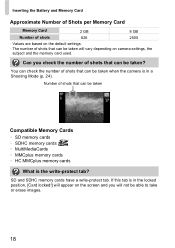
... 2505 • Values are based on the default settings. • The number of shots that can be taken when the camera is in the locked position, [Card locked!] will appear on camera settings, the subject and the memory card used. SD and SDHC memory cards have a write-protect tab. You can check...
... 2505 • Values are based on the default settings. • The number of shots that can be taken when the camera is in the locked position, [Card locked!] will appear on camera settings, the subject and the memory card used. SD and SDHC memory cards have a write-protect tab. You can check...

User Guide
Page 19
Setting the Date and Time The Date/Time settings screen will appear the first time the camera is turned on the camera. ● Press the power button. Daylight saving time settings If you select in Step 2 and press the op buttons or turn the  dial and ... set the date and time, the Date/ Time screen will set them. Since the dates and times recorded into your images are based on the camera. Set the date and time. ● Press the qr buttons to select an option. ● Press the op buttons or turn the  dial to...
Setting the Date and Time The Date/Time settings screen will appear the first time the camera is turned on the camera. ● Press the power button. Daylight saving time settings If you select in Step 2 and press the op buttons or turn the  dial and ... set the date and time, the Date/ Time screen will set them. Since the dates and times recorded into your images are based on the camera. Set the date and time. ● Press the qr buttons to select an option. ● Press the op buttons or turn the  dial to...

User Guide
Page 20
...time. ● Follow Steps 2 and 3 on . Date/Time battery • The camera has a built-in date/time battery (backup battery) that allows the date/time settings to.../time battery can change the current date and time settings. Select [Date/Time] in about 4 hours even if the camera is not turned on. • If the date/time battery is depleted, the Date/Time menu will appear when you... 3 tab. ● Press the qr buttons to select the 3 tab. ● Press the op buttons or turn the camera on p. 19 to adjust the setting. ● To close the menus, press the n button. Follow the steps on p....
...time. ● Follow Steps 2 and 3 on . Date/Time battery • The camera has a built-in date/time battery (backup battery) that allows the date/time settings to.../time battery can change the current date and time settings. Select [Date/Time] in about 4 hours even if the camera is not turned on. • If the date/time battery is depleted, the Date/Time menu will appear when you... 3 tab. ● Press the qr buttons to select the 3 tab. ● Press the op buttons or turn the camera on p. 19 to adjust the setting. ● To close the menus, press the n button. Follow the steps on p....

User Guide
Page 21
Display the settings screen. ● Press and hold the m button , then immediately press the n button . You can change the display language by pressing the n button, selecting the 3 tab, and selecting the [Language] menu item. 21 The clock will close. Set the display language. ● Press the opqr buttons or turn the  dial to remove the clock and repeat Step 2. If the clock appears, press the m button to select a language, then press the m button. Setting the Display Language You can also change the language displayed in Step 2. Set the playback mode. ● ...
Display the settings screen. ● Press and hold the m button , then immediately press the n button . You can change the display language by pressing the n button, selecting the 3 tab, and selecting the [Language] menu item. 21 The clock will close. Set the display language. ● Press the opqr buttons or turn the  dial to remove the clock and repeat Step 2. If the clock appears, press the m button to select a language, then press the m button. Setting the Display Language You can also change the language displayed in Step 2. Set the playback mode. ● ...
