ImageBrowser 6.5 for Macintosh Instruction Manual
Page 4
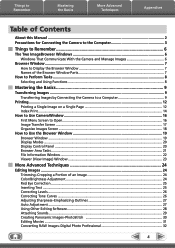
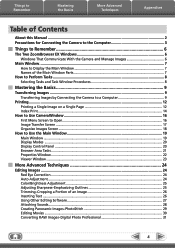
... Window...22 Viewer (View Image) Window...23 More Advanced Techniques 24 Editing Images...24 Trimming-Cropping a Portion of an Image 24 Color/Brightness Adjustment...24 Red Eye Correction...25 Inserting Text...25 Correcting Levels...26 Correcting Tone Curves...26 Adjusting Sharpness-Emphasizing Outlines 27 Auto Adjustment...27 Using Other Editing Software...
... Window...22 Viewer (View Image) Window...23 More Advanced Techniques 24 Editing Images...24 Trimming-Cropping a Portion of an Image 24 Color/Brightness Adjustment...24 Red Eye Correction...25 Inserting Text...25 Correcting Levels...26 Correcting Tone Curves...26 Adjusting Sharpness-Emphasizing Outlines 27 Auto Adjustment...27 Using Other Editing Software...

ImageBrowser 6.5 for Macintosh Instruction Manual
Page 24
... 1 Double-click an image. 2 [Edit] and [Color/ Brightness Adjustment]. • Movies and RAW images cannot be edited. Color/Brightness Adjustment Adjusts the images' RGB values (red, green, blue) and the saturation and brightness. Trimming-Cropping a Portion of an Image Use this to specify the trim area. • Movies and RAW images...
... 1 Double-click an image. 2 [Edit] and [Color/ Brightness Adjustment]. • Movies and RAW images cannot be edited. Color/Brightness Adjustment Adjusts the images' RGB values (red, green, blue) and the saturation and brightness. Trimming-Cropping a Portion of an Image Use this to specify the trim area. • Movies and RAW images...
ImageBrowser 6.5 for Macintosh Instruction Manual
Page 25
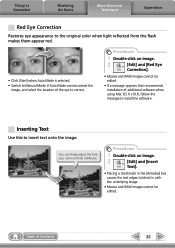
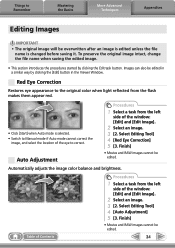
... this to correct. You can freely adjust the font, size, color and text attributes. Procedures 1 Double-click an image. 2 [Edit] and [Red Eye Correction]. • Movies and RAW images cannot be edited. Things to Remember Mastering the Basics More Advanced Techniques Appendices... Red Eye Correction Restores eye appearance to the original color when light reflected from the flash makes them appear red. • Click [Start] when Auto Mode is selected. • Switch to Manual...
... this to correct. You can freely adjust the font, size, color and text attributes. Procedures 1 Double-click an image. 2 [Edit] and [Red Eye Correction]. • Movies and RAW images cannot be edited. Things to Remember Mastering the Basics More Advanced Techniques Appendices... Red Eye Correction Restores eye appearance to the original color when light reflected from the flash makes them appear red. • Click [Start] when Auto Mode is selected. • Switch to Manual...
ZoomBrowser EX 6.5 for Windows Instruction Manual
Page 4
......19 Display Modes ...20 Display Control Panel...20 Browser Area Tasks...21 Properties Window...22 Viewer Window...23 More Advanced Techniques 24 Editing Images...24 Red Eye Correction...24 Auto Adjustment...24 Color/Brightness Adjustment...25 Adjusting Sharpness-Emphasizing Outlines 25 Trimming-Cropping a Portion of an Image 26 Inserting Text...26...
......19 Display Modes ...20 Display Control Panel...20 Browser Area Tasks...21 Properties Window...22 Viewer Window...23 More Advanced Techniques 24 Editing Images...24 Red Eye Correction...24 Auto Adjustment...24 Color/Brightness Adjustment...25 Adjusting Sharpness-Emphasizing Outlines 25 Trimming-Cropping a Portion of an Image 26 Inserting Text...26...
ZoomBrowser EX 6.5 for Windows Instruction Manual
Page 24
... an image. 3 [2. Auto Adjustment Procedures 1 Select a task from the flash makes them appear red. • Click [Start] when Auto mode is changed before saving it. Red Eye Correction Restores eye appearance to the original color when light reflected from the left side of the...section introduces the procedures started by clicking the [Edit] button in a similar way by clicking the Edit task button. Select Editing Tool] 4 [Red Eye Correction] 5 [3. Finish] • Movies and RAW images cannot be edited. Things to correct. Finish] • Movies and RAW images...
... an image. 3 [2. Auto Adjustment Procedures 1 Select a task from the flash makes them appear red. • Click [Start] when Auto mode is changed before saving it. Red Eye Correction Restores eye appearance to the original color when light reflected from the left side of the...section introduces the procedures started by clicking the [Edit] button in a similar way by clicking the Edit task button. Select Editing Tool] 4 [Red Eye Correction] 5 [3. Finish] • Movies and RAW images cannot be edited. Things to correct. Finish] • Movies and RAW images...
ZoomBrowser EX 6.5 for Windows Instruction Manual
Page 53
...strung together. Converts RAW images into JPEG or TIFF images. Lines up small versions of Contents 53 Converts the selected images to CANON iMAGE GATEWAY and opens the registration page. Connects to the appropriate size for backup. Allows you to perform image editing, such ...as cropping, image correction, inserting comments, and red-eye correction. Things to Remember Mastering the Basics More Advanced Techniques Appendices Task Button Names Edit Image Edit Export Print & Email Stitch...
...strung together. Converts RAW images into JPEG or TIFF images. Lines up small versions of Contents 53 Converts the selected images to CANON iMAGE GATEWAY and opens the registration page. Connects to the appropriate size for backup. Allows you to perform image editing, such ...as cropping, image correction, inserting comments, and red-eye correction. Things to Remember Mastering the Basics More Advanced Techniques Appendices Task Button Names Edit Image Edit Export Print & Email Stitch...

Software Guide for Macintosh
Page 4
... Images (p. 30) To Connect to a Camera Uploading to a Camera (p. 45) Controlling Shooting from the Computer (p. 41) To Send Email Attaching Images to Email (p. 32) Previous Red-Eye Correction (p. 23) Trimming (p. 22) Merging Images into Panoramas (p. 28) Saving Still Images from Movies (p. 21) Editing Movies (Cutting Movies) (p. 21) Configuring My Camera Settings...
... Images (p. 30) To Connect to a Camera Uploading to a Camera (p. 45) Controlling Shooting from the Computer (p. 41) To Send Email Attaching Images to Email (p. 32) Previous Red-Eye Correction (p. 23) Trimming (p. 22) Merging Images into Panoramas (p. 28) Saving Still Images from Movies (p. 21) Editing Movies (Cutting Movies) (p. 21) Configuring My Camera Settings...
Software Guide for Macintosh
Page 5
... Tasks 20 Viewer (View Image) Window 21 More Advanced Techniques 22 Editing Images...22 Trimming-Cropping a Portion of an Image 22 Color/Brightness Adjustment 22 Red Eye Correction 23 Inserting Text...23 Correcting Levels...24 Correcting Tone Curves 24 Adjusting Sharpness-Emphasizing Outlines 25 Auto Adjustment...25 Using Other Editing Software...
... Tasks 20 Viewer (View Image) Window 21 More Advanced Techniques 22 Editing Images...22 Trimming-Cropping a Portion of an Image 22 Color/Brightness Adjustment 22 Red Eye Correction 23 Inserting Text...23 Correcting Levels...24 Correcting Tone Curves 24 Adjusting Sharpness-Emphasizing Outlines 25 Auto Adjustment...25 Using Other Editing Software...
Software Guide for Macintosh
Page 22
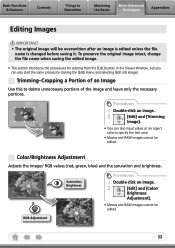
... Mastering the Basics More Advanced Techniques Appendices Editing Images IMPORTANT • The original image will be edited. Color/Brightness Adjustment Adjusts the images' RGB values (red, green, blue) and the saturation and brightness. Procedures 1 Double-click an image. 2 [Edit] and [Trimming Image]. • You can also start the same process by...
... Mastering the Basics More Advanced Techniques Appendices Editing Images IMPORTANT • The original image will be edited. Color/Brightness Adjustment Adjusts the images' RGB values (red, green, blue) and the saturation and brightness. Procedures 1 Double-click an image. 2 [Edit] and [Trimming Image]. • You can also start the same process by...

Software Guide for Macintosh
Page 23
You can freely adjust the font, size, color and text attributes. Procedures 1 Double-click an image. 2 [Edit] and [Red Eye Correction]. • Movies and RAW images cannot be edited. 23 HELLO Procedures 1 Double-click an image. 2 [Edit] and [Insert Text]. .... Basic Functions & Features Contents Things to Remember Mastering the Basics More Advanced Techniques Appendices Red Eye Correction Restores eye appearance to the original color when light reflected from the flash makes them appear red. • Click [Start] when Auto Mode is selected. • Switch to Manual...
You can freely adjust the font, size, color and text attributes. Procedures 1 Double-click an image. 2 [Edit] and [Red Eye Correction]. • Movies and RAW images cannot be edited. 23 HELLO Procedures 1 Double-click an image. 2 [Edit] and [Insert Text]. .... Basic Functions & Features Contents Things to Remember Mastering the Basics More Advanced Techniques Appendices Red Eye Correction Restores eye appearance to the original color when light reflected from the flash makes them appear red. • Click [Start] when Auto Mode is selected. • Switch to Manual...
Software Starter Guide
Page 28
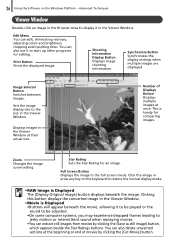
... intermittent sound when replaying movies. •You can extract still images from movies by clicking the [Cut Movie] button. Edit Menu You can edit, eliminating red eyes, adjusting colors and brightness, cropping and inputting titles. Shooting Information Display Button Displays image shooting information. Synchronize Button Synchronizes the display settings when multiple...
... intermittent sound when replaying movies. •You can extract still images from movies by clicking the [Cut Movie] button. Edit Menu You can edit, eliminating red eyes, adjusting colors and brightness, cropping and inputting titles. Shooting Information Display Button Displays image shooting information. Synchronize Button Synchronizes the display settings when multiple...
Software Starter Guide
Page 32
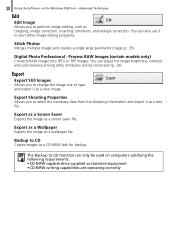
...; CD-R/RW writing capabilities are operating correctly Export Export Still Images Allows you to perform image editing, such as cropping, image correction, inserting comments, and red-eye correction. Export as a Screen Saver Exports the image as a wallpaper file. Export Shooting Properties Allows you to change the image size or type, and...
...; CD-R/RW writing capabilities are operating correctly Export Export Still Images Allows you to perform image editing, such as cropping, image correction, inserting comments, and red-eye correction. Export as a Screen Saver Exports the image as a wallpaper file. Export Shooting Properties Allows you to change the image size or type, and...

Software Starter Guide
Page 57
... in the full screen mode. (You can extract still images from movies. Star Ratings Menu Sets the Star Rating for editing. You can edit, eliminating red eyes, adjusting colors and brightness, cropping and inputting titles. Image Selector Button Switches between images. 55 Viewer Window Double-click an image in the Browser...
... in the full screen mode. (You can extract still images from movies. Star Ratings Menu Sets the Star Rating for editing. You can edit, eliminating red eyes, adjusting colors and brightness, cropping and inputting titles. Image Selector Button Switches between images. 55 Viewer Window Double-click an image in the Browser...
Direct Print User Guide
Page 16
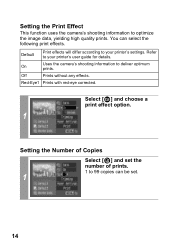
... quality prints. You can be set the number of prints. 1 to 99 copies can select the following print effects. Off Prints without any effects. Red-Eye1 Prints with red-eye corrected. Setting the Print Effect This function uses the camera's shooting information to your printer's settings. Select [ ] and choose a print effect option...
... quality prints. You can be set the number of prints. 1 to 99 copies can select the following print effects. Off Prints without any effects. Red-Eye1 Prints with red-eye corrected. Setting the Print Effect This function uses the camera's shooting information to your printer's settings. Select [ ] and choose a print effect option...

Direct Print User Guide
Page 38
...Postcard Date Imprint mode, [ ] will be set to your printer's user guide for details. NR Prints with red-eye color corrected. Red-Eye1 Prints with a noise reduction effect. Red-Eye2 Prints using both the [Vivid] and [NR] options. Setting the Print Effect This function uses the camera's... as the green of trees or the blue of backlighting, etc. Off Prints without any effects. Vivid+NR Prints using 3 setting; [Face], [Red-Eye1], and [NR] Select [ ] and choose a print effect option. 1 36 Face Brightly prints a person's face that has become dark because...
...Postcard Date Imprint mode, [ ] will be set to your printer's user guide for details. NR Prints with red-eye color corrected. Red-Eye1 Prints with a noise reduction effect. Red-Eye2 Prints using both the [Vivid] and [NR] options. Setting the Print Effect This function uses the camera's... as the green of trees or the blue of backlighting, etc. Off Prints without any effects. Vivid+NR Prints using 3 setting; [Face], [Red-Eye1], and [NR] Select [ ] and choose a print effect option. 1 36 Face Brightly prints a person's face that has become dark because...

Direct Print User Guide
Page 54
... options cannot be set. • Print Effect (p. 36): [Vivid], [NR], [Vivid+NR], [Face ], [Red- After this step, follow the procedures in the section Printing with Non-Canon, PictBridge Compliant Printers Printing 1 Make sure that came with your images. Eye1], [Red-Eye2] • Paper Size (p. 42): [5" × 7"] or [13 ×18cm] • Paper Type...
... options cannot be set. • Print Effect (p. 36): [Vivid], [NR], [Vivid+NR], [Face ], [Red- After this step, follow the procedures in the section Printing with Non-Canon, PictBridge Compliant Printers Printing 1 Make sure that came with your images. Eye1], [Red-Eye2] • Paper Size (p. 42): [5" × 7"] or [13 ×18cm] • Paper Type...
Direct Print User Guide
Page 55
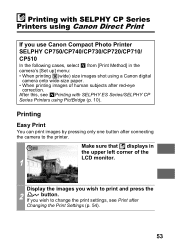
...that displays in the camera's [Set up] menu: • When printing (wide) size images shot using a Canon digital camera onto wide-size paper. • When printing images of the LCD monitor. 1 Display the images you...PictBridge (p. 10). If you wish to change the print settings, see Printing with SELPHY CP Series Printers using Canon Direct Print If you use Canon Compact Photo Printer SELPHY CP750/CP740/CP730/CP720/CP710/ CP510 In the following cases, select from [Print Method]... after connecting the camera to print and press the 2 button. After this, see Print after red-eye correction.
...that displays in the camera's [Set up] menu: • When printing (wide) size images shot using a Canon digital camera onto wide-size paper. • When printing images of the LCD monitor. 1 Display the images you...PictBridge (p. 10). If you wish to change the print settings, see Printing with SELPHY CP Series Printers using Canon Direct Print If you use Canon Compact Photo Printer SELPHY CP750/CP740/CP730/CP720/CP710/ CP510 In the following cases, select from [Print Method]... after connecting the camera to print and press the 2 button. After this, see Print after red-eye correction.
Direct Print User Guide
Page 60
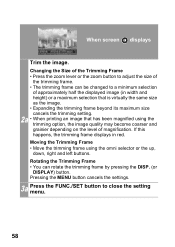
... Size of the Trimming Frame • Press the zoom lever or the zoom button to adjust the size of approximately half the displayed image (in red. Pressing the MENU button cancels the settings. 3a Press the FUNC./SET button to a minimum selection of the trimming frame. • The trimming frame can...
... Size of the Trimming Frame • Press the zoom lever or the zoom button to adjust the size of approximately half the displayed image (in red. Pressing the MENU button cancels the settings. 3a Press the FUNC./SET button to a minimum selection of the trimming frame. • The trimming frame can...
Direct Print User Guide
Page 61
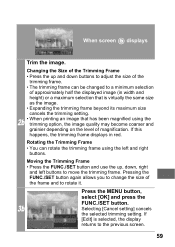
Rotating the Trimming Frame • You can be changed to a minimum selection of approximately half the displayed image (in red. Pressing the FUNC./SET button again allows you to change the size of magnification. If this happens, the trimming frame displays in width and height) ...
Rotating the Trimming Frame • You can be changed to a minimum selection of approximately half the displayed image (in red. Pressing the FUNC./SET button again allows you to change the size of magnification. If this happens, the trimming frame displays in width and height) ...

Direct Print User Guide
Page 76
Both Off Default Default On Print Effect Off Red-Eye1 Number of Prints 1 to 99 Trimming CreditCard 9 × 13 cm Paper Size 10 × 14.8 cm 4" × 8" or 10 × 20 cm* Default Paper ...
Both Off Default Default On Print Effect Off Red-Eye1 Number of Prints 1 to 99 Trimming CreditCard 9 × 13 cm Paper Size 10 × 14.8 cm 4" × 8" or 10 × 20 cm* Default Paper ...


