ImageBrowser 6.5 for Macintosh Instruction Manual
Page 10
.... For details on the previous page, then click the [Import] button. HINT Changing the Transfer Destination Folder The default settings save transferred images into the [Pictures] folder. To change the destination folder, click the button shown on the right in the Browser Window. In [Folder Settings], click [Browse] to transfer. Table...
.... For details on the previous page, then click the [Import] button. HINT Changing the Transfer Destination Folder The default settings save transferred images into the [Pictures] folder. To change the destination folder, click the button shown on the right in the Browser Window. In [Folder Settings], click [Browse] to transfer. Table...
ImageBrowser 6.5 for Macintosh Instruction Manual
Page 32
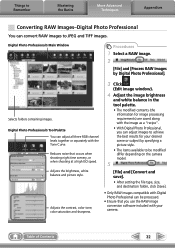
...palette. • The modified contents (the information for image processing requirements) are saved along with the Tone Curve. Adjusts the brightness, white balance and picture style. Selects folders containing images. Digital Photo Professional's Tool Palette You can adjust all three RGB channel levels together or separately with the image as... scene or subject by Digital Photo Professional]. Digital Photo Professional's Main Window Procedures 1 Select a RAW image. 2 [File] and [Process RAW Images by specifying a picture style. • The items available to JPEG and TIFF images.
...palette. • The modified contents (the information for image processing requirements) are saved along with the Tone Curve. Adjusts the brightness, white balance and picture style. Selects folders containing images. Digital Photo Professional's Tool Palette You can adjust all three RGB channel levels together or separately with the image as... scene or subject by Digital Photo Professional]. Digital Photo Professional's Main Window Procedures 1 Select a RAW image. 2 [File] and [Process RAW Images by specifying a picture style. • The items available to JPEG and TIFF images.
ZoomBrowser EX 6.5 for Windows Instruction Manual
Page 10
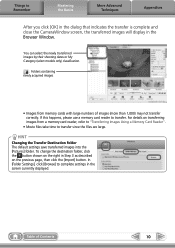
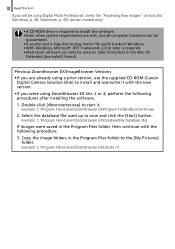
... Reader". • Movie files take time to transfer. Things to transfer. HINT Changing the Transfer Destination Folder The default settings save transferred images into the [Pictures] or [My Pictures] folders. In the [Folder Settings] tab, click [Browse] to complete settings in the Main Window.
... Reader". • Movie files take time to transfer. Things to transfer. HINT Changing the Transfer Destination Folder The default settings save transferred images into the [Pictures] or [My Pictures] folders. In the [Folder Settings] tab, click [Browse] to complete settings in the Main Window.
ZoomBrowser EX 6.5 for Windows Instruction Manual
Page 31
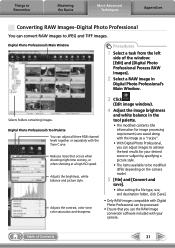
..."recipe". • With Digital Photo Professional, you use the RAW image conversion software included with your desired scene or subject by specifying a picture style. • The items available to be processed. • Ensure that occurs when shooting night time scenery, or when shooting at a ... Photo Professional You can adjust all three RGB channel levels together or separately with the Tone Curve. Adjusts the brightness, white balance and picture style. Adjusts the contrast, color tone, color saturation and sharpness. 3 Click (Edit image window). 4 Adjust the image brightness and...
..."recipe". • With Digital Photo Professional, you use the RAW image conversion software included with your desired scene or subject by specifying a picture style. • The items available to be processed. • Ensure that occurs when shooting night time scenery, or when shooting at a ... Photo Professional You can adjust all three RGB channel levels together or separately with the Tone Curve. Adjusts the brightness, white balance and picture style. Adjusts the contrast, color tone, color saturation and sharpness. 3 Click (Edit image window). 4 Adjust the image brightness and...

Software Guide for Macintosh
Page 11
... large numbers of images (more than 1,000) may not download correctly. HINT Changing the Download Destination Folder The default settings save downloaded images into the [Pictures] folder. If this happens, please use a memory card reader to Remember Mastering the Basics More Advanced Techniques Appendices When you click [OK] in the dialog...
... large numbers of images (more than 1,000) may not download correctly. HINT Changing the Download Destination Folder The default settings save downloaded images into the [Pictures] folder. If this happens, please use a memory card reader to Remember Mastering the Basics More Advanced Techniques Appendices When you click [OK] in the dialog...
Software Starter Guide
Page 12
... EX\Database\My Database.zbd If images were saved in the Program Files folder to the [My Pictures] folder. Example: C:\Program Files\Canon\ZoomBrowser EX\Library (1) Copy the image folders in the Program Files folder, then continue with the new version. •... drive is required to install the software. • Even when system requirements are already using a prior version, use the supplied CD-ROM (Canon Digital Camera Solution Disk) to install and overwrite it with the following procedures after installing the software. 1. Previous ZoomBrowser EX/ImageBrowser Versions •If...
... EX\Database\My Database.zbd If images were saved in the Program Files folder to the [My Pictures] folder. Example: C:\Program Files\Canon\ZoomBrowser EX\Library (1) Copy the image folders in the Program Files folder, then continue with the new version. •... drive is required to install the software. • Even when system requirements are already using a prior version, use the supplied CD-ROM (Canon Digital Camera Solution Disk) to install and overwrite it with the following procedures after installing the software. 1. Previous ZoomBrowser EX/ImageBrowser Versions •If...

Software Starter Guide
Page 18
... this point.) CameraWindow Thumbnail Window View Window 3 Download the images using Canon CameraWindow] from the AutoPlay dialog. The Basics 2 Select [Canon CameraWindow] when a dialog (Events dialog) similar to communicate. (Images are saved into the [Pictures] or [My Pictures] folder. Your camera model name or [Canon Camera] will appear here. By default, the downloaded images are...
... this point.) CameraWindow Thumbnail Window View Window 3 Download the images using Canon CameraWindow] from the AutoPlay dialog. The Basics 2 Select [Canon CameraWindow] when a dialog (Events dialog) similar to communicate. (Images are saved into the [Pictures] or [My Pictures] folder. Your camera model name or [Canon Camera] will appear here. By default, the downloaded images are...

Software Starter Guide
Page 21
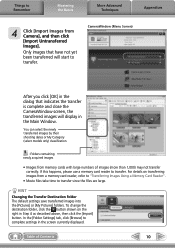
... they will also appear grouped by clicking [Preferences]. • By default, all the images that have yet to be downloaded will download to the [Pictures] or [My Pictures] folder. • To download images that have had their transfer settings set with the camera, click [Preferences] and select [Images whose transfer settings were...
... they will also appear grouped by clicking [Preferences]. • By default, all the images that have yet to be downloaded will download to the [Pictures] or [My Pictures] folder. • To download images that have had their transfer settings set with the camera, click [Preferences] and select [Images whose transfer settings were...

Software Starter Guide
Page 35
... the window as required. 6 Click the [Release] button. • You can release the shutter by [Canon Utilities], [CameraWindow], [RemoteCapture DC 3] and [RemoteCapture DC]. According to the default settings, recorded images are saved into the [Pictures] or [My Pictures] folder. 33 3 In the [Start] menu, select [All Programs] or [Programs], followed by pressing the...
... the window as required. 6 Click the [Release] button. • You can release the shutter by [Canon Utilities], [CameraWindow], [RemoteCapture DC 3] and [RemoteCapture DC]. According to the default settings, recorded images are saved into the [Pictures] or [My Pictures] folder. 33 3 In the [Start] menu, select [All Programs] or [Programs], followed by pressing the...
Software Starter Guide
Page 39
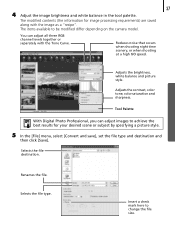
...Adjust the image brightness and white balance in the tool palette. The modified contents (the information for your desired scene or subject by specifying a picture style. 5 In the [File] menu, select [Convert and save], set the file type and destination and then click [Save]. Reduces noise ...along with the Tone Curve. Selects the file type. The items available to change the file size. Adjusts the brightness, white balance and picture style. Insert a check mark here to be modified differ depending on the camera model. Tool Palette With Digital Photo Professional, you can...
...Adjust the image brightness and white balance in the tool palette. The modified contents (the information for your desired scene or subject by specifying a picture style. 5 In the [File] menu, select [Convert and save], set the file type and destination and then click [Save]. Reduces noise ...along with the Tone Curve. Selects the file type. The items available to change the file size. Adjusts the brightness, white balance and picture style. Insert a check mark here to be modified differ depending on the camera model. Tool Palette With Digital Photo Professional, you can...

Software Starter Guide
Page 48
... camera or the computer. The Basics CameraWindow displays when the camera and computer are set to the mode to communicate. (Images are saved into the [Pictures] folder.
... camera or the computer. The Basics CameraWindow displays when the camera and computer are set to the mode to communicate. (Images are saved into the [Pictures] folder.

Software Starter Guide
Page 50
... clicking [Preferences]. You can adjust the settings, such as the image type to be downloaded. • Click [Lets you select and download images] to the [Pictures] folder. • To download images that have had their transfer settings set with the camera, click [Preferences] and select [Images whose transfer settings were specified...
... clicking [Preferences]. You can adjust the settings, such as the image type to be downloaded. • Click [Lets you select and download images] to the [Pictures] folder. • To download images that have had their transfer settings set with the camera, click [Preferences] and select [Images whose transfer settings were specified...

Software Starter Guide
Page 64
... settings and the settings at the bottom of the window as required. 6 Click the [Release] button. • You can also release the shutter by the [Canon Utilities] folder, [CameraWindow] folder and the [RemoteCapture DC] icon. 62 Using the Software on the Macintosh Platform - Advanced Techniques 3 Double-click the [Applications] folder, followed... activation is slightly longer for remote shooting than when the camera is used independently. According to the default settings, recorded images are saved into the [Pictures] folder.
... settings and the settings at the bottom of the window as required. 6 Click the [Release] button. • You can also release the shutter by the [Canon Utilities] folder, [CameraWindow] folder and the [RemoteCapture DC] icon. 62 Using the Software on the Macintosh Platform - Advanced Techniques 3 Double-click the [Applications] folder, followed... activation is slightly longer for remote shooting than when the camera is used independently. According to the default settings, recorded images are saved into the [Pictures] folder.
Software Starter Guide
Page 68
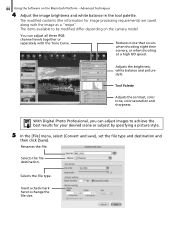
...) are saved along with the Tone Curve. Renames the file. The modified contents (the information for your desired scene or subject by specifying a picture style. 5 In the [File] menu, select [Convert and save], set the file type and destination and then click [Save]. The items... available to change the file size. Adjusts the brightness, white balance and picture style. With Digital Photo Professional, you can adjust all three RGB channel levels together or separately with the image as a "recipe". Advanced ...
...) are saved along with the Tone Curve. Renames the file. The modified contents (the information for your desired scene or subject by specifying a picture style. 5 In the [File] menu, select [Convert and save], set the file type and destination and then click [Save]. The items... available to change the file size. Adjusts the brightness, white balance and picture style. With Digital Photo Professional, you can adjust all three RGB channel levels together or separately with the image as a "recipe". Advanced ...
Direct Print User Guide
Page 8
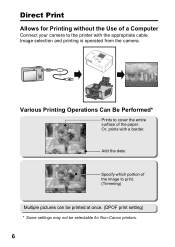
Specify which portion of the image to cover the entire surface of a Computer Connect your camera to the printer with a border. 02/02/2008 Add the date. Or, prints with the appropriate cable. Direct Print Allows for Non-Canon printers. 6 Various Printing Operations Can Be Performed* Prints to print. (Trimming) Multiple pictures can be printed at once. (DPOF print setting) * Some settings may not be selectable for Printing without the Use of the paper. Image selection and printing is operated from the camera.
Specify which portion of the image to cover the entire surface of a Computer Connect your camera to the printer with a border. 02/02/2008 Add the date. Or, prints with the appropriate cable. Direct Print Allows for Non-Canon printers. 6 Various Printing Operations Can Be Performed* Prints to print. (Trimming) Multiple pictures can be printed at once. (DPOF print setting) * Some settings may not be selectable for Printing without the Use of the paper. Image selection and printing is operated from the camera.
PowerShot SX10 IS Camera User Guide
Page 15
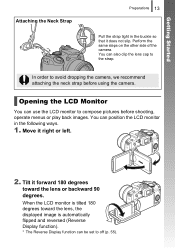
... LCD monitor to avoid dropping the camera, we recommend attaching the neck strap before shooting, operate menus or play back images. In order to compose pictures before using the camera. Getting Started Attaching the Neck Strap Preparations 13 Pull the strap tight in the following ways. 1. You can also clip the...
... LCD monitor to avoid dropping the camera, we recommend attaching the neck strap before shooting, operate menus or play back images. In order to compose pictures before using the camera. Getting Started Attaching the Neck Strap Preparations 13 Pull the strap tight in the following ways. 1. You can also clip the...

PowerShot SX10 IS Camera User Guide
Page 81
See Face Detect Feature (p. 119) for details on face detection. Commonly Used Shooting Functions 79 5 Have the other subject enter the composition and face the camera. • When the new face is detected, the blinking of the self-timer lamp and the self-timer sound speed up, and the shutter releases approx. 2 seconds later. • When the number of shots is set to 2 or more, pictures will continue to be taken at approximately 2-second intervals. • If the subject enters the composition but the camera does not detect the face, the shutter will release approx. 30 seconds later.
See Face Detect Feature (p. 119) for details on face detection. Commonly Used Shooting Functions 79 5 Have the other subject enter the composition and face the camera. • When the new face is detected, the blinking of the self-timer lamp and the self-timer sound speed up, and the shutter releases approx. 2 seconds later. • When the number of shots is set to 2 or more, pictures will continue to be taken at approximately 2-second intervals. • If the subject enters the composition but the camera does not detect the face, the shutter will release approx. 30 seconds later.
PowerShot SX10 IS Camera User Guide
Page 128
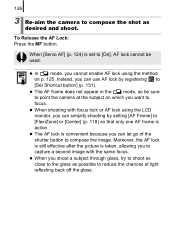
z In mode, you cannot enable AF lock using the LCD monitor, you to focus. Moreover, the AF lock is still effective after the picture is taken, allowing you can use AF lock by setting [AF Frame] to [On], AF lock cannot be sure to point the camera at the ...
z In mode, you cannot enable AF lock using the LCD monitor, you to focus. Moreover, the AF lock is still effective after the picture is taken, allowing you can use AF lock by setting [AF Frame] to [On], AF lock cannot be sure to point the camera at the ...

PowerShot SX10 IS Camera User Guide
Page 186
z You can perform brightness compensation an unlimited number of another image, repeat operations from Step 2. 5 Display the saved image. 1. z Depending on the image, the picture quality may drop and the compensation results may drop. 184 4 Save the image. 1. Use the or button to select [OK]. 2. Use the or button to select [Yes]. 3. Press the MENU button. 2. Press the button. • If you wish to the Play menu. Press the button. • Selecting [No] returns to continue compensating of times, but the picture quality may not be as expected.
z You can perform brightness compensation an unlimited number of another image, repeat operations from Step 2. 5 Display the saved image. 1. z Depending on the image, the picture quality may drop and the compensation results may drop. 184 4 Save the image. 1. Use the or button to select [OK]. 2. Use the or button to select [Yes]. 3. Press the MENU button. 2. Press the button. • If you wish to the Play menu. Press the button. • Selecting [No] returns to continue compensating of times, but the picture quality may not be as expected.
PowerShot SX10 IS Camera User Guide
Page 244
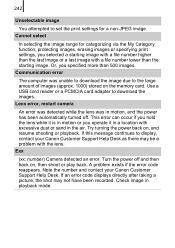
... error code reappears. Lens error, restart camera An error was detected while the lens was unable to download the image due to display, contact your Canon Customer Support Help Desk. This error can occur if you hold the lens while it is in motion or you operate it in motion, and... select In selecting the image range for a non-JPEG image. Note the number and contact your Canon Customer Support Help Desk as there may not have been recorded. If an error code displays directly after taking a picture, the shot may be a problem with excessive dust or sand in playback mode. Turn the...
... error code reappears. Lens error, restart camera An error was detected while the lens was unable to download the image due to display, contact your Canon Customer Support Help Desk. This error can occur if you hold the lens while it is in motion or you operate it in motion, and... select In selecting the image range for a non-JPEG image. Note the number and contact your Canon Customer Support Help Desk as there may not have been recorded. If an error code displays directly after taking a picture, the shot may be a problem with excessive dust or sand in playback mode. Turn the...


