Direct Print User Guide
Page 13
Sets the date The print order screen appears. and the file number for printing (p. 13). 2 Depending on the LCD monitor, please refer to Printing with SELPHY CP Series Printers using Canon Direct Print (p. 48). Sets the number of the LCD monitor. 1 If displays on the printer model, ...some setting options may not display. Sets the paper size, type and layout (p. 17). Sets the trimming portion (p. 15). Print Order Screen 3 Select print settings...
Sets the date The print order screen appears. and the file number for printing (p. 13). 2 Depending on the LCD monitor, please refer to Printing with SELPHY CP Series Printers using Canon Direct Print (p. 48). Sets the number of the LCD monitor. 1 If displays on the printer model, ...some setting options may not display. Sets the paper size, type and layout (p. 17). Sets the trimming portion (p. 15). Print Order Screen 3 Select print settings...

Direct Print User Guide
Page 19
.... * Paper sizes vary according to set the trimming settings. Press the SET button. The page layout screen appears. 3 17 Select a paper size and press the SET button. The default settings and specified 2 paper cassette size are displayed. Selecting the Paper Settings Select [... Settings] and press the SET button. • The paper size and page layout settings determine the shape of the trimming frame. • Please use the LCD monitor to region.
.... * Paper sizes vary according to set the trimming settings. Press the SET button. The page layout screen appears. 3 17 Select a paper size and press the SET button. The default settings and specified 2 paper cassette size are displayed. Selecting the Paper Settings Select [... Settings] and press the SET button. • The paper size and page layout settings determine the shape of the trimming frame. • Please use the LCD monitor to region.

Direct Print User Guide
Page 23
...40 mm 45 mm 50 mm 1.8 inch 2.0 inch 1.4 inch 1.5 inch 1.8 inch 2.0 inch T Trim the image to trim the image. Follow the steps according to the screen that displays on your camera. • The shape of Setting the Printing Area (Trimming) (p. 16) on the specified print size. • Use the... LCD monitor to specify the print size settings. See Step 2 of the trimming frame varies depending on how to specify the print area. The trimming frame...
...40 mm 45 mm 50 mm 1.8 inch 2.0 inch 1.4 inch 1.5 inch 1.8 inch 2.0 inch T Trim the image to trim the image. Follow the steps according to the screen that displays on your camera. • The shape of Setting the Printing Area (Trimming) (p. 16) on the specified print size. • Use the... LCD monitor to specify the print size settings. See Step 2 of the trimming frame varies depending on how to specify the print area. The trimming frame...

Direct Print User Guide
Page 32
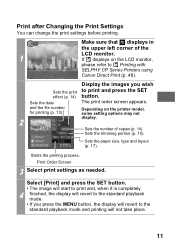
...and press the SET effect (p. 33) button. Sets the number of the LCD monitor. 1 If displays on the printer model, some setting options may not display. Sets the date for The print order screen appears. Starts the printing process. Print after Changing the Print Settings You can... change the print settings before printing. printing (p. 32). 2 Depending on the LCD monitor, please refer to print and, when it is completely 4...
...and press the SET effect (p. 33) button. Sets the number of the LCD monitor. 1 If displays on the printer model, some setting options may not display. Sets the date for The print order screen appears. Starts the printing process. Print after Changing the Print Settings You can... change the print settings before printing. printing (p. 32). 2 Depending on the LCD monitor, please refer to print and, when it is completely 4...

Direct Print User Guide
Page 38
... display correctly on the trimming setting. • The paper size and page layout settings determine the shape of the trimming frame. • Please use the LCD monitor to set the trimming settings. The trimming frame may not be printed properly depending on a TV...
... display correctly on the trimming setting. • The paper size and page layout settings determine the shape of the trimming frame. • Please use the LCD monitor to set the trimming settings. The trimming frame may not be printed properly depending on a TV...

Direct Print User Guide
Page 46
...printer connection. (Depending on the printer, some paper again and press the RESUME/CANCEL button on the camera LCD monitor if an error occurs during printing. If you select [Continue] in the error screen, you select [Continue] in the printer. Please request replacement of the waste tank (waste ink absorber).... Also open the paper output tray if it is no paper set some messages may not appear.) • Please refer to your nearest Canon Customer Support center listed in the user guide. Ink Error Check the level of the printer's ink and the condition of the waste tank ...
...printer connection. (Depending on the printer, some paper again and press the RESUME/CANCEL button on the camera LCD monitor if an error occurs during printing. If you select [Continue] in the error screen, you select [Continue] in the printer. Please request replacement of the waste tank (waste ink absorber).... Also open the paper output tray if it is no paper set some messages may not appear.) • Please refer to your nearest Canon Customer Support center listed in the user guide. Ink Error Check the level of the printer's ink and the condition of the waste tank ...

Direct Print User Guide
Page 56
...display correctly on the trimming setting. • The selected image and border settings determine the shape of the trimming frame. • Please use the LCD monitor to set the trimming settings for another image. • When you close the Print mode (when you turn the camera power off, change ...the date in images shot in [Date Stamp] mode with a camera that has the Postcard Print mode may not be printed properly depending on a TV screen. 54 • The trimming setting only applies to one image. • The trimming setting is canceled with the following operations. • When you set...
...display correctly on the trimming setting. • The selected image and border settings determine the shape of the trimming frame. • Please use the LCD monitor to set the trimming settings for another image. • When you close the Print mode (when you turn the camera power off, change ...the date in images shot in [Date Stamp] mode with a camera that has the Postcard Print mode may not be printed properly depending on a TV screen. 54 • The trimming setting only applies to one image. • The trimming setting is canceled with the following operations. • When you set...

Direct Print User Guide
Page 59
The trimming frame may not display correctly on the specified print size. • Use the LCD monitor to one image. • The print size setting is canceled with the following operations: • When you set the print size settings for another image. • When you close the Print mode (when you turn the camera power off, change the camera mode, or detach the connection cable). • The shape of the trimming frame varies depending on a TV screen. 57 • The print size setting only applies to specify the print size settings.
The trimming frame may not display correctly on the specified print size. • Use the LCD monitor to one image. • The print size setting is canceled with the following operations: • When you set the print size settings for another image. • When you close the Print mode (when you turn the camera power off, change the camera mode, or detach the connection cable). • The shape of the trimming frame varies depending on a TV screen. 57 • The print size setting only applies to specify the print size settings.

PowerShot SD400 / DIGITAL IXUS 50 Camera User Guide
Page 63
... desired composition (relative size of subject in Auto Mode Shooting Mode In this mode, all you have to do is difficult to focus on the LCD monitor. 3 Aim the camera at the subject. 4 Use the zoom lever to (Shooting). Shooting Shooting Shooting in viewfinder) (p. 45). 5 Press the shutter button... halfway (p. 46). • Two beeps will play one time. 61 The display will return to the shooting screen and will appear on , the lower indicator beside the viewfinder will blink yellow and the beep will play when the camera has finished metering, and...
... desired composition (relative size of subject in Auto Mode Shooting Mode In this mode, all you have to do is difficult to focus on the LCD monitor. 3 Aim the camera at the subject. 4 Use the zoom lever to (Shooting). Shooting Shooting Shooting in viewfinder) (p. 45). 5 Press the shutter button... halfway (p. 46). • Two beeps will play one time. 61 The display will return to the shooting screen and will appear on , the lower indicator beside the viewfinder will blink yellow and the beep will play when the camera has finished metering, and...

PowerShot SD400 / DIGITAL IXUS 50 Camera User Guide
Page 71
... you to change the settings easily. 2 Press the FUNC./SET button. • The display will return to the shooting screen and the icon of the selected shooting mode will appear on the LCD monitor. • The shooting procedures for , , and modes are the same as for Shooting in Auto Mode (p. 61). •...
... you to change the settings easily. 2 Press the FUNC./SET button. • The display will return to the shooting screen and the icon of the selected shooting mode will appear on the LCD monitor. • The shooting procedures for , , and modes are the same as for Shooting in Auto Mode (p. 61). •...

PowerShot SD400 / DIGITAL IXUS 50 Camera User Guide
Page 75
...; See Functions Available in Each Shooting Mode (p. 192). • The image area at maximum wide angle). The display will return to the shooting screen and will appear on the LCD monitor. 3 Use the zoom lever to adjust the zoom to the following powers in the range of 3 to 10 cm (1.2 to change...
...; See Functions Available in Each Shooting Mode (p. 192). • The image area at maximum wide angle). The display will return to the shooting screen and will appear on the LCD monitor. 3 Use the zoom lever to adjust the zoom to the following powers in the range of 3 to 10 cm (1.2 to change...

PowerShot SD400 / DIGITAL IXUS 50 Camera User Guide
Page 76
... cannot be zoomed to the Shooting screen. 4 Press the zoom lever toward . • The combined optical and digital zoom factor appears on . 2 In the (Rec.) menu, select [Digital Zoom]. See Selecting Menus and Settings (p. 48). 3 Use the or button to turn the LCD monitor on the LCD monitor. • When you press the... zoom lever toward to zoom out. • The digital zoom can also be used when the LCD monitor is on, images can be used in movie mode (standard). 74 • Images become coarser the more they are digitally zoomed. Press the zoom ...
... cannot be zoomed to the Shooting screen. 4 Press the zoom lever toward . • The combined optical and digital zoom factor appears on . 2 In the (Rec.) menu, select [Digital Zoom]. See Selecting Menus and Settings (p. 48). 3 Use the or button to turn the LCD monitor on the LCD monitor. • When you press the... zoom lever toward to zoom out. • The digital zoom can also be used when the LCD monitor is on, images can be used in movie mode (standard). 74 • Images become coarser the more they are digitally zoomed. Press the zoom ...

PowerShot SD400 / DIGITAL IXUS 50 Camera User Guide
Page 78
... You can shoot images with the optimal resolution and compression for postcard size printing. • When printing standard image data to the shooting screen and will appear on the LCD monitor. • When you press the shutter button halfway, the area that will return to postcard size, sometimes the top, bottom and...
... You can shoot images with the optimal resolution and compression for postcard size printing. • When printing standard image data to the shooting screen and will appear on the LCD monitor. • When you press the shutter button halfway, the area that will return to postcard size, sometimes the top, bottom and...

PowerShot SD400 / DIGITAL IXUS 50 Camera User Guide
Page 79
Embedding the Date in the Image Data You can embed the date in the LCD monitor when the date stamp setting (see below) is set to Date or Date & Time. • For printing instructions, refer to the Direct Print User ...Guide. Shooting • The icon appears in image data when (Postcard Date Imprint Mode) is selected. The date will return to the shooting screen. • When you do not want to print on a compact photo printer (SELPHY CP series) or card photo printer. 77 See Selecting Menus and Settings...
Embedding the Date in the Image Data You can embed the date in the LCD monitor when the date stamp setting (see below) is set to Date or Date & Time. • For printing instructions, refer to the Direct Print User ...Guide. Shooting • The icon appears in image data when (Postcard Date Imprint Mode) is selected. The date will return to the shooting screen. • When you do not want to print on a compact photo printer (SELPHY CP series) or card photo printer. 77 See Selecting Menus and Settings...

PowerShot SD400 / DIGITAL IXUS 50 Camera User Guide
Page 84
... can change the settings easily. • In or mode, you can shoot the image right after the shot, allowing you to the shooting screen and the icon of the selected movie mode will automatically set the exposure, focus and white balance. 5 Press the shutter button fully. •...; Shooting and sound recording starts simultaneously. • During shooting the recording time (in the LCD monitor. 4 Press the shutter button halfway. The display will return to change the resolution (p. 65) and frame rate (p. 85). 3 Press the FUNC...
... can change the settings easily. • In or mode, you can shoot the image right after the shot, allowing you to the shooting screen and the icon of the selected movie mode will automatically set the exposure, focus and white balance. 5 Press the shutter button fully. •...; Shooting and sound recording starts simultaneously. • During shooting the recording time (in the LCD monitor. 4 Press the shutter button halfway. The display will return to change the resolution (p. 65) and frame rate (p. 85). 3 Press the FUNC...

PowerShot SD400 / DIGITAL IXUS 50 Camera User Guide
Page 91
... as they appear in Each Shooting Mode (p. 192). You can set it will use to the center AF frame. Shooting See Functions Available in the LCD monitor. 1 In the (Rec.) menu, select [AiAF]. Switching between Focusing Modes Shooting Mode Although the autofocus function is convenient for focusing on a specific part of... digital zoom is set to [On], the AF frame does not appear. See Selecting Menus and Settings (p. 48). 2 Use the or button to the shooting screen. When [AiAF] is set to [Off], however, the AF frame will return to select [On] or [Off].
... as they appear in Each Shooting Mode (p. 192). You can set it will use to the center AF frame. Shooting See Functions Available in the LCD monitor. 1 In the (Rec.) menu, select [AiAF]. Switching between Focusing Modes Shooting Mode Although the autofocus function is convenient for focusing on a specific part of... digital zoom is set to [On], the AF frame does not appear. See Selecting Menus and Settings (p. 48). 2 Use the or button to the shooting screen. When [AiAF] is set to [Off], however, the AF frame will return to select [On] or [Off].

PowerShot SD400 / DIGITAL IXUS 50 Camera User Guide
Page 97
... an option. The display will return to +2. • You can confirm the effect of the setting in the LCD monitor. • You can also be adjusted in 1/3 stops in the range -2 to the shooting screen. See Selecting Menus and Settings (p. 48). * The current setting is displayed. 2 Use the or button to adjust...
... an option. The display will return to +2. • You can confirm the effect of the setting in the LCD monitor. • You can also be adjusted in 1/3 stops in the range -2 to the shooting screen. See Selecting Menus and Settings (p. 48). * The current setting is displayed. 2 Use the or button to adjust...

PowerShot SD400 / DIGITAL IXUS 50 Camera User Guide
Page 99
... in the FUNC. FE Lock - Flash: Auto, Auto with Red-Eye Reduction, Flash on the LCD monitor, secure the camera to a tripod before the next image can be shot. • Use the LCD monitor to the shooting screen. Light Metering - menu, press the MENU button. Exposure Compensation - Shooting 5 Press the FUNC./SET button...
... in the FUNC. FE Lock - Flash: Auto, Auto with Red-Eye Reduction, Flash on the LCD monitor, secure the camera to a tripod before the next image can be shot. • Use the LCD monitor to the shooting screen. Light Metering - menu, press the MENU button. Exposure Compensation - Shooting 5 Press the FUNC./SET button...

PowerShot SD400 / DIGITAL IXUS 50 Camera User Guide
Page 102
... the default settings (p. 59). 100 The correct white balance may not be read in the (Rec.) menu. • The camera will return to the shooting screen. • You are recommended to set . The camera reads the white balance data when you shoot. • Since the white balance data cannot be set... FUNC./SET button. 3 Aim the camera at the white paper, cloth or gray card and press the MENU button. • If you are using the LCD monitor, compose the image so the paper or cloth completely fills the center frame in the display, or the entire viewfinder, before selecting [Stitch Assist...
... the default settings (p. 59). 100 The correct white balance may not be read in the (Rec.) menu. • The camera will return to the shooting screen. • You are recommended to set . The camera reads the white balance data when you shoot. • Since the white balance data cannot be set... FUNC./SET button. 3 Aim the camera at the white paper, cloth or gray card and press the MENU button. • If you are using the LCD monitor, compose the image so the paper or cloth completely fills the center frame in the display, or the entire viewfinder, before selecting [Stitch Assist...

PowerShot SD400 / DIGITAL IXUS 50 Camera User Guide
Page 103
... again after selecting an option. The display will return to select an effect. • You can confirm the photo effect in the LCD monitor. • You can change the settings easily. 3 Press the FUNC./SET button. Effect Off Records normally with softened outlines. Sepia...See Selecting Menus and Settings (p. 48). * The current setting is displayed. menu, select *. Shooting 2 Use the or button to the shooting screen. 101 Vivid Emphasizes the contrast and color saturation to record bold colors. Changing the Photo Effect Shooting Mode By setting a photo effect before you ...
... again after selecting an option. The display will return to select an effect. • You can confirm the photo effect in the LCD monitor. • You can change the settings easily. 3 Press the FUNC./SET button. Effect Off Records normally with softened outlines. Sepia...See Selecting Menus and Settings (p. 48). * The current setting is displayed. menu, select *. Shooting 2 Use the or button to the shooting screen. 101 Vivid Emphasizes the contrast and color saturation to record bold colors. Changing the Photo Effect Shooting Mode By setting a photo effect before you ...

