
User Guide
Page 1
ENGLISH Camera User Guide • Before use, be sure to read this guide, including the safety precautions. • This guide will familiarize you with how to use the camera correctly. • Keep the guide handy for future reference.
ENGLISH Camera User Guide • Before use, be sure to read this guide, including the safety precautions. • This guide will familiarize you with how to use the camera correctly. • Keep the guide handy for future reference.
User Guide
Page 2
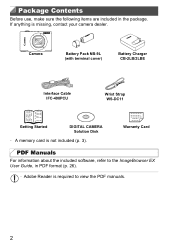
Warranty Card PDF Manuals For information about the included software, refer to view the PDF manuals. 2 Camera Battery Pack NB-9L (with terminal cover) Battery Charger CB-2LB/2LBE Interface Cable IFC-400PCU Wrist Strap WS-DC11 Getting Started DIGITAL CAMERA Solution Disk • A memory card is required to the ImageBrowser EX User Guide, in the package. Package Contents Before use, make sure the following items are included in PDF format (p. 26). • Adobe Reader is not included (p. 3). If anything is missing, contact your camera dealer.
Warranty Card PDF Manuals For information about the included software, refer to view the PDF manuals. 2 Camera Battery Pack NB-9L (with terminal cover) Battery Charger CB-2LB/2LBE Interface Cable IFC-400PCU Wrist Strap WS-DC11 Getting Started DIGITAL CAMERA Solution Disk • A memory card is required to the ImageBrowser EX User Guide, in the package. Package Contents Before use, make sure the following items are included in PDF format (p. 26). • Adobe Reader is not included (p. 3). If anything is missing, contact your camera dealer.
User Guide
Page 3
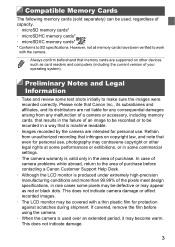
...to SD specifications. This does not indicate camera damage or affect recorded images. • The LCD monitor may become warm. Please note that Canon Inc., its subsidiaries and affiliates, and its distributors are intended for personal use , photography may appear as card readers and computers (including the ... 99.99% of the pixels meet design specifications, in the area of your operating system). If covered, remove the film before contacting a Canon Customer Support Help Desk. • Although the LCD monitor is valid only in rare cases some pixels may be covered with the camera....
...to SD specifications. This does not indicate camera damage or affect recorded images. • The LCD monitor may become warm. Please note that Canon Inc., its subsidiaries and affiliates, and its distributors are intended for personal use , photography may appear as card readers and computers (including the ... 99.99% of the pixels meet design specifications, in the area of your operating system). If covered, remove the film before contacting a Canon Customer Support Help Desk. • Although the LCD monitor is valid only in rare cases some pixels may be covered with the camera....
User Guide
Page 4
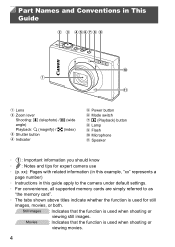
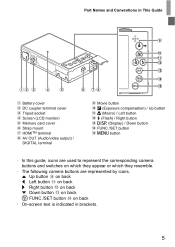
xx): Pages with related information (in this example, "xx" represents a page number) • Instructions in This Guide Lens Zoom lever Shooting: i (telephoto) / j (wide angle) Playback: k (magnify) / g (index) Shutter button Indicator Power button Mode switch 1 (Playback) button Lamp Flash Microphone Speaker • : Important information you should know • : Notes and tips for still images, movies, or both. Part Names and Conventions in this guide apply to the camera under default settings. • For convenience, all supported memory cards are simply referred to as "...
xx): Pages with related information (in this example, "xx" represents a page number) • Instructions in This Guide Lens Zoom lever Shooting: i (telephoto) / j (wide angle) Playback: k (magnify) / g (index) Shutter button Indicator Power button Mode switch 1 (Playback) button Lamp Flash Microphone Speaker • : Important information you should know • : Notes and tips for still images, movies, or both. Part Names and Conventions in this guide apply to the camera under default settings. • For convenience, all supported memory cards are simply referred to as "...
User Guide
Page 5
o Up button on back q Left button on back r Right button on back p Down button on back m FUNC./SET button on which they appear or which they resemble. • The following camera buttons are used to represent the corresponding camera buttons and switches on back • On-screen text is indicated in This Guide Battery cover DC coupler terminal cover Tripod socket Screen (LCD monitor) Memory card cover Strap mount HDMITM terminal AV OUT (Audio/video output) / DIGITAL terminal Movie button b (Exposure compensation) / Up button e (Macro) / Left button h (Flash) / Right button l (Display) ...
o Up button on back q Left button on back r Right button on back p Down button on back m FUNC./SET button on which they appear or which they resemble. • The following camera buttons are used to represent the corresponding camera buttons and switches on back • On-screen text is indicated in This Guide Battery cover DC coupler terminal cover Tripod socket Screen (LCD monitor) Memory card cover Strap mount HDMITM terminal AV OUT (Audio/video output) / DIGITAL terminal Movie button b (Exposure compensation) / Up button e (Macro) / Left button h (Flash) / Right button l (Display) ...

User Guide
Page 6
Contents 8 Appendix 193 Troubleshooting 194 Handling Precautions 197 On-Screen Messages 198 On-Screen Information 200 Functions and Menu Tables .......... 204 Index 212 7
Contents 8 Appendix 193 Troubleshooting 194 Handling Precautions 197 On-Screen Messages 198 On-Screen Information 200 Functions and Menu Tables .......... 204 Index 212 7
User Guide
Page 7
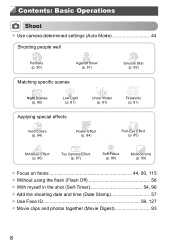
Contents: Basic Operations 4 Shoot z Use camera-determined settings (Auto Mode 44 Shooting people well I Portraits (p. 80) P Against Snow (p. 81) Smooth Skin (p. 83) Matching specific scenes Night Scenes (p. 80) Low Light (p. 81) S Under Water (p. 81) t Fireworks (p. 81) Applying special effects Vivid Colors (p. 84) Poster Effect (p. 84) Fish-Eye Effect (p. 85) Miniature Effect (p. 86) Toy Camera Effect (p. 87) Soft Focus (p. 88) Monochrome (p. 89) z Focus on faces 44, 80, 115 z Without using the flash (Flash Off 56 z With myself in the shot (Self-Timer 54, 96 z Add the ...
Contents: Basic Operations 4 Shoot z Use camera-determined settings (Auto Mode 44 Shooting people well I Portraits (p. 80) P Against Snow (p. 81) Smooth Skin (p. 83) Matching specific scenes Night Scenes (p. 80) Low Light (p. 81) S Under Water (p. 81) t Fireworks (p. 81) Applying special effects Vivid Colors (p. 84) Poster Effect (p. 84) Fish-Eye Effect (p. 85) Miniature Effect (p. 86) Toy Camera Effect (p. 87) Soft Focus (p. 88) Monochrome (p. 89) z Focus on faces 44, 80, 115 z Without using the flash (Flash Off 56 z With myself in the shot (Self-Timer 54, 96 z Add the ...

User Guide
Page 8
Contents: Basic Operations 1 View z View images (Playback Mode 126 z Automatic playback (Slideshow 136 z On a TV 175 z On a computer 27 z Browse through images quickly 130 z Erase images 143 E Shoot/View Movies z Shoot movies 44, 101 z View movies 126 z Fast-moving subjects, slow-motion playback 101 c Print z Print pictures 180 Save z Save images to a computer 27 9
Contents: Basic Operations 1 View z View images (Playback Mode 126 z Automatic playback (Slideshow 136 z On a TV 175 z On a computer 27 z Browse through images quickly 130 z Erase images 143 E Shoot/View Movies z Shoot movies 44, 101 z View movies 126 z Fast-moving subjects, slow-motion playback 101 c Print z Print pictures 180 Save z Save images to a computer 27 9
User Guide
Page 9
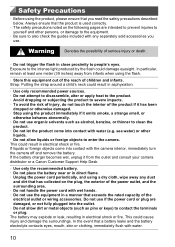
In particular, remain at least one meter (39 inches) away from the outlet and consult your camera distributor or a Canon Customer Support Help Desk. • Use only the recommended battery. • Do not place the battery near or in asphyxiation. • Use only recommended power ...
In particular, remain at least one meter (39 inches) away from the outlet and consult your camera distributor or a Canon Customer Support Help Desk. • Use only the recommended battery. • Do not place the battery near or in asphyxiation. • Use only recommended power ...
User Guide
Page 10
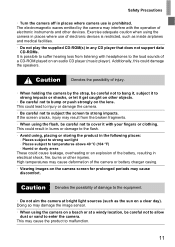
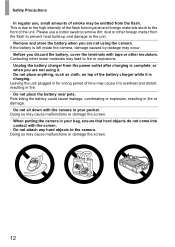
Safety Precautions • Turn the camera off in the following places: - Caution Denotes the possibility of the battery, resulting in any CD player that does not support data CD-ROMs. It is possible to cover it get caught on the lens. This could cause leakage, overheating or an explosion of injury. • When holding the camera by the camera may damage the image sensor. • When using the flash, be careful not to suffer hearing loss from the broken fragments. • When using the camera on a beach or at bright light sources (such as inside airplanes and medical ...
Safety Precautions • Turn the camera off in the following places: - Caution Denotes the possibility of the battery, resulting in any CD player that does not support data CD-ROMs. It is possible to cover it get caught on the lens. This could cause leakage, overheating or an explosion of injury. • When holding the camera by the camera may damage the image sensor. • When using the flash, be careful not to suffer hearing loss from the broken fragments. • When using the camera on a beach or at bright light sources (such as inside airplanes and medical ...
User Guide
Page 11
If the battery is left inside the camera, damage caused by leakage may occur. • Before you discard the battery, cover the terminals with the camera in your bag, ensure that hard objects do not come into contact with the screen. • Do not attach any hard objects to the camera. Leaving the unit plugged in for a long period of time may cause it is charging. Pets biting the battery could cause leakage, overheating or explosion, resulting in fire or damage. • Do not sit down with tape or other insulators. Contacting other foreign matter from the flash. Doing so may ...
If the battery is left inside the camera, damage caused by leakage may occur. • Before you discard the battery, cover the terminals with the camera in your bag, ensure that hard objects do not come into contact with the screen. • Do not attach any hard objects to the camera. Leaving the unit plugged in for a long period of time may cause it is charging. Pets biting the battery could cause leakage, overheating or explosion, resulting in fire or damage. • Do not sit down with tape or other insulators. Contacting other foreign matter from the flash. Doing so may ...
User Guide
Page 12
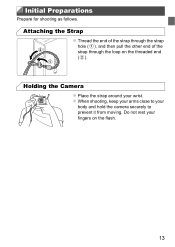
Attaching the Strap z Thread the end of the strap through the strap hole ( ), and then pull the other end of the strap through the loop on the flash. 13 Do not rest your fingers on the threaded end ( ). z When shooting, keep your arms close to your wrist. Holding the Camera z Place the strap around your body and hold the camera securely to prevent it from moving. Initial Preparations Prepare for shooting as follows.
Attaching the Strap z Thread the end of the strap through the strap hole ( ), and then pull the other end of the strap through the loop on the flash. 13 Do not rest your fingers on the threaded end ( ). z When shooting, keep your arms close to your wrist. Holding the Camera z Place the strap around your body and hold the camera securely to prevent it from moving. Initial Preparations Prepare for shooting as follows.
User Guide
Page 13
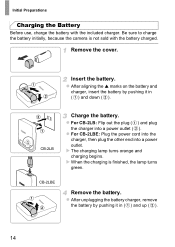
Remove the cover. CB-2LB Charge the battery. X When the charging is not sold with the included charger. CB-2LBE Remove the battery. Initial Preparations Charging the Battery Before use, charge the battery with the battery charged. z For CB-2LBE: Plug the power cord into the charger, then plug the other end into a power outlet ( ). Insert the battery. X The charging lamp turns orange and charging begins. z After unplugging the battery charger, remove the battery by pushing it in ( ) and down ( ). Be sure to charge the battery initially, because the camera is ...
Remove the cover. CB-2LB Charge the battery. X When the charging is not sold with the included charger. CB-2LBE Remove the battery. Initial Preparations Charging the Battery Before use, charge the battery with the battery charged. z For CB-2LBE: Plug the power cord into the charger, then plug the other end into a power outlet ( ). Insert the battery. X The charging lamp turns orange and charging begins. z After unplugging the battery charger, remove the battery by pushing it in ( ) and down ( ). Be sure to charge the battery initially, because the camera is ...
User Guide
Page 14
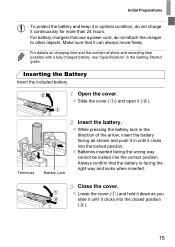
Open the cover. z While pressing the battery lock in the direction of shots and recording time possible with a fully charged battery, see "Specifications" in until it ( ). z Batteries inserted facing the wrong way cannot be locked into the locked position. z Slide the cover ( ) and open it clicks into the closed position ( ). 15 Always confirm that it continuously for more than 24 hours. • For battery chargers that use a power cord, do not charge it can always move freely. • For details on charging time and the number of the arrow, insert the battery facing as ...
Open the cover. z While pressing the battery lock in the direction of shots and recording time possible with a fully charged battery, see "Specifications" in until it ( ). z Batteries inserted facing the wrong way cannot be locked into the locked position. z Slide the cover ( ) and open it clicks into the closed position ( ). 15 Always confirm that it continuously for more than 24 hours. • For battery chargers that use a power cord, do not charge it can always move freely. • For details on charging time and the number of the arrow, insert the battery facing as ...
User Guide
Page 15
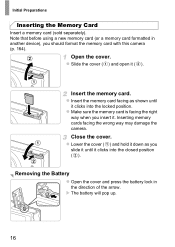
Open the cover. Close the cover. z Make sure the memory card is facing the right way when you insert it ( ). X The battery will pop up. 16 z Insert the memory card facing as you should format the memory card with this camera (p. 164). Insert the memory card. Initial Preparations Inserting the Memory Card Insert a memory card (sold separately). z Slide the cover ( ) and open it . z Lower the cover ( ) and hold it down as shown until it clicks into the closed position ( ). Removing the Battery z Open the cover and press the battery lock in another device), you slide ...
Open the cover. Close the cover. z Make sure the memory card is facing the right way when you insert it ( ). X The battery will pop up. 16 z Insert the memory card facing as you should format the memory card with this camera (p. 164). Insert the memory card. Initial Preparations Inserting the Memory Card Insert a memory card (sold separately). z Slide the cover ( ) and open it . z Lower the cover ( ) and hold it down as shown until it clicks into the closed position ( ). Removing the Battery z Open the cover and press the battery lock in another device), you slide ...
User Guide
Page 16
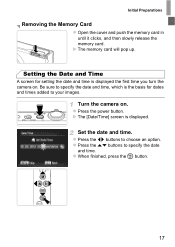
Turn the camera on . Be sure to your images. Set the date and time. z Press the qr buttons to specify the date and time. z When finished, press the m button. 17 X The memory card will pop up. z Press the power button. z Press the op buttons to choose an option. Setting the Date and Time A screen for dates and times added to specify the date and time, which is the basis for setting the date and time is displayed. X The [Date/Time] screen is displayed the first time you turn the camera on . Initial Preparations Removing the Memory Card z Open the cover and push the ...
Turn the camera on . Be sure to your images. Set the date and time. z Press the qr buttons to specify the date and time. z When finished, press the m button. 17 X The memory card will pop up. z Press the power button. z Press the op buttons to choose an option. Setting the Date and Time A screen for dates and times added to specify the date and time, which is the basis for setting the date and time is displayed. X The [Date/Time] screen is displayed the first time you turn the camera on . Initial Preparations Removing the Memory Card z Open the cover and push the ...
User Guide
Page 17
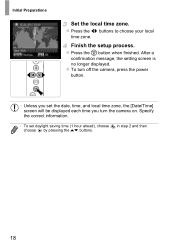
Specify the correct information. • To set the date, time, and local time zone, the [Date/Time] screen will be displayed each time you turn the camera on. Initial Preparations Set the local time zone. Finish the setup process. After a confirmation message, the setting screen is no longer displayed. in step 2 and then 18 z Press the qr buttons to choose your local time zone. z To turn off the camera, press the power button. • Unless you set daylight saving time (1 hour ahead), choose choose by pressing the op buttons. z Press the m button when finished.
Specify the correct information. • To set the date, time, and local time zone, the [Date/Time] screen will be displayed each time you turn the camera on. Initial Preparations Set the local time zone. Finish the setup process. After a confirmation message, the setting screen is no longer displayed. in step 2 and then 18 z Press the qr buttons to choose your local time zone. z To turn off the camera, press the power button. • Unless you set daylight saving time (1 hour ahead), choose choose by pressing the op buttons. z Press the m button when finished.
User Guide
Page 18
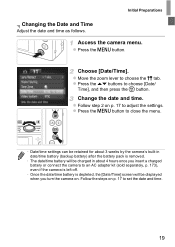
z Press the n button. Choose [Date/Time]. z Press the op buttons to choose the 3 tab. z Press the n button to close the menu. • Date/time settings can be retained for about 3 weeks by the camera's built-in date/time battery (backup battery) after the battery pack is removed. • The date/time battery will be charged in about 4 hours once you insert a charged battery or connect the camera to an AC adapter kit (sold separately, p. 173), even if the camera is left off. • Once the date/time battery is depleted, the [Date/Time] screen will be displayed when you turn the camera ...
z Press the n button. Choose [Date/Time]. z Press the op buttons to choose the 3 tab. z Press the n button to close the menu. • Date/time settings can be retained for about 3 weeks by the camera's built-in date/time battery (backup battery) after the battery pack is removed. • The date/time battery will be charged in about 4 hours once you insert a charged battery or connect the camera to an AC adapter kit (sold separately, p. 173), even if the camera is left off. • Once the date/time battery is depleted, the [Date/Time] screen will be displayed when you turn the camera ...

User Guide
Page 19
z Press and hold the m button, and then immediately press the n button. Set the display language. X Once the display language has been set, the setting screen is no longer displayed. • A clock icon is displayed if you wait too long in step 2 after pressing the m button before you press the n button. Enter Playback mode. Access the setting screen. In this case, press the m button to choose a language, and then press the m button. z Press the opqr buttons to dismiss the clock icon and repeat step 2. • You can be changed as needed. z Press the 1 button. Initial ...
z Press and hold the m button, and then immediately press the n button. Set the display language. X Once the display language has been set, the setting screen is no longer displayed. • A clock icon is displayed if you wait too long in step 2 after pressing the m button before you press the n button. Enter Playback mode. Access the setting screen. In this case, press the m button to choose a language, and then press the m button. z Press the opqr buttons to dismiss the clock icon and repeat step 2. • You can be changed as needed. z Press the 1 button. Initial ...
User Guide
Page 20
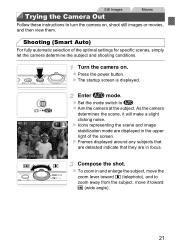
X The startup screen is displayed. z Set the mode switch to turn the camera on . Still Images Trying the Camera Out Movies Follow these instructions to A. X Icons representing the scene and image stabilization mode are in the upper right of the optimal settings for specific scenes, simply let the camera determine the subject and shooting conditions. z To zoom in and enlarge the subject, move the zoom lever toward i (telephoto), and to zoom away from the subject, move it will make a slight clicking noise. z Press the power button. z Aim the camera at the subject. X Frames...
X The startup screen is displayed. z Set the mode switch to turn the camera on . Still Images Trying the Camera Out Movies Follow these instructions to A. X Icons representing the scene and image stabilization mode are in the upper right of the optimal settings for specific scenes, simply let the camera determine the subject and shooting conditions. z To zoom in and enlarge the subject, move the zoom lever toward i (telephoto), and to zoom away from the subject, move it will make a slight clicking noise. z Press the power button. z Aim the camera at the subject. X Frames...
