Canon PowerShot A495 Red

View Results Below
Free Canon PowerShot A495 manuals!
Problems with Canon PowerShot A495?
Ask a Question
Free Canon PowerShot A495 manuals!
Problems with Canon PowerShot A495?
Ask a Question
Related Manual Pages


Related Videos

Canon Powershot A495 Video Test
Duration: :41
Total Views: 2,924
Duration: :41
Total Views: 2,924
Similar Questions

Downloaded Pics Have A Red X?cannot Upload To Fb
(Posted by Anonymous-107308 11 years ago)

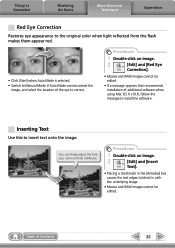
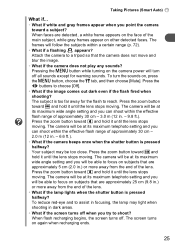
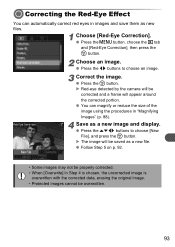
Red Eye
i own an a470 and i cannot figure out how utilize the red eye edit function! there are 2 kinds. 1 i...
i own an a470 and i cannot figure out how utilize the red eye edit function! there are 2 kinds. 1 i...
(Posted by carreloe1 11 years ago)

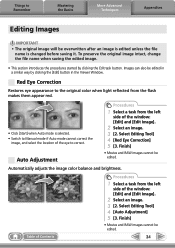
Red Eye Correction
sir/madam,,,how can i correct red eye effect in my pics
sir/madam,,,how can i correct red eye effect in my pics
(Posted by harguruparm 11 years ago)