User Guide
Page 4
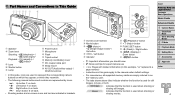
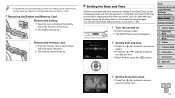
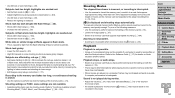
... Guide 1 Camera Basics 2 Smart Auto Mode 3 Other Shooting Modes 4 P Mode 5 Playback Mode 6 Setting Menu 7 Accessories 8 Appendix Index 4 Part Names and Conventions in This Guide Speaker Zoom lever Shooting: / Playback: / Lens Shutter button Lamp Power button Microphone Flash Tripod socket Memory card/battery cover DC coupler cable port Strap mount AV OUT (Audio/video output) / DIGITAL terminal • In this guide apply to the camera under default settings. • For convenience, all supported memory cards are simply referred to represent the corresponding camera buttons on -screen...
... Guide 1 Camera Basics 2 Smart Auto Mode 3 Other Shooting Modes 4 P Mode 5 Playback Mode 6 Setting Menu 7 Accessories 8 Appendix Index 4 Part Names and Conventions in This Guide Speaker Zoom lever Shooting: / Playback: / Lens Shutter button Lamp Power button Microphone Flash Tripod socket Memory card/battery cover DC coupler cable port Strap mount AV OUT (Audio/video output) / DIGITAL terminal • In this guide apply to the camera under default settings. • For convenience, all supported memory cards are simply referred to represent the corresponding camera buttons on -screen...
User Guide
Page 5
... ([P] Mode 48 Image Brightness (Exposure Compensation 48 Color and Continuous Shooting....51 Shooting Range and Focusing.....52 Flash 56 Using Eco Mode 57 Other Settings 57 5 Playback Mode 60 Viewing 61 Browsing and Filtering Images.....62 Image Viewing Options 64 Protecting Images 65 Erasing Images 67 Rotating Images 68 Editing Still Images 69 6 Setting Menu 72 Adjusting Basic Camera Functions 73 7 Accessories 79 Optional Accessories 80 Using Optional Accessories..........81 Printing Images 83 Using an Eye-Fi Card 90 8 Appendix 92 Troubleshooting 93 On-Screen Messages 95...
... ([P] Mode 48 Image Brightness (Exposure Compensation 48 Color and Continuous Shooting....51 Shooting Range and Focusing.....52 Flash 56 Using Eco Mode 57 Other Settings 57 5 Playback Mode 60 Viewing 61 Browsing and Filtering Images.....62 Image Viewing Options 64 Protecting Images 65 Erasing Images 67 Rotating Images 68 Editing Still Images 69 6 Setting Menu 72 Adjusting Basic Camera Functions 73 7 Accessories 79 Optional Accessories 80 Using Optional Accessories..........81 Printing Images 83 Using an Eye-Fi Card 90 8 Appendix 92 Troubleshooting 93 On-Screen Messages 95...
User Guide
Page 6
...using the flash (Flash Off 34 zzInclude yourself in the shot (Self-Timer 33, 45 zzAdd a date stamp 35 1 View zzView images (Playback Mode 61 zzAutomatic playback (Slideshow 64 zzOn a TV 81 zzOn a computer 18 zzBrowse through images quickly 62 zzErase images 67 E Shoot/View Movies zzShoot movies 29 zzView movies (Playback Mode 61 c Print zzPrint pictures 83 Save zzSave images to a computer 18 Cover Preliminary Notes and Legal Information Contents: Basic Operations Basic Guide Advanced Guide 1 Camera Basics 2 Smart Auto Mode 3 Other Shooting Modes 4 P Mode 5 Playback Mode 6 Setting...
...using the flash (Flash Off 34 zzInclude yourself in the shot (Self-Timer 33, 45 zzAdd a date stamp 35 1 View zzView images (Playback Mode 61 zzAutomatic playback (Slideshow 64 zzOn a TV 81 zzOn a computer 18 zzBrowse through images quickly 62 zzErase images 67 E Shoot/View Movies zzShoot movies 29 zzView movies (Playback Mode 61 c Print zzPrint pictures 83 Save zzSave images to a computer 18 Cover Preliminary Notes and Legal Information Contents: Basic Operations Basic Guide Advanced Guide 1 Camera Basics 2 Smart Auto Mode 3 Other Shooting Modes 4 P Mode 5 Playback Mode 6 Setting...
User Guide
Page 12
... power button. XXThe [Date/Time] screen is used when you wish (=35). 1 Turn the camera on. zzPress the buttons to specify the date and time. Information you specify this way is displayed when you turn the camera on one memory card, see "Number of 4:3 Shots per Memory Card" (=104). Cover Preliminary Notes and Legal Information Contents: Basic Operations Basic Guide Advanced Guide 1 Camera Basics 2 Smart Auto Mode 3 Other Shooting Modes 4 P Mode 5 Playback Mode 6 Setting Menu 7 Accessories 8 Appendix Index 3 Set the home time zone. Setting the Date and Time Set...
... power button. XXThe [Date/Time] screen is used when you wish (=35). 1 Turn the camera on. zzPress the buttons to specify the date and time. Information you specify this way is displayed when you turn the camera on one memory card, see "Number of 4:3 Shots per Memory Card" (=104). Cover Preliminary Notes and Legal Information Contents: Basic Operations Basic Guide Advanced Guide 1 Camera Basics 2 Smart Auto Mode 3 Other Shooting Modes 4 P Mode 5 Playback Mode 6 Setting Menu 7 Accessories 8 Appendix Index 3 Set the home time zone. Setting the Date and Time Set...
User Guide
Page 13
Changing the Date and Time Adjust the date and time as follows. 1 Access the camera menu. 4 Finish the setup process. zzOnce the date and time have been set daylight saving time (1 hour ahead), choose [ ] in about 4 hours once you turn the camera on . zzPress the button. 2 Choose [Date/Time]. zzFollow step 2 in "Setting the Date and Time" (=12) to set the date and time, the [Date/Time] screen will be displayed each time you insert a charged battery or connect the camera to close the menu. •...
Changing the Date and Time Adjust the date and time as follows. 1 Access the camera menu. 4 Finish the setup process. zzOnce the date and time have been set daylight saving time (1 hour ahead), choose [ ] in about 4 hours once you turn the camera on . zzPress the button. 2 Choose [Date/Time]. zzFollow step 2 in "Setting the Date and Time" (=12) to set the date and time, the [Date/Time] screen will be displayed each time you insert a charged battery or connect the camera to close the menu. •...
User Guide
Page 18
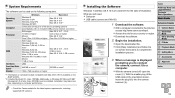
... Operations Basic Guide Advanced Guide 1 Camera Basics 2 Smart Auto Mode 3 Other Shooting Modes 4 P Mode 5 Playback Mode 6 Setting Menu 7 Accessories 8 Appendix Index 18 System Requirements The software can be installed. Installing the Software Windows 7 and Mac OS X 10.6 are used on -screen instructions to complete the installation process. 3 When a message is available on computer performance. • Check the Canon website for your country or region. zzOpen the downloaded file. zzDownload the software. 2 Begin the installation. Installation may take some time...
... Operations Basic Guide Advanced Guide 1 Camera Basics 2 Smart Auto Mode 3 Other Shooting Modes 4 P Mode 5 Playback Mode 6 Setting Menu 7 Accessories 8 Appendix Index 18 System Requirements The software can be installed. Installing the Software Windows 7 and Mac OS X 10.6 are used on -screen instructions to complete the installation process. 3 When a message is available on computer performance. • Check the Canon website for your country or region. zzOpen the downloaded file. zzDownload the software. 2 Begin the installation. Installation may take some time...
User Guide
Page 20
... by connecting your camera to the computer without using Canon CameraWindow] on the screen displayed when you connect the camera to the computer until camera images are saved, close CameraWindow, press the button to a computer. - It may be saved in separate folders named by the software may be available, such as movie editing. Cover Preliminary Notes and Legal Information Contents: Basic Operations Basic Guide Advanced Guide 1 Camera Basics 2 Smart Auto Mode 3 Other Shooting Modes 4 P Mode 5 Playback Mode 6 Setting Menu...
... by connecting your camera to the computer without using Canon CameraWindow] on the screen displayed when you connect the camera to the computer until camera images are saved, close CameraWindow, press the button to a computer. - It may be saved in separate folders named by the software may be available, such as movie editing. Cover Preliminary Notes and Legal Information Contents: Basic Operations Basic Guide Advanced Guide 1 Camera Basics 2 Smart Auto Mode 3 Other Shooting Modes 4 P Mode 5 Playback Mode 6 Setting Menu...
User Guide
Page 45
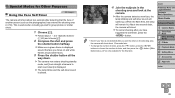
... blinking and self-timer sound will speed up. (When the flash fires, the lamp will remain lit.) About two seconds later, the camera will shoot about 15 seconds later. • To change the number of shots, press the button, press the buttons to start count down . Cover Preliminary Notes and Legal Information Contents: Basic Operations Basic Guide Advanced Guide 1 Camera Basics 2 Smart Auto Mode 3 Other Shooting Modes 4 P Mode 5 Playback Mode 6 Setting Menu 7 Accessories 8 Appendix Index 45 XXThe camera...
... blinking and self-timer sound will speed up. (When the flash fires, the lamp will remain lit.) About two seconds later, the camera will shoot about 15 seconds later. • To change the number of shots, press the button, press the buttons to start count down . Cover Preliminary Notes and Legal Information Contents: Basic Operations Basic Guide Advanced Guide 1 Camera Basics 2 Smart Auto Mode 3 Other Shooting Modes 4 P Mode 5 Playback Mode 6 Setting Menu 7 Accessories 8 Appendix Index 45 XXThe camera...
User Guide
Page 51
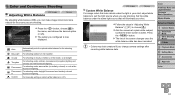
... 2 Smart Auto Mode 3 Other Shooting Modes 4 P Mode 5 Playback Mode 6 Setting Menu 7 Accessories 8 Appendix Index 51 For shooting under daylight fluorescent and similarly colored fluorescent lighting. zzFollow the steps in your shot. Custom For manually setting a custom white balance (=51). Tungsten Fluorescent Fluorescent H For shooting under the same light source that will illuminate your shot, adjust white balance to choose [ ]. zzAim the camera at twilight. XXThe option you change camera settings after recording white balance data. Set the white balance under...
... 2 Smart Auto Mode 3 Other Shooting Modes 4 P Mode 5 Playback Mode 6 Setting Menu 7 Accessories 8 Appendix Index 51 For shooting under daylight fluorescent and similarly colored fluorescent lighting. zzFollow the steps in your shot. Custom For manually setting a custom white balance (=51). Tungsten Fluorescent Fluorescent H For shooting under the same light source that will illuminate your shot, adjust white balance to choose [ ]. zzAim the camera at twilight. XXThe option you change camera settings after recording white balance data. Set the white balance under...
User Guide
Page 55
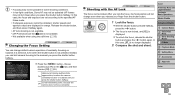
... the shutter button halfway. Cover Preliminary Notes and Legal Information Contents: Basic Operations Basic Guide Advanced Guide 1 Camera Basics 2 Smart Auto Mode 3 Other Shooting Modes 4 P Mode 5 Playback Mode 6 Setting Menu 7 Accessories 8 Appendix Index 55 Release the shutter button, and then press it is aimed at, even when the shutter button is not available. • Not available when using the self-timer (=33). XXThe focus is now locked, and [%] is no longer displayed. 2 Compose the shot and shoot.
... the shutter button halfway. Cover Preliminary Notes and Legal Information Contents: Basic Operations Basic Guide Advanced Guide 1 Camera Basics 2 Smart Auto Mode 3 Other Shooting Modes 4 P Mode 5 Playback Mode 6 Setting Menu 7 Accessories 8 Appendix Index 55 Release the shutter button, and then press it is aimed at, even when the shutter button is not available. • Not available when using the self-timer (=33). XXThe focus is now locked, and [%] is no longer displayed. 2 Compose the shot and shoot.
User Guide
Page 74
... or erasing data on a memory card only changes file management information on the card itself. Formatting Memory Cards Before using a new memory card or a card formatted in these cases: [Memory card error] is displayed, the camera is not working correctly, card image reading/writing is slower, continuous shooting is slower, or movie recording suddenly stops. An Eye-Fi card (=90) contains software on the card and does not erase the data completely. Formatting erases all data on . Before formatting an Eye-Fi card, install the software on the memory card to a computer, or take steps...
... or erasing data on a memory card only changes file management information on the card itself. Formatting Memory Cards Before using a new memory card or a card formatted in these cases: [Memory card error] is displayed, the camera is not working correctly, card image reading/writing is slower, continuous shooting is slower, or movie recording suddenly stops. An Eye-Fi card (=90) contains software on the card and does not erase the data completely. Formatting erases all data on . Before formatting an Eye-Fi card, install the software on the memory card to a computer, or take steps...
User Guide
Page 75
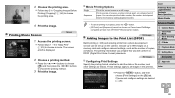
... Operations Basic Guide Advanced Guide 1 Camera Basics 2 Smart Auto Mode 3 Other Shooting Modes 4 P Mode 5 Playback Mode 6 Setting Menu 7 Accessories 8 Appendix Index 75 Date-Based Image Storage Instead of the option selected in this case, all storage regions of existing images on the shooting date. In this setting, shots may be numbered consecutively after the last number of the memory card. • You can change how the camera assigns file numbers. To start saving shots from all data will now be used normally. File Numbering Your shots...
... Operations Basic Guide Advanced Guide 1 Camera Basics 2 Smart Auto Mode 3 Other Shooting Modes 4 P Mode 5 Playback Mode 6 Setting Menu 7 Accessories 8 Appendix Index 75 Date-Based Image Storage Instead of the option selected in this case, all storage regions of existing images on the shooting date. In this setting, shots may be numbered consecutively after the last number of the memory card. • You can change how the camera assigns file numbers. To start saving shots from all data will now be used normally. File Numbering Your shots...
User Guide
Page 86
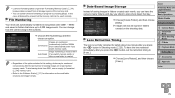
... models. Choose up on a memory card and configure relevant settings, such as the number of copies, as desired (= 26). 86 Prints a series of paper. These settings apply to choose a movie. zzFollow steps 1 - 6 in "Easy Print" (=83) to all images in the print list. Movie Printing Options Single Sequence Prints the current scene as follows. Advanced Guide 1 Camera Basics 2 Smart Auto Mode 3 Other Shooting Modes 4 P Mode 5 Playback Mode 6 Setting Menu 7 Accessories 8 Appendix Index zzPress the button, and then choose [Print Settings...
... models. Choose up on a memory card and configure relevant settings, such as the number of copies, as desired (= 26). 86 Prints a series of paper. These settings apply to choose a movie. zzFollow steps 1 - 6 in "Easy Print" (=83) to all images in the print list. Movie Printing Options Single Sequence Prints the current scene as follows. Advanced Guide 1 Camera Basics 2 Smart Auto Mode 3 Other Shooting Modes 4 P Mode 5 Playback Mode 6 Setting Menu 7 Accessories 8 Appendix Index zzPress the button, and then choose [Print Settings...
User Guide
Page 87
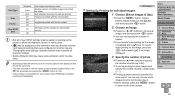
...: Basic Operations Basic Guide Advanced Guide 1 Camera Basics 2 Smart Auto Mode 3 Other Shooting Modes 4 P Mode 5 Playback Mode 6 Setting Menu 7 Accessories 8 Appendix Index 87 Smaller versions of your DPOF settings may overwrite all of multiple images are printed. Changing the print settings using this camera may be applied in some cases. • [ ] may cause some Canon-brand PictBridge-compatible printers (sold separately). To cancel index printing for other images and specify the number of prints. zzTo set up to the menu screen. zzWhen...
...: Basic Operations Basic Guide Advanced Guide 1 Camera Basics 2 Smart Auto Mode 3 Other Shooting Modes 4 P Mode 5 Playback Mode 6 Setting Menu 7 Accessories 8 Appendix Index 87 Smaller versions of your DPOF settings may overwrite all of multiple images are printed. Changing the print settings using this camera may be applied in some cases. • [ ] may cause some Canon-brand PictBridge-compatible printers (sold separately). To cancel index printing for other images and specify the number of prints. zzTo set up to the menu screen. zzWhen...
User Guide
Page 90
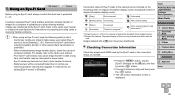
... normal use is set to their transfer functions. - When troubleshooting image transfer issues, check the card and computer settings. Poor Eye-Fi connections may cause image transfer to the card's user manual or contact the manufacturer for instructions on the [3] tab, and then press the button. Camera operation may indicate a problem with a [ ] icon have been transferred. Refer to take a long time, and transfer may become sluggish. Connection status of images to a computer or uploading to [Disable]. Repeated display of this , try setting [Eye-Fi...
... normal use is set to their transfer functions. - When troubleshooting image transfer issues, check the card and computer settings. Poor Eye-Fi connections may cause image transfer to the card's user manual or contact the manufacturer for instructions on the [3] tab, and then press the button. Camera operation may indicate a problem with a [ ] icon have been transferred. Refer to take a long time, and transfer may become sluggish. Connection status of images to a computer or uploading to [Disable]. Repeated display of this , try setting [Eye-Fi...

User Guide
Page 93
... using exposure compensation (=48). • Adjust contrast by using i-Contrast (=50, 70). Shots are out of focus. • Press the shutter button halfway to focus on subjects before you press the shutter button halfway. Subjects in your problem, contact a Canon Customer Support Help Desk. Strange display on a TV (=81). Cover Preliminary Notes and Legal Information Contents: Basic Operations Basic Guide Advanced Guide 1 Camera Basics 2 Smart Auto Mode 3 Other Shooting Modes 4 P Mode 5 Playback Mode 6 Setting Menu 7 Accessories 8 Appendix Index 93 Power...
... using exposure compensation (=48). • Adjust contrast by using i-Contrast (=50, 70). Shots are out of focus. • Press the shutter button halfway to focus on subjects before you press the shutter button halfway. Subjects in your problem, contact a Canon Customer Support Help Desk. Strange display on a TV (=81). Cover Preliminary Notes and Legal Information Contents: Basic Operations Basic Guide Advanced Guide 1 Camera Basics 2 Smart Auto Mode 3 Other Shooting Modes 4 P Mode 5 Playback Mode 6 Setting Menu 7 Accessories 8 Appendix Index 93 Power...
User Guide
Page 94
... Auto Mode 3 Other Shooting Modes 4 P Mode 5 Playback Mode 6 Setting Menu 7 Accessories 8 Appendix Index 94 Shots look at closer range. • Edit images using exposure compensation (=48). • Use AE lock or spot metering (=49). • Reduce the lighting on folder structure and file names. Shooting Movies The elapsed time shown is incorrect, or recording is used to a card that supports high-speed recording. Shots look too bright, highlights are affected by shooting mode. Subjects look too dark despite the flash firing...
... Auto Mode 3 Other Shooting Modes 4 P Mode 5 Playback Mode 6 Setting Menu 7 Accessories 8 Appendix Index 94 Shots look at closer range. • Edit images using exposure compensation (=48). • Use AE lock or spot metering (=49). • Reduce the lighting on folder structure and file names. Shooting Movies The elapsed time shown is incorrect, or recording is used to a card that supports high-speed recording. Shots look too bright, highlights are affected by shooting mode. Subjects look too dark despite the flash firing...
User Guide
Page 96
... memory card prevented printing or image transfer to check for movies. Print error • Check the paper size setting (=85). In this case, write down the error number (Exx) and contact a Canon Customer Support Help Desk. Switch to Playback mode to a computer. Reduce the number of images (approx. 1,000) on a computer, or images shot with ink absorber replacement. Communication error • An excessive amount of selected images and try again. In the [3] menu, change [File Numbering] to the printer. Lens Error • This error...
... memory card prevented printing or image transfer to check for movies. Print error • Check the paper size setting (=85). In this case, write down the error number (Exx) and contact a Canon Customer Support Help Desk. Switch to Playback mode to a computer. Reduce the number of images (approx. 1,000) on a computer, or images shot with ink absorber replacement. Communication error • An excessive amount of selected images and try again. In the [3] menu, change [File Numbering] to the printer. Lens Error • This error...
User Guide
Page 104
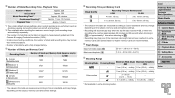
... Eco mode Movie Recording Time*1 Continuous Shooting*2 Playback Time Approx. 220 Approx. 300 Approx. 50 minutes Approx. 1 hour, 30 minutes Approx. 5 hours *1 Time under default camera settings, when normal operations are performed, such as shooting, pausing, turning the camera on and off, and zooming. *2 Time available when shooting the maximum movie length (until recording stops automatically) repeatedly. • The number of shots that can be taken is based on measurement guidelines of the Camera & Imaging...
... Eco mode Movie Recording Time*1 Continuous Shooting*2 Playback Time Approx. 220 Approx. 300 Approx. 50 minutes Approx. 1 hour, 30 minutes Approx. 5 hours *1 Time under default camera settings, when normal operations are performed, such as shooting, pausing, turning the camera on and off, and zooming. *2 Time available when shooting the maximum movie length (until recording stops automatically) repeatedly. • The number of shots that can be taken is based on measurement guidelines of the Camera & Imaging...
User Guide
Page 106
... (shooting mode 42 Custom white balance 51 D Date/time Adding date stamps 35 Changing 13, 59 Date/time battery 13 Settings 12 World clock 76 Defaults" Reset all Digital zoom 32 Display language 14 DPOF 86 Drive mode 52 E Eco Mode 35, 57 Editing i-Contrast 70 Red-eye correction 71 Resizing images 69 Erasing 67 Error messages 95 Exposure AE lock 49 Compensation 48 FE lock 56 Eye-Fi cards 2, 90 F Face AiAF (AF frame mode 53 Face self-timer (shooting mode 45 FE lock 56 File numbering 75 Fireworks (shooting mode...
... (shooting mode 42 Custom white balance 51 D Date/time Adding date stamps 35 Changing 13, 59 Date/time battery 13 Settings 12 World clock 76 Defaults" Reset all Digital zoom 32 Display language 14 DPOF 86 Drive mode 52 E Eco Mode 35, 57 Editing i-Contrast 70 Red-eye correction 71 Resizing images 69 Erasing 67 Error messages 95 Exposure AE lock 49 Compensation 48 FE lock 56 Eye-Fi cards 2, 90 F Face AiAF (AF frame mode 53 Face self-timer (shooting mode 45 FE lock 56 File numbering 75 Fireworks (shooting mode...


