Software Guide for Windows
Page 3
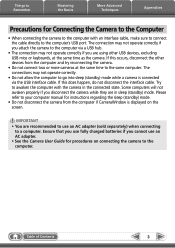
Things to Remember Mastering the Basics More Advanced Techniques Appendices Precautions for instructions regarding the sleep (standby) mode. • Do not disconnect the camera from the computer and try reconnecting the camera. • Do not connect two or ...
Things to Remember Mastering the Basics More Advanced Techniques Appendices Precautions for instructions regarding the sleep (standby) mode. • Do not disconnect the camera from the computer and try reconnecting the camera. • Do not connect two or ...

Software Guide for Windows
Page 8
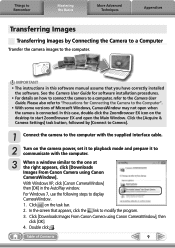
...the steps in the appendix. 1 Select a task. You can be accessed by selecting a task in the Main Window and following the instructions in the guidance section of the new window. The major steps for the selected task appears here. For further details on the functions, refer... to "List of Contents 2 Follow the instructions to perform the task. 8 Table of Available Functions" in order. An overview for the task appear here. Cancels the procedure and returns to the...
...the steps in the appendix. 1 Select a task. You can be accessed by selecting a task in the Main Window and following the instructions in the guidance section of the new window. The major steps for the selected task appears here. For further details on the functions, refer... to "List of Contents 2 Follow the instructions to perform the task. 8 Table of Available Functions" in order. An overview for the task appear here. Cancels the procedure and returns to the...
Software Guide for Windows
Page 9
...The instructions in the AutoPlay window. In this software manual assume that appears, click the link to modify the program. 3. For Windows 7, use the following steps to start ZoomBrowser EX and open when the camera is connected. Click [Downloads Images From Canon Camera using Canon CameraWindow... the Camera User Guide for Connecting the Camera to the Computer". • With some versions of Contents 9 With Windows XP, click [Canon CameraWindow] then [OK] in this case, double-click the ZoomBrowser EX icon on the desktop to display CameraWindow. 1. Double click . ...
...The instructions in the AutoPlay window. In this software manual assume that appears, click the link to modify the program. 3. For Windows 7, use the following steps to start ZoomBrowser EX and open when the camera is connected. Click [Downloads Images From Canon Camera using Canon CameraWindow... the Camera User Guide for Connecting the Camera to the Computer". • With some versions of Contents 9 With Windows XP, click [Canon CameraWindow] then [OK] in this case, double-click the ZoomBrowser EX icon on the desktop to display CameraWindow. 1. Double click . ...

Software Guide for Macintosh
Page 3
Please refer to your computer manual for instructions regarding the sleep (standby) mode. • Do not disconnect the camera from the computer and try reconnecting the camera. • Do not connect two or ...
Please refer to your computer manual for instructions regarding the sleep (standby) mode. • Do not disconnect the camera from the computer and try reconnecting the camera. • Do not connect two or ...
Software Guide for Macintosh
Page 8
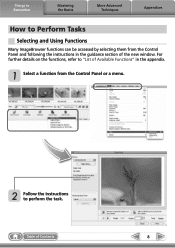
Table of the new window. Things to Remember Mastering the Basics More Advanced Techniques Appendices How to perform the task. For further details on the functions, refer to "List of Available Functions" in the appendix. 1 Select a function from the Control Panel or a menu. 2 Follow the instructions to Perform Tasks Selecting and Using Functions Many ImageBrowser functions can be accessed by selecting them from the Control Panel and following the instructions in the guidance section of Contents 8
Table of the new window. Things to Remember Mastering the Basics More Advanced Techniques Appendices How to perform the task. For further details on the functions, refer to "List of Available Functions" in the appendix. 1 Select a function from the Control Panel or a menu. 2 Follow the instructions to Perform Tasks Selecting and Using Functions Many ImageBrowser functions can be accessed by selecting them from the Control Panel and following the instructions in the guidance section of Contents 8
Software Guide for Macintosh
Page 9
Only images that you connect the camera, click the [CameraWindow] icon in the Dock (the bar at the bottom of Contents 9 IMPORTANT • The instructions in this software manual assume that have correctly installed the software. Please also refer to "Precautions for software installation procedures. • For details on the ...
Only images that you connect the camera, click the [CameraWindow] icon in the Dock (the bar at the bottom of Contents 9 IMPORTANT • The instructions in this software manual assume that have correctly installed the software. Please also refer to "Precautions for software installation procedures. • For details on the ...
PowerShot A1200 Camera User Guide
Page 28
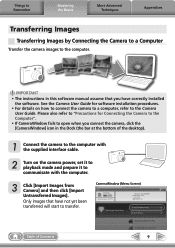
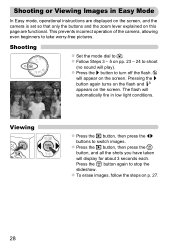
... the r button to switch images. Shooting z Set the mode dial to take worry-free pictures. will automatically fire in Easy Mode In Easy mode, operational instructions are displayed on the screen, and the camera is set so that only the buttons and the zoom lever explained on this page are functional...
... the r button to switch images. Shooting z Set the mode dial to take worry-free pictures. will automatically fire in Easy Mode In Easy mode, operational instructions are displayed on the screen, and the camera is set so that only the buttons and the zoom lever explained on this page are functional...
PowerShot A1200 Camera User Guide
Page 33
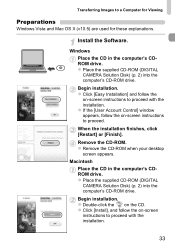
... Begin installation. Begin installation. Remove the CD-ROM. Macintosh Place the CD in the computer's CDROM drive. z Click [Install], and follow the on -screen instructions to proceed. z Place the supplied CD-ROM (DIGITAL CAMERA Solution Disk) (p. 2) into the computer's CD-ROM drive. Install the Software. z Place the... Place the CD in the computer's CDROM drive. Transferring Images to proceed with the installation. z Double-click the on -screen instructions to a Computer for Viewing Preparations Windows Vista and Mac OS X (v10.5) are used for these explanations.
... Begin installation. Begin installation. Remove the CD-ROM. Macintosh Place the CD in the computer's CDROM drive. z Click [Install], and follow the on -screen instructions to proceed. z Place the supplied CD-ROM (DIGITAL CAMERA Solution Disk) (p. 2) into the computer's CD-ROM drive. Install the Software. z Place the... Place the CD in the computer's CDROM drive. Transferring Images to proceed with the installation. z Double-click the on -screen instructions to a Computer for Viewing Preparations Windows Vista and Mac OS X (v10.5) are used for these explanations.

PowerShot A1200 Camera User Guide
Page 39
2 Learning More This chapter explains the parts of the camera and what appears on the screen, as well as the basic operating instructions. 39
2 Learning More This chapter explains the parts of the camera and what appears on the screen, as well as the basic operating instructions. 39


