
Quick Start Guide
Page 4
... easy-to-use guide to change without the prior written consent of Sony Corporation. "Adobe" and "Adobe RGB(1998)" are trademarks of Canon U.S.A., Inc. © 2006 Canon U.S.A., Inc. Canon PIXMA iP6700D Photo Printer Quick Start Guide. All statements, technical information and recommendations in this manual thoroughly in any guides or related documents are believed reliable, but...
... easy-to-use guide to change without the prior written consent of Sony Corporation. "Adobe" and "Adobe RGB(1998)" are trademarks of Canon U.S.A., Inc. © 2006 Canon U.S.A., Inc. Canon PIXMA iP6700D Photo Printer Quick Start Guide. All statements, technical information and recommendations in this manual thoroughly in any guides or related documents are believed reliable, but...

Quick Start Guide
Page 5
... Printing Becomes Faint or Colors are Incorrect 32 Troubleshooting Cannot Install the Printer Driver 34 Cannot Connect to PC Properly 35 Print Results Not Satisfactory or Contains Errors 36 Troubleshooting Printer Hardware 39 Paper Does Not Feed Properly 41 Paper Jams 41 An ...Error Message is displayed on the Screen 42 POWER Lamp and Alarm Lamp Flash Alternately 43 Appendix Specifications 44 Safety Precautions 48 Regulatory Information 50 CANON U.S.A., INC. LIMITED WARRANTY...
... Printing Becomes Faint or Colors are Incorrect 32 Troubleshooting Cannot Install the Printer Driver 34 Cannot Connect to PC Properly 35 Print Results Not Satisfactory or Contains Errors 36 Troubleshooting Printer Hardware 39 Paper Does Not Feed Properly 41 Paper Jams 41 An ...Error Message is displayed on the Screen 42 POWER Lamp and Alarm Lamp Flash Alternately 43 Appendix Specifications 44 Safety Precautions 48 Regulatory Information 50 CANON U.S.A., INC. LIMITED WARRANTY...

Quick Start Guide
Page 6
If the Alarm lamp lights, refer to know more information, view the iP6700D User's Guide, Printer Driver Guide, and Photo Application Guide installed on the Printer 1 Press the POWER button. Clicking provides detailed information about , or click the Help button when displayed. Basic Printing Basic ...Printing This Quick Start Guide describes some of the features of your printer and how to steady (nonflashing) when the printer is Displayed on the LCD" in the Direct Printing Guide. Turning on your computer, or use them. For ...
If the Alarm lamp lights, refer to know more information, view the iP6700D User's Guide, Printer Driver Guide, and Photo Application Guide installed on the Printer 1 Press the POWER button. Clicking provides detailed information about , or click the Help button when displayed. Basic Printing Basic ...Printing This Quick Start Guide describes some of the features of your printer and how to steady (nonflashing) when the printer is Displayed on the LCD" in the Direct Printing Guide. Turning on your computer, or use them. For ...

Quick Start Guide
Page 7
Basic Printing About the Power Plug When removing the power plug after turing off the printer, be sure to check that the POWER lamp is removed from the wall outlet with the POWER lamp lit or blinking, the printer cannot protect its print heads and may be unable to print. 3 If the power plug is not lit. Turning off the Printer 1 To turn off . When the POWER lamp stops blinking, the printer is turned off the printer, press the POWER button.
Basic Printing About the Power Plug When removing the power plug after turing off the printer, be sure to check that the POWER lamp is removed from the wall outlet with the POWER lamp lit or blinking, the printer cannot protect its print heads and may be unable to print. 3 If the power plug is not lit. Turning off the Printer 1 To turn off . When the POWER lamp stops blinking, the printer is turned off the printer, press the POWER button.

Quick Start Guide
Page 8
...embossed or treated surface • Any type of paper. Using such paper will not only produce unsatisfactory results, but can also cause the printer to load paper in the auto sheet feeder and the cassette. Basic Printing Loading Paper This section describes how to jam or malfunction. •...• Excessively thin paper (less than 64 gsm or 17 lb) • Excessively thick paper* (more than 105 gsm or 28 lb) * non-Canon genuine paper • Picture postcards • Postcards affixed with photos or stickers • Envelopes with double flaps • Envelopes with sticker flaps • ...
...embossed or treated surface • Any type of paper. Using such paper will not only produce unsatisfactory results, but can also cause the printer to load paper in the auto sheet feeder and the cassette. Basic Printing Loading Paper This section describes how to jam or malfunction. •...• Excessively thin paper (less than 64 gsm or 17 lb) • Excessively thick paper* (more than 105 gsm or 28 lb) * non-Canon genuine paper • Picture postcards • Postcards affixed with photos or stickers • Envelopes with double flaps • Envelopes with sticker flaps • ...
Quick Start Guide
Page 9
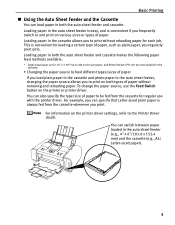
... 6"/101.6 x 152.4 mm) and the cassette (e.g., A4/ Letter-sized paper). 5 This is convenient for regular use the Feed Switch button on the printer driver settings, refer to print without removing and reloading paper. Loading paper in the auto sheet feeder, changing the paper source allows you frequently switch...a certain type of paper, such as plain paper, you print. To change the paper source, use with the printer driver. For information on the printer or printer driver. Basic Printing Using the Auto Sheet Feeder and the Cassette You can load paper in both types of paper ...
... 6"/101.6 x 152.4 mm) and the cassette (e.g., A4/ Letter-sized paper). 5 This is convenient for regular use the Feed Switch button on the printer driver settings, refer to print without removing and reloading paper. Loading paper in the auto sheet feeder, changing the paper source allows you frequently switch...a certain type of paper, such as plain paper, you print. To change the paper source, use with the printer driver. For information on the printer or printer driver. Basic Printing Using the Auto Sheet Feeder and the Cassette You can load paper in both types of paper ...

Quick Start Guide
Page 10
... sheet feeder runs out of paper, the paper source automatically changes to the cassette. • Choosing the paper source to match the location of the printer You can use just the auto sheet feeder or cassette according to the location of paper, the paper source automatically switches to the other one... type/size of paper by using both the auto sheet feeder and cassette together If the auto sheet feeder or cassette runs out of the printer. For example, if you can use just the cassette for printing onto a large volume of paper. Legal-sized paper and 2.13" x 3.39"/54.0 x 86.0 mm...
... sheet feeder runs out of paper, the paper source automatically changes to the cassette. • Choosing the paper source to match the location of the printer You can use just the auto sheet feeder or cassette according to the location of paper, the paper source automatically switches to the other one... type/size of paper by using both the auto sheet feeder and cassette together If the auto sheet feeder or cassette runs out of the printer. For example, if you can use just the cassette for printing onto a large volume of paper. Legal-sized paper and 2.13" x 3.39"/54.0 x 86.0 mm...
Quick Start Guide
Page 11
...the paper. You can also select the paper source with its various printers, see "Using Specialty Media" on how to load specialty media into the printer. 1 Flatten the four corners of the paper before loading it....Media is curled, gently bend it in the opposite direction of the front cover and pull down to the Printer Driver Guide. 7 For details, refer to open it. 2 Pull out the paper output tray extension completely...Printing Media" in the User's Guide for use with the printer driver. Basic Printing Loading Plain Paper in the Auto Sheet Feeder For detailed information on the specialty ...
...the paper. You can also select the paper source with its various printers, see "Using Specialty Media" on how to load specialty media into the printer. 1 Flatten the four corners of the paper before loading it....Media is curled, gently bend it in the opposite direction of the front cover and pull down to the Printer Driver Guide. 7 For details, refer to open it. 2 Pull out the paper output tray extension completely...Printing Media" in the User's Guide for use with the printer driver. Basic Printing Loading Plain Paper in the Auto Sheet Feeder For detailed information on the specialty ...

Quick Start Guide
Page 13
... the paper guide and slide it against the cover guide on the right side of the envelope. Env. #10 in the printer driver according to match the direction of the printer driver settings, see "Printing with Windows" on page 20, "Printing with Macintosh" on the left side of the paper support with...
... the paper guide and slide it against the cover guide on the right side of the envelope. Env. #10 in the printer driver according to match the direction of the printer driver settings, see "Printing with Windows" on page 20, "Printing with Macintosh" on the left side of the paper support with...

Quick Start Guide
Page 14
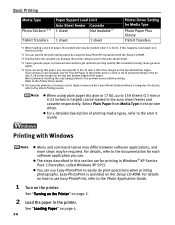
.... (1) Load the paper into the auto sheet feeder with the print side facing UP and align the cover guide on the right side of the printer driver settings, see "Printing with Windows" on page 20, or "Printing with Macintosh" on page 24. Loading paper in landscape orientation can load up to... lamp lights. (4) Select 4 x 6 in 101.6 x 152.4 mm, 5 x 7 in 127.0 x 177.8 mm, or Credit Card 2.13 x 3.39 in 54.0 x 86.0 mm from Page Size in the printer driver.
.... (1) Load the paper into the auto sheet feeder with the print side facing UP and align the cover guide on the right side of the printer driver settings, see "Printing with Windows" on page 20, or "Printing with Macintosh" on page 24. Loading paper in landscape orientation can load up to... lamp lights. (4) Select 4 x 6 in 101.6 x 152.4 mm, 5 x 7 in 127.0 x 177.8 mm, or Credit Card 2.13 x 3.39 in 54.0 x 86.0 mm from Page Size in the printer driver.

Quick Start Guide
Page 15
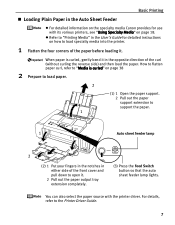
... Printing We recommend using genuine Canon photo media when printing photographs. See "Using Specialty Media" on page 18. When paper is loadable in the opposite direction until the paper becomes completely flat. 2 Prepare to load paper. (1) Pull out the cassette from the printer. (2) Remove the cover on... x 3.39" / 54.0 x 86.0 mm size paper, and Photo Stickers are not loadable in the User's Guide for use with its various printers, see "Using Specialty Media" on page 18. For detailed information on the specialty media Canon provides for detailed instructions on the cassette. 11
... Printing We recommend using genuine Canon photo media when printing photographs. See "Using Specialty Media" on page 18. When paper is loadable in the opposite direction until the paper becomes completely flat. 2 Prepare to load paper. (1) Pull out the cassette from the printer. (2) Remove the cover on... x 3.39" / 54.0 x 86.0 mm size paper, and Photo Stickers are not loadable in the User's Guide for use with its various printers, see "Using Specialty Media" on page 18. For detailed information on the specialty media Canon provides for detailed instructions on the cassette. 11
Quick Start Guide
Page 18
For specific drying times, refer to the instructions packaged with the printer driver. If the cassette has been extended to the Printer Driver Guide. Push the cassette all the way into the printer. Do not touch the printed surfaces until the ink dries. For details, refer to accommodate paper ... the Feed Switch button so that the cassette lamp lights. Basic Printing 5 Insert the Cassette into the printer. (1) Set the cover on the cassette. (2) Insert the cassette into the printer. You can also select the paper source with your fingers in the notches in either side of the...
For specific drying times, refer to the instructions packaged with the printer driver. If the cassette has been extended to the Printer Driver Guide. Push the cassette all the way into the printer. Do not touch the printed surfaces until the ink dries. For details, refer to accommodate paper ... the Feed Switch button so that the cassette lamp lights. Basic Printing 5 Insert the Cassette into the printer. (1) Set the cover on the cassette. (2) Insert the cassette into the printer. You can also select the paper source with your fingers in the notches in either side of the...

Quick Start Guide
Page 19
... in Page Size. Do not use envelopes with Macintosh" on page 24. 15 For a detailed description of the cassette. or Comm. Env. #10 in the printer driver according to match the direction of the envelope will be loaded at once. (2) Slide the paper guide against the right side of the... printer driver settings, see "Printing with Windows" on the left side. A maximum of 5 envelopes can be printed in the wrong direction. Select either DL Env. The ...
... in Page Size. Do not use envelopes with Macintosh" on page 24. 15 For a detailed description of the cassette. or Comm. Env. #10 in the printer driver according to match the direction of the envelope will be loaded at once. (2) Slide the paper guide against the right side of the... printer driver settings, see "Printing with Windows" on the left side. A maximum of 5 envelopes can be printed in the wrong direction. Select either DL Env. The ...

Quick Start Guide
Page 21
Loading paper in portrait orientation. Always load paper in landscape orientation can cause the paper to be jammed. Basic Printing (5) Select 4 x 6 in 101.6 x 152.4 mm or 5 x 7 in 127.0 x 177.8 mm from Page Size in the printer driver. Portrait Landscape We recommend using genuine Canon photo media when printing photographs. See "Using Specialty Media" on page 24. For a detailed description of the printer driver settings, see "Printing with Windows" on page 20, or "Printing with Macintosh" on page 18. 17
Loading paper in portrait orientation. Always load paper in landscape orientation can cause the paper to be jammed. Basic Printing (5) Select 4 x 6 in 101.6 x 152.4 mm or 5 x 7 in 127.0 x 177.8 mm from Page Size in the printer driver. Portrait Landscape We recommend using genuine Canon photo media when printing photographs. See "Using Specialty Media" on page 24. For a detailed description of the printer driver settings, see "Printing with Windows" on page 20, or "Printing with Macintosh" on page 18. 17
Quick Start Guide
Page 24
...in the 35 mm/1.38 inches margin on the Setup CD-ROM. We recommend using Canon genuine paper. *5 If you choose a special paper size for each software application you cannot print in the printer. Easy-PhotoPrint is set to 150 sheets (13 mm or 0.52 inches in Windows... quality. We recommend checking the area being printed in the printer driver. Refer to the documentation for Fine Art Paper in a memory card or digital camera on the Canon Photo Stickers without a computer. For details, refer to the Printer Driver Guide. *6 You can use . The steps described in...
...in the 35 mm/1.38 inches margin on the Setup CD-ROM. We recommend using Canon genuine paper. *5 If you choose a special paper size for each software application you cannot print in the printer. Easy-PhotoPrint is set to 150 sheets (13 mm or 0.52 inches in Windows... quality. We recommend checking the area being printed in the printer driver. Refer to the documentation for Fine Art Paper in a memory card or digital camera on the Canon Photo Stickers without a computer. For details, refer to the Printer Driver Guide. *6 You can use . The steps described in...

Quick Start Guide
Page 25
Basic Printing When the auto sheet feeder lamp is lit, paper is fed from the cassette. 4 Create a document or open a file to print. 5 Open the printer properties dialog box. (1) Select Print from the auto sheet feeder. The Print dialog box opens. (2) Ensure that the proper paper source is selected. 3 Ensure that your printer is selected. (3) Click Preferences or Properties. 21 When the cassette lamp is lit, paper is fed from the application software's File menu.
Basic Printing When the auto sheet feeder lamp is lit, paper is fed from the cassette. 4 Create a document or open a file to print. 5 Open the printer properties dialog box. (1) Select Print from the auto sheet feeder. The Print dialog box opens. (2) Ensure that the proper paper source is selected. 3 Ensure that your printer is selected. (3) Click Preferences or Properties. 21 When the cassette lamp is lit, paper is fed from the application software's File menu.
Quick Start Guide
Page 26
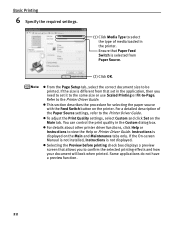
... Feed Switch is different from Paper Source. (2) Click OK. To adjust the Print Quality settings, select Custom and click Set on the printer. If the On-screen Manual is not installed, Instructions is displayed on the Main and Maintenance tabs only. For a detailed description of ...not displayed. Basic Printing 6 Specify the required settings. (1) Click Media Type to select the type of the Paper Source settings, refer to the Printer Driver Guide. Some applications do not have a preview function. 22 From the Page Setup tab, select the correct document size to be printed....
... Feed Switch is different from Paper Source. (2) Click OK. To adjust the Print Quality settings, select Custom and click Set on the printer. If the On-screen Manual is not installed, Instructions is displayed on the Main and Maintenance tabs only. For a detailed description of ...not displayed. Basic Printing 6 Specify the required settings. (1) Click Media Type to select the type of the Paper Source settings, refer to the Printer Driver Guide. Some applications do not have a preview function. 22 From the Page Setup tab, select the correct document size to be printed....

Quick Start Guide
Page 27
See "Canceling Printing" on the printer. Basic Printing (1) Click Print or OK. You can cancel a print job in progress by simply pressing the Stop/Reset button on page 27. 23 7 Print the document.
See "Canceling Printing" on the printer. Basic Printing (1) Click Print or OK. You can cancel a print job in progress by simply pressing the Stop/Reset button on page 27. 23 7 Print the document.

Quick Start Guide
Page 28
... in this section are for each software application you use Easy-PhotoPrint to the Photo Application Guide. 1 Turn on the printer. See "Turning on the Printer" on page 2. 2 Load the paper on the printer. The steps described in Mac® OS X v.10.4.x (hereafter called Macintosh®). For details on how to use Easy...
... in this section are for each software application you use Easy-PhotoPrint to the Photo Application Guide. 1 Turn on the printer. See "Turning on the Printer" on page 2. 2 Load the paper on the printer. The steps described in Mac® OS X v.10.4.x (hereafter called Macintosh®). For details on how to use Easy...
Quick Start Guide
Page 30
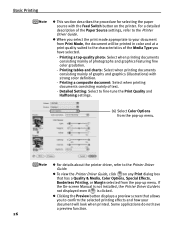
... document will be printed in color and at a print quality suited to the characteristics of the Media Type you to the Printer Driver Guide. Printing tables and charts: Select when printing documents consisting mainly of the Paper Source settings, refer to confirm the...clicked. Basic Printing This section describes the procedure for selecting the paper source with strong color definition. - Detailed Setting: Select to the Printer Driver Guide. For a detailed description of graphs and graphics (illustrations) with the Feed Switch button on any Print dialog box that allows...
... document will be printed in color and at a print quality suited to the characteristics of the Media Type you to the Printer Driver Guide. Printing tables and charts: Select when printing documents consisting mainly of the Paper Source settings, refer to confirm the...clicked. Basic Printing This section describes the procedure for selecting the paper source with strong color definition. - Detailed Setting: Select to the Printer Driver Guide. For a detailed description of graphs and graphics (illustrations) with the Feed Switch button on any Print dialog box that allows...


