
iP5000 Quick Start Guide
Page 49
... ink tank. Push the tab and remove the ink tank. z Handle ink tanks carefully to replace ink tanks one by one when replacing more than one ink tank. 45 Be sure to avoid staining clothing or the surrounding area. Printing Maintenance „ Replacing Ink Tanks When an ink tank runs out of... following steps. 1 Ensure that the printer is on, and then push the upper center ( Front Cover to open . Do not touch the lock lever; The Print Head Holder moves to the center. 3 Remove the empty ink tank.
... ink tank. Push the tab and remove the ink tank. z Handle ink tanks carefully to replace ink tanks one by one when replacing more than one ink tank. 45 Be sure to avoid staining clothing or the surrounding area. Printing Maintenance „ Replacing Ink Tanks When an ink tank runs out of... following steps. 1 Ensure that the printer is on, and then push the upper center ( Front Cover to open . Do not touch the lock lever; The Print Head Holder moves to the center. 3 Remove the empty ink tank.
iP5000 Quick Start Guide
Page 51
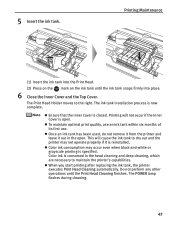
... the right. z Once an ink tank has been used, do not remove it from the printer and leave it is specified. Printing Maintenance (1) Insert the ink tank into the Print Head. (2) Press on the mark on the ink tank until the Print Head Cleaning finishes. Printing will cause the ink tank to maintain the printer's capabilities. The...
... the right. z Once an ink tank has been used, do not remove it from the printer and leave it is specified. Printing Maintenance (1) Insert the ink tank into the Print Head. (2) Press on the mark on the ink tank until the Print Head Cleaning finishes. Printing will cause the ink tank to maintain the printer's capabilities. The...
iP5000 Quick Start Guide
Page 71
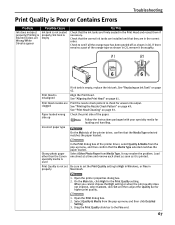
... Print Head is empty, replace the ink tank. Print Head nozzles are firmly seated in the Print Head and reseat them if necessary. Follow the instructions packaged with your specialty media for the Print Quality setting. Glossy photo paper other than the Canon specialty media is used In the Print ...then click Detailed Setting. 3. Print Quality is printed. If there remains a part of the paper. Open the Print dialog box. 2. Check to High in Windows, or Fine in (1). See "Print Head Cleaning" on page 42. Load one sheet at a time and remove each sheet as soon as shown...
... Print Head is empty, replace the ink tank. Print Head nozzles are firmly seated in the Print Head and reseat them if necessary. Follow the instructions packaged with your specialty media for the Print Quality setting. Glossy photo paper other than the Canon specialty media is used In the Print ...then click Detailed Setting. 3. Print Quality is printed. If there remains a part of the paper. Open the Print dialog box. 2. Check to High in Windows, or Fine in (1). See "Print Head Cleaning" on page 42. Load one sheet at a time and remove each sheet as soon as shown...
iP5000 Quick Start Guide
Page 79
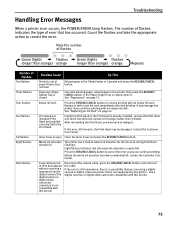
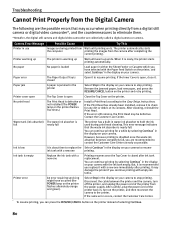
... Six flashes Eight flashes Nine flashes Possible Cause Try This Printer is already installed, remove the Print Head and check the electrical contacts for the ink used during Print Head Cleaning. Before the waste ink absorber becomes completely full, contact the Customer Care Center.../ERROR lamp flashes. A specified period of error that the waste ink absorber is open it. Print Head not installed/Print Head not installed correctly/Defective Print Head Install the Print Head. Press the RESUME/CANCEL button to realign it with this printer. not feed Paper jam/Paper Output...
... Six flashes Eight flashes Nine flashes Possible Cause Try This Printer is already installed, remove the Print Head and check the electrical contacts for the ink used during Print Head Cleaning. Before the waste ink absorber becomes completely full, contact the Customer Care Center.../ERROR lamp flashes. A specified period of error that the waste ink absorber is open it. Print Head not installed/Print Head not installed correctly/Defective Print Head Install the Print Head. Press the RESUME/CANCEL button to realign it with this printer. not feed Paper jam/Paper Output...
iP5000 Quick Start Guide
Page 84
... possible. If the same error occurs, contact the Customer Care Center. * To resume printing, you are recommended to stop printing. Remove the jammed paper, load new paper, and press the RESUME/CANCEL button on the printer flashes five times.) Install a Print Head according to eliminate them. *Hereafter, the digital still camera and digital video camcorder...
... possible. If the same error occurs, contact the Customer Care Center. * To resume printing, you are recommended to stop printing. Remove the jammed paper, load new paper, and press the RESUME/CANCEL button on the printer flashes five times.) Install a Print Head according to eliminate them. *Hereafter, the digital still camera and digital video camcorder...

iP5000 Quick Start Guide
Page 93
.... Do not place metal objects (paper clips, staples, etc.) or containers of the printer. If a child ingests any object on a Print Head after printing. Ink may cause injury or damage the printer if you purchased the printer. Never touch the electrical contacts on the printer. The metal parts...for the printer in a location with its back attached to a heating source. Do not shake Print Heads or ink tanks. Ensure that is printing. Do not place any ink, consult a doctor immediately. Never remove the plug by pulling on a slant, vertically or upside-down, as the ink may be very...
.... Do not place metal objects (paper clips, staples, etc.) or containers of the printer. If a child ingests any object on a Print Head after printing. Ink may cause injury or damage the printer if you purchased the printer. Never touch the electrical contacts on the printer. The metal parts...for the printer in a location with its back attached to a heating source. Do not shake Print Heads or ink tanks. Ensure that is printing. Do not place any ink, consult a doctor immediately. Never remove the plug by pulling on a slant, vertically or upside-down, as the ink may be very...
iP5000 Easy Setup Instructions
Page 1
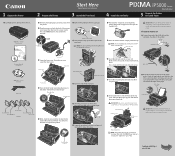
... Cover Inner Cover Print Head Nozzles Electrical Contacts Front Cover 3 Raise the print head lock lever. 4 The print head holder automatically moves to close the inner cover completely, or the paper will not feed properly. PIXMA iP5000 Series Photo Printer Photo Printer Series Quick Start Guide 1 Remove all items from the print head. NOTE: Do not touch the print head nozzles and the...
... Cover Inner Cover Print Head Nozzles Electrical Contacts Front Cover 3 Raise the print head lock lever. 4 The print head holder automatically moves to close the inner cover completely, or the paper will not feed properly. PIXMA iP5000 Series Photo Printer Photo Printer Series Quick Start Guide 1 Remove all items from the print head. NOTE: Do not touch the print head nozzles and the...
iP5000 Easy Setup Instructions
Page 2
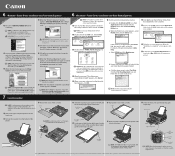
.... NOTE: Print head alignment will extend NOTE: When feeding paper from the bottom of the printer. 3 Remove the cover of the cassette. c. Select iP5000 and click Maintenance...Print Head Alignment" screen appears, ensure that the cassette lamp turns on to Windows as an Administrator before continuing. 2 Double-click the CD-ROM icon, then the Mac OS X folder, then the Printer Driver folder. 3 Double-click the PIXMA iP5000.... 7 Insert cassette completely into place. QA7-3439-V01 © 2004 Canon Inc. Canon is completed" screen appears, click OK. 10 Double-click on -screen ...
.... NOTE: Print head alignment will extend NOTE: When feeding paper from the bottom of the printer. 3 Remove the cover of the cassette. c. Select iP5000 and click Maintenance...Print Head Alignment" screen appears, ensure that the cassette lamp turns on to Windows as an Administrator before continuing. 2 Double-click the CD-ROM icon, then the Mac OS X folder, then the Printer Driver folder. 3 Double-click the PIXMA iP5000.... 7 Insert cassette completely into place. QA7-3439-V01 © 2004 Canon Inc. Canon is completed" screen appears, click OK. 10 Double-click on -screen ...


