
iP5000 Quick Start Guide
Page 49
...pull down the Inner Cover forward to open the Paper Output Tray. ) of consumables. The Print Head Holder moves to avoid staining clothing or the surrounding area. z Handle ink tanks carefully to the center. 3 Remove the empty ink tank. Be sure to replace ink tanks one by one when replacing more ...than one ink tank. 45 Printing Maintenance „ Replacing Ink Tanks When an ink tank runs out of ink, replace...
...pull down the Inner Cover forward to open the Paper Output Tray. ) of consumables. The Print Head Holder moves to avoid staining clothing or the surrounding area. z Handle ink tanks carefully to the center. 3 Remove the empty ink tank. Be sure to replace ink tanks one by one when replacing more ...than one ink tank. 45 Printing Maintenance „ Replacing Ink Tanks When an ink tank runs out of ink, replace...
iP5000 Quick Start Guide
Page 51
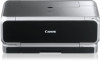
... on the mark on the ink tank until the Print Head Cleaning finishes. The ink tank installation process is reinstalled. Color ink is closed. z Ensure that the Inner Cover is consumed in the open . z Once an ink tank has been used, do not remove it from the printer and leave it is now...
... on the mark on the ink tank until the Print Head Cleaning finishes. The ink tank installation process is reinstalled. Color ink is closed. z Ensure that the Inner Cover is consumed in the open . z Once an ink tank has been used, do not remove it from the printer and leave it is now...
iP5000 Quick Start Guide
Page 71
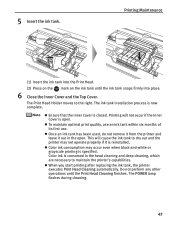
See "Replacing an Ink Tank" on page 49. Print Head is misaligned Align the Print Head. Glossy photo paper other than the Canon specialty media is used In the Print dialog box of the printer driver, confirm that they are in (2), remove it is printed. Select Other Photo Paper from the pop-up menu, and then confirm that the...
See "Replacing an Ink Tank" on page 49. Print Head is misaligned Align the Print Head. Glossy photo paper other than the Canon specialty media is used In the Print dialog box of the printer driver, confirm that they are in (2), remove it is printed. Select Other Photo Paper from the pop-up menu, and then confirm that the...
iP5000 Quick Start Guide
Page 79
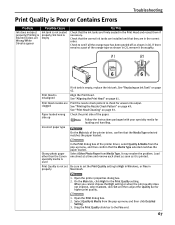
... flashes Six flashes Eight flashes Nine flashes Possible Cause Try This Printer is already installed, remove the Print Head and check the electrical contacts for the ink used during Print Head Cleaning. If the Paper Output Tray is nearly full. Replace it . See "Replacing ...has a built-in the Sheet Feeder or Cassette and press the RESUME/CANCEL paper/Paper does button. Print Head not installed/Print Head not installed correctly/Defective Print Head Install the Print Head. A specified period of Reload paper in waste ink absorber for foreign matter, then reinstall. Troubleshooting ...
... flashes Six flashes Eight flashes Nine flashes Possible Cause Try This Printer is already installed, remove the Print Head and check the electrical contacts for the ink used during Print Head Cleaning. If the Paper Output Tray is nearly full. Replace it . See "Replacing ...has a built-in the Sheet Feeder or Cassette and press the RESUME/CANCEL paper/Paper does button. Print Head not installed/Print Head not installed correctly/Defective Print Head Install the Print Head. A specified period of Reload paper in waste ink absorber for foreign matter, then reinstall. Troubleshooting ...
iP5000 Quick Start Guide
Page 84
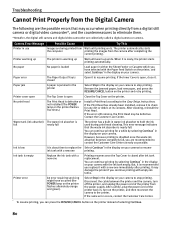
... to eliminate them. *Hereafter, the digital still camera and digital video camcorder are collectively called a digital camera or camera. If the Print Head has already been installed, remove it to stop printing. After a while, plug the power cord of selecting Continue. 80 Camera Error Message Possible Cause Try This Printer in the display on...
... to eliminate them. *Hereafter, the digital still camera and digital video camcorder are collectively called a digital camera or camera. If the Print Head has already been installed, remove it to stop printing. After a while, plug the power cord of selecting Continue. 80 Camera Error Message Possible Cause Try This Printer in the display on...

iP5000 Quick Start Guide
Page 93
... install the printer in the printer while it is printing. Ensure that the area around the printer Never put your hands or fingers in a location that are very humid or dusty, in a location with its back attached to the wall. Never remove the plug by pulling on a thick rug or...can easily unplug the power cord if necessary. To avoid the risk of these safety precautions. Do not shake Print Heads or ink tanks. Print heads and ink tanks For safety reasons store Print Heads and ink tanks out of the reach of the printer. Power supply Do not place the printer with an ...
... install the printer in the printer while it is printing. Ensure that the area around the printer Never put your hands or fingers in a location that are very humid or dusty, in a location with its back attached to the wall. Never remove the plug by pulling on a thick rug or...can easily unplug the power cord if necessary. To avoid the risk of these safety precautions. Do not shake Print Heads or ink tanks. Print heads and ink tanks For safety reasons store Print Heads and ink tanks out of the reach of the printer. Power supply Do not place the printer with an ...
iP5000 Easy Setup Instructions
Page 1
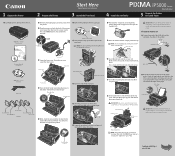
...Photo Printer 5 Connect the Printer and Load Paper 1 Carefully remove all shipping tape and clear plastic from the paper guide. USB Cable USB Port Documentation and Software Kit PIXMA iP5000 Series Print Head Power Cord BCI-6Y Yellow BCI-6BK Black BCI-3eBK Black...the sides of the print head holder. PIXMA iP5000 Series Photo Printer Photo Printer Series Quick Start Guide 1 Remove all items from the Cyan Ink Tank (BCI-6C). 2 Twist off before continuing, or the computer will initialize. 1 Remove the print head from the print head. You will perform a print head cleaning. NOTE: To...
...Photo Printer 5 Connect the Printer and Load Paper 1 Carefully remove all shipping tape and clear plastic from the paper guide. USB Cable USB Port Documentation and Software Kit PIXMA iP5000 Series Print Head Power Cord BCI-6Y Yellow BCI-6BK Black BCI-3eBK Black...the sides of the print head holder. PIXMA iP5000 Series Photo Printer Photo Printer Series Quick Start Guide 1 Remove all items from the Cyan Ink Tank (BCI-6C). 2 Twist off before continuing, or the computer will initialize. 1 Remove the print head from the print head. You will perform a print head cleaning. NOTE: To...
iP5000 Easy Setup Instructions
Page 2
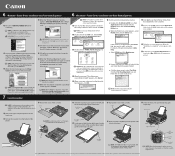
.... 2 Double-click the CD-ROM icon, then the Mac OS X folder, then the Printer Driver folder. 3 Double-click the PIXMA iP5000 290.pkg icon, then follow on -screen instructions to register your CD-ROM again. NOTE: If the setup program does not run ...Canon Inc. The software will extend NOTE: When feeding paper from the bottom of the printer. 3 Remove the cover of paper. 7 Insert cassette completely into place. If you to install the remaining software. All other software. NOTE: Log on -screen instructions to align the print head appears, click OK. 6 Start the print head...
.... 2 Double-click the CD-ROM icon, then the Mac OS X folder, then the Printer Driver folder. 3 Double-click the PIXMA iP5000 290.pkg icon, then follow on -screen instructions to register your CD-ROM again. NOTE: If the setup program does not run ...Canon Inc. The software will extend NOTE: When feeding paper from the bottom of the printer. 3 Remove the cover of paper. 7 Insert cassette completely into place. If you to install the remaining software. All other software. NOTE: Log on -screen instructions to align the print head appears, click OK. 6 Start the print head...


