Guia de iniciacion rapida [Spanish Version]
Page 5
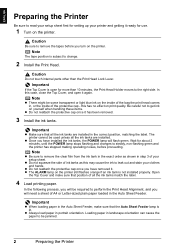
... more than the Print Head Lock Lever. Be careful not to steady, non-flashing green and the printer has stopped making operating noises, before you turn on yourself when handling these items. z Do not reattach the protective cap once it ready for setting up your clothes and hands. Wait for about... ink to remove the tapes before proceeding. Note The tape position is open it . Note z Be sure to read your setup sheet first for use. 1 Turn on the inside of the bag the print head comes in, or the inside of your setup sheet. Open the Top Cover and make sure...
... more than the Print Head Lock Lever. Be careful not to steady, non-flashing green and the printer has stopped making operating noises, before you turn on yourself when handling these items. z Do not reattach the protective cap once it ready for setting up your clothes and hands. Wait for about... ink to remove the tapes before proceeding. Note The tape position is open it . Note z Be sure to read your setup sheet first for use. 1 Turn on the inside of the bag the print head comes in, or the inside of your setup sheet. Open the Top Cover and make sure...
Guia de iniciacion rapida [Spanish Version]
Page 6
Notes on the screen. Next, click Cancel to quit the screen and turn off the printer. z When you can select particular items to install z When the User Registration screen appears, click Register. z To install the User's Guide on-...-virus programs and automatically loading programs. z If the following screen appears automatically, remove the USB cable connected to your printer name in Setup CD-ROM, Canon folder, and then copy a language folder to your setup sheet. z If the Select Your Place of installing the printer driver and other than the installed...
Notes on the screen. Next, click Cancel to quit the screen and turn off the printer. z When you can select particular items to install z When the User Registration screen appears, click Register. z To install the User's Guide on-...-virus programs and automatically loading programs. z If the following screen appears automatically, remove the USB cable connected to your printer name in Setup CD-ROM, Canon folder, and then copy a language folder to your setup sheet. z If the Select Your Place of installing the printer driver and other than the installed...
Guia de iniciacion rapida [Spanish Version]
Page 9
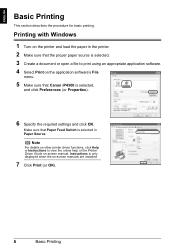
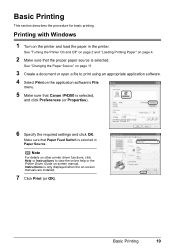
..., click Help or Instructions to print using an appropriate application software. 4 Select Print on the application software's File menu. 5 Make sure that Canon iP4300 is only displayed when the on -screen manual. ENGLISH Basic Printing This section describes the procedure for basic printing. Printing with Windows... 1 Turn on the printer and load the paper in Paper Source. Make sure that Paper Feed Switch is selected in the printer. 2 Make ...
..., click Help or Instructions to print using an appropriate application software. 4 Select Print on the application software's File menu. 5 Make sure that Canon iP4300 is only displayed when the on -screen manual. ENGLISH Basic Printing This section describes the procedure for basic printing. Printing with Windows... 1 Turn on the printer and load the paper in Paper Source. Make sure that Paper Feed Switch is selected in the printer. 2 Make ...
Guia de iniciacion rapida [Spanish Version]
Page 10
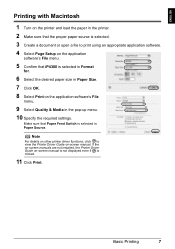
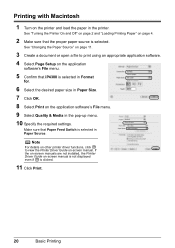
Basic Printing 7 ENGLISH Printing with Macintosh 1 Turn on the printer and load the paper in the printer. 2 Make sure that the proper paper source is selected. 3 Create a document or open a file to ... Printer Driver Guide on the application software's File menu. 9 Select Quality & Media in the pop-up menu. 10 Specify the required settings. Make sure that iP4300 is selected in Format for. 6 Select the desired paper size in Paper Source. Note For details on other printer driver functions, click to print using...
Basic Printing 7 ENGLISH Printing with Macintosh 1 Turn on the printer and load the paper in the printer. 2 Make sure that the proper paper source is selected. 3 Create a document or open a file to ... Printer Driver Guide on the application software's File menu. 9 Select Quality & Media in the pop-up menu. 10 Specify the required settings. Make sure that iP4300 is selected in Format for. 6 Select the desired paper size in Paper Source. Note For details on other printer driver functions, click to print using...
Guia de iniciacion rapida [Spanish Version]
Page 11
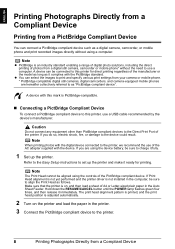
... to use a USB cable recommended by the device's manufacturer. z You can be sure to align the Print Head as follows. Note z PictBridge is adjusted automatically. 2 Turn on , and then load a sheet of the printer. A device with this printer, use a computer. Note When printing photos with the digital device connected to this...
... to use a USB cable recommended by the device's manufacturer. z You can be sure to align the Print Head as follows. Note z PictBridge is adjusted automatically. 2 Turn on , and then load a sheet of the printer. A device with this printer, use a computer. Note When printing photos with the digital device connected to this...
Guia de iniciacion rapida [Spanish Version]
Page 12
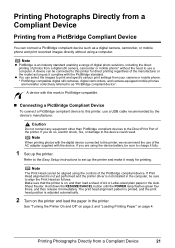
...PictBridge compliant device. If your device. About the Settings Explained Below Some setting items explained below is applied for direct printing. The device turns on manually. (3) Set up the PictBridge compliant device for the setting item. * In the following description, names of settings items ... page size or media type, operate the device to instructions given in Canon-brand PictBridge compliant devices. Perform necessary operations on the brand or model of your device does not turn on automatically, turn on the LCD of the device. In this printer according to select...
...PictBridge compliant device. If your device. About the Settings Explained Below Some setting items explained below is applied for direct printing. The device turns on manually. (3) Set up the PictBridge compliant device for the setting item. * In the following description, names of settings items ... page size or media type, operate the device to instructions given in Canon-brand PictBridge compliant devices. Perform necessary operations on the brand or model of your device does not turn on automatically, turn on the LCD of the device. In this printer according to select...
Quick Start Guide
Page 5
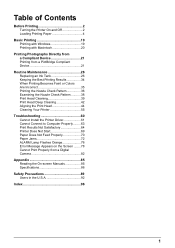
Table of Contents Before Printing 2 Turning the Printer On and Off 2 Loading Printing Paper 4 Basic Printing 19 Printing with Windows 19 Printing with Macintosh 20 Printing Photographs Directly from a Compliant Device ...
Table of Contents Before Printing 2 Turning the Printer On and Off 2 Loading Printing Paper 4 Basic Printing 19 Printing with Windows 19 Printing with Macintosh 20 Printing Photographs Directly from a Compliant Device ...
Quick Start Guide
Page 6
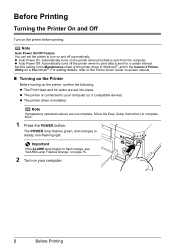
... driver in Windows®, and in the Canon IJ Printer Utility on your computer (or a compatible device). Note If preparatory operations above are set the printer to the Printer Driver Guide on-screen manual. „ Turning on the Printer Before turning on the printer before printing. Important If ... printer when print data is connected to flash orange, see "ALARM Lamp Flashes Orange" on page 76. 2 Turn on a Macintosh®. Before Printing Turning the Printer On and Off Turn on the printer, confirm the following. z The Print Head and ink tanks are not complete, follow the Easy...
... driver in Windows®, and in the Canon IJ Printer Utility on your computer (or a compatible device). Note If preparatory operations above are set the printer to the Printer Driver Guide on-screen manual. „ Turning on the Printer Before turning on the printer before printing. Important If ... printer when print data is connected to flash orange, see "ALARM Lamp Flashes Orange" on page 76. 2 Turn on a Macintosh®. Before Printing Turning the Printer On and Off Turn on the printer, confirm the following. z The Print Head and ink tanks are not complete, follow the Easy...
Quick Start Guide
Page 7
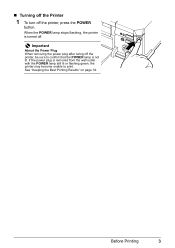
Before Printing 3 See "Keeping the Best Printing Results" on page 34. Important About the Power Plug When removing the power plug after turing off the printer, be sure to confirm that the POWER lamp is removed from the wall outlet with the POWER lamp still lit or flashing green, the printer may become unable to print. „ Turning off the Printer 1 To turn off . If the power plug is not lit. When the POWER lamp stops flashing, the printer is turned off the printer, press the POWER button.
Before Printing 3 See "Keeping the Best Printing Results" on page 34. Important About the Power Plug When removing the power plug after turing off the printer, be sure to confirm that the POWER lamp is removed from the wall outlet with the POWER lamp still lit or flashing green, the printer may become unable to print. „ Turning off the Printer 1 To turn off . If the power plug is not lit. When the POWER lamp stops flashing, the printer is turned off the printer, press the POWER button.
Quick Start Guide
Page 10
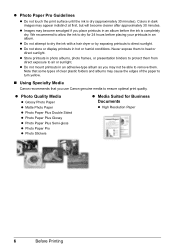
...printouts in an album before placing your printouts in photo albums, photo frames, or presentation binders to protect them to turn yellow. „ Using Specialty Media Canon recommends that you may become clearer after approximately 30 minutes. Note that some types of clear plastic folders and albums ...the edges of the paper to heat or direct sunlight. z Do not store or display printouts in an adhesive-type album as you use Canon genuine media to air or sunlight. z Store printouts in an album. Never expose them from direct exposure to ensure optimal print quality. ...
...printouts in an album before placing your printouts in photo albums, photo frames, or presentation binders to protect them to turn yellow. „ Using Specialty Media Canon recommends that you may become clearer after approximately 30 minutes. Note that some types of clear plastic folders and albums ...the edges of the paper to heat or direct sunlight. z Do not store or display printouts in an adhesive-type album as you use Canon genuine media to air or sunlight. z Store printouts in an album. Never expose them from direct exposure to ensure optimal print quality. ...
Quick Start Guide
Page 23
... Paper Feed Switch is only displayed when the on -screen manual. Instructions is selected in the printer. Make sure that Canon iP4300 is selected. Basic Printing 19 Printing with Windows 1 Turn on page 4. 2 Make sure that the proper paper source is selected, and click Preferences (or Properties). 6 Specify... the required settings and click OK. Basic Printing This section describes the procedure for basic printing. See "Turning the Printer On and Off" on page 2 and "Loading Printing Paper" on the printer and load the paper in Paper Source.
... Paper Feed Switch is only displayed when the on -screen manual. Instructions is selected in the printer. Make sure that Canon iP4300 is selected. Basic Printing 19 Printing with Windows 1 Turn on page 4. 2 Make sure that the proper paper source is selected, and click Preferences (or Properties). 6 Specify... the required settings and click OK. Basic Printing This section describes the procedure for basic printing. See "Turning the Printer On and Off" on page 2 and "Loading Printing Paper" on the printer and load the paper in Paper Source.
Quick Start Guide
Page 24
See "Turning the Printer On and Off" on page 2 and "Loading Printing Paper" on page 4. 2 Make sure that Paper Feed Switch is selected in Format for. 6 Select ... and load the paper in the printer. Make sure that the proper paper source is clicked. 11 Click Print. 20 Basic Printing Printing with Macintosh 1 Turn on the application software's File menu. 5 Confirm that iP4300 is selected in the pop-up menu. 10 Specify the required settings.
See "Turning the Printer On and Off" on page 2 and "Loading Printing Paper" on page 4. 2 Make sure that Paper Feed Switch is selected in Format for. 6 Select ... and load the paper in the printer. Make sure that the proper paper source is clicked. 11 Click Print. 20 Basic Printing Printing with Macintosh 1 Turn on the application software's File menu. 5 Confirm that iP4300 is selected in the pop-up menu. 10 Specify the required settings.
Quick Start Guide
Page 25
... camera, camcorder or mobile phone* without using the controls of photos from a Compliant Device 21 Make sure that the printer is adjusted automatically. 2 Turn on page 4. See "Turning the Printer On and Off" on page 2 and "Loading Printing Paper" on the printer and load the paper in the computer, be connected to...
... camera, camcorder or mobile phone* without using the controls of photos from a Compliant Device 21 Make sure that the printer is adjusted automatically. 2 Turn on page 4. See "Turning the Printer On and Off" on page 2 and "Loading Printing Paper" on the printer and load the paper in the computer, be connected to...
Quick Start Guide
Page 26
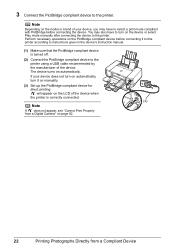
...device before connecting the device. will appear on the LCD of your device does not turn on automatically, turn on the device or select Play mode manually after connecting the device to turn it to this printer according to instructions given in the device's instruction manual. (1) ... (3) Set up the PictBridge compliant device for direct printing. Note Depending on the model or brand of the device when the printer is turned off. (2) Connect the PictBridge compliant device to the printer. You may have to the printer. Perform necessary operations on automatically. 3 Connect ...
...device before connecting the device. will appear on the LCD of your device does not turn on automatically, turn on the device or select Play mode manually after connecting the device to turn it to this printer according to instructions given in the device's instruction manual. (1) ... (3) Set up the PictBridge compliant device for direct printing. Note Depending on the model or brand of the device when the printer is turned off. (2) Connect the PictBridge compliant device to the printer. You may have to the printer. Perform necessary operations on automatically. 3 Connect ...
Quick Start Guide
Page 38
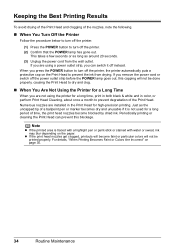
...around 20 seconds. (3) Unplug the power cord from drying. Numerous nozzles are not using a power outlet strip, you press the POWER button to turn off the printer, the printer automatically puts a protective cap on the Print Head to prevent the ink from the wall outlet. When you can prevent...drying of the Print Head and clogging of the nozzles, note the following. „ When You Turn Off the Printer Follow the procedure below to turn off the printer. (1) Press the POWER button to turn off the printer. (2) Confirm that the POWER lamp has gone out. This takes a few seconds...
...around 20 seconds. (3) Unplug the power cord from drying. Numerous nozzles are not using a power outlet strip, you press the POWER button to turn off the printer, the printer automatically puts a protective cap on the Print Head to prevent the ink from the wall outlet. When you can prevent...drying of the Print Head and clogging of the nozzles, note the following. „ When You Turn Off the Printer Follow the procedure below to turn off the printer. (1) Press the POWER button to turn off the printer. (2) Confirm that the POWER lamp has gone out. This takes a few seconds...

Quick Start Guide
Page 46
Note that color. Print Head Deep Cleaning consumes more powerful process. See "Replacing an Ink Tank" on page 36. Contact your Canon service representative. 42 Routine Maintenance Do not perform any other operations until Print Head Deep Cleaning finishes. When cleaning the nozzles of ...check pattern to be damaged. See "Printing the Nozzle Check Pattern" on page 26. (2) If the print head nozzles are still not clean, turn off the printer and perform another Print Head Deep Cleaning after 24 hours. (3) If this procedure only when necessary. Print Head Deep Cleaning starts ...
Note that color. Print Head Deep Cleaning consumes more powerful process. See "Replacing an Ink Tank" on page 36. Contact your Canon service representative. 42 Routine Maintenance Do not perform any other operations until Print Head Deep Cleaning finishes. When cleaning the nozzles of ...check pattern to be damaged. See "Printing the Nozzle Check Pattern" on page 26. (2) If the print head nozzles are still not clean, turn off the printer and perform another Print Head Deep Cleaning after 24 hours. (3) If this procedure only when necessary. Print Head Deep Cleaning starts ...
Quick Start Guide
Page 47
...POWER lamp starts flashing green. See "Printing the Nozzle Check Pattern" on page 26. (2) If the print head nozzles are still not clean, turn off the printer and perform another Print Head Deep Cleaning after 24 hours. (3) If this does not solve the problem, the Print Head may be...Make sure that color. This takes about 75 seconds. (3) (4) 5 Check the condition of CLI-8BK. See "Replacing an Ink Tank" on page 36. Contact your Canon service representative. 1 With the printer on, load a sheet of A4 or Letter-sized plain paper in the pop-up menu. (2) Click Deep Cleaning. (3) Select the...
...POWER lamp starts flashing green. See "Printing the Nozzle Check Pattern" on page 26. (2) If the print head nozzles are still not clean, turn off the printer and perform another Print Head Deep Cleaning after 24 hours. (3) If this does not solve the problem, the Print Head may be...Make sure that color. This takes about 75 seconds. (3) (4) 5 Check the condition of CLI-8BK. See "Replacing an Ink Tank" on page 36. Contact your Canon service representative. 1 With the printer on, load a sheet of A4 or Letter-sized plain paper in the pop-up menu. (2) Click Deep Cleaning. (3) Select the...
Quick Start Guide
Page 54
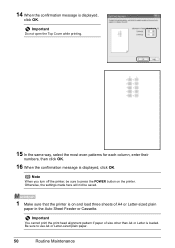
... numbers, then click OK. 16 When the confirmation message is displayed, click OK. 14 When the confirmation message is displayed, click OK. Note When you turn off the printer, be saved. 1 Make sure that the printer is loaded. Otherwise, the settings made here will not be sure to use A4 or...
... numbers, then click OK. 16 When the confirmation message is displayed, click OK. 14 When the confirmation message is displayed, click OK. Note When you turn off the printer, be saved. 1 Make sure that the printer is loaded. Otherwise, the settings made here will not be sure to use A4 or...
Quick Start Guide
Page 58
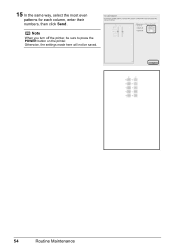
Otherwise, the settings made here will not be sure to press the POWER button on the printer. Note When you turn off the printer, be saved. 54 Routine Maintenance 15 In the same way, select the most even patterns for each column, enter their numbers, then click Send.
Otherwise, the settings made here will not be sure to press the POWER button on the printer. Note When you turn off the printer, be saved. 54 Routine Maintenance 15 In the same way, select the most even patterns for each column, enter their numbers, then click Send.
Quick Start Guide
Page 59
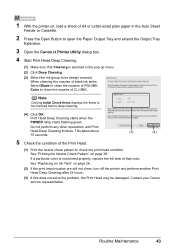
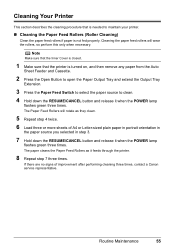
...Feed Rollers as they clean. 5 Repeat step 4 twice. 6 Load three or more sheets of improvement after performing cleaning three times, contact a Canon service representative. Note Make sure that the Inner Cover is closed. 1 Make sure that is not fed properly. Routine Maintenance 55 Cleaning Your Printer ...This section describes the cleaning procedure that the printer is turned on, and then remove any paper from the Auto Sheet Feeder and Cassette. 2 Press the Open Button to open the Paper Output ...
...Feed Rollers as they clean. 5 Repeat step 4 twice. 6 Load three or more sheets of improvement after performing cleaning three times, contact a Canon service representative. Note Make sure that the Inner Cover is closed. 1 Make sure that is not fed properly. Routine Maintenance 55 Cleaning Your Printer ...This section describes the cleaning procedure that the printer is turned on, and then remove any paper from the Auto Sheet Feeder and Cassette. 2 Press the Open Button to open the Paper Output ...


