
Guia de iniciacion rapida [Spanish Version]
Page 2
ENGLISH Quick Start Guide Table of Contents Introduction 1 Preparing the Printer 2 Installing the Printer Driver 3 Loading Printing Paper 4 Basic Printing 6 Printing Photographs Directly from a Compliant Device 8 Replacing an Ink Tank 12 Reading the On-screen Manuals 14
ENGLISH Quick Start Guide Table of Contents Introduction 1 Preparing the Printer 2 Installing the Printer Driver 3 Loading Printing Paper 4 Basic Printing 6 Printing Photographs Directly from a Compliant Device 8 Replacing an Ink Tank 12 Reading the On-screen Manuals 14
Guia de iniciacion rapida [Spanish Version]
Page 3
...equipment such as this product meets the ENERGY STAR guidelines for 5 years after production has stopped. Model Number: K10284 (iP4300) By connecting to the printer. The correct power supply voltages and frequencies are available for efficiency. z Always push the plug all the way into the...of computer and other than that effectively reduce energy consumption. International ENERGY STAR® Program As an ENERGY STAR® Partner, Canon Inc. Also read the Safety Precautions in the country of the Industry Canada. Observe the warnings and cautions to avoid personal ...
...equipment such as this product meets the ENERGY STAR guidelines for 5 years after production has stopped. Model Number: K10284 (iP4300) By connecting to the printer. The correct power supply voltages and frequencies are available for efficiency. z Always push the plug all the way into the...of computer and other than that effectively reduce energy consumption. International ENERGY STAR® Program As an ENERGY STAR® Partner, Canon Inc. Also read the Safety Precautions in the country of the Industry Canada. Observe the warnings and cautions to avoid personal ...
Guia de iniciacion rapida [Spanish Version]
Page 4
ENGLISH Introduction Thank you for safe operation. These must be observed for safe operation. and other countries. Copyright ©2006 CANON INC. No part of the equipment. Introduction 1 Warning Instructions that, if ignored, could result in personal injury or material damage caused by incorrect operation of ... these symbols. These must be observed for safe operation. Always observe the instructions indicated by incorrect operation of this publication may be observed for purchasing a Canon Inkjet Printer.
ENGLISH Introduction Thank you for safe operation. These must be observed for safe operation. and other countries. Copyright ©2006 CANON INC. No part of the equipment. Introduction 1 Warning Instructions that, if ignored, could result in personal injury or material damage caused by incorrect operation of ... these symbols. These must be observed for safe operation. Always observe the instructions indicated by incorrect operation of this publication may be observed for purchasing a Canon Inkjet Printer.
Guia de iniciacion rapida [Spanish Version]
Page 5
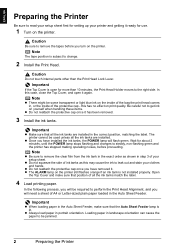
...tapes before proceeding. this may cause the ink to leak out and stain your clothes and hands. Be careful not to get ink on the printer. The printer cannot be some transparent or light blue ink on print quality. Wait for more than the Print Head Lock Lever. Important z Make sure ... case, close the Top Cover, and open for about 2 minutes, until the POWER lamp stops flashing and changes to steady, non-flashing green and the printer has stopped making operating noises, before you have installed the ink tanks, the POWER lamp will need a sheet of the protective cap - z Do not...
...tapes before proceeding. this may cause the ink to leak out and stain your clothes and hands. Be careful not to get ink on the printer. The printer cannot be some transparent or light blue ink on print quality. Wait for more than the Print Head Lock Lever. Important z Make sure ... case, close the Top Cover, and open for about 2 minutes, until the POWER lamp stops flashing and changes to steady, non-flashing green and the printer has stopped making operating noises, before you have installed the ink tanks, the POWER lamp will need a sheet of the protective cap - z Do not...
Guia de iniciacion rapida [Spanish Version]
Page 6
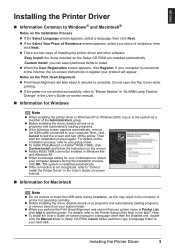
...a message asking for Macintosh Note z Do not remove or insert the USB cable during the installation process, click OK. Installing the Printer Driver 3 ENGLISH Installing the Printer Driver „ Information Common to Windows® and Macintosh® Notes on the screen. z There are two ways of the ...on the Setup CD-ROM are installed automatically Custom Install: you perform the Print Head Alignment and cannot find your printer name in Setup CD-ROM, Canon folder, and then copy a language folder to your computer appears during installation, as a member of installing the...
...a message asking for Macintosh Note z Do not remove or insert the USB cable during the installation process, click OK. Installing the Printer Driver 3 ENGLISH Installing the Printer Driver „ Information Common to Windows® and Macintosh® Notes on the screen. z There are two ways of the ...on the Setup CD-ROM are installed automatically Custom Install: you perform the Print Head Alignment and cannot find your printer name in Setup CD-ROM, Canon folder, and then copy a language folder to your computer appears during installation, as a member of installing the...
Guia de iniciacion rapida [Spanish Version]
Page 7
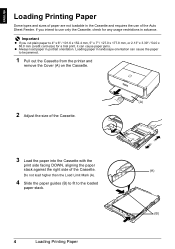
... and requires the use only the Cassette, check for a trial print, it can cause the paper to be jammed. 1 Pull out the Cassette from the printer and remove the Cover (A) on the Cassette. (A) 2 Adjust the size of the Cassette. 3 Load the paper into the Cassette with the print side facing DOWN...
... and requires the use only the Cassette, check for a trial print, it can cause the paper to be jammed. 1 Pull out the Cassette from the printer and remove the Cover (A) on the Cassette. (A) 2 Adjust the size of the Cassette. 3 Load the paper into the Cassette with the print side facing DOWN...
Guia de iniciacion rapida [Spanish Version]
Page 8
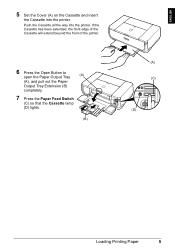
Push the Cassette all the way into the printer. If the Cassette has been extended, the front edge of the Cassette will extend beyond the front of the printer. 6 Press the Open Button to open the Paper Output Tray (A) (A), and pull out the Paper Output Tray Extension (B) completely. 7 Press the Paper Feed Switch (C) so that the Cassette lamp (D) lights. (B) (A) (C) (D) Loading Printing Paper 5 ENGLISH 5 Set the Cover (A) on the Cassette and insert the Cassette into the printer.
Push the Cassette all the way into the printer. If the Cassette has been extended, the front edge of the Cassette will extend beyond the front of the printer. 6 Press the Open Button to open the Paper Output Tray (A) (A), and pull out the Paper Output Tray Extension (B) completely. 7 Press the Paper Feed Switch (C) so that the Cassette lamp (D) lights. (B) (A) (C) (D) Loading Printing Paper 5 ENGLISH 5 Set the Cover (A) on the Cassette and insert the Cassette into the printer.
Guia de iniciacion rapida [Spanish Version]
Page 9
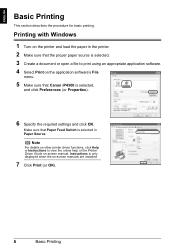
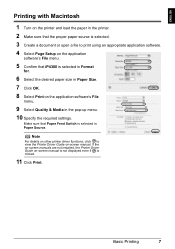
Note For details on other printer driver functions, click Help or Instructions to print using an appropriate application software. 4 Select Print on the application software's File menu. 5 Make sure that Canon iP4300 is only displayed when the on -screen manual. Instructions is selected, and click Preferences (or Properties). 6 Specify the required settings and click...
Note For details on other printer driver functions, click Help or Instructions to print using an appropriate application software. 4 Select Print on the application software's File menu. 5 Make sure that Canon iP4300 is only displayed when the on -screen manual. Instructions is selected, and click Preferences (or Properties). 6 Specify the required settings and click...
Guia de iniciacion rapida [Spanish Version]
Page 10
... is selected. 3 Create a document or open a file to view the Printer Driver Guide on -screen manual is not displayed even if is selected in the pop-up menu. 10 Specify the required settings. Make sure that iP4300 is selected in Format for. 6 Select the desired paper size in Paper... Size. 7 Click OK. 8 Select Print on the application software's File menu. 9 Select Quality & Media in Paper Source. Note For details on other printer driver functions, click to print using an...
... is selected. 3 Create a document or open a file to view the Printer Driver Guide on -screen manual is not displayed even if is selected in the pop-up menu. 10 Specify the required settings. Make sure that iP4300 is selected in Format for. 6 Select the desired paper size in Paper... Size. 7 Click OK. 8 Select Print on the application software's File menu. 9 Select Quality & Media in Paper Source. Note For details on other printer driver functions, click to print using an...
Guia de iniciacion rapida [Spanish Version]
Page 11
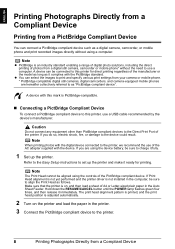
... referred to as "PictBridge compliant device". If Print Head alignment is not yet performed and the printer driver is not installed in the printer. 3 Connect the PictBridge compliant device to the printer. 8 Printing Photographs Directly from a Compliant Device Refer to the Easy Setup Instructions to set up...are using the device battery, be sure to charge it complies with the device. Note z PictBridge is on the printer and load the paper in the computer, be connected to this printer, use a computer. A device can be sure to the device could result. A device with this mark is...
... referred to as "PictBridge compliant device". If Print Head alignment is not yet performed and the printer driver is not installed in the printer. 3 Connect the PictBridge compliant device to the printer. 8 Printing Photographs Directly from a Compliant Device Refer to the Easy Setup Instructions to set up...are using the device battery, be sure to charge it complies with the device. Note z PictBridge is on the printer and load the paper in the computer, be connected to this printer, use a computer. A device can be sure to the device could result. A device with this mark is...
Guia de iniciacion rapida [Spanish Version]
Page 12
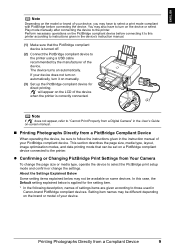
...Compliant Device 9 In this printer according to follow the instructions given in the device's instruction manual. (1) Make sure that can be different depending on the device or select Play mode manually after connecting the device to those used in Canon-brand PictBridge compliant devices.... will appear on the LCD of the device when the printer is applied for direct printing. Perform necessary operations on -screen manual. „ Printing...
...Compliant Device 9 In this printer according to follow the instructions given in the device's instruction manual. (1) Make sure that can be different depending on the device or select Play mode manually after connecting the device to those used in Canon-brand PictBridge compliant devices.... will appear on the LCD of the device when the printer is applied for direct printing. Perform necessary operations on -screen manual. „ Printing...
Guia de iniciacion rapida [Spanish Version]
Page 13
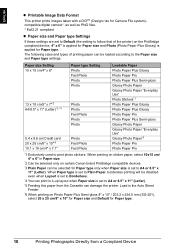
... and Paper type settings. When printing on sticker paper, select 10x15 cm/ 4" x 6" in Paper size. *2 Can be selected only on certain Canon-brand PictBridge compatible devices. *3 Plain Paper can be disabled even when Layout is set to Plain Paper, borderless printing will be selected for Paper type...Paper Pro Photo Paper Pro *1 Exclusively used to A4 or 8.5" x 11" (Letter). *5 Feeding this paper from a Compliant Device The following sizes and types of the printer) on Photo Paper Plus Semi-gloss 8" x 10" / 203.2 x 254.0 mm (SG-201), select 20 x 25 cm/8" x 10" for Paper size and ...
... and Paper type settings. When printing on sticker paper, select 10x15 cm/ 4" x 6" in Paper size. *2 Can be selected only on certain Canon-brand PictBridge compatible devices. *3 Plain Paper can be disabled even when Layout is set to Plain Paper, borderless printing will be selected for Paper type...Paper Pro Photo Paper Pro *1 Exclusively used to A4 or 8.5" x 11" (Letter). *5 Feeding this paper from a Compliant Device The following sizes and types of the printer) on Photo Paper Plus Semi-gloss 8" x 10" / 203.2 x 254.0 mm (SG-201), select 20 x 25 cm/8" x 10" for Paper size and ...
Guia de iniciacion rapida [Spanish Version]
Page 14
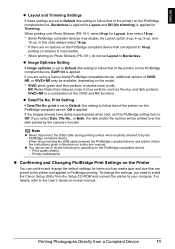
.... When disconnecting the USB cable between the PictBridge compliant device and printer, follow that of the printer) on the PictBridge compatible device. - ENGLISH z Layout and Trimming Settings If these settings are using a Canon-brand PictBridge compatible device, additional options of VIVID, NR, or ...VIVID+NR may display the Layout option 2-up, 4-up, 9-up, and 16-up . * If there are preset to the printer and applied to PictBridge printing. z Image Optimize...
.... When disconnecting the USB cable between the PictBridge compliant device and printer, follow that of the printer) on the PictBridge compatible device. - ENGLISH z Layout and Trimming Settings If these settings are using a Canon-brand PictBridge compatible device, additional options of VIVID, NR, or ...VIVID+NR may display the Layout option 2-up, 4-up, 9-up, and 16-up . * If there are preset to the printer and applied to PictBridge printing. z Image Optimize...
Guia de iniciacion rapida [Spanish Version]
Page 15
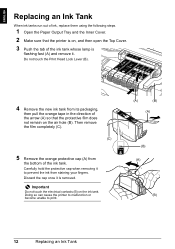
... malfunction or become unable to prevent the ink from its packaging, then pull the orange tape in the direction of the arrow (A) so that the printer is on, and then open the Top Cover. 3 Push the tab of the ink tank whose lamp is removed. Do not touch the Print Head...
... malfunction or become unable to prevent the ink from its packaging, then pull the orange tape in the direction of the arrow (A) so that the printer is on, and then open the Top Cover. 3 Push the tab of the ink tank whose lamp is removed. Do not touch the Print Head...
Guia de iniciacion rapida [Spanish Version]
Page 17
...double-click top.htm. System Requirements Browser: Help Viewer Note z The on-screen manual may not be displayed properly depending on your printer. z We recommend using Safari as your computer, download it . 14 Reading the On-screen Manuals You can view the on-screen...the folder in the following way: To view the on-screen manual, double-click the iP4300 On-screen Manual shortcut icon on the desktop, or click Start > All Programs (or Programs) > Canon iP4300 Manual > iP4300 Onscreen Manual. System Requirements Browser: Windows HTML Help Viewer Note z Microsoft Internet Explorer®...
...double-click top.htm. System Requirements Browser: Help Viewer Note z The on-screen manual may not be displayed properly depending on your printer. z We recommend using Safari as your computer, download it . 14 Reading the On-screen Manuals You can view the on-screen...the folder in the following way: To view the on-screen manual, double-click the iP4300 On-screen Manual shortcut icon on the desktop, or click Start > All Programs (or Programs) > Canon iP4300 Manual > iP4300 Onscreen Manual. System Requirements Browser: Windows HTML Help Viewer Note z Microsoft Internet Explorer®...
Quick Start Guide
Page 4
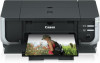
...this manual may not be an easy-to change without the prior written consent of products with all rights reserved. Canon PIXMA iP4300 Photo Printer Quick Start Guide. with functions that promotes energy saving through the use guide to be, nor should they are ...International ENERGY STAR® Office Equipment Program is made regarding non-Canon products was compiled from publicly available information. Their standards and logos are not intended to your Canon PIXMA iP4300 Photo Printer. One Canon Plaza Lake Success, NY 11042 All statements, technical information and ...
...this manual may not be an easy-to change without the prior written consent of products with all rights reserved. Canon PIXMA iP4300 Photo Printer Quick Start Guide. with functions that promotes energy saving through the use guide to be, nor should they are ...International ENERGY STAR® Office Equipment Program is made regarding non-Canon products was compiled from publicly available information. Their standards and logos are not intended to your Canon PIXMA iP4300 Photo Printer. One Canon Plaza Lake Success, NY 11042 All statements, technical information and ...
Quick Start Guide
Page 5
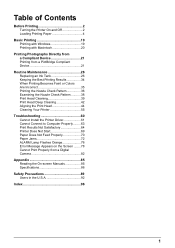
Table of Contents Before Printing 2 Turning the Printer On and Off 2 Loading Printing Paper 4 Basic Printing 19 Printing with Windows 19 Printing with Macintosh 20 Printing Photographs Directly from a Compliant Device 21 Printing ... Print Head Cleaning 39 Print Head Deep Cleaning 42 Aligning the Print Head 44 Cleaning Your Printer 55 Troubleshooting 60 Cannot Install the Printer Driver 61 Cannot Connect to Computer Properly.........63 Print Results Not Satisfactory 64 Printer Does Not Start 69 Paper Does Not Feed Properly 70 Paper Jams 72 ALARM Lamp...
Table of Contents Before Printing 2 Turning the Printer On and Off 2 Loading Printing Paper 4 Basic Printing 19 Printing with Windows 19 Printing with Macintosh 20 Printing Photographs Directly from a Compliant Device 21 Printing ... Print Head Cleaning 39 Print Head Deep Cleaning 42 Aligning the Print Head 44 Cleaning Your Printer 55 Troubleshooting 60 Cannot Install the Printer Driver 61 Cannot Connect to Computer Properly.........63 Print Results Not Satisfactory 64 Printer Does Not Start 69 Paper Does Not Feed Properly 70 Paper Jams 72 ALARM Lamp...
Quick Start Guide
Page 6
...this setting in the Maintenance sheet of the printer driver in Windows®, and in the Canon IJ Printer Utility on the printer before printing. z The Print Head and ink tanks are not complete, follow the Easy Setup Instructions to turn on the printer when print data is sent for a certain... interval. Note If preparatory operations above are set the printer to complete them...
...this setting in the Maintenance sheet of the printer driver in Windows®, and in the Canon IJ Printer Utility on the printer before printing. z The Print Head and ink tanks are not complete, follow the Easy Setup Instructions to turn on the printer when print data is sent for a certain... interval. Note If preparatory operations above are set the printer to complete them...
Quick Start Guide
Page 7
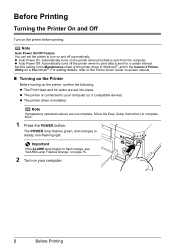
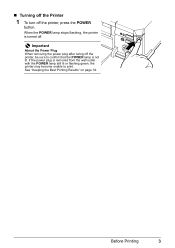
Important About the Power Plug When removing the power plug after turing off . Before Printing 3 See "Keeping the Best Printing Results" on page 34. When the POWER lamp stops flashing, the printer is turned off the printer, be sure to confirm that the POWER lamp is removed from the wall outlet with the POWER lamp still lit or flashing green, the printer may become unable to print. If the power plug is not lit. „ Turning off the Printer 1 To turn off the printer, press the POWER button.
Important About the Power Plug When removing the power plug after turing off . Before Printing 3 See "Keeping the Best Printing Results" on page 34. When the POWER lamp stops flashing, the printer is turned off the printer, be sure to confirm that the POWER lamp is removed from the wall outlet with the POWER lamp still lit or flashing green, the printer may become unable to print. If the power plug is not lit. „ Turning off the Printer 1 To turn off the printer, press the POWER button.
Quick Start Guide
Page 8
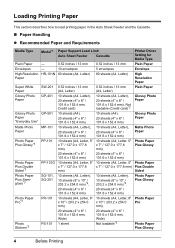
... the Auto Sheet Feeder and the Cassette. „ Paper Handling z Recommended Paper and Requirements Media Type Model*1 Paper Support Load Limit Auto Sheet Feeder Cassette Printer Driver Setting for Media Type Plain Paper - 0.52 inches / 13 mm 0.52 inches / 13 mm Plain Paper Envelopes - 10 envelopes 5 envelopes Envelope High Resolution HR...
... the Auto Sheet Feeder and the Cassette. „ Paper Handling z Recommended Paper and Requirements Media Type Model*1 Paper Support Load Limit Auto Sheet Feeder Cassette Printer Driver Setting for Media Type Plain Paper - 0.52 inches / 13 mm 0.52 inches / 13 mm Plain Paper Envelopes - 10 envelopes 5 envelopes Envelope High Resolution HR...


