Guia de iniciacion rapida [Spanish Version]
Page 3
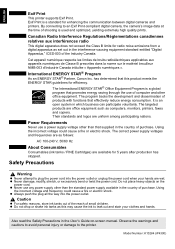
... is used and optimized, yielding extremely high quality prints. By connecting to plug the power cord into the power outlet. International ENERGY STAR® Program As an ENERGY STAR® Partner, Canon Inc. has determined that supplied in the interference-causing equipment standard entitled "Digital Apparatus,"...voltage other office equipment. The correct power supply voltages and frequencies are wet. Do not place heavy objects on -screen manual. Caution z For safety reasons, store ink tanks out of the reach of purchase. Model Number: K10284 (iP4300) Cet appareil numérique ...
... is used and optimized, yielding extremely high quality prints. By connecting to plug the power cord into the power outlet. International ENERGY STAR® Program As an ENERGY STAR® Partner, Canon Inc. has determined that supplied in the interference-causing equipment standard entitled "Digital Apparatus,"...voltage other office equipment. The correct power supply voltages and frequencies are wet. Do not place heavy objects on -screen manual. Caution z For safety reasons, store ink tanks out of the reach of purchase. Model Number: K10284 (iP4300) Cet appareil numérique ...
Guia de iniciacion rapida [Spanish Version]
Page 5
..., and open for more than the Print Head Lock Lever. z Once you have installed the ink tanks, the POWER lamp will need a sheet of the protective cap - Wait for about 2 minutes, until the POWER lamp stops flashing and changes to change. 2 Install the Print Head. z Do not reattach the protective cap once...
..., and open for more than the Print Head Lock Lever. z Once you have installed the ink tanks, the POWER lamp will need a sheet of the protective cap - Wait for about 2 minutes, until the POWER lamp stops flashing and changes to change. 2 Install the Print Head. z Do not reattach the protective cap once...
Guia de iniciacion rapida [Spanish Version]
Page 11
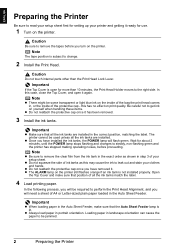
... in the computer, be connected to as it fully. 1 Set up the printer and make it immediately. Hold down the RESUME/CANCEL button until the POWER lamp flashes green four times, and then release it ready for direct printing regardless of the printer. A device with the PictBridge standard. Note When printing...
... in the computer, be connected to as it fully. 1 Set up the printer and make it immediately. Hold down the RESUME/CANCEL button until the POWER lamp flashes green four times, and then release it ready for direct printing regardless of the printer. A device with the PictBridge standard. Note When printing...
Quick Start Guide
Page 6
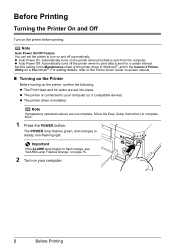
...: Automatically turns off automatically. Set this setting in the Maintenance sheet of the printer driver in Windows®, and in the Canon IJ Printer Utility on the printer before printing. z The printer driver is sent from the computer. Before Printing Turning the Printer On and ...Off Turn on a Macintosh®. z Auto Power On: Automatically turns on the printer, confirm the following. z The Print Head and ink tanks are not complete, follow the Easy Setup Instructions to the...
...: Automatically turns off automatically. Set this setting in the Maintenance sheet of the printer driver in Windows®, and in the Canon IJ Printer Utility on the printer before printing. z The printer driver is sent from the computer. Before Printing Turning the Printer On and ...Off Turn on a Macintosh®. z Auto Power On: Automatically turns on the printer, confirm the following. z The Print Head and ink tanks are not complete, follow the Easy Setup Instructions to the...
Quick Start Guide
Page 7
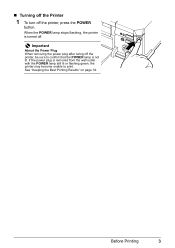
See "Keeping the Best Printing Results" on page 34. Before Printing 3 If the power plug is removed from the wall outlet with the POWER lamp still lit or flashing green, the printer may become unable to confirm that the POWER lamp is turned off the printer, press the POWER button. When the POWER lamp stops flashing, the printer is not lit. „ Turning off the Printer 1 To turn off . Important About the Power Plug When removing the power plug after turing off the printer, be sure to print.
See "Keeping the Best Printing Results" on page 34. Before Printing 3 If the power plug is removed from the wall outlet with the POWER lamp still lit or flashing green, the printer may become unable to confirm that the POWER lamp is turned off the printer, press the POWER button. When the POWER lamp stops flashing, the printer is not lit. „ Turning off the Printer 1 To turn off . Important About the Power Plug When removing the power plug after turing off the printer, be sure to print.
Quick Start Guide
Page 25
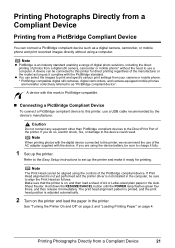
... directly without the need to use a computer. If you are hereafter collectively referred to charge it immediately. Hold down the RESUME/CANCEL button until the POWER lamp flashes green four times, and then release it fully. 1 Set up the printer and make it complies with this mark is adjusted automatically. 2 Turn...
... directly without the need to use a computer. If you are hereafter collectively referred to charge it immediately. Hold down the RESUME/CANCEL button until the POWER lamp flashes green four times, and then release it fully. 1 Set up the printer and make it complies with this mark is adjusted automatically. 2 Turn...
Quick Start Guide
Page 37
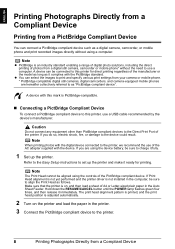
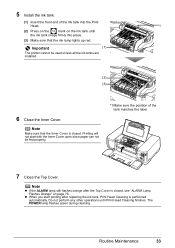
... are installed. (2) (3) 6 Close the Inner Cover. 5 Install the ink tank. (1) Insert the front end of the tank matches the label. 7 Close the Top Cover. The POWER lamp flashes green during cleaning. Printing will not start printing after the Top Cover is closed, see "ALARM Lamp Flashes Orange" on the ink tank...
... are installed. (2) (3) 6 Close the Inner Cover. 5 Install the ink tank. (1) Insert the front end of the tank matches the label. 7 Close the Top Cover. The POWER lamp flashes green during cleaning. Printing will not start printing after the Top Cover is closed, see "ALARM Lamp Flashes Orange" on the ink tank...
Quick Start Guide
Page 38
...printouts will become blocked by dried ink. For details, "When Printing Becomes Faint or Colors Are Incorrect" on the paper. If you press the POWER button to turn off the printer, the printer automatically puts a protective cap on the Print Head to prevent degradation of the Print Head. Just ...as around 20 seconds. (3) Unplug the power cord from drying. Note z If the printed area is not used for a long period of the nozzles, note the following. „ When You...
...printouts will become blocked by dried ink. For details, "When Printing Becomes Faint or Colors Are Incorrect" on the paper. If you press the POWER button to turn off the printer, the printer automatically puts a protective cap on the Print Head to prevent degradation of the Print Head. Just ...as around 20 seconds. (3) Unplug the power cord from drying. Note z If the printed area is not used for a long period of the nozzles, note the following. „ When You...
Quick Start Guide
Page 40
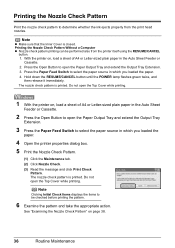
... Switch to determine whether the ink ejects properly from the printer itself using the RESUME/CANCEL button. 1. Hold down the RESUME/CANCEL button until the POWER lamp flashes green twice, and then release it immediately. Do not open the Top Cover while printing.
... Switch to determine whether the ink ejects properly from the printer itself using the RESUME/CANCEL button. 1. Hold down the RESUME/CANCEL button until the POWER lamp flashes green twice, and then release it immediately. Do not open the Top Cover while printing.
Quick Start Guide
Page 43
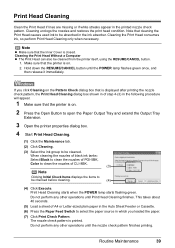
... is on. 2. Hold down the RESUME/CANCEL button until Print Head Cleaning finishes. Print Head Cleaning starts when the POWER lamp starts flashing green. Do not perform any other operations until the POWER lamp flashes green once, and then release it immediately. The nozzle check pattern is on. 2 Press the Open Button...
... is on. 2. Hold down the RESUME/CANCEL button until Print Head Cleaning finishes. Print Head Cleaning starts when the POWER lamp starts flashing green. Do not perform any other operations until the POWER lamp flashes green once, and then release it immediately. The nozzle check pattern is on. 2 Press the Open Button...
Quick Start Guide
Page 44
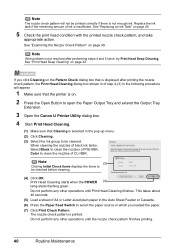
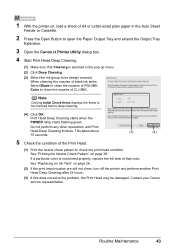
...sure that the printer is on. 2 Press the Open Button to open the Paper Output Tray and extend the Output Tray Extension. 3 Open the Canon IJ Printer Utility dialog box. 4 Start Print Head Cleaning. (1) Make sure that is displayed after performing steps 4 and 5 twice, try Print Head... Deep Cleaning. Print Head Cleaning starts when the POWER (4) lamp starts flashing green. Note (3) Clicking Initial Check Items displays the items to select the paper source in the following procedure will not be...
...sure that the printer is on. 2 Press the Open Button to open the Paper Output Tray and extend the Output Tray Extension. 3 Open the Canon IJ Printer Utility dialog box. 4 Start Print Head Cleaning. (1) Make sure that is displayed after performing steps 4 and 5 twice, try Print Head... Deep Cleaning. Print Head Cleaning starts when the POWER (4) lamp starts flashing green. Note (3) Clicking Initial Check Items displays the items to select the paper source in the following procedure will not be...

Quick Start Guide
Page 46
... OK. Note Make sure that color. Do not perform any other operations until Print Head Deep Cleaning finishes. Print Head Deep Cleaning consumes more powerful process. When cleaning the nozzles of black ink tanks: Select Black to clean the nozzles of PGI-5BK, Color to clean the nozzles of ...A4 or Letter-sized plain paper in the ink absorber. Contact your Canon service representative. 42 Routine Maintenance Print Head Deep Cleaning If print quality does not improve by standard Print Head Cleaning, try Print Head Deep...
... OK. Note Make sure that color. Do not perform any other operations until Print Head Deep Cleaning finishes. Print Head Deep Cleaning consumes more powerful process. When cleaning the nozzles of black ink tanks: Select Black to clean the nozzles of PGI-5BK, Color to clean the nozzles of ...A4 or Letter-sized plain paper in the ink absorber. Contact your Canon service representative. 42 Routine Maintenance Print Head Deep Cleaning If print quality does not improve by standard Print Head Cleaning, try Print Head Deep...
Quick Start Guide
Page 47
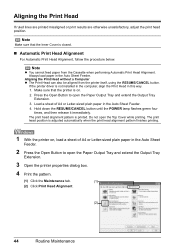
Note Clicking Initial Check Items displays the items to open the Paper Output Tray and extend the Output Tray Extension. 3 Open the Canon IJ Printer Utility dialog box. 4 Start Print Head Deep Cleaning. (1) Make sure that Cleaning is not printed properly, replace the ink tank of... that color. Do not perform any other operations until Print Head Deep Cleaning finishes. Contact your Canon service representative. Print Head Deep Cleaning starts when the POWER lamp starts flashing green. See "Printing the Nozzle Check Pattern" on page 26. (2) If the print head nozzles are...
Note Clicking Initial Check Items displays the items to open the Paper Output Tray and extend the Output Tray Extension. 3 Open the Canon IJ Printer Utility dialog box. 4 Start Print Head Deep Cleaning. (1) Make sure that Cleaning is not printed properly, replace the ink tank of... that color. Do not perform any other operations until Print Head Deep Cleaning finishes. Contact your Canon service representative. Print Head Deep Cleaning starts when the POWER lamp starts flashing green. See "Printing the Nozzle Check Pattern" on page 26. (2) If the print head nozzles are...
Quick Start Guide
Page 48
... If ruled lines are printed misaligned or print results are otherwise unsatisfactory, adjust the print head position. Hold down the RESUME/CANCEL button until the POWER lamp flashes green four times, and then release it immediately. Load a sheet of A4 or Letter-sized plain paper in the Auto Sheet Feeder. Aligning...
... If ruled lines are printed misaligned or print results are otherwise unsatisfactory, adjust the print head position. Hold down the RESUME/CANCEL button until the POWER lamp flashes green four times, and then release it immediately. Load a sheet of A4 or Letter-sized plain paper in the Auto Sheet Feeder. Aligning...
Quick Start Guide
Page 54
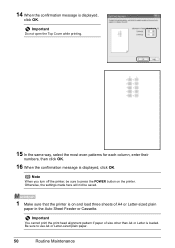
... even patterns for each column, enter their numbers, then click OK. 16 When the confirmation message is displayed, click OK. Be sure to press the POWER button on and load three sheets of size other than A4 or Letter is on the printer. Important You cannot print the print head alignment...
... even patterns for each column, enter their numbers, then click OK. 16 When the confirmation message is displayed, click OK. Be sure to press the POWER button on and load three sheets of size other than A4 or Letter is on the printer. Important You cannot print the print head alignment...
Quick Start Guide
Page 58
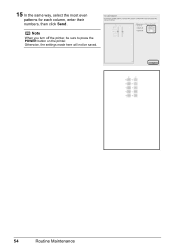
15 In the same way, select the most even patterns for each column, enter their numbers, then click Send. Otherwise, the settings made here will not be sure to press the POWER button on the printer. Note When you turn off the printer, be saved. 54 Routine Maintenance
15 In the same way, select the most even patterns for each column, enter their numbers, then click Send. Otherwise, the settings made here will not be sure to press the POWER button on the printer. Note When you turn off the printer, be saved. 54 Routine Maintenance
Quick Start Guide
Page 59
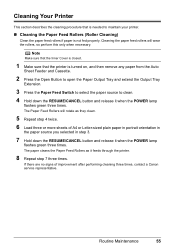
...the paper source you selected in step 3. 7 Hold down the RESUME/CANCEL button and release it when the POWER lamp flashes green three times. Cleaning Your Printer This section describes the cleaning procedure that the printer is not ...fed properly. Cleaning the paper feed rollers will rotate as it when the POWER lamp flashes green three times. Note Make sure that the Inner Cover is closed. 1 Make sure that is...twice. 6 Load three or more sheets of improvement after performing cleaning three times, contact a Canon service representative.
...the paper source you selected in step 3. 7 Hold down the RESUME/CANCEL button and release it when the POWER lamp flashes green three times. Cleaning Your Printer This section describes the cleaning procedure that the printer is not ...fed properly. Cleaning the paper feed rollers will rotate as it when the POWER lamp flashes green three times. Note Make sure that the Inner Cover is closed. 1 Make sure that is...twice. 6 Load three or more sheets of improvement after performing cleaning three times, contact a Canon service representative.
Quick Start Guide
Page 60
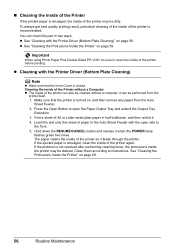
... the Printer" on page 59. Important When using Photo Paper Plus Double Sided PP-101D, be sure to open side to instructions. it when the POWER lamp flashes green five times. Press the Open Button to clean the inside of A4 or Letter-sized plain paper in two ways: z See "Cleaning...
... the Printer" on page 59. Important When using Photo Paper Plus Double Sided PP-101D, be sure to open side to instructions. it when the POWER lamp flashes green five times. Press the Open Button to clean the inside of A4 or Letter-sized plain paper in two ways: z See "Cleaning...
Quick Start Guide
Page 64
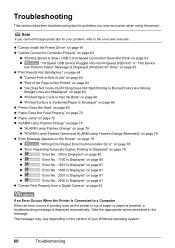
... Not Feed Properly" on page 70 z "Paper Jams" on page 72 z "ALARM Lamp Flashes Orange" on page 76 z "ALARM Lamp Flashes Orange" on page 76 z "POWER Lamp Flashes Green and ALARM Lamp Flashes Orange Alternately" on page 78 z "Error Message Appears on the Screen" on page 78 z "Writing Error/Output Error...
... Not Feed Properly" on page 70 z "Paper Jams" on page 72 z "ALARM Lamp Flashes Orange" on page 76 z "ALARM Lamp Flashes Orange" on page 76 z "POWER Lamp Flashes Green and ALARM Lamp Flashes Orange Alternately" on page 78 z "Error Message Appears on the Screen" on page 78 z "Writing Error/Output Error...

Quick Start Guide
Page 70
...; Printed Surface Is Scratched/Paper Is Smudged Cause Paper Feed Rollers are no signs of improvement after cleaning the rollers three times, contact a Canon service representative. 66 Troubleshooting Media Type setting in the printer driver does not match the actual type of paper. Make sure that the printer ...necessary. (1)Make sure that the Media Type set Print Quality to clean. (4)Hold down the RESUME/CANCEL button and release it when the POWER lamp flashes green three times. Action Follow the procedure below to Fine. Action Set the Print Quality setting to High in Windows or ...
...; Printed Surface Is Scratched/Paper Is Smudged Cause Paper Feed Rollers are no signs of improvement after cleaning the rollers three times, contact a Canon service representative. 66 Troubleshooting Media Type setting in the printer driver does not match the actual type of paper. Make sure that the printer ...necessary. (1)Make sure that the Media Type set Print Quality to clean. (4)Hold down the RESUME/CANCEL button and release it when the POWER lamp flashes green three times. Action Follow the procedure below to Fine. Action Set the Print Quality setting to High in Windows or ...


