
Service Manual
Page 4
... ink counter reset Destination settings 3-4. CONNECTOR LOCATION AND PIN LAYOUT 2-1. II. Special Tools 1-5. Warnings 2-4. Special Notes on Service Part Replacement (and Disassembling / Reassembling) 3-2. NEW TECHNOLOGIES 2. BLOCK DIAGRAM 2. Service Call Errors 2-3. Notes on Repair Servicing 3-3. CLEANING MODE AND AMOUNT OF INK PURGED 3. Customer Maintenance 1-3. Carriage Board (Print Head Connector) PIXMA iP4200 Specifications Operator Call...
... ink counter reset Destination settings 3-4. CONNECTOR LOCATION AND PIN LAYOUT 2-1. II. Special Tools 1-5. Warnings 2-4. Special Notes on Service Part Replacement (and Disassembling / Reassembling) 3-2. NEW TECHNOLOGIES 2. BLOCK DIAGRAM 2. Service Call Errors 2-3. Notes on Repair Servicing 3-3. CLEANING MODE AND AMOUNT OF INK PURGED 3. Customer Maintenance 1-3. Carriage Board (Print Head Connector) PIXMA iP4200 Specifications Operator Call...
Service Manual
Page 6
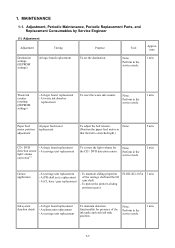
...replacement - time Destination settings (EEPROM settings) At logic board replacement To set the destination. None. At waste ink absorber replacement To reset the waste ink counter. To maintain sliding properties of the ink tanks and each ink tank position. At logic board replacement - ...MAINTENANCE 1-1. Perform in the service mode. 1 min. Waste ink counter resetting (EEPROM settings) - Perform in the service mode. 1 min. Paper feed motor position adjustment At paper feed motor replacement To adjust the...
...replacement - time Destination settings (EEPROM settings) At logic board replacement To set the destination. None. At waste ink absorber replacement To reset the waste ink counter. To maintain sliding properties of the ink tanks and each ink tank position. At logic board replacement - ...MAINTENANCE 1-1. Perform in the service mode. 1 min. Waste ink counter resetting (EEPROM settings) - Perform in the service mode. 1 min. Paper feed motor position adjustment At paper feed motor replacement To adjust the...
Service Manual
Page 17
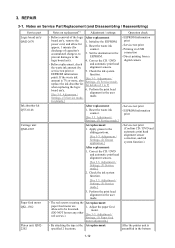
... - Initialize the EEPROM. 2. Before removal of the logic After replacement: board ass'y, remove the power cord, and allow for approx. 1 minute (for details.] - Reset the waste ink counter. 3. EEPROM information print - Service test print - Adjustment / Settings, (5) Service mode.] - REPAIR 3-1. Check the ink system EEPROM information function....the user [See 3-3. Service test print (Confirm CD / DVD and automatic print head alignment sensor correction, and ink system function.) 3. Reset the waste ink counter. [See 3.3. Adjustment / Settings, (5) Service mode.] -
... - Initialize the EEPROM. 2. Before removal of the logic After replacement: board ass'y, remove the power cord, and allow for approx. 1 minute (for details.] - Reset the waste ink counter. 3. EEPROM information print - Service test print - Adjustment / Settings, (5) Service mode.] - REPAIR 3-1. Check the ink system EEPROM information function....the user [See 3-3. Service test print (Confirm CD / DVD and automatic print head alignment sensor correction, and ink system function.) 3. Reset the waste ink counter. [See 3.3. Adjustment / Settings, (5) Service mode.] -
Service Manual
Page 27
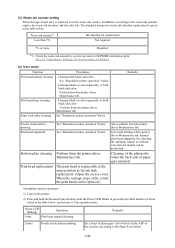
... "Standalone printer operation" below . Cleaning of the platen ribs when the back side of paper gets smeared. Print head replacement The print head is replaced, reset the waste ink counter. Waste ink amount*1 Less than 7% Ink absorber kit replacement Not required. 7% or more Required. *1: Check the waste ink amount by selecting...
... "Standalone printer operation" below . Cleaning of the platen ribs when the back side of paper gets smeared. Print head replacement The print head is replaced, reset the waste ink counter. Waste ink amount*1 Less than 7% Ink absorber kit replacement Not required. 7% or more Required. *1: Check the waste ink amount by selecting...

Service Manual
Page 28
... with the folded ridge facing down. 7 times 8 times or more , replace the ink absorber kit. USB serial number - CD / DVD correction value Waste ink counter reset See "Service mode operation procedures" below . Ink system function check result - ROM version - Waste ink counter - 3 times Paper feed roller cleaning setting). 4 times Automatic print...
... with the folded ridge facing down. 7 times 8 times or more , replace the ink absorber kit. USB serial number - CD / DVD correction value Waste ink counter reset See "Service mode operation procedures" below . Ink system function check result - ROM version - Waste ink counter - 3 times Paper feed roller cleaning setting). 4 times Automatic print...

Service Manual
Page 29
... test print. 2 times Green (Power) EEPROM information See 3-4. Verification Items, (2) EEPROM print information print. 3 times Orange (Alarm) EEPROM initialization 4 times Green (Power) Waste ink counter resetting 5 times Orange (Alarm) Destination settings After entering the destination settings mode, press the Resume/Cancel button the specified number of both black and color) 7 times...
... test print. 2 times Green (Power) EEPROM information See 3-4. Verification Items, (2) EEPROM print information print. 3 times Orange (Alarm) EEPROM initialization 4 times Green (Power) Waste ink counter resetting 5 times Orange (Alarm) Destination settings After entering the destination settings mode, press the Resume/Cancel button the specified number of both black and color) 7 times...


