Quick Start Guide
Page 9
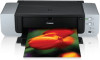
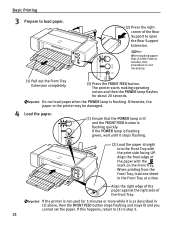
... you need right before printing. 2 Prepare to load paper. (1) 1 Open the Paper Support. 2 2 Open the Paper Support Extension to support the paper. 1 1 2 (2) 1 Gently press the mark on the Front Tray. 2 Pull out the Front Tray Extension completely. (3) Ensure that the FRONT FEED button is curled, gently bend it in the opposite... package, and store them horizontally. - z When paper is not lit. „ Loading Paper in the Auto Sheet Feeder Basic Printing For detailed information on the Canon genuine media for use with its normal printing position.
... you need right before printing. 2 Prepare to load paper. (1) 1 Open the Paper Support. 2 2 Open the Paper Support Extension to support the paper. 1 1 2 (2) 1 Gently press the mark on the Front Tray. 2 Pull out the Front Tray Extension completely. (3) Ensure that the FRONT FEED button is curled, gently bend it in the opposite... package, and store them horizontally. - z When paper is not lit. „ Loading Paper in the Auto Sheet Feeder Basic Printing For detailed information on the Canon genuine media for use with its normal printing position.
Quick Start Guide
Page 10
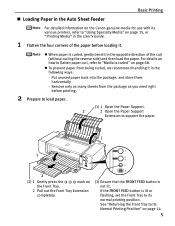
... the User's Guide. z When printing on the type of the paper stack. See "Non-Canon Genuine Specialty Paper" of the Auto Sheet Feeder. Load Limit Mark Do not load beyond this (except for supported Canon genuine media) *You can be used in the Auto Sheet Feeder. z The following paper can... use paper heavier than this Load Limit Mark. (3) Pinch the Paper Guide and slide it could...
... the User's Guide. z When printing on the type of the paper stack. See "Non-Canon Genuine Specialty Paper" of the Auto Sheet Feeder. Load Limit Mark Do not load beyond this (except for supported Canon genuine media) *You can be used in the Auto Sheet Feeder. z The following paper can... use paper heavier than this Load Limit Mark. (3) Pinch the Paper Guide and slide it could...
Quick Start Guide
Page 14
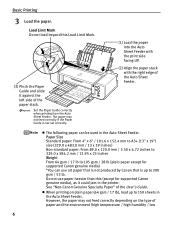
... FEED Button You can check the printer status by FRONT FEED button indication. Keep a space of the printer. mark 10 Lift up the front of the printer. For detailed information on the Canon genuine media for this purpose behind the printer. Start printing from the Front Tray are wheels on page 15...
... FEED Button You can check the printer status by FRONT FEED button indication. Keep a space of the printer. mark 10 Lift up the front of the printer. For detailed information on the Canon genuine media for this purpose behind the printer. Start printing from the Front Tray are wheels on page 15...
Quick Start Guide
Page 16
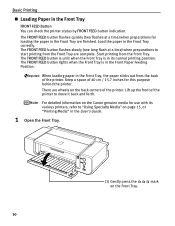
... noises and then the POWER lamp flashes for 5 minutes or more while it stops flashing. (2) Load the paper straight into the Front Tray with the mark on the Front Tray. Align the front edge of the paper with the print side facing UP. Align the right edge of the paper against...
... noises and then the POWER lamp flashes for 5 minutes or more while it stops flashing. (2) Load the paper straight into the Front Tray with the mark on the Front Tray. Align the front edge of the paper with the print side facing UP. Align the right edge of the paper against...
Quick Start Guide
Page 21
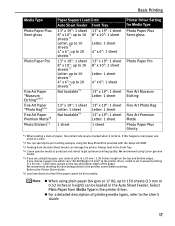
... Art Premium Matte Photo Paper Plus Glossy *1 When loading a stack of paper, the printed side may be marked when it is fed in the Auto Sheet Feeder. Always load in a 35 mm / 1.38 inches margin..., load paper one sheet at a time if the paper cannot be loaded in . We recommend using Canon genuine media. *5 If you are using the Easy-PhotoPrint provided with the Setup CD-ROM. *3 Feeding...checking the area being printed in the printer driver. If you cannnot print in the Front Tray. *4 Canon genuine media is set to get optimum printing quality. If this paper, you choose a paper size which...
... Art Premium Matte Photo Paper Plus Glossy *1 When loading a stack of paper, the printed side may be marked when it is fed in the Auto Sheet Feeder. Always load in a 35 mm / 1.38 inches margin..., load paper one sheet at a time if the paper cannot be loaded in . We recommend using Canon genuine media. *5 If you are using the Easy-PhotoPrint provided with the Setup CD-ROM. *3 Feeding...checking the area being printed in the printer driver. If you cannnot print in the Front Tray. *4 Canon genuine media is set to get optimum printing quality. If this paper, you choose a paper size which...
Quick Start Guide
Page 30
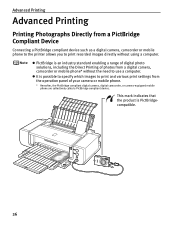
... as a digital camera, camcorder or mobile phone to the printer allows you to print recorded images directly without using a computer. z It is PictBridgecompatible. 26 This mark indicates that the product is possible to specify which images to use a computer. Advanced Printing Advanced Printing Printing Photographs Directly from the operation panel of...
... as a digital camera, camcorder or mobile phone to the printer allows you to print recorded images directly without using a computer. z It is PictBridgecompatible. 26 This mark indicates that the product is possible to specify which images to use a computer. Advanced Printing Advanced Printing Printing Photographs Directly from the operation panel of...
Quick Start Guide
Page 45
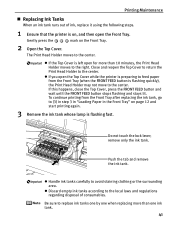
.... Push the tab and remove the ink tank. Printing Maintenance „ Replacing Ink Tanks When an ink tank runs out of consumables. Gently press the mark on , and then open for more than 10 minutes, the Print Head Holder moves to (3) in step 3 in "Loading Paper in the Front Tray" on...
.... Push the tab and remove the ink tank. Printing Maintenance „ Replacing Ink Tanks When an ink tank runs out of consumables. Gently press the mark on , and then open for more than 10 minutes, the Print Head Holder moves to (3) in step 3 in "Loading Paper in the Front Tray" on...
Quick Start Guide
Page 47
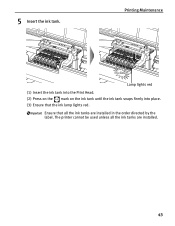
Printing Maintenance Lamp lights red (1) Insert the ink tank into the Print Head. (2) Press on the mark on the ink tank until the ink tank snaps firmly into place. (3) Ensure that all the ink tanks are installed in the order directed by the label. Ensure that the ink lamp lights red. The printer cannot be used unless all the ink tanks are installed. 43 5 Insert the ink tank.
Printing Maintenance Lamp lights red (1) Insert the ink tank into the Print Head. (2) Press on the mark on the ink tank until the ink tank snaps firmly into place. (3) Ensure that all the ink tanks are installed in the order directed by the label. Ensure that the ink lamp lights red. The printer cannot be used unless all the ink tanks are installed. 43 5 Insert the ink tank.
Quick Start Guide
Page 49
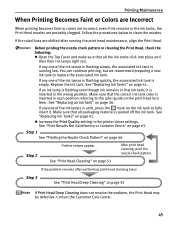
... following; Make sure that ink tank, it . If any one of the ink lamps is flashing quickly, the associated ink tank is unlit, press the mark on page 51 After print head cleaning, print the nozzle check pattern. You can continue printing, but we recommend preparing a new ink tank to clean...
... following; Make sure that ink tank, it . If any one of the ink lamps is flashing quickly, the associated ink tank is unlit, press the mark on page 51 After print head cleaning, print the nozzle check pattern. You can continue printing, but we recommend preparing a new ink tank to clean...
Quick Start Guide
Page 72
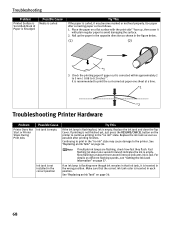
... cause damage to the printer. Roll up , then cover it with the print side*1 face up the paper in the "no ink" state may become marked or not feed properly. Continuing to 0.2 inches*2. Fast flashing (at a time. *1 *2 Troubleshooting Printer Hardware Problem Printer Does Not Start or Printer Stops During Print Jobs...
... cause damage to the printer. Roll up , then cover it with the print side*1 face up the paper in the "no ink" state may become marked or not feed properly. Continuing to 0.2 inches*2. Fast flashing (at a time. *1 *2 Troubleshooting Printer Hardware Problem Printer Does Not Start or Printer Stops During Print Jobs...
Quick Start Guide
Page 73
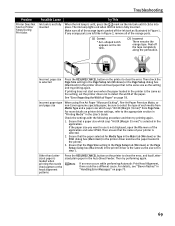
... dialog box (Macintosh) in step 1. Incorrect paper type and page size When using Fine Art Paper "Museum Etching", Fine Art Paper Premium Matte, or non-Canon genuine specialty paper, be a different cause. If the paper size you want to clear the error. Ensure that the Page Size setting in the Page... Start or Printer Stops During Print Jobs Possible Cause Ink tank is not fully inserted Try This When the ink lamp is unlit, press the mark on page 78.
... dialog box (Macintosh) in step 1. Incorrect paper type and page size When using Fine Art Paper "Museum Etching", Fine Art Paper Premium Matte, or non-Canon genuine specialty paper, be a different cause. If the paper size you want to clear the error. Ensure that the Page Size setting in the Page... Start or Printer Stops During Print Jobs Possible Cause Ink tank is not fully inserted Try This When the ink lamp is unlit, press the mark on page 78.
Quick Start Guide
Page 96
... from the Start Menu (Windows 33 Opening the Printer Properties Dialog Box from the Digital Camera 80 Canon IJ Printer Utility dialog box (Macintosh 48 Canon IJ Status Monitor (Windows 70 Canon U.S.A., INC. Index Index A Accessing the Printer Driver 33 Advanced Printing 26 ALARM lamp 73 Aligning... the Print Head 58 An Error Message Appears on the Printer 37 Insert the ink tank 43 K Knowing When to Replace Ink Tanks 39 L Load Limit Mark ...
... from the Start Menu (Windows 33 Opening the Printer Properties Dialog Box from the Digital Camera 80 Canon IJ Printer Utility dialog box (Macintosh 48 Canon IJ Status Monitor (Windows 70 Canon U.S.A., INC. Index Index A Accessing the Printer Driver 33 Advanced Printing 26 ALARM lamp 73 Aligning... the Print Head 58 An Error Message Appears on the Printer 37 Insert the ink tank 43 K Knowing When to Replace Ink Tanks 39 L Load Limit Mark ...

Easy Setup Instructions
Page 1
...print quality. IMPORTANT: Print Head Alignment (Step 6) requires that the ink tanks are installed in the Auto Sheet Feeder (top paper feeder). PIXMA Pro9000 Photo Printer Documentation and Software Kit 2 Prepare the Printer Start Here Easy Setup Instructions 3 Install the Print Head 4 Install the Ink Tanks...1 Unpack the Printer 1 Carefully remove all items from its lamp lights red. Ensure that ink lamps light red. NOTE: Gently press the mark on the print head lock lever. You will rest at notch to change. Wait until the POWER lamp displays a steady green light and ...
...print quality. IMPORTANT: Print Head Alignment (Step 6) requires that the ink tanks are installed in the Auto Sheet Feeder (top paper feeder). PIXMA Pro9000 Photo Printer Documentation and Software Kit 2 Prepare the Printer Start Here Easy Setup Instructions 3 Install the Print Head 4 Install the Ink Tanks...1 Unpack the Printer 1 Carefully remove all items from its lamp lights red. Ensure that ink lamps light red. NOTE: Gently press the mark on the print head lock lever. You will rest at notch to change. Wait until the POWER lamp displays a steady green light and ...


