Getting Started
Page 5
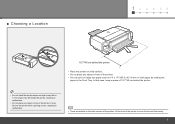
... in malfunction. • Do not place any object in front of the printer. • You can print on large size paper such as 14" x 17"/355.6 x 431.8 mm or thick paper by loading the paper in malfunction. • There are wheels on the back corners of the printer. Lift the front of the printer...
... in malfunction. • Do not place any object in front of the printer. • You can print on large size paper such as 14" x 17"/355.6 x 431.8 mm or thick paper by loading the paper in malfunction. • There are wheels on the back corners of the printer. Lift the front of the printer...
Getting Started
Page 19
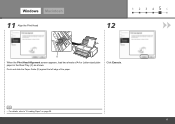
Windows Macintosh 11 Align the Print Head 12 1 2 3 456 C D When the Print Head Alignment screen appears, load two sheets of the paper. Pinch and slide the Paper Guide (D) against the left edge of A4 or Letter-sized plain paper in the Rear Tray (C) as shown. Click Execute. • For details, refer to "6 Loading Paper" on page 28. 17
Windows Macintosh 11 Align the Print Head 12 1 2 3 456 C D When the Print Head Alignment screen appears, load two sheets of the paper. Pinch and slide the Paper Guide (D) against the left edge of A4 or Letter-sized plain paper in the Rear Tray (C) as shown. Click Execute. • For details, refer to "6 Loading Paper" on page 28. 17
Getting Started
Page 26
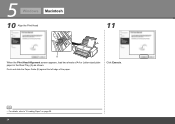
Click Execute. • For details, refer to "6 Loading Paper" on page 28. 24 5 Windows Macintosh 10 Align the Print Head 11 A B When the Print Head Alignment screen appears, load two sheets of the paper. Pinch and slide the Paper Guide (B) against the left edge of A4 or Letter-sized plain paper in the Rear Tray (A) as shown.
Click Execute. • For details, refer to "6 Loading Paper" on page 28. 24 5 Windows Macintosh 10 Align the Print Head 11 A B When the Print Head Alignment screen appears, load two sheets of the paper. Pinch and slide the Paper Guide (B) against the left edge of A4 or Letter-sized plain paper in the Rear Tray (A) as shown.
Getting Started
Page 31
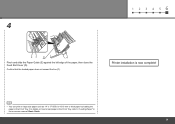
1 2 3 4 56 4 EF D Pinch and slide the Paper Guide (E) against the left edge of the paper, then close the Feed Slot Cover (D). Printer installation is now complete! • You can print on large size paper such as 14" x 17"/355.6 x 431.8 mm or thick paper by loading the paper in the on how to load paper in the Front Tray, refer to "Loading Paper" in the Front Tray. Confirm that the loaded paper does not exceed the line (F). For details on -screen manual: Basic Guide. 29
1 2 3 4 56 4 EF D Pinch and slide the Paper Guide (E) against the left edge of the paper, then close the Feed Slot Cover (D). Printer installation is now complete! • You can print on large size paper such as 14" x 17"/355.6 x 431.8 mm or thick paper by loading the paper in the on how to load paper in the Front Tray, refer to "Loading Paper" in the Front Tray. Confirm that the loaded paper does not exceed the line (F). For details on -screen manual: Basic Guide. 29


