Quick Start Guide
Page 4
... system Ultimate Edition (hereafter referred to as "Windows Vista") and Mac® OS X v.10.4.x. For details, refer to your Canon PIXMA MX850 series Office All-In-One. z "Macintosh" and "Mac" are trademarks of this manual are in any guides or related documents are believed reliable, but the accuracy and completeness thereof are not guaranteed...
... system Ultimate Edition (hereafter referred to as "Windows Vista") and Mac® OS X v.10.4.x. For details, refer to your Canon PIXMA MX850 series Office All-In-One. z "Macintosh" and "Mac" are trademarks of this manual are in any guides or related documents are believed reliable, but the accuracy and completeness thereof are not guaranteed...
Quick Start Guide
Page 5
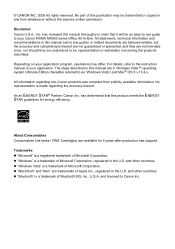
... 161 Problems Receiving Faxes 162 Problems Sending Faxes 165 Telephone Problems 166 Appendix 167 How to Use the Documentation Provided... 167 Reading the On-screen Manuals 168 Solution Menu (Windows only 169 My Printer (Windows only 169 Specifications 170 Legal Limitations on Use of Your Product and Use of Images 174...
... 161 Problems Receiving Faxes 162 Problems Sending Faxes 165 Telephone Problems 166 Appendix 167 How to Use the Documentation Provided... 167 Reading the On-screen Manuals 168 Solution Menu (Windows only 169 My Printer (Windows only 169 Specifications 170 Legal Limitations on Use of Your Product and Use of Images 174...

Quick Start Guide
Page 7
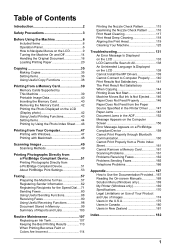
If you use a cardiac pacemaker and feel abnormalities, please move away from this manual. z You may cause an electric shock, fire, or damage the machine if you use the machine in any of the machine and refrain from the ... power outlet. Use the power cable included with other equipment (extension lead/cord, 2- Safety Precautions Please read the safety warnings and cautions provided in this manual to ensure that is shared with the machine. Always push the plug all the way into a power socket that you ignore any way not described...
If you use a cardiac pacemaker and feel abnormalities, please move away from this manual. z You may cause an electric shock, fire, or damage the machine if you use the machine in any of the machine and refrain from the ... power outlet. Use the power cable included with other equipment (extension lead/cord, 2- Safety Precautions Please read the safety warnings and cautions provided in this manual to ensure that is shared with the machine. Always push the plug all the way into a power socket that you ignore any way not described...
Quick Start Guide
Page 11
For details, refer to the Scanning Guide on-screen manual. (5) MEMORY CARD button Switches the machine to tone dialing. You can use this button and a two-digit code to display a pre-registered fax/telephone number ...
For details, refer to the Scanning Guide on-screen manual. (5) MEMORY CARD button Switches the machine to tone dialing. You can use this button and a two-digit code to display a pre-registered fax/telephone number ...
Quick Start Guide
Page 13
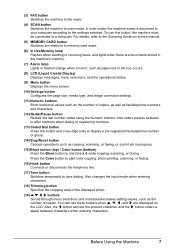
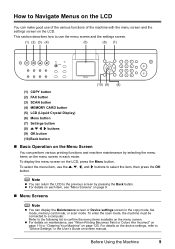
... Note z You can return the LCD to the previous screen by selecting the menu items on the menu screen in the User's Guide on-screen manual. This section describes how to use the menu screen and the settings screen. (1) (2) (3) (4) (5) (6) (7) (10) (9) (8) (1) COPY button (2) FAX button (3) SCAN button (4) MEMORY CARD button (5) LCD (Liquid...
... Note z You can return the LCD to the previous screen by selecting the menu items on the menu screen in the User's Guide on-screen manual. This section describes how to use the menu screen and the settings screen. (1) (2) (3) (4) (5) (6) (7) (10) (9) (8) (1) COPY button (2) FAX button (3) SCAN button (4) MEMORY CARD button (5) LCD (Liquid...
Quick Start Guide
Page 15
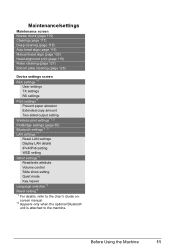
Maintenance/settings Maintenance screen Nozzle check (page 115) Cleaning (page 117) Deep cleaning (page 118) Auto head align (page 119) Manual head align (page 120) Head alignment print (page 119) Roller cleaning (page 127) Bottom plate cleaning (page 128) Device settings screen FAX settings *1 User settings...*1 Read/write attribute Volume control Slide show setting Quiet mode Key repeat Language selection*1 Reset setting*1 *1 For details, refer to the User's Guide onscreen manual. *2 Appears only when the optional Bluetooth unit is attached to the machine. Before Using the Machine 11
Maintenance/settings Maintenance screen Nozzle check (page 115) Cleaning (page 117) Deep cleaning (page 118) Auto head align (page 119) Manual head align (page 120) Head alignment print (page 119) Roller cleaning (page 127) Bottom plate cleaning (page 128) Device settings screen FAX settings *1 User settings...*1 Read/write attribute Volume control Slide show setting Quiet mode Key repeat Language selection*1 Reset setting*1 *1 For details, refer to the User's Guide onscreen manual. *2 Appears only when the optional Bluetooth unit is attached to the machine. Before Using the Machine 11
Quick Start Guide
Page 16
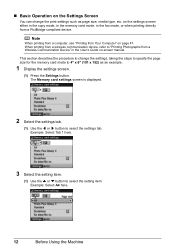
... printing directly from a Wireless Communication Device" in the User's Guide on page 47. Note When printing from a computer, see "Printing from Your Computer" on -screen manual. Example: Select Tab 1 here. 3 Select the setting item. (1) Use the { or } button to select the settings tab.
... printing directly from a Wireless Communication Device" in the User's Guide on page 47. Note When printing from a computer, see "Printing from Your Computer" on -screen manual. Example: Select Tab 1 here. 3 Select the setting item. (1) Use the { or } button to select the settings tab.
Quick Start Guide
Page 22
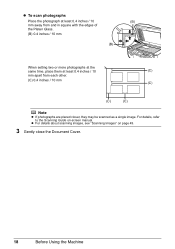
... / 10 mm (C) (C) (C) Note z If photographs are placed closer, they may be scanned as a single image. z For details about scanning images, see "Scanning Images" on -screen manual. For details, refer to the Scanning Guide on page 49. 3 Gently close the Document Cover. 18 Before Using the Machine
... / 10 mm (C) (C) (C) Note z If photographs are placed closer, they may be scanned as a single image. z For details about scanning images, see "Scanning Images" on -screen manual. For details, refer to the Scanning Guide on page 49. 3 Gently close the Document Cover. 18 Before Using the Machine
Quick Start Guide
Page 25
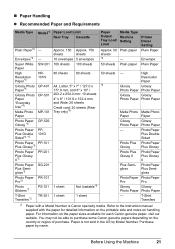
... papers depending on handling paper. You may not be able to the instruction manual supplied with a Model Number is not sold in the US by name. Paper is Canon specialty media. Before Using the Machine 21 Printer Driver Setting Plain Paper Envelope Super White SW-201 100 sheets 100 sheets Paper 50...; Paper Handling z Recommended Paper and Requirements Media Type Model*1 Paper Load Limit Rear Tray Cassette Plain Paper*2 - T-Shirt Transfers *1 Paper with the paper for each Canon genuine paper, visit our website.
... papers depending on handling paper. You may not be able to the instruction manual supplied with a Model Number is not sold in the US by name. Paper is Canon specialty media. Before Using the Machine 21 Printer Driver Setting Plain Paper Envelope Super White SW-201 100 sheets 100 sheets Paper 50...; Paper Handling z Recommended Paper and Requirements Media Type Model*1 Paper Load Limit Rear Tray Cassette Plain Paper*2 - T-Shirt Transfers *1 Paper with the paper for each Canon genuine paper, visit our website.
Quick Start Guide
Page 26
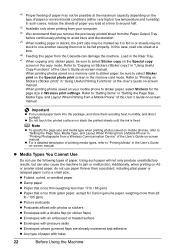
...media type when printing photos saved on mobile phones, refer to "Printing on -screen manual. Important z Put unused paper back into the package, and store them not to be sure to sticker paper, select Stickers for Canon genuine paper, weighing more than 28 lb / 105 gsm) z Picture postcards z ... on the type of paper you remove the previously printed sheet from the Cassette can also cause the machine to select Sticker copy on -screen manual. z Folded, curled, or wrinkled paper z Damp paper z Paper that is too thick (plain paper, except for the page size in "Setting ...
...media type when printing photos saved on mobile phones, refer to "Printing on -screen manual. Important z Put unused paper back into the package, and store them not to be sure to sticker paper, select Stickers for Canon genuine paper, weighing more than 28 lb / 105 gsm) z Picture postcards z ... on the type of paper you remove the previously printed sheet from the Cassette can also cause the machine to select Sticker copy on -screen manual. z Folded, curled, or wrinkled paper z Damp paper z Paper that is too thick (plain paper, except for the page size in "Setting ...
Quick Start Guide
Page 27
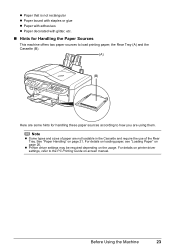
... glitter, etc. „ Hints for handling these paper sources according to how you are using them. z Printer driver settings may be required depending on -screen manual. Before Using the Machine 23 Note z Some types and sizes of paper are not loadable in the Cassette and require the use of the Rear...
... glitter, etc. „ Hints for handling these paper sources according to how you are using them. z Printer driver settings may be required depending on -screen manual. Before Using the Machine 23 Note z Some types and sizes of paper are not loadable in the Cassette and require the use of the Rear...
Quick Start Guide
Page 29
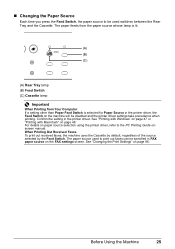
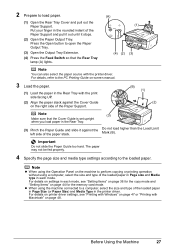
... Switch. „ Changing the Paper Source Each time you press the Feed Switch, the paper source to be used to the PC Printing Guide onscreen manual. For details on page 96. See "Changing the Print Settings" on paper source selection using the printer driver, refer to print out faxes can be...
... Switch. „ Changing the Paper Source Each time you press the Feed Switch, the paper source to be used to the PC Printing Guide onscreen manual. For details on page 96. See "Changing the Print Settings" on paper source selection using the printer driver, refer to print out faxes can be...
Quick Start Guide
Page 31
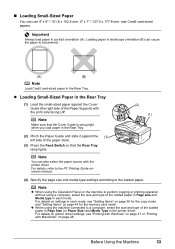
... Limit Mark (B). The paper may not be fed properly. 4 Specify the page size and media type settings according to the PC Printing Guide on-screen manual. 3 Load the paper. (1) Load the paper in the Rear Tray with the printer driver. Important Do not slide the Paper Guide too hard. For details...
... Limit Mark (B). The paper may not be fed properly. 4 Specify the page size and media type settings according to the PC Printing Guide on-screen manual. 3 Load the paper. (1) Load the paper in the Rear Tray with the printer driver. Important Do not slide the Paper Guide too hard. For details...
Quick Start Guide
Page 33
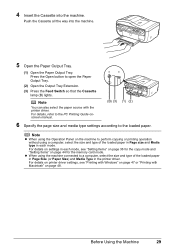
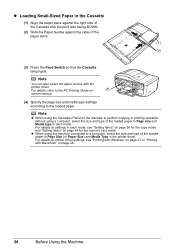
Push the Cassette all the way into the machine. For details, refer to the PC Printing Guide onscreen manual. (B) (3) (1) (2) 6 Specify the page size and media type settings according to open the Paper Output Tray. (2) Open the Output Tray Extension. (3) Press the Feed Switch so ...
Push the Cassette all the way into the machine. For details, refer to the PC Printing Guide onscreen manual. (B) (3) (1) (2) 6 Specify the page size and media type settings according to open the Paper Output Tray. (2) Open the Output Tray Extension. (3) Press the Feed Switch so ...
Quick Start Guide
Page 35
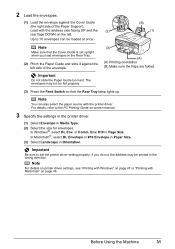
... "Printing with the address side facing UP and the (2) rear flaps DOWN on the left side of the Paper Support). Load with Macintosh" on -screen manual. 3 Specify the settings in the printer driver. (1) Select Envelope in the wrong direction. or Comm. In Macintosh®, select DL Envelope or #10 Envelope in...
... "Printing with the address side facing UP and the (2) rear flaps DOWN on the left side of the Paper Support). Load with Macintosh" on -screen manual. 3 Specify the settings in the printer driver. (1) Select Envelope in the wrong direction. or Comm. In Macintosh®, select DL Envelope or #10 Envelope in...
Quick Start Guide
Page 36
screen manual. (3) (B) (B) Printing orientation 3 Specify the settings in the printer driver. (1) Select Envelope in Orientation. In Macintosh, select DL Envelope or #10 Envelope in Paper Size. (3) Select ...
screen manual. (3) (B) (B) Printing orientation 3 Specify the settings in the printer driver. (1) Select Envelope in Orientation. In Macintosh, select DL Envelope or #10 Envelope in Paper Size. (3) Select ...
Quick Start Guide
Page 37
For details, refer to the PC Printing Guide onscreen manual. (4) Specify the page size and media type settings according to a computer, select the size and type of the paper stack. (3) Press the Feed Switch so ...
For details, refer to the PC Printing Guide onscreen manual. (4) Specify the page size and media type settings according to a computer, select the size and type of the paper stack. (3) Press the Feed Switch so ...
Quick Start Guide
Page 38
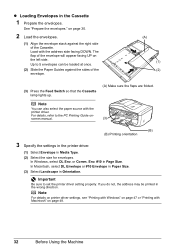
... to the PC Printing Guide on page 48. 34 Before Using the Machine Note You can also select the paper source with Macintosh" on - (3) screen manual. (4) Specify the page size and media type settings according to a computer, select the size and type of the paper stack. (1) (2) (3) Press the Feed Switch so...
... to the PC Printing Guide on page 48. 34 Before Using the Machine Note You can also select the paper source with Macintosh" on - (3) screen manual. (4) Specify the page size and media type settings according to a computer, select the size and type of the paper stack. (1) (2) (3) Press the Feed Switch so...
Quick Start Guide
Page 39
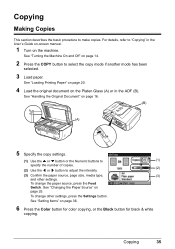
... page 20. 4 Load the original document on page 25. See "Changing the Paper Source" on the Platen Glass (A) or in the User's Guide on-screen manual. 1 Turn on the machine. To change the paper source, press the Feed Switch. See "Setting Items" on page 16. (B) (A) 5 Specify the copy settings. (1) Use the...
... page 20. 4 Load the original document on page 25. See "Changing the Paper Source" on the Platen Glass (A) or in the User's Guide on-screen manual. 1 Turn on the machine. To change the paper source, press the Feed Switch. See "Setting Items" on page 16. (B) (A) 5 Specify the copy settings. (1) Use the...
Quick Start Guide
Page 40
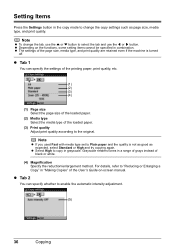
... in the copy mode to select the tab and use the [ or ] button. z Select High to "Reducing or Enlarging a Copy" in grayscale. z Depending on -screen manual. Setting Items Press the Settings button in combination. Grayscale renders tones in a range of grays instead of the page size, media type, and print quality...
... in the copy mode to select the tab and use the [ or ] button. z Select High to "Reducing or Enlarging a Copy" in grayscale. z Depending on -screen manual. Setting Items Press the Settings button in combination. Grayscale renders tones in a range of grays instead of the page size, media type, and print quality...


