PIXMA MX712 Setup - Canon
PIXMA MX712 Setup

Related Manual Pages


Similar Questions

Wireless Canon Mx512 Setup
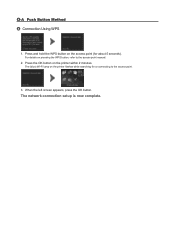
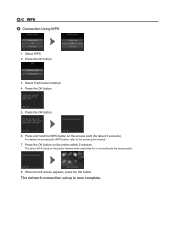
Setup for wireless printing says to hold down the WPS button on the printer. Where is that button? O...
Setup for wireless printing says to hold down the WPS button on the printer. Where is that button? O...
(Posted by sanford11 7 years ago)


Mx712 Wireless Setup Does Not Find Network.
During setup of mx712 wireless setup the network I am trying to access does not show up. Network is ...
During setup of mx712 wireless setup the network I am trying to access does not show up. Network is ...
(Posted by banderbruce 10 years ago)

How Do I Setup The Fax For Mx340?
Been trying to setup fax capabilities and need help.
Been trying to setup fax capabilities and need help.
(Posted by douglassmith2275 11 years ago)
Related Terms
The following terms were also used when searching for PIXMA MX712 Setup - Canon:- buy canon pixma mx712
- buy pixma mx712
- cannon pixma mx712
- canon pixma mg7120
- canon pixma mx 712
- canon pixma mx 712 manual
- canon pixma mx 712 printer
- canon pixma mx712
- canon pixma mx712 4-in-1 wifi airprint
- canon pixma mx712 airprint
- canon pixma mx712 amazon
- canon pixma mx712 b200 error
- canon pixma mx712 best price
- canon pixma mx712 cartridge
- canon pixma mx712 costco
- canon pixma mx712 download
- canon pixma mx712 driver
- canon pixma mx712 driver download
- canon pixma mx712 drivers
- canon pixma mx712 error code 5100
- canon pixma mx712 error code b200
- canon pixma mx712 feeding paper
- canon pixma mx712 how do you turn it off
- canon pixma mx712 how to change ink
- canon pixma mx712 i pad instructions
- canon pixma mx712 ink
- canon pixma mx712 ink cartridge
- canon pixma mx712 ink cartridges
- canon pixma mx712 ink refill
- canon pixma mx712 install
- canon pixma mx712 instructions
- canon pixma mx712 linux setup
- canon pixma mx712 loading paper
- canon pixma mx712 manual
- canon pixma mx712 pdf manual
- canon pixma mx712 price
- canon pixma mx712 print head
- canon pixma mx712 printer
- canon pixma mx712 printer cartridges
- canon pixma mx712 printer head
- canon pixma mx712 printer head replacement
- canon pixma mx712 printer manual
- canon pixma mx712 printer review
- canon pixma mx712 printer reviews
- canon pixma mx712 printer reviews cnet
- canon pixma mx712 printhead
- canon pixma mx712 printing blank pages
- canon pixma mx712 printing error c000
- canon pixma mx712 ratings
- canon pixma mx712 remove power supply
- canon pixma mx712 review
- canon pixma mx712 review cnet
- canon pixma mx712 reviews
- canon pixma mx712 scan resolution dpi
- canon pixma mx712 setup
- canon pixma mx712 software
- canon pixma mx712 specifications
- canon pixma mx712 specs
- canon pixma mx712 troubleshooting
- canon pixma mx712 user manual
- canon pixma mx712 windows 8
- canon pixma mx712 wireless
- canon pixma mx712 wireless all in one printer
- canon pixma mx712 wireless inkjet
- canon pixma mx712 wireless inkjet office all in one printer
- canon pixma mx712 wireless inkjet office all-in-one printer
- canon pixma mx712 wireless inkjet office-all-in-one printer
- canon pixma mx712 wireless office all in one inkjet printer
- canon pixma mx712 wireless office all-in-one inkjet printer
- canon pixma mx712 wireless printer
- canon pixma mx712 wireless printer manual
- canon pixma mx712 wireless review
- canon pixma mx712 wireless setup
- canon pixma mx712 won't turn on
- costco canon pixma mx712
- costco pixma mx712
- how good is the pixma mx712
- ink cartridge for pixma mx712
- ink for canon pixma mx712
- ink for pixma mx712
- pixma 7120 printer
- pixma mg7120
- pixma mx 712
- pixma mx 712 manual
- pixma mx 712 printer
- pixma mx700 downloads for windows 8
- pixma mx700 driver
- pixma mx700 ink
- pixma mx700 ink cartridge
- pixma mx700 ink cartridges
- pixma mx700 print head
- pixma mx700 printer
- pixma mx700 printer manual
- pixma mx700 setup
- pixma mx700 won't power up
- pixma mx712
- pixma mx712 4-in-1 wifi airprint
- pixma mx712 airprint
- pixma mx712 amazon
- pixma mx712 b200 error
- pixma mx712 best price
- pixma mx712 canon printer errors
- pixma mx712 cartridge
- pixma mx712 costco
- pixma mx712 download
- pixma mx712 driver
- pixma mx712 driver download
- pixma mx712 drivers
- pixma mx712 error b200
- pixma mx712 error code 5100
- pixma mx712 error code b200
- pixma mx712 feeding paper
- pixma mx712 firmware
- pixma mx712 google cloud print
- pixma mx712 how do you turn it off
- pixma mx712 how to change ink
- pixma mx712 how to load paper
- pixma mx712 i pad instructions
- pixma mx712 ink
- pixma mx712 ink cartridge
- pixma mx712 ink cartridges
- pixma mx712 ink refill
- pixma mx712 install
- pixma mx712 instructions
- pixma mx712 linux setup
- pixma mx712 loading paper
- pixma mx712 manual
- pixma mx712 pdf manual
- pixma mx712 price
- pixma mx712 print head
- pixma mx712 printer
- pixma mx712 printer cartridges
- pixma mx712 printer driver
- pixma mx712 printer head
- pixma mx712 printer head replacement
- pixma mx712 printer manual
- pixma mx712 printer review
- pixma mx712 printer reviews
- pixma mx712 printer reviews cnet
- pixma mx712 printhead
- pixma mx712 printing blank pages
- pixma mx712 printing error c000
- pixma mx712 ratings
- pixma mx712 remove power supply
- pixma mx712 review
- pixma mx712 review cnet
- pixma mx712 reviews
- pixma mx712 scan resolution dpi
- pixma mx712 setup
- pixma mx712 software
- pixma mx712 specifications
- pixma mx712 specs
- pixma mx712 troubleshooting
- pixma mx712 user manual
- pixma mx712 windows 8
- pixma mx712 wireless
- pixma mx712 wireless all in one printer
- pixma mx712 wireless inkjet
- pixma mx712 wireless inkjet office all in one printer
- pixma mx712 wireless inkjet office all-in-one printer
- pixma mx712 wireless inkjet office-all-in-one printer
- pixma mx712 wireless office all in one inkjet printer
- pixma mx712 wireless office all-in-one inkjet printer
- pixma mx712 wireless printer
- pixma mx712 wireless printer manual
- pixma mx712 wireless review
- pixma mx712 wireless setup
- pixma mx712 won't turn on
- review of canon pixma mx712
- review of pixma mx712
- reviews canon pixma mx712
- reviews pixma mx712