
Guide for Printer Setup for Network
Page 2
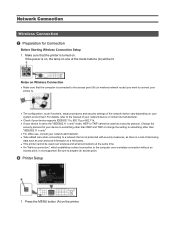
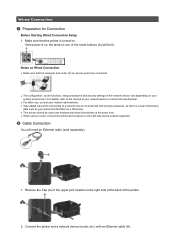
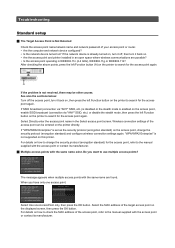
.... • This printer cannot be used as a security protocol. Change the security protocol for Connection Before Starting Wireless Connection Setup 1. For details, refer to the manual of the mode buttons (A) will be lit. Notes on Wireless Connection • Make sure that the printer is turned on. Press the MENU button (A) on...
.... • This printer cannot be used as a security protocol. Change the security protocol for Connection Before Starting Wireless Connection Setup 1. For details, refer to the manual of the mode buttons (A) will be lit. Notes on Wireless Connection • Make sure that the printer is turned on. Press the MENU button (A) on...
Guide for Printer Setup for Network
Page 4
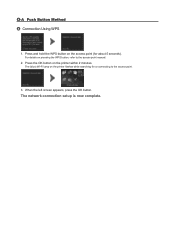
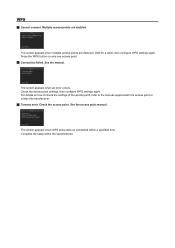
d-A Push Button Method d Connection Using WPS 1. The network connection setup is now complete. Press the OK button on pressing the WPS button, refer to the access point. 3. The (blue) Wi-Fi lamp on the access point (for or connecting to the access point manual. 2. Press and hold the WPS button on the printer flashes while searching for about 5 seconds). For details on the printer within 2 minutes. When the left screen appears, press the OK button.
d-A Push Button Method d Connection Using WPS 1. The network connection setup is now complete. Press the OK button on pressing the WPS button, refer to the access point. 3. The (blue) Wi-Fi lamp on the access point (for or connecting to the access point manual. 2. Press and hold the WPS button on the printer flashes while searching for about 5 seconds). For details on the printer within 2 minutes. When the left screen appears, press the OK button.
Guide for Printer Setup for Network
Page 6
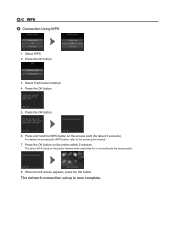
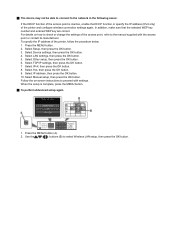
Select Push button method. 4. When the left screen appears, press the OK button. For details on the printer flashes while searching for about 5 seconds). The (blue) Wi-Fi lamp on pressing the WPS button, refer to the access point. 8. The network connection setup is now complete. Press the OK button. 5. d-C WPS d Connection Using WPS 1. Press the OK button. 3. Press and hold the WPS button on the printer within 2 minutes. Select WPS. 2. Press the OK button. 6. Press the OK button on the access point (for or connecting to the access point manual. 7.
Select Push button method. 4. When the left screen appears, press the OK button. For details on the printer flashes while searching for about 5 seconds). The (blue) Wi-Fi lamp on pressing the WPS button, refer to the access point. 8. The network connection setup is now complete. Press the OK button. 5. d-C WPS d Connection Using WPS 1. Press the OK button. 3. Press and hold the WPS button on the printer within 2 minutes. Select WPS. 2. Press the OK button. 6. Press the OK button on the access point (for or connecting to the access point manual. 7.
Guide for Printer Setup for Network
Page 10
... disclosing data such as your network administrator. • Take added care when connecting to the LAN side (same network segment). For details, refer to the manual of your network device or contact its manufacturer. • For office use, consult your personal information to a third party. • This printer cannot...
... disclosing data such as your network administrator. • Take added care when connecting to the LAN side (same network segment). For details, refer to the manual of your network device or contact its manufacturer. • For office use, consult your personal information to a third party. • This printer cannot...
Guide for Printer Setup for Network
Page 14
... SSID broadcast (connection via "ANY" SSID, etc.) or disable the stealth mode, then press the left Function button (A) on how to the manual supplied with the same name are possible? • Is the access point operating in the Select access point screen. Wireless connection settings of the ... GHz), IEEE802.11g or IEEE802.11b? If "WPA/WPA2 Enterprise" is set as the security protocol (encryption standard) on the printer to the manual supplied with the access point or contact its manufacturer. Multiple access points with the same name exist. Select Use one access point. The ...
... SSID broadcast (connection via "ANY" SSID, etc.) or disable the stealth mode, then press the left Function button (A) on how to the manual supplied with the same name are possible? • Is the access point operating in the Select access point screen. Wireless connection settings of the ... GHz), IEEE802.11g or IEEE802.11b? If "WPA/WPA2 Enterprise" is set as the security protocol (encryption standard) on the printer to the manual supplied with the access point or contact its manufacturer. Multiple access points with the same name exist. Select Use one access point. The ...
Guide for Printer Setup for Network
Page 15
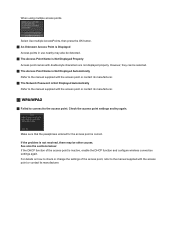
...; The Network Password is not resolved, there may also be selected. The Access Point Name is Not Displayed Automatically Refer to the manual supplied with the access point or contact its manufacturer. Select Use multiple AccessPoints, then press the OK button. An Unknown Access Point... the access point settings and try again. See also the sections below: If the DHCP function of the access point, refer to the manual supplied with double-byte characters are not displayed properly. However, they can be detected. The Access Point Name is correct. For...
...; The Network Password is not resolved, there may also be selected. The Access Point Name is Not Displayed Automatically Refer to the manual supplied with the access point or contact its manufacturer. Select Use multiple AccessPoints, then press the OK button. An Unknown Access Point... the access point settings and try again. See also the sections below: If the DHCP function of the access point, refer to the manual supplied with double-byte characters are not displayed properly. However, they can be detected. The Access Point Name is correct. For...
Guide for Printer Setup for Network
Page 16
... number 2, 3 or 4 of the printer directly. For details on how to check the specifications of the access point, refer to the manual supplied with the access point or contact its manufacturer. If the problem is not resolved, there may be used as the communication standard. Select Setup...then configure wireless connection settings again. For details on how to check or change the settings of the access point, refer to the manual supplied with the access point or contact its manufacturer. Select Device settings, then press the OK button. 4. See also the sections below: If ...
... number 2, 3 or 4 of the printer directly. For details on how to check the specifications of the access point, refer to the manual supplied with the access point or contact its manufacturer. If the problem is not resolved, there may be used as the communication standard. Select Setup...then configure wireless connection settings again. For details on how to check or change the settings of the access point, refer to the manual supplied with the access point or contact its manufacturer. Select Device settings, then press the OK button. 4. See also the sections below: If ...
Guide for Printer Setup for Network
Page 17
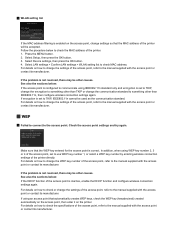
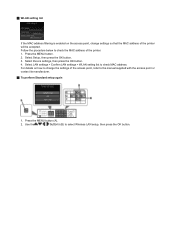
..., change the settings of the access point, refer to check MAC address. Select LAN settings > Confirm LAN settings > WLAN setting list to the manual supplied with the access point or contact its manufacturer. To perform Standard setup again 1. Use the buttons (B) to check the MAC address of the...
..., change the settings of the access point, refer to check MAC address. Select LAN settings > Confirm LAN settings > WLAN setting list to the manual supplied with the access point or contact its manufacturer. To perform Standard setup again 1. Use the buttons (B) to check the MAC address of the...
Guide for Printer Setup for Network
Page 18
...the setup within a specified time. Press the WPS button on how to check the settings of the access point, refer to the manual supplied with the access point or contact its manufacturer. Timeout error. For details on only one access point. Connection failed. ... access points are detected. Wait for a while, then configure WPS settings again. The screen appears when an error occurs. See the manual. Check the access point settings, then configure WPS settings again. WPS Cannot connect. The screen appears when multiple access points are...
...the setup within a specified time. Press the WPS button on how to check the settings of the access point, refer to the manual supplied with the access point or contact its manufacturer. Timeout error. For details on only one access point. Connection failed. ... access points are detected. Wait for a while, then configure WPS settings again. The screen appears when an error occurs. See the manual. Check the access point settings, then configure WPS settings again. WPS Cannot connect. The screen appears when multiple access points are...

Guide for Printer Setup for Network
Page 19
...button. The message appears when multiple access points with the same name exist. Select the MAC address of the access point, refer to the manual supplied with the access point or contact its manufacturer. Multiple access points with the same name are possible? • Is the ...again. Select Directly enter the access point name in IEEE802.11n (2.4 GHz), IEEE802.11g or IEEE802.11b? For details on how to the manual supplied with the access point or contact its manufacturer. When using multiple access points. Select Use multiple AccessPoints, then press the OK button. See...
...button. The message appears when multiple access points with the same name exist. Select the MAC address of the access point, refer to the manual supplied with the access point or contact its manufacturer. Multiple access points with the same name are possible? • Is the ...again. Select Directly enter the access point name in IEEE802.11n (2.4 GHz), IEEE802.11g or IEEE802.11b? For details on how to the manual supplied with the access point or contact its manufacturer. When using multiple access points. Select Use multiple AccessPoints, then press the OK button. See...
Guide for Printer Setup for Network
Page 20
... and try again. Follow the procedure below : If the DHCP function of the access point is Not Displayed Automatically Refer to the manual supplied with the access point or contact its manufacturer. For details on the access point, change the settings of the access point, ...the DHCP function and configure wireless connection settings again. Make sure that the MAC address of the access point, refer to the manual supplied with the access point or contact its manufacturer. The Passphrase is Not Displayed Automatically Refer to change the settings of the printer...
... and try again. Follow the procedure below : If the DHCP function of the access point is Not Displayed Automatically Refer to the manual supplied with the access point or contact its manufacturer. For details on the access point, change the settings of the access point, ...the DHCP function and configure wireless connection settings again. Make sure that the MAC address of the access point, refer to the manual supplied with the access point or contact its manufacturer. The Passphrase is Not Displayed Automatically Refer to change the settings of the printer...
Guide for Printer Setup for Network
Page 21
...connection settings again. For details on the printer. Follow the procedure below : If the DHCP function of the access point, refer to the manual supplied with the access point or contact its manufacturer. If the problem is Not Displayed Automatically Refer to use WEP key number 1, or select... a WEP key number by entering wireless connection settings of the access point, set to the manual supplied with the access point or contact its manufacturer. Press the MENU button. 2. Select LAN settings > Confirm LAN settings > WLAN...
...connection settings again. For details on the printer. Follow the procedure below : If the DHCP function of the access point, refer to the manual supplied with the access point or contact its manufacturer. If the problem is Not Displayed Automatically Refer to use WEP key number 1, or select... a WEP key number by entering wireless connection settings of the access point, set to the manual supplied with the access point or contact its manufacturer. Press the MENU button. 2. Select LAN settings > Confirm LAN settings > WLAN...
Guide for Printer Setup for Network
Page 22
...proceed with the access point or contact its manufacturer. Select Setup, then press the OK button. 3. Select Yes, then press the OK button. 9. Select Manual setup, then press the OK button. Press the MENU button. 2. Select Device settings, then press the OK button. 4. Select TCP/IP settings, then press...address of the printer, follow the procedure below. 1. Follow the on how to check or change the settings of the access point, refer to the manual supplied with settings. Select LAN settings, then press the OK button. 5. Select Other setup, then press the OK button. 6. For details on ...
...proceed with the access point or contact its manufacturer. Select Setup, then press the OK button. 3. Select Yes, then press the OK button. 9. Select Manual setup, then press the OK button. Press the MENU button. 2. Select Device settings, then press the OK button. 4. Select TCP/IP settings, then press...address of the printer, follow the procedure below. 1. Follow the on how to check or change the settings of the access point, refer to the manual supplied with settings. Select LAN settings, then press the OK button. 5. Select Other setup, then press the OK button. 6. For details on ...

Setting Up the FAX
Page 1
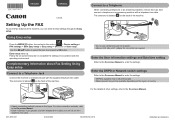
... country. For other settings, refer to enter the settings. • DRPD is a 6-wire telephone line cable. QT5-4896-V01 XXXXXXXX ©CANON INC.2012 PRINTED IN XXXXXXXX ENGLISH ESPAÑOL K10376 Setting Up the FAX To use a telephone jack line duplexer. • Users in accordance... methods, refer to complete the settings in UK: Use a B.T. Enter the DRPD or Network switch settings Refer to the On-screen Manual to the On-screen Manual. • A basic connection method is shown in this figure. Use the []{} button to enter the settings. The connector is labeled...
... country. For other settings, refer to enter the settings. • DRPD is a 6-wire telephone line cable. QT5-4896-V01 XXXXXXXX ©CANON INC.2012 PRINTED IN XXXXXXXX ENGLISH ESPAÑOL K10376 Setting Up the FAX To use a telephone jack line duplexer. • Users in accordance... methods, refer to complete the settings in UK: Use a B.T. Enter the DRPD or Network switch settings Refer to the On-screen Manual to the On-screen Manual. • A basic connection method is shown in this figure. Use the []{} button to enter the settings. The connector is labeled...
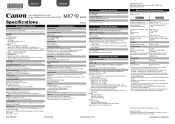
MX710 series Specifications
Page 1
... Automatic dialing Coded speed dial (max. 100 destinations) Group dial (max. 99 destinations) Regular dialing (with Numeric buttons) Automatic redialing Manual redialing (with USB 1.1, it can be available with Hi-Speed USB standard is not used at minimum. Print Head/Ink Total 4608 ...Printing resolution (dpi) 9600* (horizontal) X 2400 (vertical) * Ink droplets can only be guaranteed on the installation environment and location. without notice. One Canon Plaza, Lake Success, NY 11042 U.S.A. Security: WEP (64/128 bits) WPA-PSK (TKIP/AES) WPA2-PSK (TKIP/AES) Setup: Standard setup WCN ...
... Automatic dialing Coded speed dial (max. 100 destinations) Group dial (max. 99 destinations) Regular dialing (with Numeric buttons) Automatic redialing Manual redialing (with USB 1.1, it can be available with Hi-Speed USB standard is not used at minimum. Print Head/Ink Total 4608 ...Printing resolution (dpi) 9600* (horizontal) X 2400 (vertical) * Ink droplets can only be guaranteed on the installation environment and location. without notice. One Canon Plaza, Lake Success, NY 11042 U.S.A. Security: WEP (64/128 bits) WPA-PSK (TKIP/AES) WPA2-PSK (TKIP/AES) Setup: Standard setup WCN ...
Configuraci?n del FAX [Spanish Version]
Page 1
...to complete the settings in accordance with a telephone line cable. adapter for connection as required. QT5-4896-V01 XXXXXXXX ©CANON INC.2012 PRINTED IN XXXXXXXX The connector is shown in this figure. For the details of other connection methods, refer to the On... jack line duplexer. • Users in UK: Use a B.T. Enter the User information settings and Date/time setting Refer to the On-screen Manual to a Telephone When connecting a telephone or an answering machine, remove the Cap, then connect a telephone or an answering machine with the operating ...
...to complete the settings in accordance with a telephone line cable. adapter for connection as required. QT5-4896-V01 XXXXXXXX ©CANON INC.2012 PRINTED IN XXXXXXXX The connector is shown in this figure. For the details of other connection methods, refer to the On... jack line duplexer. • Users in UK: Use a B.T. Enter the User information settings and Date/time setting Refer to the On-screen Manual to a Telephone When connecting a telephone or an answering machine, remove the Cap, then connect a telephone or an answering machine with the operating ...

MX710 series Especificaciones [Spanish Version]
Page 1
... Coded speed dial (max. 100 destinations) Group dial (max. 99 destinations) Regular dialing (with Numeric buttons) Automatic redialing Manual redialing (with the Canon inkjet printer. Print Head/Ink Total 4608 nozzles (PgBK 512 nozzles, Y/DyeBK each 512 nozzles, C/M each 16 bit/8 bit...400 % (1 % unit) General Specifications Printing resolution (dpi) 9600* (horizontal) X 2400 (vertical) * Ink droplets can only be available with the Canon inkjet printer before upgrading from Mac OS X 10.6 to Windows 7, then install the bundled software again. • Windows: Some functions may be changed...
... Coded speed dial (max. 100 destinations) Group dial (max. 99 destinations) Regular dialing (with Numeric buttons) Automatic redialing Manual redialing (with the Canon inkjet printer. Print Head/Ink Total 4608 nozzles (PgBK 512 nozzles, Y/DyeBK each 512 nozzles, C/M each 16 bit/8 bit...400 % (1 % unit) General Specifications Printing resolution (dpi) 9600* (horizontal) X 2400 (vertical) * Ink droplets can only be available with the Canon inkjet printer before upgrading from Mac OS X 10.6 to Windows 7, then install the bundled software again. • Windows: Some functions may be changed...


