Guide for Printer Setup for Network
Page 4
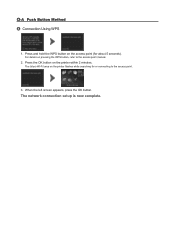
The (blue) Wi-Fi lamp on the access point (for or connecting to the access point manual. 2. Press and hold the WPS button on the printer flashes while searching for about 5 seconds). When the left screen appears, press the OK button. For details on the printer within 2 minutes. Press the OK button on pressing the WPS button, refer to the access point. 3. d-A Push Button Method d Connection Using WPS 1. The network connection setup is now complete.
The (blue) Wi-Fi lamp on the access point (for or connecting to the access point manual. 2. Press and hold the WPS button on the printer flashes while searching for about 5 seconds). When the left screen appears, press the OK button. For details on the printer within 2 minutes. Press the OK button on pressing the WPS button, refer to the access point. 3. d-A Push Button Method d Connection Using WPS 1. The network connection setup is now complete.
Guide for Printer Setup for Network
Page 6
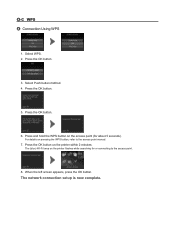
d-C WPS d Connection Using WPS 1. The network connection setup is now complete. Press and hold the WPS button on the printer flashes while searching for about 5 seconds). When the left screen appears, press the OK button. Select Push button method. 4. Press the OK button on pressing the WPS button, refer to the access point. 8. The (blue) Wi-Fi lamp on the access point (for or connecting to the access point manual. 7. Select WPS. 2. Press the OK button. 3. Press the OK button. 5. For details on the printer within 2 minutes. Press the OK button. 6.
d-C WPS d Connection Using WPS 1. The network connection setup is now complete. Press and hold the WPS button on the printer flashes while searching for about 5 seconds). When the left screen appears, press the OK button. Select Push button method. 4. Press the OK button on pressing the WPS button, refer to the access point. 8. The (blue) Wi-Fi lamp on the access point (for or connecting to the access point manual. 7. Select WPS. 2. Press the OK button. 3. Press the OK button. 5. For details on the printer within 2 minutes. Press the OK button. 6.
Guide for Printer Setup for Network
Page 13
...the OK button. Select the MAC address of the access point, refer to check the MAC address of the target access point on the displayed screen, then press the OK button. Select Directly enter the access point name in IEEE802.11n (2.4 GHz), IEEE802.11g or IEEE802.11b? Wireless connection.... Multiple access points with the same name exist. For details on how to the manual supplied with the same name are possible? • Is the access point operating in the Select access point screen. If "WPA/WPA2 Enterprise" is not supported on this printer. "WPA/WPA2 Enterprise" is ...
...the OK button. Select the MAC address of the access point, refer to check the MAC address of the target access point on the displayed screen, then press the OK button. Select Directly enter the access point name in IEEE802.11n (2.4 GHz), IEEE802.11g or IEEE802.11b? Wireless connection.... Multiple access points with the same name exist. For details on how to the manual supplied with the same name are possible? • Is the access point operating in the Select access point screen. If "WPA/WPA2 Enterprise" is not supported on this printer. "WPA/WPA2 Enterprise" is ...
Guide for Printer Setup for Network
Page 17
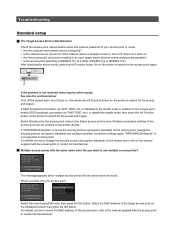
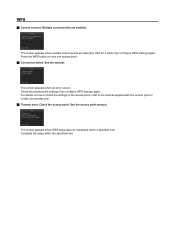
...for a while, then configure WPS settings again. The screen appears when multiple access points are enabled. Press the WPS button on how to check the settings of the access point, refer to the manual supplied with the access point or contact its manufacturer. ...Timeout error. See the manual. For details on only one access point. Connection failed. Check the access point. See the access point manual. The screen appears when an error occurs. Complete the setup within a specified time. ...
...for a while, then configure WPS settings again. The screen appears when multiple access points are enabled. Press the WPS button on how to check the settings of the access point, refer to the manual supplied with the access point or contact its manufacturer. ...Timeout error. See the manual. For details on only one access point. Connection failed. Check the access point. See the access point manual. The screen appears when an error occurs. Complete the setup within a specified time. ...
Guide for Printer Setup for Network
Page 18
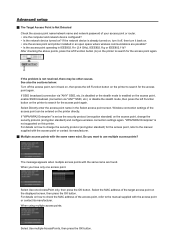
...again. Select the MAC address of the target access point on . • Are the access point and printer installed in the Select access point screen. Select Use multiple AccessPoints, then press the OK button. Do you have only one AccessPoint only, then press the OK button. Wireless connection ...computer and network device configured? • Is the network device turned on the printer directly. For details on the printer to the manual supplied with the same name are possible? • Is the access point operating in IEEE802.11n (2.4 GHz), IEEE802.11g or IEEE802.11b? If...
...again. Select the MAC address of the target access point on . • Are the access point and printer installed in the Select access point screen. Select Use multiple AccessPoints, then press the OK button. Do you have only one AccessPoint only, then press the OK button. Wireless connection ...computer and network device configured? • Is the network device turned on the printer directly. For details on the printer to the manual supplied with the same name are possible? • Is the access point operating in IEEE802.11n (2.4 GHz), IEEE802.11g or IEEE802.11b? If...
Guide for Printer Setup for Network
Page 20
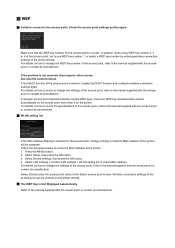
... LAN settings > Confirm LAN settings > WLAN setting list to the manual supplied with the access point or contact its manufacturer. Select Directly enter the access point name in the Select access point screen. Select Setup, then press the OK button. 3. Check the access point settings... and try again. See also the sections below to the manual supplied with the access point or contact its manufacturer.
... LAN settings > Confirm LAN settings > WLAN setting list to the manual supplied with the access point or contact its manufacturer. Select Directly enter the access point name in the Select access point screen. Select Setup, then press the OK button. 3. Check the access point settings... and try again. See also the sections below to the manual supplied with the access point or contact its manufacturer.
Guide for Printer Setup for Network
Page 21
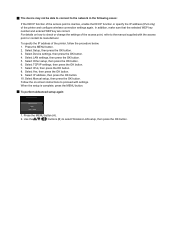
..., make sure that the selected WEP key number and entered WEP key are correct. Select TCP/IP settings, then press the OK button. 7. Select Manual setup, then press the OK button. When the setup is inactive, enable the DHCP function or specify the IP address (IPv4 only) of the printer... the OK button. 4. Select IPv4, then press the OK button. 8. For details on -screen instructions to select Wireless LAN setup, then press the OK button. The device may not be able to connect to the manual supplied with settings. To specify the IP address of the printer and confi...
..., make sure that the selected WEP key number and entered WEP key are correct. Select TCP/IP settings, then press the OK button. 7. Select Manual setup, then press the OK button. When the setup is inactive, enable the DHCP function or specify the IP address (IPv4 only) of the printer... the OK button. 4. Select IPv4, then press the OK button. 8. For details on -screen instructions to select Wireless LAN setup, then press the OK button. The device may not be able to connect to the manual supplied with settings. To specify the IP address of the printer and confi...

Setting Up the FAX
Page 1
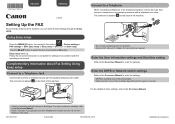
... cable. Easy setup starts up. Connect to enter the settings. Enter the User information settings and Date/time setting Refer to the On-screen Manual to a Telephone When connecting a telephone or an answering machine, remove the Cap, then connect a telephone or an answering machine with the... operating environment. QT5-4954-V01 XXXXXXXX ©CANON INC.2012 PRINTED IN XXXXXXXX The connector is shown in this figure. Follow the on the back of > Device settings > FAX settings >...
... cable. Easy setup starts up. Connect to enter the settings. Enter the User information settings and Date/time setting Refer to the On-screen Manual to a Telephone When connecting a telephone or an answering machine, remove the Cap, then connect a telephone or an answering machine with the... operating environment. QT5-4954-V01 XXXXXXXX ©CANON INC.2012 PRINTED IN XXXXXXXX The connector is shown in this figure. Follow the on the back of > Device settings > FAX settings >...
Configuraci?n del FAX [Spanish Version]
Page 1
...supplied telephone line cable. Easy setup starts up. Follow the on the back of the machine. QT5-4954-V01 XXXXXXXX ©CANON INC.2012 PRINTED IN XXXXXXXX Connect to the On-screen Manual. • A basic connection method is shown in this figure. Enter the DRPD or Network switch settings Refer to the On...-screen Manual to complete the settings in accordance with the operating environment. Use the []{} button to enter the settings. The connector is labeled on the region ...
...supplied telephone line cable. Easy setup starts up. Follow the on the back of the machine. QT5-4954-V01 XXXXXXXX ©CANON INC.2012 PRINTED IN XXXXXXXX Connect to the On-screen Manual. • A basic connection method is shown in this figure. Enter the DRPD or Network switch settings Refer to the On...-screen Manual to complete the settings in accordance with the operating environment. Use the []{} button to enter the settings. The connector is labeled on the region ...


