
Setup Guide
Page 5
For details on the printer within 2 minutes. Press the OK button on pressing the WPS button, refer to the access point. 3. d-A Push Button Method d Connection Using WPS 1. Press and hold the WPS button on the printer flashes while searching for or connecting to the access point manual. 2. When the left screen appears, press the OK button. 4. Press the COPY button (A). The (blue) Wi-Fi lamp on the access point. The network connection setup is now complete.
For details on the printer within 2 minutes. Press the OK button on pressing the WPS button, refer to the access point. 3. d-A Push Button Method d Connection Using WPS 1. Press and hold the WPS button on the printer flashes while searching for or connecting to the access point manual. 2. When the left screen appears, press the OK button. 4. Press the COPY button (A). The (blue) Wi-Fi lamp on the access point. The network connection setup is now complete.
Setup Guide
Page 6
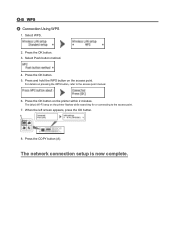
For details on the printer flashes while searching for or connecting to the access point manual. 6. When the left screen appears, press the OK button. 8. The network connection setup is now complete. Press the OK button. 5. d-B WPS d Connection Using WPS 1. The (blue) Wi-Fi lamp on pressing the WPS button, refer to the access point. 7. Select WPS. 2. Press and hold the WPS button on the printer within 2 minutes. Select Push button method. 4. Press the OK button. 3. Press the COPY button (A). Press the OK button on the access point.
For details on the printer flashes while searching for or connecting to the access point manual. 6. When the left screen appears, press the OK button. 8. The network connection setup is now complete. Press the OK button. 5. d-B WPS d Connection Using WPS 1. The (blue) Wi-Fi lamp on pressing the WPS button, refer to the access point. 7. Select WPS. 2. Press and hold the WPS button on the printer within 2 minutes. Select Push button method. 4. Press the OK button. 3. Press the COPY button (A). Press the OK button on the access point.

User Manual
Page 2
...the steps below to display the menus. 2. In addition, Canon may suspend or stop the disclosure of this guide are based on Online Manual Usage • Reproduction, diversion or copying of any text, photo or image published in the Online Manual (hereinafter referred to as a result of changes in or deletion...function of your Web browser to print this guide without prior notice to customers. See the manual supplied with utmost care, please contact the service center if you find any damage suffered by Canon. Select Page Setup... Press the Alt key to display the Page Setup dialog box, ...
...the steps below to display the menus. 2. In addition, Canon may suspend or stop the disclosure of this guide are based on Online Manual Usage • Reproduction, diversion or copying of any text, photo or image published in the Online Manual (hereinafter referred to as a result of changes in or deletion...function of your Web browser to print this guide without prior notice to customers. See the manual supplied with utmost care, please contact the service center if you find any damage suffered by Canon. Select Page Setup... Press the Alt key to display the Page Setup dialog box, ...


