
Getting Started
Page 3
..., remove all the orange tapes and the protective sheets. 12 3 4 5 6 7 8 □ Choosing a Location Color Black FINE cartridges power cord telephone line cable • Manuals • Setup CD-ROM (containing the drivers, applications and on-screen manuals) • Warranty • Do not install the machine where an object may fall into the...
..., remove all the orange tapes and the protective sheets. 12 3 4 5 6 7 8 □ Choosing a Location Color Black FINE cartridges power cord telephone line cable • Manuals • Setup CD-ROM (containing the drivers, applications and on-screen manuals) • Warranty • Do not install the machine where an object may fall into the...

Getting Started
Page 13
... Vista") and Mac OS X v.10.5.x. • Quit all running applications before installation. • You need to log on -screen instructions and do not remove the Setup CD-ROM during restarting. Follow the on as the administrator (or a member of the Administrators group). • Do not switch users during the installation process...
... Vista") and Mac OS X v.10.5.x. • Quit all running applications before installation. • You need to log on -screen instructions and do not remove the Setup CD-ROM during restarting. Follow the on as the administrator (or a member of the Administrators group). • Do not switch users during the installation process...
Getting Started
Page 14
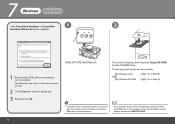
... Step . Windows Vista Go to quit the dialog box. 3 Proceed from . 12 TURN OFF THE MACHINE (A). The setup program should start automatically, double-click the CD-ROM icon on the computer, then insert the Setup CD-ROM into the CD-ROM drive. The dialog box may close. When the CD-ROM contents...
... Step . Windows Vista Go to quit the dialog box. 3 Proceed from . 12 TURN OFF THE MACHINE (A). The setup program should start automatically, double-click the CD-ROM icon on the computer, then insert the Setup CD-ROM into the CD-ROM drive. The dialog box may close. When the CD-ROM contents...

Getting Started
Page 20
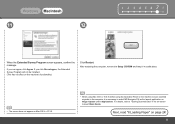
7 Windows Macintosh 14 15 When the Extended Survey Program screen appears, confirm the message. If you click Do not agree, the Extended Survey Program will not be installed. (This has no effect on page 24! 18 If Restart is displayed, make sure that the Restart the system now (recommended) check box is selected, then click Restart. Next, read "8 Loading Paper" on the machine's functionality.) Click Exit. After restarting the computer, remove the Setup CD-ROM and keep it in a safe place. If you can agree, click Agree.
7 Windows Macintosh 14 15 When the Extended Survey Program screen appears, confirm the message. If you click Do not agree, the Extended Survey Program will not be installed. (This has no effect on page 24! 18 If Restart is displayed, make sure that the Restart the system now (recommended) check box is selected, then click Restart. Next, read "8 Loading Paper" on the machine's functionality.) Click Exit. After restarting the computer, remove the Setup CD-ROM and keep it in a safe place. If you can agree, click Agree.
Getting Started
Page 21
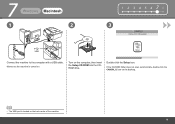
If the CD-ROM folder does not open automatically, double-click the CANON_IJ icon on the desktop. • The USB port is turned on the back center of the machine. 19 Make sure the machine is located on . 7 Windows Macintosh 1 2 1 2 3 4 5 678 3 Connect the machine to the computer with a USB cable. Turn on the computer, then insert the Setup CD-ROM into the CDROM drive. Double-click the Setup icon.
If the CD-ROM folder does not open automatically, double-click the CANON_IJ icon on the desktop. • The USB port is turned on the back center of the machine. 19 Make sure the machine is located on . 7 Windows Macintosh 1 2 1 2 3 4 5 678 3 Connect the machine to the computer with a USB cable. Turn on the computer, then insert the Setup CD-ROM into the CDROM drive. Double-click the Setup icon.
Getting Started
Page 25
After restarting the computer, remove the Setup CD-ROM and keep it is necessary to the computer, it in the on Image Capture under Applications. For details, refer to "Saving Scanned Data" ...
After restarting the computer, remove the Setup CD-ROM and keep it is necessary to the computer, it in the on Image Capture under Applications. For details, refer to "Saving Scanned Data" ...
On-Screen Manual
Page 47
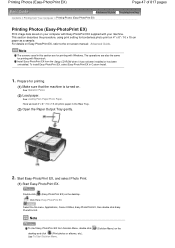
...> Printing Photos (Easy-PhotoPrint EX) Printing Photos (Easy-PhotoPrint EX) Print image data saved on the Install Easy-PhotoPrint EX from the Setup CD-ROM when it has not been installed or has been uninstalled. Prepare for printing with your computer with Easy-PhotoPrint EX supplied with ...select Photo Print. (1) Start Easy-PhotoPrint EX. See Operation Panel. (2) Load paper. Click Here: Easy-PhotoPrint EX Select the Go menu, Applications, Canon Utilities, Easy-PhotoPrint EX, then double-click EasyPhotoPrint EX. See To Start Solution Menu. (Solution Menu) on your machine.
...> Printing Photos (Easy-PhotoPrint EX) Printing Photos (Easy-PhotoPrint EX) Print image data saved on the Install Easy-PhotoPrint EX from the Setup CD-ROM when it has not been installed or has been uninstalled. Prepare for printing with your computer with Easy-PhotoPrint EX supplied with ...select Photo Print. (1) Start Easy-PhotoPrint EX. See Operation Panel. (2) Load paper. Click Here: Easy-PhotoPrint EX Select the Go menu, Applications, Canon Utilities, Easy-PhotoPrint EX, then double-click EasyPhotoPrint EX. See To Start Solution Menu. (Solution Menu) on your machine.

On-Screen Manual
Page 51
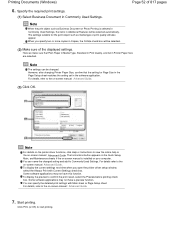
Load paper. Open the printer driver setup window. (1) Select Print on -screen manual: Advanced Guide. For details, refer to a computer, you can send faxes using an appropriate software application. 5. See Operation Panel. 2. ...
Load paper. Open the printer driver setup window. (1) Select Print on -screen manual: Advanced Guide. For details, refer to a computer, you can send faxes using an appropriate software application. 5. See Operation Panel. 2. ...
On-Screen Manual
Page 52
... check box. Some software applications may not have this function. Start printing. The settings suitable for Page Size in the Page Setup sheet matches the setting set in Additional Features will be selected automatically. Note When the print object such as media type or...screen manual: Advanced Guide. (3) Click OK. Some software applications may not have a preview function. The Instructions button appears on the Quick Setup, Main, and Maintenance sheets if the on-screen manual is selected in Commonly Used Settings, the items in the software application. When you...
... check box. Some software applications may not have this function. Start printing. The settings suitable for Page Size in the Page Setup sheet matches the setting set in Additional Features will be selected automatically. Note When the print object such as media type or...screen manual: Advanced Guide. (3) Click OK. Some software applications may not have a preview function. The Instructions button appears on the Quick Setup, Main, and Maintenance sheets if the on-screen manual is selected in Commonly Used Settings, the items in the software application. When you...

On-Screen Manual
Page 56
... name is selected in Printer. (3) Select Quality & Media in Media Type. See Loading Plain Paper/Photo Paper. Specify the page size. (1) Select Page Setup on . Here we select Plain Paper. Open the Paper Output Tray gently. 4. Note If you select the wrong media type, the machine may not print...File menu in Paper Size. Page 56 of the loaded paper to print using an appropriate software application. 5. Here we select Standard. The Page Setup dialog box will appear. (2) Make sure that A4 plain paper is loaded in your machine's name is selected in Format for printing with the...
... name is selected in Printer. (3) Select Quality & Media in Media Type. See Loading Plain Paper/Photo Paper. Specify the page size. (1) Select Page Setup on . Here we select Plain Paper. Open the Paper Output Tray gently. 4. Note If you select the wrong media type, the machine may not print...File menu in Paper Size. Page 56 of the loaded paper to print using an appropriate software application. 5. Here we select Standard. The Page Setup dialog box will appear. (2) Make sure that A4 plain paper is loaded in your machine's name is selected in Format for printing with the...
On-Screen Manual
Page 82
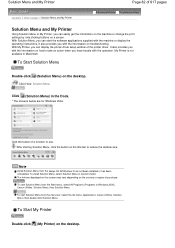
... Solution Menu Double-click (Solution Menu) on the desktop. Click the button of purchase. To install Solution Menu, select Solution Menu in Windows 2000), Canon Utilities, Solution Menu, then Solution Menu. To Start My Printer Double-click (My Printer) on the desktop. With My Printer, you can easily get...on the machine or change the print settings by only clicking buttons on how to reduce the window size. To start Solution Menu from the Setup CD-ROM when it has not been installed or has been uninstalled. It also provides you with the information on a screen. Note Install ...
... Solution Menu Double-click (Solution Menu) on the desktop. Click the button of purchase. To install Solution Menu, select Solution Menu in Windows 2000), Canon Utilities, Solution Menu, then Solution Menu. To Start My Printer Double-click (My Printer) on the desktop. With My Printer, you can easily get...on the machine or change the print settings by only clicking buttons on how to reduce the window size. To start Solution Menu from the Setup CD-ROM when it has not been installed or has been uninstalled. It also provides you with the information on a screen. Note Install ...
On-Screen Manual
Page 83
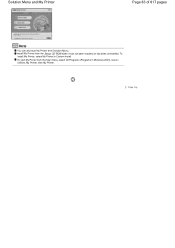
Solution Menu and My Printer Page 83 of 817 pages Note You can also start My Printer from the Start menu, select All Programs (Programs in Custom Install. Install My Printer from Solution Menu. To start My Printer from the Setup CD-ROM when it has not been installed or has been uninstalled. To install My Printer, select My Printer in Windows 2000), Canon Utilities, My Printer, then My Printer. Page top
Solution Menu and My Printer Page 83 of 817 pages Note You can also start My Printer from the Start menu, select All Programs (Programs in Custom Install. Install My Printer from Solution Menu. To start My Printer from the Setup CD-ROM when it has not been installed or has been uninstalled. To install My Printer, select My Printer in Windows 2000), Canon Utilities, My Printer, then My Printer. Page top
On-Screen Manual
Page 92
...time. *6 When printing photos onto stickers from the Paper Output Tray before continuously printing to the instruction manual supplied with a Model Number is Canon genuine paper. In this case, load one sheet at a time to less than half (100% recycled paper can use the following range.... / 101.6 x 180.6 mm) Non-standard sizes: You can specify the print setting easily by using the Easy-Photo Print EX provided with the Setup CD-ROM. *7 When copying onto sticker paper, be specified. Purchase paper by Model Number. See Using Various Copy Functions . Standard sizes: Letter (8.50...
...time. *6 When printing photos onto stickers from the Paper Output Tray before continuously printing to the instruction manual supplied with a Model Number is Canon genuine paper. In this case, load one sheet at a time to less than half (100% recycled paper can use the following range.... / 101.6 x 180.6 mm) Non-standard sizes: You can specify the print setting easily by using the Easy-Photo Print EX provided with the Setup CD-ROM. *7 When copying onto sticker paper, be specified. Purchase paper by Model Number. See Using Various Copy Functions . Standard sizes: Letter (8.50...

On-Screen Manual
Page 120
Tip!: Never press the ON button! Note If you cannot cancel printing by pressing the Stop button while printing from a computer, open the printer driver setup window to delete the unnecessary print jobs from nozzles) so that the ON button is to prevent the Print Head from the machine. If you ...
Tip!: Never press the ON button! Note If you cannot cancel printing by pressing the Stop button while printing from a computer, open the printer driver setup window to delete the unnecessary print jobs from nozzles) so that the ON button is to prevent the Print Head from the machine. If you ...
On-Screen Manual
Page 123
...Background Adding Photos Swapping Positions of Photos Replacing Photos Changing Position, Angle and Size of the Displayed Image Does the Printing Start from? MX320 series Advanced Guide Page 123 of 817 pages Adjusting Images Correct/Enhance Images Window Questions and Answers How Can I Print with Easy... Setup Setting a Page Size and Orientation Setting the Number of Copies and Printing Order Setting the Stapling Margin Borderless Printing Fit-to-Page ...
...Background Adding Photos Swapping Positions of Photos Replacing Photos Changing Position, Angle and Size of the Displayed Image Does the Printing Start from? MX320 series Advanced Guide Page 123 of 817 pages Adjusting Images Correct/Enhance Images Window Questions and Answers How Can I Print with Easy... Setup Setting a Page Size and Orientation Setting the Number of Copies and Printing Order Setting the Stapling Margin Borderless Printing Fit-to-Page ...
On-Screen Manual
Page 124
MX320 series Advanced Guide Page 124 of 817 pages Saving Image Data to be Used as a Background Printing an Envelope Displaying the Print Results before Printing ... Changing Color Properties to Improve Coloration Reducing Photo Noise Overview of the Printer Driver Printer Driver Operations Canon IJ Printer Driver How to Open the Printer Driver Setup Window Maintenance Tab Canon IJ Status Monitor The Canon IJ Preview Printing Using the Operation Panel of the Machine Printing Lined Paper or Graph Paper Printing...
MX320 series Advanced Guide Page 124 of 817 pages Saving Image Data to be Used as a Background Printing an Envelope Displaying the Print Results before Printing ... Changing Color Properties to Improve Coloration Reducing Photo Noise Overview of the Printer Driver Printer Driver Operations Canon IJ Printer Driver How to Open the Printer Driver Setup Window Maintenance Tab Canon IJ Status Monitor The Canon IJ Preview Printing Using the Operation Panel of the Machine Printing Lined Paper or Graph Paper Printing...
On-Screen Manual
Page 155
... Layout.... The Change Layout dialog box appears. To display the Page Number Settings dialog box, select the Page number checkbox and click Settings.... The Page Setup screen appears. 2. Set the following items in the Cover Options dialog box. To display the Cover Options dialog box, select Front or Front & Back for...
... Layout.... The Change Layout dialog box appears. To display the Page Number Settings dialog box, select the Page number checkbox and click Settings.... The Page Setup screen appears. 2. Set the following items in the Cover Options dialog box. To display the Cover Options dialog box, select Front or Front & Back for...

On-Screen Manual
Page 156
... may vary depending on the Paper Size, Orientation, Double page album, or the type of 817 pages which the picture was taken) on the Page Setup screen. To display the Date Settings dialog box, select the Print date checkbox in the Date Settings dialog box. Page top Note See Help for...
... may vary depending on the Paper Size, Orientation, Double page album, or the type of 817 pages which the picture was taken) on the Page Setup screen. To display the Date Settings dialog box, select the Print date checkbox in the Date Settings dialog box. Page top Note See Help for...
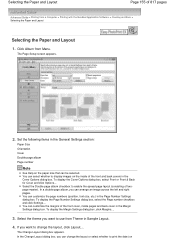
On-Screen Manual
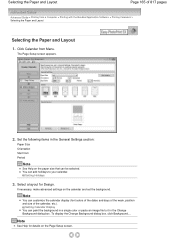
Page 165
Selecting the Paper and Layout Page 165 of the calendar, etc.). The Page Setup screen appears. 2. Setting Calendar Display You can customize the calendar display (font colors of the dates and days of the week, position and size of ... Design. Note You can paint the background in a single color or paste an image file to your calendar. Select a layout for details on the Page Setup screen. Set the following items in the Change Background dialog box. Setting Holidays 3. To display the Change Background dialog box, click Background.... If necessary, make...
Selecting the Paper and Layout Page 165 of the calendar, etc.). The Page Setup screen appears. 2. Setting Calendar Display You can customize the calendar display (font colors of the dates and days of the week, position and size of ... Design. Note You can paint the background in a single color or paste an image file to your calendar. Select a layout for details on the Page Setup screen. Set the following items in the Change Background dialog box. Setting Holidays 3. To display the Change Background dialog box, click Background.... If necessary, make...
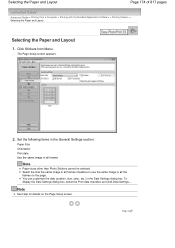
On-Screen Manual
Page 174
... Menu. Click Stickers from a Computer > Printing with the Bundled Application Software > Printing Stickers > Selecting the Paper and Layout Selecting the Paper and Layout 1. The Page Setup screen appears. 2. Page top Note See Help for details on the page. Set the following items in the General Settings section: Paper Size Orientation Print... the same image in the Date Settings dialog box. You can customize the date (position, size, color, etc.) in all the frames on the Page Setup screen.
... Menu. Click Stickers from a Computer > Printing with the Bundled Application Software > Printing Stickers > Selecting the Paper and Layout Selecting the Paper and Layout 1. The Page Setup screen appears. 2. Page top Note See Help for details on the page. Set the following items in the General Settings section: Paper Size Orientation Print... the same image in the Date Settings dialog box. You can customize the date (position, size, color, etc.) in all the frames on the Page Setup screen.


