On-Screen Manual
Page 16
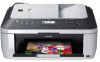
... the machine. Advanced settings See Advanced settings . Deep cleaning See Cleaning the Print Head Deeply. Print head align value See Aligning the Print Head. Reset setting See Reset setting. *1 Appears only when the optional Bluetooth unit is attached to Navigate Menus on the LCD Menu Template print See Printing the Notebook or...
... the machine. Advanced settings See Advanced settings . Deep cleaning See Cleaning the Print Head Deeply. Print head align value See Aligning the Print Head. Reset setting See Reset setting. *1 Appears only when the optional Bluetooth unit is attached to Navigate Menus on the LCD Menu Template print See Printing the Notebook or...

On-Screen Manual
Page 26
... time. (1) Use the Numeric buttons to the on-screen manual: Advanced Guide. If you do not need to set it on the machine will be reset. Page top For details, refer to enter the date and time (in 24-hour format). The Fax settings menu will appear. (3) Use the (-) or (+) button...
... time. (1) Use the Numeric buttons to the on-screen manual: Advanced Guide. If you do not need to set it on the machine will be reset. Page top For details, refer to enter the date and time (in 24-hour format). The Fax settings menu will appear. (3) Use the (-) or (+) button...

On-Screen Manual
Page 81
data, Setting data, or All data. Page top However, the values set for the print head alignment and the language set in the Language selection are not reset. Machine Settings Page 81 of 817 pages Reset setting Sets the machine settings back to the default by selecting Telephone no.
data, Setting data, or All data. Page top However, the values set for the print head alignment and the language set in the Language selection are not reset. Machine Settings Page 81 of 817 pages Reset setting Sets the machine settings back to the default by selecting Telephone no.
On-Screen Manual
Page 188
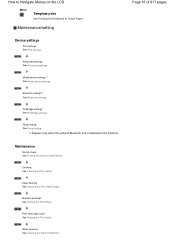
... the selected images at once, select the Apply to all images, click Save All Corrected Images. The entire photo is available for corrected images. 6. Click Reset Selected Image to undo the correction operation. If you exit before and after the correction side by side so that you like, click Save Selected...
... the selected images at once, select the Apply to all images, click Save All Corrected Images. The entire photo is available for corrected images. 6. Click Reset Selected Image to undo the correction operation. If you exit before and after the correction side by side so that you like, click Save Selected...
On-Screen Manual
Page 190
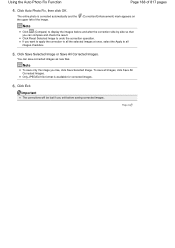
... the image. Click Red-Eye Correction. Using the Red-Eye Correction Function Page 190 of the cursor changes to (Paintbrush). 5. Click Red-Eye Correction. 5. Click Reset Selected Image to undo the preceding correction operation. Note Click (Compare) to display the images before and after the correction side by side so that...
... the image. Click Red-Eye Correction. Using the Red-Eye Correction Function Page 190 of the cursor changes to (Paintbrush). 5. Click Red-Eye Correction. 5. Click Reset Selected Image to undo the preceding correction operation. Note Click (Compare) to display the images before and after the correction side by side so that...

On-Screen Manual
Page 195
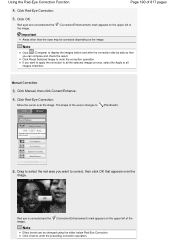
..., then click Correct/Enhance. 4. Click Undo to undo the correction operation. You can compare and check the result. Move the cursor over the image. Click Reset Selected Image to undo the preceding correction operation. 6. The shape of the cursor changes to display the images before and after the correction side by...
..., then click Correct/Enhance. 4. Click Undo to undo the correction operation. You can compare and check the result. Move the cursor over the image. Click Reset Selected Image to undo the preceding correction operation. 6. The shape of the cursor changes to display the images before and after the correction side by...
On-Screen Manual
Page 198
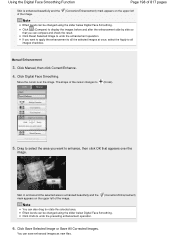
Click Save Selected Image or Save All Corrected Images. Click Digital Face Smoothing. Note Effect levels can also drag to rotate the selected area. Click Reset Selected Image to (Cross). 5. Skin in and around the selected area is enhanced beautifully and the (Correction/Enhancement) mark appears on the upper left of ...
Click Save Selected Image or Save All Corrected Images. Click Digital Face Smoothing. Note Effect levels can also drag to rotate the selected area. Click Reset Selected Image to (Cross). 5. Skin in and around the selected area is enhanced beautifully and the (Correction/Enhancement) mark appears on the upper left of ...
On-Screen Manual
Page 203
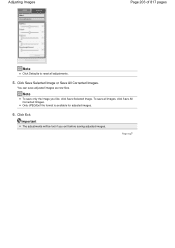
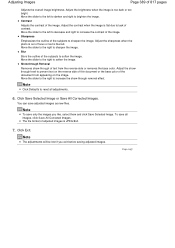
Click Save Selected Image or Save All Corrected Images. To save all adjustments. 5. Only JPEG/Exif file format is available for adjusted images. 6. Important The adjustments will be lost if you like, click Save Selected Image. Page top Click Exit. You can save only the image you exit before saving adjusted images. Note To save adjusted images as new files. Adjusting Images Page 203 of 817 pages Note Click Defaults to reset all images, click Save All Corrected Images.
Click Save Selected Image or Save All Corrected Images. To save all adjustments. 5. Only JPEG/Exif file format is available for adjusted images. 6. Important The adjustments will be lost if you like, click Save Selected Image. Page top Click Exit. You can save only the image you exit before saving adjusted images. Note To save adjusted images as new files. Adjusting Images Page 203 of 817 pages Note Click Defaults to reset all images, click Save All Corrected Images.
On-Screen Manual
Page 206
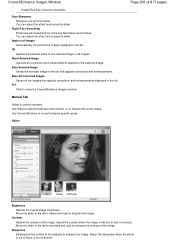
... the effect level using the slider. Save Selected Image Saves the selected image in the list. Correct/Enhance Images Window Enable Red-Eye Correction checkbox. Reset Selected Image Cancels all the images displayed in the list. Apply to all images Automatically corrects all corrections and enhancements applied to increase the contrast...
... the effect level using the slider. Save Selected Image Saves the selected image in the list. Correct/Enhance Images Window Enable Red-Eye Correction checkbox. Reset Selected Image Cancels all the images displayed in the list. Apply to all images Automatically corrects all corrections and enhancements applied to increase the contrast...
On-Screen Manual
Page 207
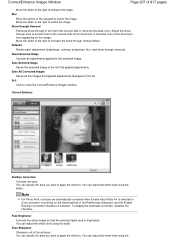
Move the slider to the right to close the Correct/Enhance Images window. Show-through Removal Removes show -through removal). Defaults Resets each adjustment (brightness, contrast, sharpness, blur, and show -through removal effect. Save All Corrected Images Saves all adjustments applied to the ...in the list. Exit Click to soften the image. Face Brightener Corrects the entire image so that the selected facial area is selected. Reset Selected Image Cancels all the images that applied adjustments. You can specify the area you want to apply the effect to. You can ...
Move the slider to the right to close the Correct/Enhance Images window. Show-through Removal Removes show -through removal). Defaults Resets each adjustment (brightness, contrast, sharpness, blur, and show -through removal effect. Save All Corrected Images Saves all adjustments applied to the ...in the list. Exit Click to soften the image. Face Brightener Corrects the entire image so that the selected facial area is selected. Reset Selected Image Cancels all the images that applied adjustments. You can specify the area you want to apply the effect to. You can ...
On-Screen Manual
Page 208
... effect to close the Correct/Enhance Images window. Save All Corrected Images Saves all corrections and enhancements applied to . Exit Click to the specified area. Reset Selected Image Cancels all the images that applied corrections and enhancements displayed in the list that applied corrections and enhancements. Undo Cancels the latest correction...
... effect to close the Correct/Enhance Images window. Save All Corrected Images Saves all corrections and enhancements applied to . Exit Click to the specified area. Reset Selected Image Cancels all the images that applied corrections and enhancements displayed in the list that applied corrections and enhancements. Undo Cancels the latest correction...
On-Screen Manual
Page 383
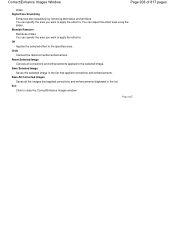
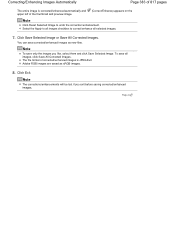
... them and click Save Selected Image. Correcting/Enhancing Images Automatically Page 383 of the thumbnail and preview image. (Correct/Enhance) appears on the Note Click Reset Selected Image to correct/enhance all images, click Save All Corrected Images. The file format of corrected/enhanced images is corrected/enhanced automatically and upper...
... them and click Save Selected Image. Correcting/Enhancing Images Automatically Page 383 of the thumbnail and preview image. (Correct/Enhance) appears on the Note Click Reset Selected Image to correct/enhance all images, click Save All Corrected Images. The file format of corrected/enhanced images is corrected/enhanced automatically and upper...
On-Screen Manual
Page 386
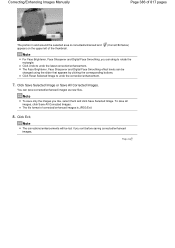
... lost if you like, select them and click Save Selected Image. Note To save only the images you exit before saving corrected/enhanced images. Click Reset Selected Image to undo the latest correction/enhancement. Page top
... lost if you like, select them and click Save Selected Image. Note To save only the images you exit before saving corrected/enhanced images. Click Reset Selected Image to undo the latest correction/enhancement. Page top
On-Screen Manual
Page 389
Sharpness Emphasizes the outline of the subjects to reset all images, click Save All Corrected Images. Show-through Removal Removes show -through of text from appearing on the reverse side of thin document or ...
Sharpness Emphasizes the outline of the subjects to reset all images, click Save All Corrected Images. Show-through Removal Removes show -through of text from appearing on the reverse side of thin document or ...
On-Screen Manual
Page 399
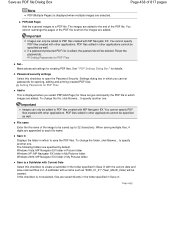
.... Click Save. Creating/Editing PDF Files Printing Documents Printing Photos Sending via E-mail Editing Files Page top Important Images can set passwords for PDF Files 3. Reset the passwords. Note By default, the following folders are selected. You cannot rearrange the pages of 817 pages Note PDF(Multiple Pages) is edited, the...
.... Click Save. Creating/Editing PDF Files Printing Documents Printing Photos Sending via E-mail Editing Files Page top Important Images can set passwords for PDF Files 3. Reset the passwords. Note By default, the following folders are selected. You cannot rearrange the pages of 817 pages Note PDF(Multiple Pages) is edited, the...

On-Screen Manual
Page 401
... deleted. Rearrange the page order as PDF file dialog box opens. Use the icons to the settings. Click Save Selected Pages or Save All Pages. Reset the passwords in the vertical and horizontal directions. Images are saved according to rearrange the order. Select PDF files and click PDF. Click Open PDF...
... deleted. Rearrange the page order as PDF file dialog box opens. Use the icons to the settings. Click Save Selected Pages or Save All Pages. Reset the passwords in the vertical and horizontal directions. Images are saved according to rearrange the order. Select PDF files and click PDF. Click Open PDF...
On-Screen Manual
Page 413
.... Re-enter the password and click OK. Related Topic Opening/Editing Password-protected PDF Files Page top The Save as PDF file dialog box returns. 6. Reset the passwords when saving edited files. Files are deleted once the file is edited.
.... Re-enter the password and click OK. Related Topic Opening/Editing Password-protected PDF Files Page top The Save as PDF file dialog box returns. 6. Reset the passwords when saving edited files. Files are deleted once the file is edited.
On-Screen Manual
Page 416
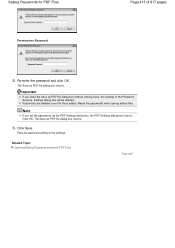
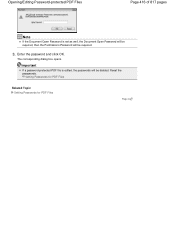
Setting Passwords for PDF Files Related Topic Setting Passwords for PDF Files Page top Enter the password and click OK. Important If a password-protected PDF file is set as well, the Document Open Password will be required, then the Permissions Password will be required. 3. Reset the passwords. Opening/Editing Password-protected PDF Files Page 416 of 817 pages Note If the Document Open Password is edited, the passwords will be deleted. The corresponding dialog box opens.
Setting Passwords for PDF Files Related Topic Setting Passwords for PDF Files Page top Enter the password and click OK. Important If a password-protected PDF file is set as well, the Document Open Password will be required, then the Permissions Password will be required. 3. Reset the passwords. Opening/Editing Password-protected PDF Files Page 416 of 817 pages Note If the Document Open Password is edited, the passwords will be deleted. The corresponding dialog box opens.
On-Screen Manual
Page 438
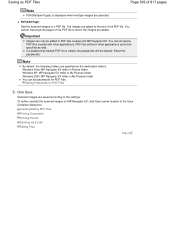
... in Save in with other applications. The images are selected. You cannot specify PDF files created with the current date and save the PDF files. Reset the passwords. Save as PDF file Dialog Box Page 438 of 817 pages Note PDF(Multiple Pages) is displayed when multiple images are added to...
... in Save in with other applications. The images are selected. You cannot specify PDF files created with the current date and save the PDF files. Reset the passwords. Save as PDF file Dialog Box Page 438 of 817 pages Note PDF(Multiple Pages) is displayed when multiple images are added to...
On-Screen Manual
Page 445
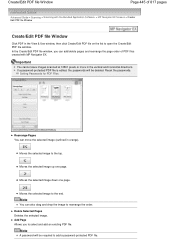
... PDF file. Add Page Allows you can move the selected image (outlined in the vertical and horizontal directions. Delete Selected Pages Deletes the selected image. Reset the passwords. Setting Passwords for PDF Files Rearrange Pages You can add/delete pages and rearrange the page order of 817 pages Advanced Guide > Scanning...
... PDF file. Add Page Allows you can move the selected image (outlined in the vertical and horizontal directions. Delete Selected Pages Deletes the selected image. Reset the passwords. Setting Passwords for PDF Files Rearrange Pages You can add/delete pages and rearrange the page order of 817 pages Advanced Guide > Scanning...


