
MP640 series Getting Started
Page 1
Please keep it in hand for future reference. Photo All-In-One series Getting Started Read Me First Make sure to read this manual before using the machine.
Please keep it in hand for future reference. Photo All-In-One series Getting Started Read Me First Make sure to read this manual before using the machine.
MP640 series Getting Started
Page 3
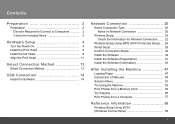
... 32 Install the Software 34 Install the Software (Registration 41 Install the Software (Information 45 After Installing the Machine 47 Loading Paper 47 Introduction of Manuals 50 Solution Menu 51 Try Using the Machine 52 Print Photos from a Memory Card 53 Try Copying 56 Print Photos from a Computer 57 Reference Information...
... 32 Install the Software 34 Install the Software (Registration 41 Install the Software (Information 45 After Installing the Machine 47 Loading Paper 47 Introduction of Manuals 50 Solution Menu 51 Try Using the Machine 52 Print Photos from a Memory Card 53 Try Copying 56 Print Photos from a Computer 57 Reference Information...
MP640 series Getting Started
Page 5
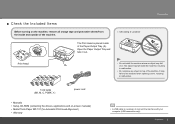
... a Location The Print Head is placed inside the machine, resulting in malfunction. 5 ink tanks (BK, M, C, PGBK, Y) power cord • Manuals • Setup CD-ROM (containing the drivers, applications and on-screen manuals) • Matte Photo Paper MP-101 (for Automatic Print Head Alignment) • Warranty • A USB cable is necessary to connect...
... a Location The Print Head is placed inside the machine, resulting in malfunction. 5 ink tanks (BK, M, C, PGBK, Y) power cord • Manuals • Setup CD-ROM (containing the drivers, applications and on-screen manuals) • Matte Photo Paper MP-101 (for Automatic Print Head Alignment) • Warranty • A USB cable is necessary to connect...
MP640 series Getting Started
Page 13
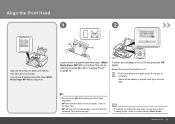
... step. • Be sure to complete. Load it in the Rear Tray. • MP-101 has front and back sides. C Confirm the message on -screen manual: Basic Guide. This takes about 5 minutes to use , refer to in the on the LCD and press the OK button. Extend the Output Tray Extension...
... step. • Be sure to complete. Load it in the Rear Tray. • MP-101 has front and back sides. C Confirm the message on -screen manual: Basic Guide. This takes about 5 minutes to use , refer to in the on the LCD and press the OK button. Extend the Output Tray Extension...

MP640 series Getting Started
Page 14
.... 2 Load paper along the right edge of the Cassette. 3 Slide the Paper Guide against the left edge of the paper. E Confirm the message on -screen manual: Basic Guide. • The pattern is printed in the illustration is now complete. • For details, refer to "Loading Paper" on the LCD. Print Head...
.... 2 Load paper along the right edge of the Cassette. 3 Slide the Paper Guide against the left edge of the paper. E Confirm the message on -screen manual: Basic Guide. • The pattern is printed in the illustration is now complete. • For details, refer to "Loading Paper" on the LCD. Print Head...

MP640 series Getting Started
Page 19
Click Install. • If you can use the Web print software Easy-WebPrint EX. An internet connection is required for installation. (It is also possible to install, click Custom Install. The drivers, application software, and on-screen manuals are using Internet Explorer 7 or later, you want to select particular items to install this software later.) USB Connection 17 For Windows Vista/XP • If you are installed all together. Install the Software 4 5 Click Easy Install.
Click Install. • If you can use the Web print software Easy-WebPrint EX. An internet connection is required for installation. (It is also possible to install, click Custom Install. The drivers, application software, and on-screen manuals are using Internet Explorer 7 or later, you want to select particular items to install this software later.) USB Connection 17 For Windows Vista/XP • If you are installed all together. Install the Software 4 5 Click Easy Install.
MP640 series Getting Started
Page 22
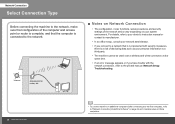
... or router, etc. 20 Network Connection • To use the machine on additional computers (after connecting it to the first computer), refer to the printed manual: Network Setup Troubleshooting. For details, refer to your device's instruction manual or contact its manufacturer. • In an office setup, consult your system environment.
... or router, etc. 20 Network Connection • To use the machine on additional computers (after connecting it to the first computer), refer to the printed manual: Network Setup Troubleshooting. For details, refer to your device's instruction manual or contact its manufacturer. • In an office setup, consult your system environment.
MP640 series Getting Started
Page 24
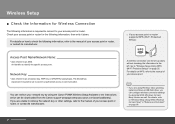
... wireless connection can be set to prevent unauthorized access to your network key by using the Canon PIXMA Wireless Setup Assistant or the instructions which can be downloaded from the Canon support webpage (www.usa.canon.com/downloadlibrary). For details on page 58. 22 Network Connection For details on page 26....retrieve your access point or router. Check your access point or router for Wireless Connection The following information, refer to the manual of your access point or router supports WPS (Wi-Fi Protected Setup): Access Point Name/Network Name: * Also referred to the...
... wireless connection can be set to prevent unauthorized access to your network key by using the Canon PIXMA Wireless Setup Assistant or the instructions which can be downloaded from the Canon support webpage (www.usa.canon.com/downloadlibrary). For details on page 58. 22 Network Connection For details on page 26....retrieve your access point or router. Check your access point or router for Wireless Connection The following information, refer to the manual of your access point or router supports WPS (Wi-Fi Protected Setup): Access Point Name/Network Name: * Also referred to the...

MP640 series Getting Started
Page 27
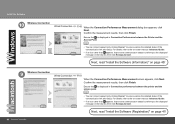
When the completion screen appears, press the OK button, then press the HOME button (C). Next, read "Confirm Connection Status" on page 32! Network Connection 25 If a connection still cannot be established, refer to the access point. appears, press the OK button, make sure that the network key is correct, then enter it again. Wireless Setup 7 8 C Make sure that the network key is correct, then press the OK button. The standby screen returns. • If Failed to connect to the printed manual: Network Setup Troubleshooting.
When the completion screen appears, press the OK button, then press the HOME button (C). Next, read "Confirm Connection Status" on page 32! Network Connection 25 If a connection still cannot be established, refer to the access point. appears, press the OK button, make sure that the network key is correct, then enter it again. Wireless Setup 7 8 C Make sure that the network key is correct, then press the OK button. The standby screen returns. • If Failed to connect to the printed manual: Network Setup Troubleshooting.
MP640 series Getting Started
Page 29
... appears. Press the OK button to return to operate the machine and access point. Network Connection 27 Follow the on the screen to the printed manual: Network Setup Troubleshooting. If the timeout error screen appears, press the OK button, then perform the setup again and set the new PIN code displayed...
... appears. Press the OK button to return to operate the machine and access point. Network Connection 27 Follow the on the screen to the printed manual: Network Setup Troubleshooting. If the timeout error screen appears, press the OK button, then perform the setup again and set the new PIN code displayed...
MP640 series Getting Started
Page 30
For details on the WPS button pressing, refer to the printed manual: Network Setup Troubleshooting. 28 Network Connection The Wi-Fi lamp (blue) flashes while searching for about 5 seconds), then press the OK button on the machine ... point. Next, read "Confirm Connection Status" on page 32! • If the timeout error screen appeared repeatedly, or if another error appeared, refer to the manual of your access point. The standby screen returns. When the completion screen appears, press the OK button, then press the HOME button (C).
For details on the WPS button pressing, refer to the printed manual: Network Setup Troubleshooting. 28 Network Connection The Wi-Fi lamp (blue) flashes while searching for about 5 seconds), then press the OK button on the machine ... point. Next, read "Confirm Connection Status" on page 32! • If the timeout error screen appeared repeatedly, or if another error appeared, refer to the manual of your access point. The standby screen returns. When the completion screen appears, press the OK button, then press the HOME button (C).

MP640 series Getting Started
Page 38
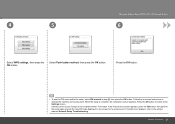
Install the Software 3 4 Click Easy Install. The drivers, application software, and on-screen manuals are using Internet Explorer 7 or later, you can use the Web print software Easy-WebPrint EX. An internet connection is required for installation. (It is also possible to install, click Custom Install. 36 Network Connection For Windows Vista/XP • If you are installed all together. Click Install. • If you want to select particular items to install this software later.)
Install the Software 3 4 Click Easy Install. The drivers, application software, and on-screen manuals are using Internet Explorer 7 or later, you can use the Web print software Easy-WebPrint EX. An internet connection is required for installation. (It is also possible to install, click Custom Install. 36 Network Connection For Windows Vista/XP • If you are installed all together. Click Install. • If you want to select particular items to install this software later.)
MP640 series Getting Started
Page 41
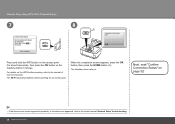
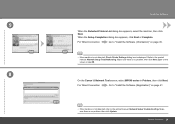
...Software (Information)" on the screen in step . 8 On the Canon IJ Network Tool screen, select MP640 series in Printers, then click Next. Make sure there is no problem, then click Update. Refer to the printed manual: Network Setup Troubleshooting. Install the Software 9 When the Detected Printers... click Next. When the Setup Completion dialog box appears, click Next or Complete. Make sure there is not detected, refer to the printed manual: Network Setup Troubleshooting. For Wired Connection Go to "Install the Software (Registration)" on page 41. • If the machine is no...
...Software (Information)" on the screen in step . 8 On the Canon IJ Network Tool screen, select MP640 series in Printers, then click Next. Make sure there is no problem, then click Update. Refer to the printed manual: Network Setup Troubleshooting. Install the Software 9 When the Detected Printers... click Next. When the Setup Completion dialog box appears, click Next or Complete. Make sure there is not detected, refer to the printed manual: Network Setup Troubleshooting. For Wired Connection Go to "Install the Software (Registration)" on page 41. • If the machine is no...
MP640 series Getting Started
Page 42
...between the Printer and the Access Point. • You can cancel measuring by clicking Cancel. For details, refer to the on -screen manual: Advanced Guide. • If an icon other than appears, improve the communication status by referring to the displayed message or the help file..., then click Remeasurement. For details, refer to the on -screen manual: Advanced Guide. • If an icon other than appears, improve the communication status by referring to the displayed message or the help file...
...between the Printer and the Access Point. • You can cancel measuring by clicking Cancel. For details, refer to the on -screen manual: Advanced Guide. • If an icon other than appears, improve the communication status by referring to the displayed message or the help file..., then click Remeasurement. For details, refer to the on -screen manual: Advanced Guide. • If an icon other than appears, improve the communication status by referring to the displayed message or the help file...

MP640 series Getting Started
Page 51
... for printing is now complete! Load paper in portrait orientation with the printing side facing up , then slant it back. Load paper in the onscreen manual: Basic Guide. 7 8 9 3 2 H 1 10 Loading Paper J Open the Paper Support (H) and pull it straight up . I Move the Paper Guides (I) to "Loading Paper" in the center of...
... for printing is now complete! Load paper in portrait orientation with the printing side facing up , then slant it back. Load paper in the onscreen manual: Basic Guide. 7 8 9 3 2 H 1 10 Loading Paper J Open the Paper Support (H) and pull it straight up . I Move the Paper Guides (I) to "Loading Paper" in the center of...

MP640 series Getting Started
Page 52
... Setup Troubleshooting Describes how to make full use your machine. For details on opening the on -screen manuals Basic Guide Describes basic operations and media, and gives an introduction to page 51. Troubleshooting Describes troubleshooting tips for problems you may encounter when using ...the machine. Advanced Guide Describes various operating procedures to set up and use of Manuals The following manuals are supplied with the machine. Introduces the machine and its functions, the included...
... Setup Troubleshooting Describes how to make full use your machine. For details on opening the on -screen manuals Basic Guide Describes basic operations and media, and gives an introduction to page 51. Troubleshooting Describes troubleshooting tips for problems you may encounter when using ...the machine. Advanced Guide Describes various operating procedures to set up and use of Manuals The following manuals are supplied with the machine. Introduces the machine and its functions, the included...
MP640 series Getting Started
Page 53
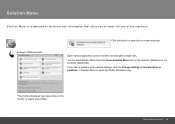
... My Printer (Windows only). *The buttons displayed vary depending on the country or region of the machine! Open various applications and on-screen manuals with machine settings, click the Change settings or find solutions to problems. in Solution Menu to open the on the Dock (Macintosh). You ...can start Solution Menu from the Canon Solution Menu icon on the desktop (Windows) or on -screen manuals. After Installing the Machine 51 Solution Menu Solution Menu is a gateway to functions and information that allow you have...
... My Printer (Windows only). *The buttons displayed vary depending on the country or region of the machine! Open various applications and on-screen manuals with machine settings, click the Change settings or find solutions to problems. in Solution Menu to open the on the Dock (Macintosh). You ...can start Solution Menu from the Canon Solution Menu icon on the desktop (Windows) or on -screen manuals. After Installing the Machine 51 Solution Menu Solution Menu is a gateway to functions and information that allow you have...

MP640 series Getting Started
Page 54
Alternatively, use the application software and the machine, refer to print your own items easily. For details on how to use the Operation Panel on the computer along with the drivers. Try Using the Machine Various application software are installed on the machine to the onscreen manuals: Basic Guide and Advanced Guide. 52 After Installing the Machine You can print creative items by correcting/ enhancing photos using the applications.
Alternatively, use the application software and the machine, refer to print your own items easily. For details on how to use the Operation Panel on the computer along with the drivers. Try Using the Machine Various application software are installed on the machine to the onscreen manuals: Basic Guide and Advanced Guide. 52 After Installing the Machine You can print creative items by correcting/ enhancing photos using the applications.
MP640 series Getting Started
Page 55
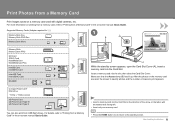
... a memory card into the Card Slot. For details, refer to "Printing from a Memory Card" in the on-screen manual: Basic Guide. • Insert a memory card into the Card Slot in the on-screen manual: Basic Guide. Supported Memory Cards (Adapter required for .) Memory Stick Duo Memory Stick PRO Duo Memory Stick Micro...
... a memory card into the Card Slot. For details, refer to "Printing from a Memory Card" in the on-screen manual: Basic Guide. • Insert a memory card into the Card Slot in the on-screen manual: Basic Guide. Supported Memory Cards (Adapter required for .) Memory Stick Duo Memory Stick PRO Duo Memory Stick Micro...
MP640 series Getting Started
Page 58
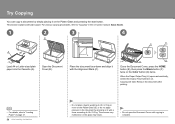
... press the Black button (F) twice or the Color button (G) twice. Copying will start button. D Place the document face-down and align it on ‑screen manual: Basic Guide. 1 2 3C 4 B E F A Load A4 or Letter-sized plain paper into the Cassette (A). I ). For various copying procedures, refer to the document by simply placing it...
... press the Black button (F) twice or the Color button (G) twice. Copying will start button. D Place the document face-down and align it on ‑screen manual: Basic Guide. 1 2 3C 4 B E F A Load A4 or Letter-sized plain paper into the Cassette (A). I ). For various copying procedures, refer to the document by simply placing it...


