
Quick Start Guide
Page 12
... computer. *3 Feeding this case, load paper one sheet at a time. *5 SG-201 only *6 You can damage the machine. Refer to the Printer Driver Guide on -screen manual. Purchase paper by Model Number. Note For a detailed description of the User's Guide on -screen manual. Load in the ... Page Size, Media Type, and Layout When Printing from your computer, refer to "Setting Items" in Wireless print settings. Refer to purchase some Canon genuine papers depending on -screen manual. Refer to "Printing on a Sticker (Sticker Print)" in "Using Other Useful Printing Functions" of the User...
... computer. *3 Feeding this case, load paper one sheet at a time. *5 SG-201 only *6 You can damage the machine. Refer to the Printer Driver Guide on -screen manual. Purchase paper by Model Number. Note For a detailed description of the User's Guide on -screen manual. Load in the ... Page Size, Media Type, and Layout When Printing from your computer, refer to "Setting Items" in Wireless print settings. Refer to purchase some Canon genuine papers depending on -screen manual. Refer to "Printing on a Sticker (Sticker Print)" in "Using Other Useful Printing Functions" of the User...
Quick Start Guide
Page 15
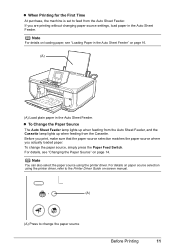
...the paper source, simply press the Paper Feed Switch. To change the paper source Before Printing 11 For details on paper source selection using the printer driver. Note For details on loading paper, see "Changing the Paper Source" on page 16. (A) (A) Load plain paper in the Auto Sheet... without changing paper source settings, load paper in the Auto Sheet Feeder. Note You can also select the paper source using the printer driver, refer to the Printer Driver Guide on-screen manual. (A) (A) Press to feed from the Cassette. z To Change the Paper Source The Auto Sheet Feeder ...
...the paper source, simply press the Paper Feed Switch. To change the paper source Before Printing 11 For details on paper source selection using the printer driver. Note For details on loading paper, see "Changing the Paper Source" on page 16. (A) (A) Load plain paper in the Auto Sheet... without changing paper source settings, load paper in the Auto Sheet Feeder. Note You can also select the paper source using the printer driver, refer to the Printer Driver Guide on-screen manual. (A) (A) Press to feed from the Cassette. z To Change the Paper Source The Auto Sheet Feeder ...
Quick Start Guide
Page 16
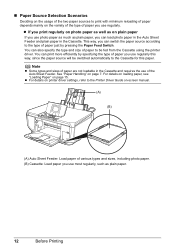
... by pressing the Paper Feed Switch. Note z Some types and sizes of paper are not loadable in the Cassette. z For details on printer driver settings, refer to the Printer Driver Guide on-screen manual. (A) (B) (A) Auto Sheet Feeder: Load paper of various types and sizes, including photo paper. (B) Cassette: Load...paper to be switched automatically to the Cassette for this way, since the paper source will be fed from the Cassette using the printer driver. „ Paper Source Selection Scenarios Deciding on the usage of the two paper sources to print with minimum reloading of paper depends...
... by pressing the Paper Feed Switch. Note z Some types and sizes of paper are not loadable in the Cassette. z For details on printer driver settings, refer to the Printer Driver Guide on-screen manual. (A) (B) (A) Auto Sheet Feeder: Load paper of various types and sizes, including photo paper. (B) Cassette: Load...paper to be switched automatically to the Cassette for this way, since the paper source will be fed from the Cassette using the printer driver. „ Paper Source Selection Scenarios Deciding on the usage of the two paper sources to print with minimum reloading of paper depends...
Quick Start Guide
Page 17
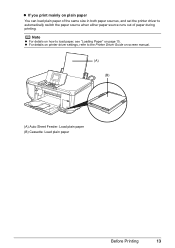
z For details on printer driver settings, refer to the Printer Driver Guide on page 15. Note z For details on how to automatically switch the paper source when either paper source runs out of paper during printing. z If you print mainly on plain paper You can load plain paper of the same size in both paper sources, and set the printer driver to load paper, see "Loading Paper" on -screen manual. (A) (B) (A) Auto Sheet Feeder: Load plain paper (B) Cassette: Load plain paper Before Printing 13
z For details on printer driver settings, refer to the Printer Driver Guide on page 15. Note z For details on how to automatically switch the paper source when either paper source runs out of paper during printing. z If you print mainly on plain paper You can load plain paper of the same size in both paper sources, and set the printer driver to load paper, see "Loading Paper" on -screen manual. (A) (B) (A) Auto Sheet Feeder: Load plain paper (B) Cassette: Load plain paper Before Printing 13
Quick Start Guide
Page 18
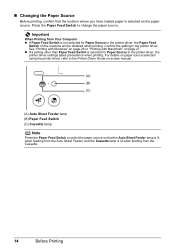
... on page 26 or "Printing with Macintosh" on the machine will be disabled when printing. For details on paper source selection using the printer driver, refer to the Printer Driver Guide on-screen manual. (A) (B) (C) (A) Auto Sheet Feeder lamp (B) Paper Feed Switch (C) Cassette lamp Note Press the Paper Feed ...feeding from the Cassette. 14 Before Printing z If a setting other than Paper Feed Switch is not selected for Paper Source in the printer driver. „ Changing the Paper Source Before printing, confirm that the Auto Sheet Feeder lamp is lit when feeding from the Auto Sheet Feeder...
... on page 26 or "Printing with Macintosh" on the machine will be disabled when printing. For details on paper source selection using the printer driver, refer to the Printer Driver Guide on-screen manual. (A) (B) (C) (A) Auto Sheet Feeder lamp (B) Paper Feed Switch (C) Cassette lamp Note Press the Paper Feed ...feeding from the Cassette. 14 Before Printing z If a setting other than Paper Feed Switch is not selected for Paper Source in the printer driver. „ Changing the Paper Source Before printing, confirm that the Auto Sheet Feeder lamp is lit when feeding from the Auto Sheet Feeder...

Quick Start Guide
Page 20
... the package and keep them in the opposite direction until the paper becomes completely flat. Note You can also select the paper source with the printer driver. Note z Align the edges of the Paper Output Tray and open it . Take out only the necessary number of the paper before loading it gently... Paper Output Tray. z Loading Paper in the Auto Sheet Feeder 1 Flatten the four corners of sheets from the package, just before printing. 2 Prepare to the Printer Driver Guide on page 76. z To avoid curling, handle paper as follows. -
... the package and keep them in the opposite direction until the paper becomes completely flat. Note You can also select the paper source with the printer driver. Note z Align the edges of the Paper Output Tray and open it . Take out only the necessary number of the paper before loading it gently... Paper Output Tray. z Loading Paper in the Auto Sheet Feeder 1 Flatten the four corners of sheets from the package, just before printing. 2 Prepare to the Printer Driver Guide on page 76. z To avoid curling, handle paper as follows. -

Quick Start Guide
Page 21
... or "Printing with the print side facing UP. (2) Align the paper stack against the left side of the loaded paper in Page Size in the printer driver. See "Paper Handling" on page 16. 2 Prepare to natural aging. This may get roller traces on settings in each menu. on page 7. 3 Load... restrictions in the Auto Sheet Feeder. (A) (3) (1) (2) (3) Pinch the Paper Guide and slide it against the Cover Guide on page 27. For details on printer driver settings, see "Changing the Paper and Print Settings" on page 21. Note Make sure that the Cover Guide is set upright when you intend to...
... or "Printing with the print side facing UP. (2) Align the paper stack against the left side of the loaded paper in Page Size in the printer driver. See "Paper Handling" on page 16. 2 Prepare to natural aging. This may get roller traces on settings in each menu. on page 7. 3 Load... restrictions in the Auto Sheet Feeder. (A) (3) (1) (2) (3) Pinch the Paper Guide and slide it against the Cover Guide on page 27. For details on printer driver settings, see "Changing the Paper and Print Settings" on page 21. Note Make sure that the Cover Guide is set upright when you intend to...
Quick Start Guide
Page 22
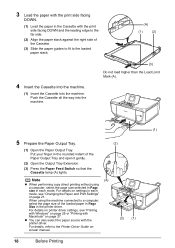
... so that the Cassette lamp (A) lights. For details on page 27. For details on printer driver settings, see "Changing the Paper and Print Settings" on page 26 or "Printing with the printer driver. Push the Cassette all the way into the machine. For details, refer to a computer...(A). (1) 5 Prepare the Paper Output Tray. (3) (1) Open the Paper Output Tray. screen manual. (2) (1) 18 Before Printing Put your finger in the printer driver. When using a computer, select the page size selected in Page size in each mode, see "Printing with Windows" on page 21. 3 Load the ...
... so that the Cassette lamp (A) lights. For details on page 27. For details on printer driver settings, see "Changing the Paper and Print Settings" on page 26 or "Printing with the printer driver. Push the Cassette all the way into the machine. For details, refer to a computer...(A). (1) 5 Prepare the Paper Output Tray. (3) (1) Open the Paper Output Tray. screen manual. (2) (1) 18 Before Printing Put your finger in the printer driver. When using a computer, select the page size selected in Page size in each mode, see "Printing with Windows" on page 21. 3 Load the ...
Quick Start Guide
Page 23
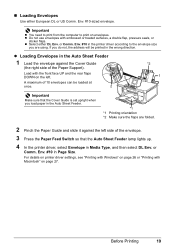
.... 2 Pinch the Paper Guide and slide it against the left . 3 A maximum of 10 envelopes can be printed in Page Size. For details on printer driver settings, see "Printing with Windows" on page 26 or "Printing with Macintosh" on envelopes. z Do not use envelopes with the front face UP and... you do not, the address will be loaded at once. 2 *2 1 Important Make sure that the Auto Sheet Feeder lamp lights up. 4 In the printer driver, select Envelope in Media Type, and then select DL Env. Env. #10 in the wrong direction. Before Printing 19 Env. #10-sized envelope. Load ...
.... 2 Pinch the Paper Guide and slide it against the left . 3 A maximum of 10 envelopes can be printed in Page Size. For details on printer driver settings, see "Printing with Windows" on page 26 or "Printing with Macintosh" on envelopes. z Do not use envelopes with the front face UP and... you do not, the address will be loaded at once. 2 *2 1 Important Make sure that the Auto Sheet Feeder lamp lights up. 4 In the printer driver, select Envelope in Media Type, and then select DL Env. Env. #10 in the wrong direction. Before Printing 19 Env. #10-sized envelope. Load ...
Quick Start Guide
Page 24
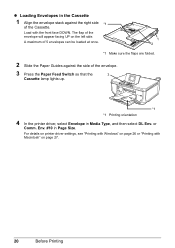
... the envelope stack against the side of the envelope. 3 Press the Paper Feed Switch so that the 3 Cassette lamp lights up. *1 *1 Printing orientation 4 In the printer driver, select Envelope in Page Size. or Comm. Env. #10 in Media Type, and then select DL Env. Load with Macintosh" on the left side. The... folded. 2 Slide the Paper Guides against the right side *1 of the envelope will appear facing UP on page 27. 20 Before Printing For details on printer driver settings, see "Printing with Windows" on page 26 or "Printing with the front face DOWN.
... the envelope stack against the side of the envelope. 3 Press the Paper Feed Switch so that the 3 Cassette lamp lights up. *1 *1 Printing orientation 4 In the printer driver, select Envelope in Page Size. or Comm. Env. #10 in Media Type, and then select DL Env. Load with Macintosh" on the left side. The... folded. 2 Slide the Paper Guides against the right side *1 of the envelope will appear facing UP on page 27. 20 Before Printing For details on printer driver settings, see "Printing with Windows" on page 26 or "Printing with the front face DOWN.
Quick Start Guide
Page 30
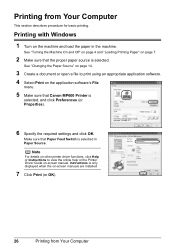
... 1 Turn on the application software's File menu. 5 Make sure that Canon MP600 Printer is selected in the machine. See "Turning the Machine On and Off" on page 4 and "Loading Printing Paper" on -screen manual. Printing from Your Computer Note For details on other printer driver functions, click Help or Instructions to print using an appropriate...
... 1 Turn on the application software's File menu. 5 Make sure that Canon MP600 Printer is selected in the machine. See "Turning the Machine On and Off" on page 4 and "Loading Printing Paper" on -screen manual. Printing from Your Computer Note For details on other printer driver functions, click Help or Instructions to print using an appropriate...
Quick Start Guide
Page 31
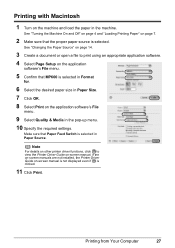
Make sure that MP600 is selected in the machine. Printing from Your Computer 27 See "Changing the Paper Source" on page 14. 3 Create a document or open a file to view the Printer Driver Guide on page 7. 2 Make sure that the proper paper source is clicked. 11 Click Print. Note For details on other printer driver functions, click.... See "Turning the Machine On and Off" on page 4 and "Loading Printing Paper" on -screen manual. If the on-screen manuals are not installed, the Printer Driver Guide on-screen manual is not displayed even if is selected.
Make sure that MP600 is selected in the machine. Printing from Your Computer 27 See "Changing the Paper Source" on page 14. 3 Create a document or open a file to view the Printer Driver Guide on page 7. 2 Make sure that the proper paper source is clicked. 11 Click Print. Note For details on other printer driver functions, click.... See "Turning the Machine On and Off" on page 4 and "Loading Printing Paper" on -screen manual. If the on-screen manuals are not installed, the Printer Driver Guide on-screen manual is not displayed even if is selected.
Quick Start Guide
Page 56
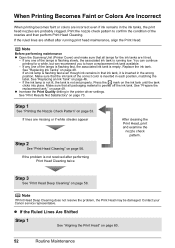
...Replacing an Ink Tank" on page 73. See "Prepare the replacement tank." See "Print Results Not Satisfactory" on page 46. - Contact your Canon service representative. See "Replacing Ink Tanks" on page 58. z Increase the Print Quality setting in the ink tanks, the print head nozzles ...Head. When Printing Becomes Faint or Colors Are Incorrect When printing becomes faint or colors are incorrect even if ink remains in the printer driver settings. Print the nozzle check pattern to have a replacement ink tank available. - Make sure that all packaging material is flashing ...
...Replacing an Ink Tank" on page 73. See "Prepare the replacement tank." See "Print Results Not Satisfactory" on page 46. - Contact your Canon service representative. See "Replacing Ink Tanks" on page 58. z Increase the Print Quality setting in the ink tanks, the print head nozzles ...Head. When Printing Becomes Faint or Colors Are Incorrect When printing becomes faint or colors are incorrect even if ink remains in the printer driver settings. Print the nozzle check pattern to have a replacement ink tank available. - Make sure that all packaging material is flashing ...
Quick Start Guide
Page 75
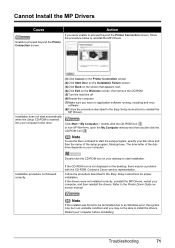
.... Follow the procedure described in an unstable condition and you were unable to proceed beyond the Printer Connection screen. Troubleshooting 71 Action If you may be able to install the drivers. Installation procedure not followed correctly. Contact a Canon service representative. Double-click the CD-ROM icon on the Welcome screen, then remove the...
.... Follow the procedure described in an unstable condition and you were unable to proceed beyond the Printer Connection screen. Troubleshooting 71 Action If you may be able to install the drivers. Installation procedure not followed correctly. Contact a Canon service representative. Double-click the CD-ROM icon on the Welcome screen, then remove the...
Quick Start Guide
Page 77
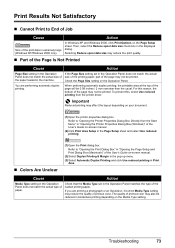
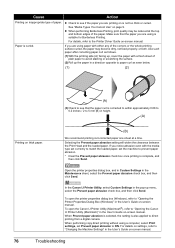
...paper, part of the page may not be printed. Print Results Not Satisfactory „ Cannot Print to "Opening the Printer Properties Dialog Box Directly from the printer driver. the paper loaded in the Operation Panel does not match the actual type of paper. Cause Action Media Type setting...duplex printing. To prevent this reason, the bottom of the page will be reduced in borderless printing depending on your document. (1)Open the printer properties dialog box. When performing automatic duplex printing, the printable area at the top of the page may also be 0.08 inches / ...
...paper, part of the page may not be printed. Print Results Not Satisfactory „ Cannot Print to "Opening the Printer Properties Dialog Box Directly from the printer driver. the paper loaded in the Operation Panel does not match the actual type of paper. Cause Action Media Type setting...duplex printing. To prevent this reason, the bottom of the page will be reduced in borderless printing depending on your document. (1)Open the printer properties dialog box. When performing automatic duplex printing, the printable area at the top of the page may also be 0.08 inches / ...
Quick Start Guide
Page 80
... on is not too thick or curled. z Check to the Printer Driver Guide on page 9. See "Media Types You Cannot Use" on -screen manual. Paper is suitable for Borderless Printing. To open the Canon IJ Printer Utility (Macintosh®), refer to "Opening the Printer Properties Dialog Box (Windows)" in the User's Guide on-screen manual...
... on is not too thick or curled. z Check to the Printer Driver Guide on page 9. See "Media Types You Cannot Use" on -screen manual. Paper is suitable for Borderless Printing. To open the Canon IJ Printer Utility (Macintosh®), refer to "Opening the Printer Properties Dialog Box (Windows)" in the User's Guide on-screen manual...
Quick Start Guide
Page 83
...job to select individual print jobs in Windows XP or Windows 2000. (5)When the confirmation message is selected for Paper Source in the printer driver, the printer driver settings takes precedence when printing. z When loading two or more sheets of paper, align the edges of paper. The print jobs..., regardless of the paper stack against the left edge of the stack. If not, change the paper source using the printer driver, refer to "Opening the Printer Properties Dialog Box Directly from your computer may not be able to delete and click . Cause Unnecessary print jobs are deleted...
...job to select individual print jobs in Windows XP or Windows 2000. (5)When the confirmation message is selected for Paper Source in the printer driver, the printer driver settings takes precedence when printing. z When loading two or more sheets of paper, align the edges of paper. The print jobs..., regardless of the paper stack against the left edge of the stack. If not, change the paper source using the printer driver, refer to "Opening the Printer Properties Dialog Box Directly from your computer may not be able to delete and click . Cause Unnecessary print jobs are deleted...
Quick Start Guide
Page 89
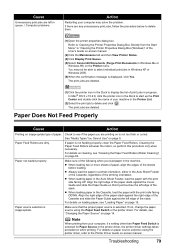
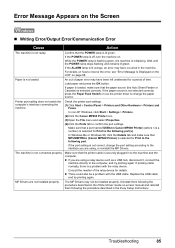
.... Uninstall them following the procedure described in the Printer Driver Guide on page 68. An out of paper error may have occurred in the machine. Make sure that MPUSBPRNnn (Canon MP600 Printer) is securely plugged in the Easy Setup Instructions. MP Drivers are using , or reinstall the MP Drivers. Error Message Appears on . While the POWER lamp...
.... Uninstall them following the procedure described in the Printer Driver Guide on page 68. An out of paper error may have occurred in the machine. Make sure that MPUSBPRNnn (Canon MP600 Printer) is securely plugged in the Easy Setup Instructions. MP Drivers are using , or reinstall the MP Drivers. Error Message Appears on . While the POWER lamp...
Quick Start Guide
Page 90
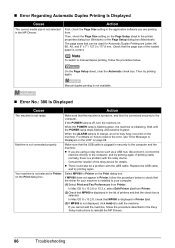
... displayed in Printer List. (3)If MP600 is initializing. Manual duplex printing is not available. „ Error No.: 300 Is Displayed Cause Action The machine is off, turn the machine on the Page Setup sheet in the MP Drivers. If the POWER lamp is not ready. z If you cannot add the machine, follow the...
... displayed in Printer List. (3)If MP600 is initializing. Manual duplex printing is not available. „ Error No.: 300 Is Displayed Cause Action The machine is off, turn the machine on the Page Setup sheet in the MP Drivers. If the POWER lamp is not ready. z If you cannot add the machine, follow the...
Easy Setup Instructions
Page 2
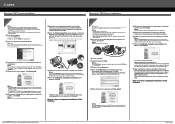
Click Cancel to install the MP Drivers. Then proceed from step 3 to quit the screen. g When the Printer Connection screen appears, connect the machine with a USB cable, then turn the machine on . The software will need your product. Note Make sure the...Me/98, Adobe RGB cannot be detected. Note • Select Easy Install in the U.S. c Insert the Setup CD-ROM. QT5-0683-V02 © 2006 Canon Inc. If you cannot go to the next procedure after 3 minutes, refer to "Troubleshooting" instructions in the U.S. The system is located on -screen instructions. Important...
Click Cancel to install the MP Drivers. Then proceed from step 3 to quit the screen. g When the Printer Connection screen appears, connect the machine with a USB cable, then turn the machine on . The software will need your product. Note Make sure the...Me/98, Adobe RGB cannot be detected. Note • Select Easy Install in the U.S. c Insert the Setup CD-ROM. QT5-0683-V02 © 2006 Canon Inc. If you cannot go to the next procedure after 3 minutes, refer to "Troubleshooting" instructions in the U.S. The system is located on -screen instructions. Important...


