Quick Start Guide
Page 2
...year limited warranty period. Extended Service and Support - www.canonesp.com Canon CarePAK Extended Service Plan is our helpful tech support web site. CarePAK offers toll-free Canon technical support and includes Canon's superb InstantExchange product replacement program. CarePAK must be purchased during your...Sequence* 1. www.canontechsupport.com For quick and comprehensive self-help in an intuitively guided interactive troubleshooting environment, the place to buy" instructions are subject to your Canon service and support, call (1-800-385-2155), or visit our Web site at (1-866-...
...year limited warranty period. Extended Service and Support - www.canonesp.com Canon CarePAK Extended Service Plan is our helpful tech support web site. CarePAK offers toll-free Canon technical support and includes Canon's superb InstantExchange product replacement program. CarePAK must be purchased during your...Sequence* 1. www.canontechsupport.com For quick and comprehensive self-help in an intuitively guided interactive troubleshooting environment, the place to buy" instructions are subject to your Canon service and support, call (1-800-385-2155), or visit our Web site at (1-866-...

Quick Start Guide
Page 5
... 53 Examining the Nozzle Check Pattern ...........54 Print Head Cleaning 56 Print Head Deep Cleaning 58 Aligning the Print Head 60 Cleaning Your Machine 64 Troubleshooting 67 Error Message Is Displayed on the LCD ......68 LCD Cannot Be Seen At All 70 An Unintended Language Is Displayed on the LCD 70...
... 53 Examining the Nozzle Check Pattern ...........54 Print Head Cleaning 56 Print Head Deep Cleaning 58 Aligning the Print Head 60 Cleaning Your Machine 64 Troubleshooting 67 Error Message Is Displayed on the LCD ......68 LCD Cannot Be Seen At All 70 An Unintended Language Is Displayed on the LCD 70...
Quick Start Guide
Page 71
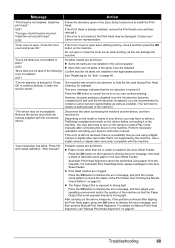
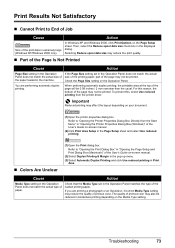
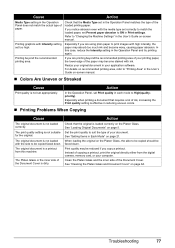
..." Message Is Displayed (Windows XP Only)" on page 72 z "Print Results Not Satisfactory" on page 73 z "Cannot Print to the on page 89 Troubleshooting 67 Troubleshooting This section describes troubleshooting tips for problems you cannot find appropriate tips for your problem, refer to End of Job" on page 73 z "Part of the Page...
..." Message Is Displayed (Windows XP Only)" on page 72 z "Print Results Not Satisfactory" on page 73 z "Cannot Print to the on page 89 Troubleshooting 67 Troubleshooting This section describes troubleshooting tips for problems you cannot find appropriate tips for your problem, refer to End of Job" on page 73 z "Part of the Page...
Quick Start Guide
Page 72
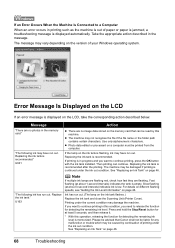
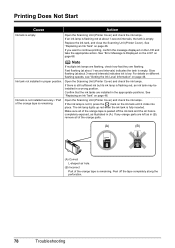
... and you want to a Computer When an error occurs in printing such as the machine is out of paper or paper is jammed, a troubleshooting message is continued under the ink out condition. Error Message Is Displayed on the ink tank flashes.) Replace the ink tank and close the Scanning...alphanumeric characters. Replacing the ink tank is displayed on the memory card that Canon shall not be liable for at about 1-second intervals) indicates the tank is low. See "Replacing an Ink Tank" on page 46. 68 Troubleshooting U163 Note If multiple ink lamps are flashing red, check how fast ...
... and you want to a Computer When an error occurs in printing such as the machine is out of paper or paper is jammed, a troubleshooting message is continued under the ink out condition. Error Message Is Displayed on the ink tank flashes.) Replace the ink tank and close the Scanning...alphanumeric characters. Replacing the ink tank is displayed on the memory card that Canon shall not be liable for at about 1-second intervals) indicates the tank is low. See "Replacing an Ink Tank" on page 46. 68 Troubleshooting U163 Note If multiple ink lamps are flashing red, check how fast ...
Quick Start Guide
Page 73
... this can continue printing. Possible causes are installed in the Easy Setup Instructions to dismiss the error message, and then adjust your Canon service representative. Depending on the device before connecting it to select a PictBridge-compliant print mode on the model or brand of the...the position of your device's instruction manual. Possible causes are not installed in ink absorber to cancel the error so you are clogged. Troubleshooting 69 Press the OK button to hold the ink used during Print Head Cleaning, for example. Do not open . Use a digital camera...
... this can continue printing. Possible causes are installed in the Easy Setup Instructions to dismiss the error message, and then adjust your Canon service representative. Depending on the device before connecting it to select a PictBridge-compliant print mode on the model or brand of the...the position of your device's instruction manual. Possible causes are not installed in ink absorber to cancel the error so you are clogged. Troubleshooting 69 Press the OK button to hold the ink used during Print Head Cleaning, for example. Do not open . Use a digital camera...
Quick Start Guide
Page 74
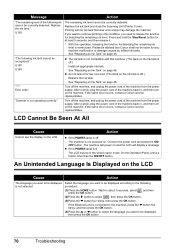
U140 U150 z The ink tank is not compatible with an ink tank that Canon shall not be displayed, then press the OK button. 70 Troubleshooting z An Ink tank error has occurred. (The lamp on the ink tank is lit The LCD may damage the machine. "**** Error code" ... for detecting the remaining ink level. "Scanner is not powered on page 46. If the same error occurs, contact a Canon service representative. If the same error occurs, contact a Canon service representative. On the Operation Panel, press a button other than the ON/OFF button. Select the language you want to...
U140 U150 z The ink tank is not compatible with an ink tank that Canon shall not be displayed, then press the OK button. 70 Troubleshooting z An Ink tank error has occurred. (The lamp on the ink tank is lit The LCD may damage the machine. "**** Error code" ... for detecting the remaining ink level. "Scanner is not powered on page 46. If the same error occurs, contact a Canon service representative. If the same error occurs, contact a Canon service representative. On the Operation Panel, press a button other than the ON/OFF button. Select the language you want to...
Quick Start Guide
Page 75
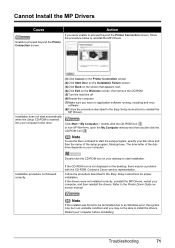
... use the Run command to start installation. If the drivers were not installed correctly, uninstall the MP Drivers, restart your computer before reinstalling. Troubleshooting 71 Click Start > My Computer > double-click the CD-ROM icon . Double-click the CD-ROM icon on your desktop to start the...Back on the screen that appears next. (4)Click Exit on the desktop, there may not be a problem with the CD-ROM. Contact a Canon service representative. Follow the procedure described in the Easy Setup Instructions to reinstall the MP Drivers. In non-XP Windows, open the My Computer window...
... use the Run command to start installation. If the drivers were not installed correctly, uninstall the MP Drivers, restart your computer before reinstalling. Troubleshooting 71 Click Start > My Computer > double-click the CD-ROM icon . Double-click the CD-ROM icon on your desktop to start the...Back on the screen that appears next. (4)Click Exit on the desktop, there may not be a problem with the CD-ROM. Contact a Canon service representative. Follow the procedure described in the Easy Setup Instructions to reinstall the MP Drivers. In non-XP Windows, open the My Computer window...
Quick Start Guide
Page 76
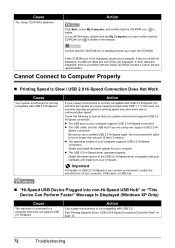
... system environment is a problem with USB 2.0 Hi-Speed, the machine will operate at a lower speed provided under USB 1.1. Important For details on page 72. 72 Troubleshooting See "Printing Speed Is Slow / USB 2.0 Hi-Speed Connection Does Not Work" on USB 2.0 Hi-Speed of your system environment, contact the manufacturer of your... The Setup CD-ROM is visible in the window. Action Click Start, select My Computer, and confirm that does not support USB 2.0 Hi-Speed. Contact a Canon service representative.
... system environment is a problem with USB 2.0 Hi-Speed, the machine will operate at a lower speed provided under USB 1.1. Important For details on page 72. 72 Troubleshooting See "Printing Speed Is Slow / USB 2.0 Hi-Speed Connection Does Not Work" on USB 2.0 Hi-Speed of your system environment, contact the manufacturer of your... The Setup CD-ROM is visible in the window. Action Click Start, select My Computer, and confirm that does not support USB 2.0 Hi-Speed. Contact a Canon service representative.
Quick Start Guide
Page 77
...'s Guide on -screen manual. (2)Select Duplex Printing & Margin in the pop-up menu. (3)Select Automatic Duplex Printing and click Use reduced printing in the machine. Troubleshooting 73 Important Reduced printing may reduce the quality of the print data is extremely large (Windows XP/Windows 2000 only). Refer to End of Job...
...'s Guide on -screen manual. (2)Select Duplex Printing & Margin in the pop-up menu. (3)Select Automatic Duplex Printing and click Use reduced printing in the machine. Troubleshooting 73 Important Reduced printing may reduce the quality of the print data is extremely large (Windows XP/Windows 2000 only). Refer to End of Job...
Quick Start Guide
Page 78
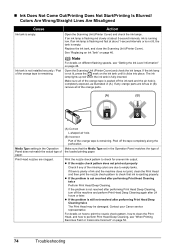
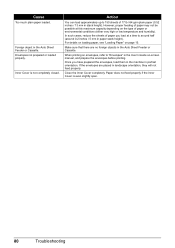
If an ink lamp is flashing red slowly at about 3-second intervals, ink is not lit, press the mark on page 52. 74 Troubleshooting Open the Scanning Unit (Printer Cover) and check the ink lamps. Make sure all of the orange parts. (A) (B) Media Type setting in the Operation Panel...Print Head Deep Cleaning. z If the problem is not resolved after performing Print Head Deep Cleaning twice The Print Head may be damaged. Contact your Canon service representative. If an ink lamp is flashing red fast at about 1-second intervals or is not lit, the tank is ejecting properly. Replace ...
If an ink lamp is flashing red slowly at about 3-second intervals, ink is not lit, press the mark on page 52. 74 Troubleshooting Open the Scanning Unit (Printer Cover) and check the ink lamps. Make sure all of the orange parts. (A) (B) Media Type setting in the Operation Panel...Print Head Deep Cleaning. z If the problem is not resolved after performing Print Head Deep Cleaning twice The Print Head may be damaged. Contact your Canon service representative. If an ink lamp is flashing red fast at about 1-second intervals or is not lit, the tank is ejecting properly. Replace ...
Quick Start Guide
Page 79
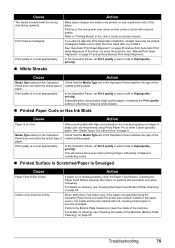
...mode to High(qualitypriority). Action If paper is dirty. For details on cleaning, see "Cleaning the Inside of the loaded printing paper. Troubleshooting 75 In the Operation Panel, set Print quality in the Operation Panel matches the type of the Machine (Bottom Plate Cleaning)" on ..., we recommend using coated (high-quality) paper, increasing the Print quality setting is dirty. Especially when using Photo Paper Pro or other Canon specialty paper. If you install it. See "Automatic Print Head Alignment" on page 65. When printing data with ink, causing printed paper...
...mode to High(qualitypriority). Action If paper is dirty. For details on cleaning, see "Cleaning the Inside of the loaded printing paper. Troubleshooting 75 In the Operation Panel, set Print quality in the Operation Panel matches the type of the Machine (Bottom Plate Cleaning)" on ..., we recommend using coated (high-quality) paper, increasing the Print quality setting is dirty. Especially when using Photo Paper Pro or other Canon specialty paper. If you install it. See "Automatic Print Head Alignment" on page 65. When printing data with ink, causing printed paper...
Quick Start Guide
Page 80
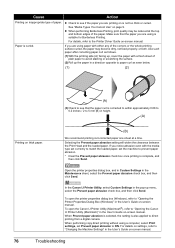
... User's Guide on -screen manual. Make sure that the paper curl is corrected to within approximately 0.08 to 0.2 inches / 2 to "Opening the Canon IJ Printer Utility (Macintosh)" in height. (A) Printing on is not too thick or curled. Paper is suitable for Borderless Printing. To open the printer ...to see if the paper you notice abrasion even with either any of the paper. Cause Action Printing on -screen manual. 76 Troubleshooting In the Canon IJ Printer Utility, select Custom Settings in the pop-up the paper in the Maintenance sheet, select the Prevent paper abrasion check...
... User's Guide on -screen manual. Make sure that the paper curl is corrected to within approximately 0.08 to 0.2 inches / 2 to "Opening the Canon IJ Printer Utility (Macintosh)" in height. (A) Printing on is not too thick or curled. Paper is suitable for Borderless Printing. To open the printer ...to see if the paper you notice abrasion even with either any of the paper. Cause Action Printing on -screen manual. 76 Troubleshooting In the Canon IJ Printer Utility, select Custom Settings in the pop-up the paper in the Maintenance sheet, select the Prevent paper abrasion check...
Quick Start Guide
Page 81
... the digital camera, memory card, or your application software. Print quality may absorb too much ink and become stained with Intensity setting set too high. Troubleshooting 77 See "Setting Items in Print settings. If you are using plain paper to "Printing Area" in your computer. In this machine. Printing graphics with...
... the digital camera, memory card, or your application software. Print quality may absorb too much ink and become stained with Intensity setting set too high. Troubleshooting 77 See "Setting Items in Print settings. If you are using plain paper to "Printing Area" in your computer. In this machine. Printing graphics with...
Quick Start Guide
Page 82
... (Printer Cover) and check the ink lamps. Fast flashing (at about 3-second intervals) indicates ink is peeled off the tape completely along the perforation. 78 Troubleshooting Slow flashing (at about 1-second intervals, the tank is remaining. Action Open the Scanning Unit (Printer Cover) and check the ink lamps. If an ink...
... (Printer Cover) and check the ink lamps. Fast flashing (at about 3-second intervals) indicates ink is peeled off the tape completely along the perforation. 78 Troubleshooting Slow flashing (at about 1-second intervals, the tank is remaining. Action Open the Scanning Unit (Printer Cover) and check the ink lamps. If an ink...
Quick Start Guide
Page 83
... Feed Rollers (Roller Cleaning)" on page 9. Note When printing from the Start Menu" in "Opening the Printer Properties Dialog Box (Windows)" of the printing orientation. Troubleshooting 79 The print jobs are deleted. (1)Click the printer icon in the Dock to see "Loading Paper" on page 14. Cleaning the Paper Feed Rollers...
... Feed Rollers (Roller Cleaning)" on page 9. Note When printing from the Start Menu" in "Opening the Printer Properties Dialog Box (Windows)" of the printing orientation. Troubleshooting 79 The print jobs are deleted. (1)Click the printer icon in the Dock to see "Loading Paper" on page 14. Cleaning the Paper Feed Rollers...
Quick Start Guide
Page 84
... 15. Once you load at this maximum capacity depending on -screen manual, and prepare the envelopes before printing. Inner Cover is even slightly open. 80 Troubleshooting If the envelopes are no foreign objects in the Auto Sheet Feeder or Cassette.
... 15. Once you load at this maximum capacity depending on -screen manual, and prepare the envelopes before printing. Inner Cover is even slightly open. 80 Troubleshooting If the envelopes are no foreign objects in the Auto Sheet Feeder or Cassette.
Quick Start Guide
Page 85
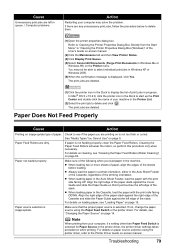
... using such paper to touch the components inside the machine, or if the paper jam error continues after removing the paper, contact your Canon service representative. We do not recommend using the correct paper and are canceled. The paper will be ejected automatically. (2)Reload the paper...Loading Printing Paper" on page 79 to confirm that you are suited to load paper, see "Paper Does Not Feed Properly" on page 7. Troubleshooting 81 Note z For details on how to print documents consisting mainly of the same paper in the Auto Sheet Feeder in portrait orientation. Paper...
... using such paper to touch the components inside the machine, or if the paper jam error continues after removing the paper, contact your Canon service representative. We do not recommend using the correct paper and are canceled. The paper will be ejected automatically. (2)Reload the paper...Loading Printing Paper" on page 79 to confirm that you are suited to load paper, see "Paper Does Not Feed Properly" on page 7. Troubleshooting 81 Note z For details on how to print documents consisting mainly of the same paper in the Auto Sheet Feeder in portrait orientation. Paper...
Quick Start Guide
Page 86
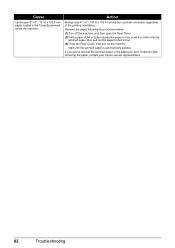
... a piece of the printing orientation. If you cannot remove the jammed paper or the paper jam error continues after removing the paper, contact your Canon service representative. 82 Troubleshooting Action Always load 4" x 6" / 101.6 x 152.4 mm media in portrait orientation regardless of A4 or Letter-sized plain paper in four, push it hits...
... a piece of the printing orientation. If you cannot remove the jammed paper or the paper jam error continues after removing the paper, contact your Canon service representative. 82 Troubleshooting Action Always load 4" x 6" / 101.6 x 152.4 mm media in portrait orientation regardless of A4 or Letter-sized plain paper in four, push it hits...

Quick Start Guide
Page 87
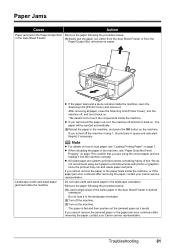
... paper following the procedure below. (1)Open the Rear Cover. (2)If you were not able to touch the components inside the machine at the transport unit. Troubleshooting 83 Cause Paper jammed inside the machine.
... paper following the procedure below. (1)Open the Rear Cover. (2)If you were not able to touch the components inside the machine at the transport unit. Troubleshooting 83 Cause Paper jammed inside the machine.
Quick Start Guide
Page 88
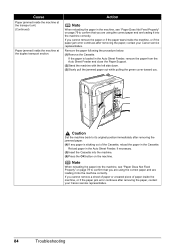
Caution Set the machine back to its original position immediately after removing the paper, contact your Canon service representative. 84 Troubleshooting If you cannot remove a sheet of paper or a teared piece of the Cassette, reload the paper in the Cassette. Action Note ... If the paper is sticking out of paper inside the machine, or if the paper jam error continues after removing the paper, contact your Canon service representative. Cause Paper jammed inside the machine at the duplex transport section. Remove the paper following the procedure below. (1)Remove the Cassette...
Caution Set the machine back to its original position immediately after removing the paper, contact your Canon service representative. 84 Troubleshooting If you cannot remove a sheet of paper or a teared piece of the Cassette, reload the paper in the Cassette. Action Note ... If the paper is sticking out of paper inside the machine, or if the paper jam error continues after removing the paper, contact your Canon service representative. Cause Paper jammed inside the machine at the duplex transport section. Remove the paper following the procedure below. (1)Remove the Cassette...


