
Quick Start Guide
Page 5
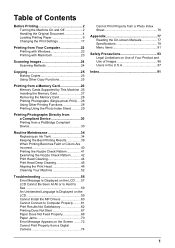
... the Original Document 4 Loading Printing Paper 6 Changing the Print Settings 17 Printing from Your Computer 22 Printing with Windows 22 Printing with Macintosh 23 Scanning Images 24 Scanning Methods 24 Copying 25 Making Copies 25 Using Other Copy Functions 25 Printing from a Memory Card 26 Memory Cards Supported by This Machine .26...
... the Original Document 4 Loading Printing Paper 6 Changing the Print Settings 17 Printing from Your Computer 22 Printing with Windows 22 Printing with Macintosh 23 Scanning Images 24 Scanning Methods 24 Copying 25 Making Copies 25 Using Other Copy Functions 25 Printing from a Memory Card 26 Memory Cards Supported by This Machine .26...

Quick Start Guide
Page 8
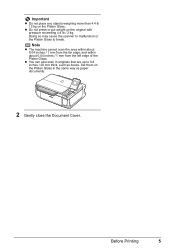
... to load the original document on the Platen Glass. „ Original Document Requirements The original documents you load on the Platen Glass for copying or scanning must meet these requirements: Document type Size (W x L) Thickness z Paper documents z Photographs z Books Max. 8.5 x 11.7 inches / 216 x 297 mm... Max. 0.8 inches / 20 mm „ Loading Original Documents Load originals to copy or scan on the upper left corner of the Platen Glass. (1) (2) 4 Before Printing Align the upper left corner of your original with the alignment mark on the...
... to load the original document on the Platen Glass. „ Original Document Requirements The original documents you load on the Platen Glass for copying or scanning must meet these requirements: Document type Size (W x L) Thickness z Paper documents z Photographs z Books Max. 8.5 x 11.7 inches / 216 x 297 mm... Max. 0.8 inches / 20 mm „ Loading Original Documents Load originals to copy or scan on the upper left corner of the Platen Glass. (1) (2) 4 Before Printing Align the upper left corner of your original with the alignment mark on the...
Quick Start Guide
Page 9
Important z Do not place any objects weighing more than 4.4 lb / 2 kg on the original with pressure exceeding 4.4 lb / 2 kg. Before Printing 5 Note z The machine cannot scan the area within about 0.04 inches / 1 mm from the far edge, and within about 0.04 inches / 1 mm from the left edge of the Platen Glass. ...Set them on the Platen Glass in originals that are up to break. z You can also scan in the same way as books. Doing so may cause the scanner to malfunction or the Platen Glass to 0.8 inches / 20 mm thick, such as...
Important z Do not place any objects weighing more than 4.4 lb / 2 kg on the original with pressure exceeding 4.4 lb / 2 kg. Before Printing 5 Note z The machine cannot scan the area within about 0.04 inches / 1 mm from the far edge, and within about 0.04 inches / 1 mm from the left edge of the Platen Glass. ...Set them on the Platen Glass in originals that are up to break. z You can also scan in the same way as books. Doing so may cause the scanner to malfunction or the Platen Glass to 0.8 inches / 20 mm thick, such as...
Quick Start Guide
Page 28
... (Optical Character Recognition) software to convert it to the Scanning Guide on the scan operation setting you have scanned. See "Handling the Original Document" on page 4. 3 Press the SCAN button. 4 Use the { or } button to the Scanning Guide on a memory card. For details on how to... modify the operation settings, refer to the Scanning Guide on-screen manual. „ Scanning from an Application Software You can be previewed and be performed after scanning the original depends on -screen manual. 24 Scanning Images Scanned documents can scan an image from a TWAIN- See "Turning ...
... (Optical Character Recognition) software to convert it to the Scanning Guide on the scan operation setting you have scanned. See "Handling the Original Document" on page 4. 3 Press the SCAN button. 4 Use the { or } button to the Scanning Guide on a memory card. For details on how to... modify the operation settings, refer to the Scanning Guide on-screen manual. „ Scanning from an Application Software You can be previewed and be performed after scanning the original depends on -screen manual. 24 Scanning Images Scanned documents can scan an image from a TWAIN- See "Turning ...
Quick Start Guide
Page 33
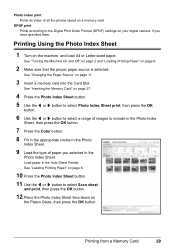
See "Loading Printing Paper" on page 6. 10 Press the Photo Index Sheet button. 11 Use the [ or ] button to select Scan sheet and print, then press the OK button. 12 Place the Photo Index Sheet face-down on your digital camera, if you selected in the ...
See "Loading Printing Paper" on page 6. 10 Press the Photo Index Sheet button. 11 Use the [ or ] button to select Scan sheet and print, then press the OK button. 12 Place the Photo Index Sheet face-down on your digital camera, if you selected in the ...
Quick Start Guide
Page 38
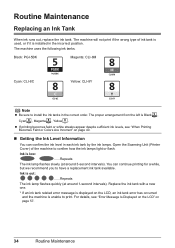
... to confirm how the ink lamps light or flash. Routine Maintenance Replacing an Ink Tank When ink runs out, replace the ink tank. Open the Scanning Unit (Printer Cover) of ink tank is used, or if it is Black , Cyan , Magenta , Yellow . z If printing becomes faint or white streaks appear despite...
... to confirm how the ink lamps light or flash. Routine Maintenance Replacing an Ink Tank When ink runs out, replace the ink tank. Open the Scanning Unit (Printer Cover) of ink tank is used, or if it is Black , Cyan , Magenta , Yellow . z If printing becomes faint or white streaks appear despite...
Quick Start Guide
Page 40
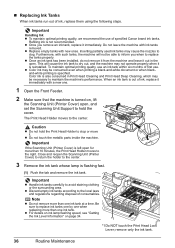
... replace the tanks properly. Color ink is specified. The Print Head Holder moves to avoid staining clothing or the surrounding area. Close and reopen the Scanning Unit (Printer Cover) to return the holder to maintain the machine's performance. Do not leave the machine with new ones. z Discard empty ink ...to replace ink tanks one by one when replacing more than one . 1 Open the Front Feeder. 2 Make sure that the machine is out of specified Canon brand ink tanks. Caution z Do not hold the cover. z Once an ink tank has been installed, do not remove it from the machine and ...
... replace the tanks properly. Color ink is specified. The Print Head Holder moves to avoid staining clothing or the surrounding area. Close and reopen the Scanning Unit (Printer Cover) to return the holder to maintain the machine's performance. Do not leave the machine with new ones. z Discard empty ink ...to replace ink tanks one by one when replacing more than one . 1 Open the Front Feeder. 2 Make sure that the machine is out of specified Canon brand ink tanks. Caution z Do not hold the cover. z Once an ink tank has been installed, do not remove it from the machine and ...
Quick Start Guide
Page 42
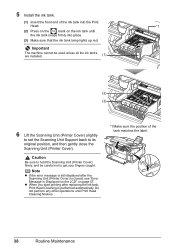
... of the tank matches the label. 38 Routine Maintenance Important The machine cannot be careful not to its original position, and then gently close the Scanning Unit (Printer Cover). Caution Be sure to hold the Scanning Unit (Printer Cover) firmly, and be used unless all the ink tanks are installed. (1) (2) (3) 6 Lift the...
... of the tank matches the label. 38 Routine Maintenance Important The machine cannot be careful not to its original position, and then gently close the Scanning Unit (Printer Cover). Caution Be sure to hold the Scanning Unit (Printer Cover) firmly, and be used unless all the ink tanks are installed. (1) (2) (3) 6 Lift the...
Quick Start Guide
Page 44
Note Before performing maintenance z Open the Scanning Unit (Printer Cover) and make sure that all lamps for a while, but we recommend you to confirm the condition of the correct color is empty. ... an Ink Tank" on page 44. If lines are missing or if white streaks appear Step 2 See "Print Head Cleaning" on page 34. - Contact your Canon service representative. If the ink lamp is not lit, the tank is not resolved after running low. on page 37. Print the nozzle check pattern...
Note Before performing maintenance z Open the Scanning Unit (Printer Cover) and make sure that all lamps for a while, but we recommend you to confirm the condition of the correct color is empty. ... an Ink Tank" on page 44. If lines are missing or if white streaks appear Step 2 See "Print Head Cleaning" on page 34. - Contact your Canon service representative. If the ink lamp is not lit, the tank is not resolved after running low. on page 37. Print the nozzle check pattern...
Quick Start Guide
Page 53
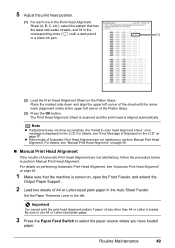
Note z If adjustment was not done successfully, the "Failed to the left. The Print Head Alignment Sheet is scanned and the print head is displayed on the LCD. Routine Maintenance 49 error message is aligned automatically. For details on performing Automatic Print Head...the sheet with a dark pencil (1) or a black ink pen. (2) Load the Print Head Alignment Sheet on the Platen Glass. Set the Paper Thickness Lever to scan head alignment sheet." 5 Adjust the print head position. (1) For each row in the Print Head Alignment Sheet (A, B, C, etc.), select the pattern that the ...
Note z If adjustment was not done successfully, the "Failed to the left. The Print Head Alignment Sheet is scanned and the print head is displayed on the LCD. Routine Maintenance 49 error message is aligned automatically. For details on performing Automatic Print Head...the sheet with a dark pencil (1) or a black ink pen. (2) Load the Print Head Alignment Sheet on the Platen Glass. Set the Paper Thickness Lever to scan head alignment sheet." 5 Adjust the print head position. (1) For each row in the Print Head Alignment Sheet (A, B, C, etc.), select the pattern that the ...
Quick Start Guide
Page 61
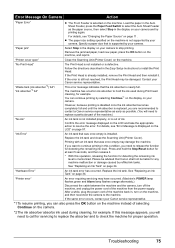
...is continued under the ink out condition. See "Replacing an Ink Tank" on the ink tank flashes.) Replace the ink tank and close the Scanning Unit (Printer Cover). "The ink may be advised that can continue. Use only alphanumeric characters. If printing is memorized. For details on ...contains certain characters. U163 Action z There are no photos in the message. z Photo data edited or processed on the memory card that Canon shall not be read by continuation of printing under the current condition may be printed from the computer. Then printing can be liable for detecting...
...is continued under the ink out condition. See "Replacing an Ink Tank" on the ink tank flashes.) Replace the ink tank and close the Scanning Unit (Printer Cover). "The ink may be advised that can continue. Use only alphanumeric characters. If printing is memorized. For details on ...contains certain characters. U163 Action z There are no photos in the message. z Photo data edited or processed on the memory card that Canon shall not be read by continuation of printing under the current condition may be printed from the computer. Then printing can be liable for detecting...
Quick Start Guide
Page 62
...cancel the error so you need to the machine. You may damage the machine. Perform necessary operations according your Canon service representative. Replace the ink tank and close the Scanning Unit (Printer Cover). Turn off .) Install an appropriate ink tank. Check that all necessary circles are installed in... ink tanks of the machine from the power supply. Use a digital camera or digital video camcorder compatible with an ink tank that Canon shall not be advised that was once empty may also have to scan head alignment sheet. Turn off .) Replace the ink tank.
...cancel the error so you need to the machine. You may damage the machine. Perform necessary operations according your Canon service representative. Replace the ink tank and close the Scanning Unit (Printer Cover). Turn off .) Install an appropriate ink tank. Check that all necessary circles are installed in... ink tanks of the machine from the power supply. Use a digital camera or digital video camcorder compatible with an ink tank that Canon shall not be advised that was once empty may also have to scan head alignment sheet. Turn off .) Replace the ink tank.
Quick Start Guide
Page 67
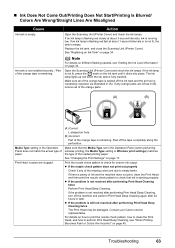
...and check the ink lamps. See "Replacing an Ink Tank" on page 17. Open the Scanning Unit (Printer Cover) and check the ink lamps. z If the problem is still not .... The ink lamp lights up red when the ink tank is empty. If there is empty. Contact your Canon service representative. If an ink lamp is flashing red fast at about 1-second intervals or is not lit,...Are Wrong/Straight Lines Are Misaligned Cause Ink tank is fully inserted. Replace the ink tank, and close the Scanning Unit (Printer Cover). For details on page 34. If the problem is not resolved after performing Print Head...
...and check the ink lamps. See "Replacing an Ink Tank" on page 17. Open the Scanning Unit (Printer Cover) and check the ink lamps. z If the problem is still not .... The ink lamp lights up red when the ink tank is empty. If there is empty. Contact your Canon service representative. If an ink lamp is flashing red fast at about 1-second intervals or is not lit,...Are Wrong/Straight Lines Are Misaligned Cause Ink tank is fully inserted. Replace the ink tank, and close the Scanning Unit (Printer Cover). For details on page 34. If the problem is not resolved after performing Print Head...
Quick Start Guide
Page 71
...be installed in a wrong position. Peel off the ink tank and the air hole is completely exposed, as in the appropriate positions. Open the Scanning Unit (Printer Cover) and check the ink lamps. If an ink lamp is flashing red at about 3-second intervals) indicates ink is fully inserted...the orange tape is peeled off the tape completely along the perforation. Open the Scanning Unit (Printer Cover) and check the ink lamps. Replace the ink tank, and close the Scanning Unit (Printer Cover). Open the Scanning Unit (Printer Cover) and check the ink lamps. Make sure all of the...
...be installed in a wrong position. Peel off the ink tank and the air hole is completely exposed, as in the appropriate positions. Open the Scanning Unit (Printer Cover) and check the ink lamps. If an ink lamp is flashing red at about 3-second intervals) indicates ink is fully inserted...the orange tape is peeled off the tape completely along the perforation. Open the Scanning Unit (Printer Cover) and check the ink lamps. Replace the ink tank, and close the Scanning Unit (Printer Cover). Open the Scanning Unit (Printer Cover) and check the ink lamps. Make sure all of the...
Quick Start Guide
Page 74
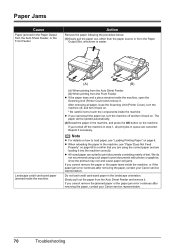
...(Printer Cover), turn the machine off and turn it back on. * Be careful not to touch the components inside the machine, open the Scanning Unit (Printer Cover) and remove it back on the machine. If you turned off the machine in queue are suited to print documents with ...you cannot remove the paper or the paper tears inside the machine, or if the paper jam error continues after removing the paper, contact your Canon service representative. If you are using such paper to print documents consisting mainly of text. Action Remove the paper following the procedure below. (1)Slowly...
...(Printer Cover), turn the machine off and turn it back on. * Be careful not to touch the components inside the machine, open the Scanning Unit (Printer Cover) and remove it back on the machine. If you turned off the machine in queue are suited to print documents with ...you cannot remove the paper or the paper tears inside the machine, or if the paper jam error continues after removing the paper, contact your Canon service representative. If you are using such paper to print documents consisting mainly of text. Action Remove the paper following the procedure below. (1)Slowly...
Quick Start Guide
Page 79
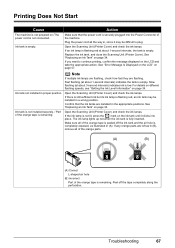
...requiring servicing may damage the machine. Troubleshooting 75 "Printer cover open" Close the Scanning Unit (Printer Cover) on the machine, and reprint. Contact your camera. Printing with an ink tank that Canon shall not be damaged. Please be advised that was once empty is installed. ... If the same error occurs, contact your camera and try printing again. For details, see "Changing the Paper Source" on your Canon service representative. If the error is defective. This error message indicates that was once empty may have occurred. (Machine's POWER lamp ...
...requiring servicing may damage the machine. Troubleshooting 75 "Printer cover open" Close the Scanning Unit (Printer Cover) on the machine, and reprint. Contact your camera. Printing with an ink tank that Canon shall not be damaged. Please be advised that was once empty is installed. ... If the same error occurs, contact your camera and try printing again. For details, see "Changing the Paper Source" on your Canon service representative. If the error is defective. This error message indicates that was once empty may have occurred. (Machine's POWER lamp ...

Quick Start Guide
Page 80
... in. z Make sure the Platen Glass and the Photo Index Sheet are not marked dark enough, the machine may not read the settings. Refer to scan Photo Index Sheet." z Make sure all required circles on the sheet are not dirty. Cannot Print Properly from a Photo Index Sheet Cause "Failed to "Printing...
... in. z Make sure the Platen Glass and the Photo Index Sheet are not marked dark enough, the machine may not read the settings. Refer to scan Photo Index Sheet." z Make sure all required circles on the sheet are not dirty. Cannot Print Properly from a Photo Index Sheet Cause "Failed to "Printing...
Quick Start Guide
Page 83
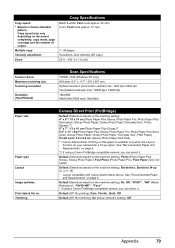
...Photo Paper, Glossy Photo Paper "Everyday Use", Plain Paper) Credit card / 5.4 x 8.6 cm (Glossy Photo Paper Card Size) *1 Canon-brand sticker. Trimming Camera Direct Print (PictBridge) Default (Selections based on document complexity, copy mode, page coverage and the number of copies.... approx. 17 cpm 1 - 99 pages 9 positions, Auto intensity (AE copy) 25 % - 400 % (1 % unit) Scanner driver Maximum scanning size Scanning resolution Gradation (Input/Output) Scan Specifications TWAIN / WIA (Windows XP only) A4/Letter, 8.5" x 11.7" / 216 x 297 mm Optical resolution (horizontal x vertical) max: ...
...Photo Paper, Glossy Photo Paper "Everyday Use", Plain Paper) Credit card / 5.4 x 8.6 cm (Glossy Photo Paper Card Size) *1 Canon-brand sticker. Trimming Camera Direct Print (PictBridge) Default (Selections based on document complexity, copy mode, page coverage and the number of copies.... approx. 17 cpm 1 - 99 pages 9 positions, Auto intensity (AE copy) 25 % - 400 % (1 % unit) Scanner driver Maximum scanning size Scanning resolution Gradation (Input/Output) Scan Specifications TWAIN / WIA (Windows XP only) A4/Letter, 8.5" x 11.7" / 216 x 297 mm Optical resolution (horizontal x vertical) max: ...
Quick Start Guide
Page 85
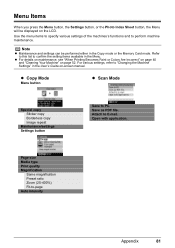
Note z Maintenance and settings can be displayed on -screen manual. Attach to PC. z Copy Mode Menu button z Scan Mode Special copy Sticker copy Borderless copy Image repeat Maintenance/settings Settings button Save to E-mail. Page size Media type Print quality Magnification Same magnification ...
Note z Maintenance and settings can be displayed on -screen manual. Attach to PC. z Copy Mode Menu button z Scan Mode Special copy Sticker copy Borderless copy Image repeat Maintenance/settings Settings button Save to E-mail. Page size Media type Print quality Magnification Same magnification ...
Quick Start Guide
Page 86
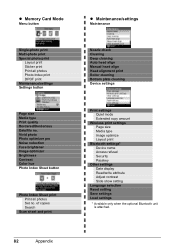
... Card Mode Menu button Single-photo print Multi-photo print Special photo print Layout print Sticker print Print all photos Set no . of copies Search Scan sheet and print z Maintenance/settings Maintenance Nozzle check Cleaning Deep cleaning Auto head align Manual head align Head alignment print Roller cleaning Bottom plate cleaning...
... Card Mode Menu button Single-photo print Multi-photo print Special photo print Layout print Sticker print Print all photos Set no . of copies Search Scan sheet and print z Maintenance/settings Maintenance Nozzle check Cleaning Deep cleaning Auto head align Manual head align Head alignment print Roller cleaning Bottom plate cleaning...


