
Quick Start Guide
Page 4
...Canon Inc. About Consumables Consumables (ink tanks / FINE Cartridges) are not intended to change without the prior written consent of Apple Computer, Inc., registered in this manual may not be an easy-to-use of SD Association. One Canon Plaza Lake Success, NY 11042 Bluetooth ID: B02954 Canon PIXMA MP510...card" and "miniSD Card" are trademarks of Canon U.S.A., Inc. © 2006 Canon U.S.A., Inc. has determined that this manual thoroughly in order that promotes energy saving through the use guide to your Canon PIXMA MP510 Photo All-in the United States and other ...
...Canon Inc. About Consumables Consumables (ink tanks / FINE Cartridges) are not intended to change without the prior written consent of Apple Computer, Inc., registered in this manual may not be an easy-to-use of SD Association. One Canon Plaza Lake Success, NY 11042 Bluetooth ID: B02954 Canon PIXMA MP510...card" and "miniSD Card" are trademarks of Canon U.S.A., Inc. © 2006 Canon U.S.A., Inc. has determined that this manual thoroughly in order that promotes energy saving through the use guide to your Canon PIXMA MP510 Photo All-in the United States and other ...
Quick Start Guide
Page 5
... Printing Using the Photo Index Sheet...........29 Printing Photographs Directly from a Compliant Device 30 Printing from a PictBridge Compliant Device 30 Routine Maintenance 34 Replacing an Ink Tank 34 Keeping the Best Printing Results 39 When Printing Becomes Faint or Colors Are Incorrect 40 Printing the Nozzle Check Pattern 41 Examining the...
... Printing Using the Photo Index Sheet...........29 Printing Photographs Directly from a Compliant Device 30 Printing from a PictBridge Compliant Device 30 Routine Maintenance 34 Replacing an Ink Tank 34 Keeping the Best Printing Results 39 When Printing Becomes Faint or Colors Are Incorrect 40 Printing the Nozzle Check Pattern 41 Examining the...
Quick Start Guide
Page 6
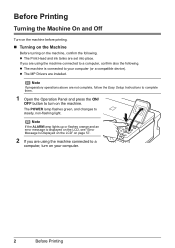
z The Print Head and ink tanks are using the machine connected to a computer, turn on the machine. If you are not complete, follow the Easy Setup Instructions to complete them. 1 ...
z The Print Head and ink tanks are using the machine connected to a computer, turn on the machine. If you are not complete, follow the Easy Setup Instructions to complete them. 1 ...

Quick Start Guide
Page 8
... x 297 mm Max. 0.8 inches / 20 mm „ Loading Original Documents Load originals to copy or scan on the Platen Glass. Note Make sure any glue, ink, correction fluid, or the like on the original document is completely dry before loading it on the Platen Glass. 1 Load the original document on the...
... x 297 mm Max. 0.8 inches / 20 mm „ Loading Original Documents Load originals to copy or scan on the Platen Glass. Note Make sure any glue, ink, correction fluid, or the like on the original document is completely dry before loading it on the Platen Glass. 1 Load the original document on the...
Quick Start Guide
Page 12
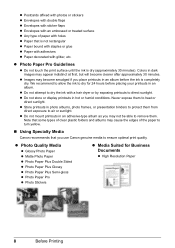
... Paper Plus Semi-gloss z Photo Paper Pro z Photo Stickers z Media Suited for 24 hours before placing your printouts in an album before the ink is completely dry. z Postcards affixed with photos or stickers z Envelopes with double flaps z Envelopes with sticker flaps z Envelopes with an embossed or... treated surface z Any type of the paper to turn yellow. „ Using Specialty Media Canon recommends that is not rectangular z Paper bound with staples or glue z Paper with adhesives z Paper decorated with a hair dryer or by exposing...
... Paper Plus Semi-gloss z Photo Paper Pro z Photo Stickers z Media Suited for 24 hours before placing your printouts in an album before the ink is completely dry. z Postcards affixed with photos or stickers z Envelopes with double flaps z Envelopes with sticker flaps z Envelopes with an embossed or... treated surface z Any type of the paper to turn yellow. „ Using Specialty Media Canon recommends that is not rectangular z Paper bound with staples or glue z Paper with adhesives z Paper decorated with a hair dryer or by exposing...
Quick Start Guide
Page 38
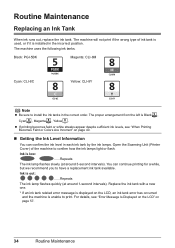
... from the left is unable to have a replacement ink tank available. Ink is low: ......Repeats The ink lamp flashes slowly (at around 3-second intervals). Replace the ink tank with a new one. * If an ink tank related error message is displayed on the LCD, an ink tank error has occurred and the machine is Black ... printing for a while, but we recommend you to print. You can confirm the ink level in each ink tank by the ink lamps. The machine will not print if the wrong type of the machine to install the ink tanks in the incorrect position. Black: PGI-5BK Magenta: CLI-8M Cyan: CLI...
... from the left is unable to have a replacement ink tank available. Ink is low: ......Repeats The ink lamp flashes slowly (at around 3-second intervals). Replace the ink tank with a new one. * If an ink tank related error message is displayed on the LCD, an ink tank error has occurred and the machine is Black ... printing for a while, but we recommend you to print. You can confirm the ink level in each ink tank by the ink lamps. The machine will not print if the wrong type of the machine to install the ink tanks in the incorrect position. Black: PGI-5BK Magenta: CLI-8M Cyan: CLI...
Quick Start Guide
Page 39
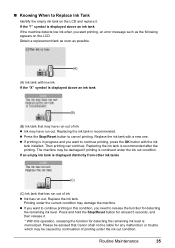
.../Reset button for at least 5 seconds, and then release it . Replacing the ink tank is recommended. If the "!" If an empty ink tank is displayed distinctly from other ink tanks (C) (C) Ink tank that may have run out. Replace the ink tank. Please be advised that Canon shall not be damaged if printing is displayed above an...
.../Reset button for at least 5 seconds, and then release it . Replacing the ink tank is recommended. If the "!" If an empty ink tank is displayed distinctly from other ink tanks (C) (C) Ink tank that may have run out. Replace the ink tank. Please be advised that Canon shall not be damaged if printing is displayed above an...
Quick Start Guide
Page 40
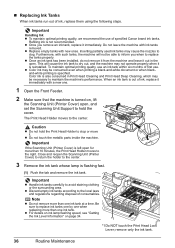
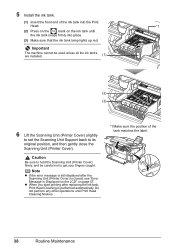
... the Scanning Unit (Printer Cover) to return the holder to avoid staining clothing or the surrounding area. Important z Handle ink tanks carefully to the center. 3 Remove the ink tank whose lamp is also consumed in the open for more than 10 minutes, the Print Head Holder moves to clog..... Be sure to the center. z Once you when to the local laws and regulations regarding disposal of specified Canon brand ink tanks. When an ink tank is out of ink, replace them using the following steps. This will not be consumed even when printing a black-and-white document or when blackand-...
... the Scanning Unit (Printer Cover) to return the holder to avoid staining clothing or the surrounding area. Important z Handle ink tanks carefully to the center. 3 Remove the ink tank whose lamp is also consumed in the open for more than 10 minutes, the Print Head Holder moves to clog..... Be sure to the center. z Once you when to the local laws and regulations regarding disposal of specified Canon brand ink tanks. When an ink tank is out of ink, replace them using the following steps. This will not be consumed even when printing a black-and-white document or when blackand-...
Quick Start Guide
Page 41
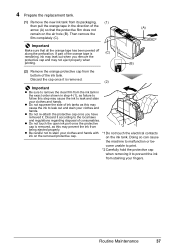
... peeled off along the perforation. Routine Maintenance 37 Discard it is removed, as this may prevent the ink from *2 *1 being ejected properly. 4 Prepare the replacement tank. (1) Remove the new ink tank from its packaging, (1) then pull the orange tape in step 4-(1), as failure to follow this... step may not eject properly when printing. (B) (2) Remove the orange protective cap from the bottom of the ink tank. Discard the cap once it according to malfunction or be- Doing so can cause the machine to the local laws and regulations ...
... peeled off along the perforation. Routine Maintenance 37 Discard it is removed, as this may prevent the ink from *2 *1 being ejected properly. 4 Prepare the replacement tank. (1) Remove the new ink tank from its packaging, (1) then pull the orange tape in step 4-(1), as failure to follow this... step may not eject properly when printing. (B) (2) Remove the orange protective cap from the bottom of the ink tank. Discard the cap once it according to malfunction or be- Doing so can cause the machine to the local laws and regulations ...
Quick Start Guide
Page 42
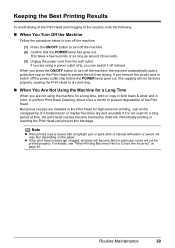
Caution Be sure to hold the Scanning Unit (Printer Cover) firmly, and be used unless all the ink tanks are installed. (1) (2) (3) 6 Lift the Scanning Unit (Printer Cover) slightly to set the Scanning Unit Support back to get your fingers caught. z When you start ..., Print Head Cleaning is closed, see "Error Message Is Displayed on the LCD" on the ink tank until Print Head Cleaning finishes. *1 Make sure the position of the ink tank into place. (3) Make sure that the ink tank lamp lights up red. Important The machine cannot be careful not to its original position...
Caution Be sure to hold the Scanning Unit (Printer Cover) firmly, and be used unless all the ink tanks are installed. (1) (2) (3) 6 Lift the Scanning Unit (Printer Cover) slightly to set the Scanning Unit Support back to get your fingers caught. z When you start ..., Print Head Cleaning is closed, see "Error Message Is Displayed on the LCD" on the ink tank until Print Head Cleaning finishes. *1 Make sure the position of the ink tank into place. (3) Make sure that the ink tank lamp lights up red. Important The machine cannot be careful not to its original position...
Quick Start Guide
Page 43
...Are Not Using the Machine for a long period of time, the print head nozzles become faint or particular colors will become blocked by dried ink. Routine Maintenance 39 Periodically printing or cleaning the Print Head can switch it is traced with a highlight pen or paint-stick or stained with... water or sweat, ink may blur depending on page 40. When you can prevent this capping will not be printed properly. For details, see "When Printing Becomes ...
...Are Not Using the Machine for a long period of time, the print head nozzles become faint or particular colors will become blocked by dried ink. Routine Maintenance 39 Periodically printing or cleaning the Print Head can switch it is traced with a highlight pen or paint-stick or stained with... water or sweat, ink may blur depending on page 40. When you can prevent this capping will not be printed properly. For details, see "When Printing Becomes ...
Quick Start Guide
Page 44
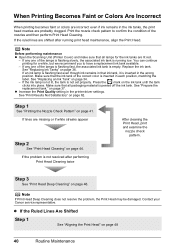
... set properly. When Printing Becomes Faint or Colors Are Incorrect When printing becomes faint or colors are incorrect even if ink remains in the ink tanks, the print head nozzles are shifted after performing Print Head Cleaning twice After cleaning the Print Head, print and... not resolved after running low. See "Print Results Not Satisfactory" on page 36. Contact your Canon service representative. Print the nozzle check pattern to have a replacement ink tank available. - If an ink lamp is empty. on page 48 40 Routine Maintenance z If the Ruled Lines Are Shifted Step...
... set properly. When Printing Becomes Faint or Colors Are Incorrect When printing becomes faint or colors are incorrect even if ink remains in the ink tanks, the print head nozzles are shifted after performing Print Head Cleaning twice After cleaning the Print Head, print and... not resolved after running low. See "Print Results Not Satisfactory" on page 36. Contact your Canon service representative. Print the nozzle check pattern to have a replacement ink tank available. - If an ink lamp is empty. on page 48 40 Routine Maintenance z If the Ruled Lines Are Shifted Step...
Quick Start Guide
Page 45
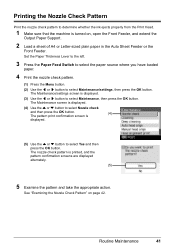
... print confirmation screen is turned on page 42. Routine Maintenance 41 Printing the Nozzle Check Pattern Print the nozzle check pattern to determine whether the ink ejects properly from the Print Head. 1 Make sure that the machine is displayed. (5) Use the { or } button to select Yes and then press the OK...
... print confirmation screen is turned on page 42. Routine Maintenance 41 Printing the Nozzle Check Pattern Print the nozzle check pattern to determine whether the ink ejects properly from the Print Head. 1 Make sure that the machine is displayed. (5) Use the { or } button to select Yes and then press the OK...
Quick Start Guide
Page 46
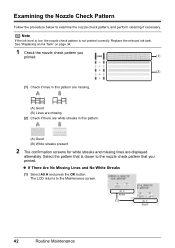
... is low, the nozzle check pattern is closer to the nozzle check pattern that is not printed correctly. See "Replacing an Ink Tank" on page 34. 1 Check the nozzle check pattern you printed. Select the pattern that you printed. (1) (2) (1) Check if lines in this ... displayed alternately. z If There Are No Missing Lines and No White Streaks (1) Select All A and press the OK button. Replace the relevant ink tank. Examining the Nozzle Check Pattern Follow the procedure below to the Maintenance screen. (1) 42 Routine Maintenance The LCD returns to examine the nozzle...
... is low, the nozzle check pattern is closer to the nozzle check pattern that is not printed correctly. See "Replacing an Ink Tank" on page 34. 1 Check the nozzle check pattern you printed. Select the pattern that you printed. (1) (2) (1) Check if lines in this ... displayed alternately. z If There Are No Missing Lines and No White Streaks (1) Select All A and press the OK button. Replace the relevant ink tank. Examining the Nozzle Check Pattern Follow the procedure below to the Maintenance screen. (1) 42 Routine Maintenance The LCD returns to examine the nozzle...

Quick Start Guide
Page 48
... operations until Print Head Cleaning finishes. The nozzle check pattern is displayed. (4) (5) Use the { or } button to be absorbed in the ink absorber. Print Head Cleaning Clean the Print Head if lines are missing or if white streaks appear in the Auto Sheet Feeder or the Front... with the printed nozzle check pattern, and take appropriate action. Cleaning the Print Head consumes ink, so perform Print Head Cleaning only when necessary. 1 Make sure that cleaning the Print Head causes used ink to select Yes and then press the OK button. Note that the machine is displayed....
... operations until Print Head Cleaning finishes. The nozzle check pattern is displayed. (4) (5) Use the { or } button to be absorbed in the ink absorber. Print Head Cleaning Clean the Print Head if lines are missing or if white streaks appear in the Auto Sheet Feeder or the Front... with the printed nozzle check pattern, and take appropriate action. Cleaning the Print Head consumes ink, so perform Print Head Cleaning only when necessary. 1 Make sure that cleaning the Print Head causes used ink to select Yes and then press the OK button. Note that the machine is displayed....
Quick Start Guide
Page 50
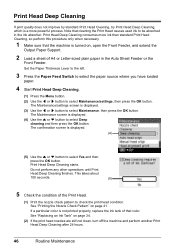
... Head Deep Cleaning. (1) Press the Menu button. (2) Use the [ or ] button to select Maintenance, then press the OK button. See "Replacing an Ink Tank" on page 41. Print Head Deep Cleaning If print quality does not improve by standard Print Head Cleaning, try Print Head Deep Cleaning, which... Maintenance Do not perform any other operations until Print Head Deep Cleaning finishes. The Maintenance/settings screen is not printed properly, replace the ink tank of the Print Head. (1) Print the nozzle check pattern to select Deep cleaning and then press the OK button. Print Head Deep...
... Head Deep Cleaning. (1) Press the Menu button. (2) Use the [ or ] button to select Maintenance, then press the OK button. See "Replacing an Ink Tank" on page 41. Print Head Deep Cleaning If print quality does not improve by standard Print Head Cleaning, try Print Head Deep Cleaning, which... Maintenance Do not perform any other operations until Print Head Deep Cleaning finishes. The Maintenance/settings screen is not printed properly, replace the ink tank of the Print Head. (1) Print the nozzle check pattern to select Deep cleaning and then press the OK button. Print Head Deep...
Quick Start Guide
Page 53
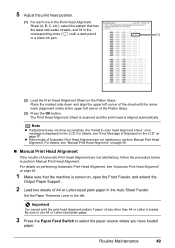
... plain paper in the corresponding circle ( ) with the arrow mark (alignment mark) at the upper left corner of the sheet with a dark pencil (1) or a black ink pen. (2) Load the Print Head Alignment Sheet on page 57. Routine Maintenance 49 Place the marked side down and align the upper left . Note z If...
... plain paper in the corresponding circle ( ) with the arrow mark (alignment mark) at the upper left corner of the sheet with a dark pencil (1) or a black ink pen. (2) Load the Print Head Alignment Sheet on page 57. Routine Maintenance 49 Place the marked side down and align the upper left . Note z If...

Quick Start Guide
Page 59
The Maintenance/settings screen is displayed. (3) Use the [ or ] button to turn the machine off any ink from the Auto Sheet Feeder. Important Before cleaning the inner parts, be sure to select Maintenance, then press the OK button. See "Cleaning the Protrusions ...
The Maintenance/settings screen is displayed. (3) Use the [ or ] button to turn the machine off any ink from the Auto Sheet Feeder. Important Before cleaning the inner parts, be sure to select Maintenance, then press the OK button. See "Cleaning the Protrusions ...
Quick Start Guide
Page 60
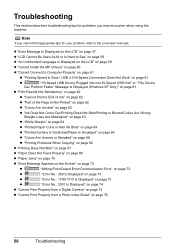
... problem, refer to End of Job" on page 62 z "Part of the Page Is Not Printed" on page 62 z "Colors Are Unclear" on page 62 z "Ink Does Not Come Out/Printing Does Not Start/Printing Is Blurred/Colors Are Wrong/ Straight Lines Are Misaligned" on page 63 z "White Streaks" on page... 64 z "Printed Paper Curls or Has Ink Blots" on page 64 z "Printed Surface Is Scratched/Paper Is Smudged" on page 64 z "Colors Are Uneven or Streaked" on page 66 z "Printing Problems When...
... problem, refer to End of Job" on page 62 z "Part of the Page Is Not Printed" on page 62 z "Colors Are Unclear" on page 62 z "Ink Does Not Come Out/Printing Does Not Start/Printing Is Blurred/Colors Are Wrong/ Straight Lines Are Misaligned" on page 63 z "White Streaks" on page... 64 z "Printed Paper Curls or Has Ink Blots" on page 64 z "Printed Surface Is Scratched/Paper Is Smudged" on page 64 z "Colors Are Uneven or Streaked" on page 66 z "Printing Problems When...
Quick Start Guide
Page 61
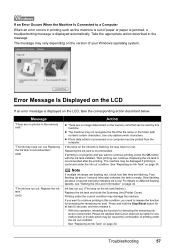
... recommended after the printing. Troubleshooting 57 z Photo data edited or processed on the memory card that Canon shall not be liable for detecting the remaining ink level. If printing is memorized. Fast flashing (at least 5 seconds, and then release it. * With this condition, you want to continue... is continued under the current condition may have run out. (The lamp on the version of your Windows operating system. Replace the ink tank." The machine may not recognize the file if the file name or the folder path contains certain characters. For details on different...
... recommended after the printing. Troubleshooting 57 z Photo data edited or processed on the memory card that Canon shall not be liable for detecting the remaining ink level. If printing is memorized. Fast flashing (at least 5 seconds, and then release it. * With this condition, you want to continue... is continued under the current condition may have run out. (The lamp on the version of your Windows operating system. Replace the ink tank." The machine may not recognize the file if the file name or the folder path contains certain characters. For details on different...


