
Quick Start Guide
Page 4
...-to-use of Bluetooth SIG, Inc., U.S.A. Their standards and logos are office equipment such as computers, monitors, printers, faxes and copiers. All information regarding the accuracy thereof. z "Macintosh" and "Mac" are available for efficiency. Canon PIXMA MP510 Photo All-in which business can participate voluntarily. All statements, technical information and recommendations in this manual...
...-to-use of Bluetooth SIG, Inc., U.S.A. Their standards and logos are office equipment such as computers, monitors, printers, faxes and copiers. All information regarding the accuracy thereof. z "Macintosh" and "Mac" are available for efficiency. Canon PIXMA MP510 Photo All-in which business can participate voluntarily. All statements, technical information and recommendations in this manual...
Quick Start Guide
Page 10
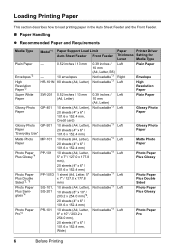
... paper in the Auto Sheet Feeder and the Front Feeder. „ Paper Handling z Recommended Paper and Requirements Media Type Model*1 Paper Support Load Limit Paper Printer Driver Auto Sheet Feeder Front Feeder Thickness Setting for Lever Media Type Plain Paper Envelopes*2 High Resolution Paper*2 - 0.52 inches / 13 mm - 10 envelopes HR...
... paper in the Auto Sheet Feeder and the Front Feeder. „ Paper Handling z Recommended Paper and Requirements Media Type Model*1 Paper Support Load Limit Paper Printer Driver Auto Sheet Feeder Front Feeder Thickness Setting for Lever Media Type Plain Paper Envelopes*2 High Resolution Paper*2 - 0.52 inches / 13 mm - 10 envelopes HR...
Quick Start Guide
Page 11
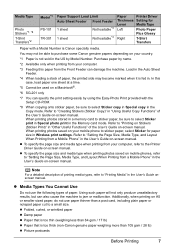
...Folded, curled, or wrinkled paper z Damp paper z Paper that is too thin (weighing less than 64 gsm / 17 lb) z Paper that is Canon specialty media. When printing photos saved on your mobile phone to "Setting the Page Size, Media Type, and Layout When Printing from your computer. *3...Transfers*2 Model*1 PS-101 TR-301 Paper Support Load Limit Auto Sheet Feeder Front Feeder 1 sheet Not loadable*3 1 sheet Not loadable*3 Paper Printer Driver Thickness Setting for paper size in the User's Guide on-screen manual. Purchase paper by using the Easy-Photo Print provided with a Model...
...Folded, curled, or wrinkled paper z Damp paper z Paper that is too thin (weighing less than 64 gsm / 17 lb) z Paper that is Canon specialty media. When printing photos saved on your mobile phone to "Setting the Page Size, Media Type, and Layout When Printing from your computer. *3...Transfers*2 Model*1 PS-101 TR-301 Paper Support Load Limit Auto Sheet Feeder Front Feeder 1 sheet Not loadable*3 1 sheet Not loadable*3 Paper Printer Driver Thickness Setting for paper size in the User's Guide on-screen manual. Purchase paper by using the Easy-Photo Print provided with a Model...

Quick Start Guide
Page 14
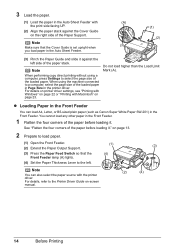
... Paper" on page 11. z If you print regularly on photo paper as well as plain paper, you can also select the paper source using the printer driver. For details on paper source selection using any other than A4, Letter, or B5-sized plain paper in the Front Feeder. When using the... printer driver, refer to the Printer Driver Guide on plain paper If you use photo paper as much as on -screen manual. (A) (A) Press to change the paper source, simply...
... Paper" on page 11. z If you print regularly on photo paper as well as plain paper, you can also select the paper source using the printer driver. For details on paper source selection using any other than A4, Letter, or B5-sized plain paper in the Front Feeder. When using the... printer driver, refer to the Printer Driver Guide on plain paper If you use photo paper as much as on -screen manual. (A) (A) Press to change the paper source, simply...
Quick Start Guide
Page 15
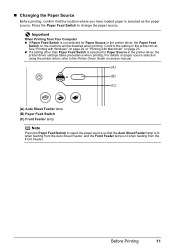
... that the location where you have loaded paper is selected for Paper Source in the printer driver, the Paper Feed Switch on page 23. For details on paper source selection using the printer driver, refer to the Printer Driver Guide on-screen manual. (A) (B) (C) (A) Auto Sheet Feeder lamp (B) Paper ...Feed Switch (C) Front Feeder lamp Note Press the Paper Feed Switch to change the paper source. Confirm the setting in the printer driver. z If a setting other than Paper Feed Switch is selected as the paper source. Before Printing 11 „ Changing the Paper Source...
... that the location where you have loaded paper is selected for Paper Source in the printer driver, the Paper Feed Switch on page 23. For details on paper source selection using the printer driver, refer to the Printer Driver Guide on-screen manual. (A) (B) (C) (A) Auto Sheet Feeder lamp (B) Paper ...Feed Switch (C) Front Feeder lamp Note Press the Paper Feed Switch to change the paper source. Confirm the setting in the printer driver. z If a setting other than Paper Feed Switch is selected as the paper source. Before Printing 11 „ Changing the Paper Source...
Quick Start Guide
Page 16
... photos or stickers. Refer to "Printing Media" in the User's Guide on postcards affixed with its various printers, refer to "Printing Media" in the User's Guide on both sides, we recommend Canon's Super White Paper Double-Sided. z You can cause the paper to "Printing Media" in the Front Feeder...plain paper (17 lb / 64 gsm, 0.39 inches / 10 mm in height) in the User's Guide on the specialty media Canon provides for use general copy paper or Canon's Super White Paper. z Do not stack more than 50 sheets in portrait orientation (A). Paper size: - z We recommend using genuine...
... photos or stickers. Refer to "Printing Media" in the User's Guide on postcards affixed with its various printers, refer to "Printing Media" in the User's Guide on both sides, we recommend Canon's Super White Paper Double-Sided. z You can cause the paper to "Printing Media" in the Front Feeder...plain paper (17 lb / 64 gsm, 0.39 inches / 10 mm in height) in the User's Guide on the specialty media Canon provides for use general copy paper or Canon's Super White Paper. z Do not stack more than 50 sheets in portrait orientation (A). Paper size: - z We recommend using genuine...
Quick Start Guide
Page 17
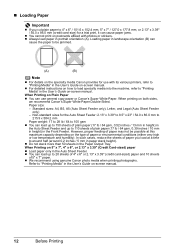
... surface. - See "Paper Handling" on page 65. Before Printing 13 on page 6. (1) (2) (5) (3) (A) (4) Note You can also select the paper source with the printer driver. Set it . z Loading Paper in the opposite direction until the paper becomes completely flat. Put unused paper back into the package and keep them... in the Auto Sheet Feeder 1 Flatten the four corners of the paper before loading it to the Printer Driver Guide on-screen manual. Loading paper without aligning the edges may cause paper jams. z If paper is curled." Note z Align the...
... surface. - See "Paper Handling" on page 65. Before Printing 13 on page 6. (1) (2) (5) (3) (A) (4) Note You can also select the paper source with the printer driver. Set it . z Loading Paper in the opposite direction until the paper becomes completely flat. Put unused paper back into the package and keep them... in the Auto Sheet Feeder 1 Flatten the four corners of the paper before loading it to the Printer Driver Guide on-screen manual. Loading paper without aligning the edges may cause paper jams. z If paper is curled." Note z Align the...
Quick Start Guide
Page 18
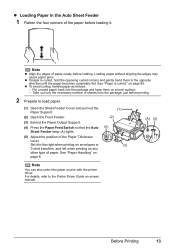
...load paper in the Front Feeder. 1 Flatten the four corners of the loaded paper. on the right side of the paper stack. For details on printer driver settings, see "Printing with Windows" on page 22 or "Printing with Macintosh" on -screen manual. (2) (4) 14 Before Printing Note When ... Align the paper stack against the left . Note You can load A4, Letter, or B5-sized plain paper (such as Canon Super White Paper SW-201) in the Auto Sheet Feeder with the printer driver. For details, refer to a computer, select the page size of the paper before loading it ."
...load paper in the Front Feeder. 1 Flatten the four corners of the loaded paper. on the right side of the paper stack. For details on printer driver settings, see "Printing with Windows" on page 22 or "Printing with Macintosh" on -screen manual. (2) (4) 14 Before Printing Note When ... Align the paper stack against the left . Note You can load A4, Letter, or B5-sized plain paper (such as Canon Super White Paper SW-201) in the Auto Sheet Feeder with the printer driver. For details, refer to a computer, select the page size of the paper before loading it ."

Quick Start Guide
Page 19
... the Front Feeder, refer to the illustration below and make sure not to load paper with the wrong side up. For details on printer driver settings, see "Printing with Windows" on page 23. z When performing copy direct printing without using the machine connected to select the... page size. Note z When loading paper in the printer driver. When using a computer, press Settings to a computer, select the page size of the loaded paper stack. (A) (1) (4) (2) (3) Do not load...
... the Front Feeder, refer to the illustration below and make sure not to load paper with the wrong side up. For details on printer driver settings, see "Printing with Windows" on page 23. z When performing copy direct printing without using the machine connected to select the... page size. Note z When loading paper in the printer driver. When using a computer, press Settings to a computer, select the page size of the loaded paper stack. (A) (1) (4) (2) (3) Do not load...
Quick Start Guide
Page 20
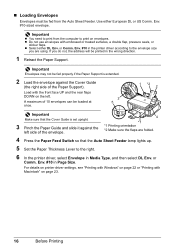
...Paper Feed Switch so that the Auto Sheet Feeder lamp lights up. 5 Set the Paper Thickness Lever to the right. 6 In the printer driver, select Envelope in the printer driver according to print on envelopes. Env. #10-sized envelope. Env. #10 in Media Type, and then select DL Env. A... #10 in the wrong direction. 1 Retract the Paper Support. Important z You need to print from the Auto Sheet Feeder. or Comm. For details on printer driver settings, see "Printing with Windows" on page 22 or "Printing with embossed or treated surfaces, a double flap, pressure seals, or sticker flaps. „...
...Paper Feed Switch so that the Auto Sheet Feeder lamp lights up. 5 Set the Paper Thickness Lever to the right. 6 In the printer driver, select Envelope in the printer driver according to print on envelopes. Env. #10-sized envelope. Env. #10 in Media Type, and then select DL Env. A... #10 in the wrong direction. 1 Retract the Paper Support. Important z You need to print from the Auto Sheet Feeder. or Comm. For details on printer driver settings, see "Printing with Windows" on page 22 or "Printing with embossed or treated surfaces, a double flap, pressure seals, or sticker flaps. „...
Quick Start Guide
Page 26
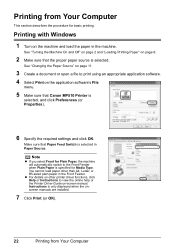
... the procedure for Plain Paper, the machine will automatically switch to view the online help or the Printer Driver Guide on page 6. 2 Make sure that Canon MP510 Printer is specified for Media Type. You cannot load paper other printer driver functions, click Help or Instructions to the Front Feeder when Plain Paper is selected, and...
... the procedure for Plain Paper, the machine will automatically switch to view the online help or the Printer Driver Guide on page 6. 2 Make sure that Canon MP510 Printer is specified for Media Type. You cannot load paper other printer driver functions, click Help or Instructions to the Front Feeder when Plain Paper is selected, and...
Quick Start Guide
Page 27
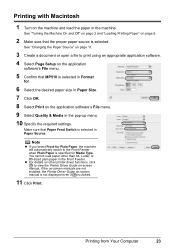
...sized plain paper in the machine. See "Changing the Paper Source" on page 11. 3 Create a document or open a file to view the Printer Driver Guide on-screen manual. Note z If you select Front for Media Type. Printing from Your Computer 23 Make sure that the proper paper ... manual is not displayed even if is selected. You cannot load paper other printer driver functions, click to print using an appropriate application software. 4 Select Page Setup on the application software's File menu. 5 Confirm that MP510 is selected in Format for. 6 Select the desired paper size in Paper ...
...sized plain paper in the machine. See "Changing the Paper Source" on page 11. 3 Create a document or open a file to view the Printer Driver Guide on-screen manual. Note z If you select Front for Media Type. Printing from Your Computer 23 Make sure that the proper paper ... manual is not displayed even if is selected. You cannot load paper other printer driver functions, click to print using an appropriate application software. 4 Select Page Setup on the application software's File menu. 5 Confirm that MP510 is selected in Format for. 6 Select the desired paper size in Paper ...
Quick Start Guide
Page 38
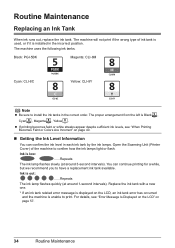
... error message is displayed on the LCD, an ink tank error has occurred and the machine is Black , Cyan , Magenta , Yellow . Open the Scanning Unit (Printer Cover) of ink tank is used, or if it is installed in the correct order. Ink is low: ......Repeats The ink lamp flashes slowly (at...
... error message is displayed on the LCD, an ink tank error has occurred and the machine is Black , Cyan , Magenta , Yellow . Open the Scanning Unit (Printer Cover) of ink tank is used, or if it is installed in the correct order. Ink is low: ......Repeats The ink lamp flashes slowly (at...
Quick Start Guide
Page 40
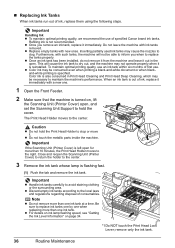
... the right. This will not be consumed even when printing a black-and-white document or when blackand-white printing is out of specified Canon brand ink tanks. remove only the ink tank. 36 Routine Maintenance z Replace empty tanks with ink tanks removed. To maintain optimal printing ... using the following steps. z For details on ink lamp flashing speed, see "Getting the Ink Level Information" on , lift the Scanning Unit (Printer Cover) open for more than 10 minutes, the Print Head Holder moves to maintain the machine's performance. When an ink tank is specified. z ...
... the right. This will not be consumed even when printing a black-and-white document or when blackand-white printing is out of specified Canon brand ink tanks. remove only the ink tank. 36 Routine Maintenance z Replace empty tanks with ink tanks removed. To maintain optimal printing ... using the following steps. z For details on ink lamp flashing speed, see "Getting the Ink Level Information" on , lift the Scanning Unit (Printer Cover) open for more than 10 minutes, the Print Head Holder moves to maintain the machine's performance. When an ink tank is specified. z ...
Quick Start Guide
Page 42
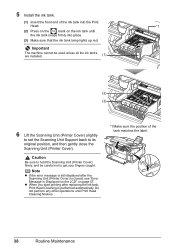
...into place. (3) Make sure that the ink tank lamp lights up red. z When you start printing after the Scanning Unit (Printer Cover) is performed automatically. Caution Be sure to hold the Scanning Unit (Printer Cover) firmly, and be used unless all the ink tanks are installed. (1) (2) (3) 6 Lift the Scanning Unit... Press on the mark on page 57. Important The machine cannot be careful not to its original position, and then gently close the Scanning Unit (Printer Cover). 5 Install the ink tank. (1) Insert the front end of the tank matches the label. 38 Routine Maintenance
...into place. (3) Make sure that the ink tank lamp lights up red. z When you start printing after the Scanning Unit (Printer Cover) is performed automatically. Caution Be sure to hold the Scanning Unit (Printer Cover) firmly, and be used unless all the ink tanks are installed. (1) (2) (3) 6 Lift the Scanning Unit... Press on the mark on page 57. Important The machine cannot be careful not to its original position, and then gently close the Scanning Unit (Printer Cover). 5 Install the ink tank. (1) Insert the front end of the tank matches the label. 38 Routine Maintenance
Quick Start Guide
Page 44
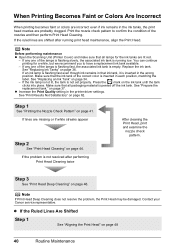
...Make sure that ink tank, it is inserted in that the ink tank of the nozzles and then perform Print Head Cleaning. Contact your Canon service representative. If any one of the lamps is flashing fast, the associated ink tank is not set properly. If any one of the... tank is empty. When Printing Becomes Faint or Colors Are Incorrect When printing becomes faint or colors are incorrect even if ink remains in the printer driver settings. Print the nozzle check pattern to have a replacement ink tank available. - If the ruled lines are probably clogged. Replace the ink ...
...Make sure that ink tank, it is inserted in that the ink tank of the nozzles and then perform Print Head Cleaning. Contact your Canon service representative. If any one of the lamps is flashing fast, the associated ink tank is not set properly. If any one of the... tank is empty. When Printing Becomes Faint or Colors Are Incorrect When printing becomes faint or colors are incorrect even if ink remains in the printer driver settings. Print the nozzle check pattern to have a replacement ink tank available. - If the ruled lines are probably clogged. Replace the ink ...
Quick Start Guide
Page 61
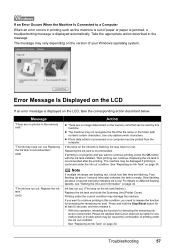
U041 "The ink has run out. (The lamp on the ink tank flashes.) Replace the ink tank and close the Scanning Unit (Printer Cover). Use only alphanumeric characters. z Photo data edited or processed on the LCD, take the corresponding action described below. If printing is in progress and... 34. See "Replacing an Ink Tank" on page 34. Printing under the ink out condition. See "Replacing an Ink Tank" on the memory card that Canon shall not be printed from the computer. Replace the ink tank." Message "There are flashing. If an Error Occurs When the Machine Is Connected to...
U041 "The ink has run out. (The lamp on the ink tank flashes.) Replace the ink tank and close the Scanning Unit (Printer Cover). Use only alphanumeric characters. z Photo data edited or processed on the LCD, take the corresponding action described below. If printing is in progress and... 34. See "Replacing an Ink Tank" on page 34. Printing under the ink out condition. See "Replacing an Ink Tank" on the memory card that Canon shall not be printed from the computer. Replace the ink tank." Message "There are flashing. If an Error Occurs When the Machine Is Connected to...
Quick Start Guide
Page 62
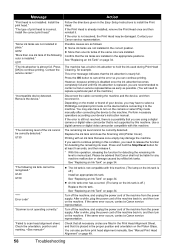
... once empty may also have to select a PictBridge-compliant print mode on the machine. Replace the ink tank and close the Scanning Unit (Printer Cover). See "Replacing an Ink Tank" on page 34. See "Replacing an Ink Tank" on page 49. 58 Troubleshooting See "Manual Print...5 seconds, and then release it to scan head alignment sheet. Contact your device's instruction manual. If the same error occurs, contact a Canon service representative. Check that all necessary circles are as possible. (You will need to continue printing. Possible causes are filled in the proper ...
... once empty may also have to select a PictBridge-compliant print mode on the machine. Replace the ink tank and close the Scanning Unit (Printer Cover). See "Replacing an Ink Tank" on page 34. See "Replacing an Ink Tank" on page 49. 58 Troubleshooting See "Manual Print...5 seconds, and then release it to scan head alignment sheet. Contact your device's instruction manual. If the same error occurs, contact a Canon service representative. Check that all necessary circles are as possible. (You will need to continue printing. Possible causes are filled in the proper ...
Quick Start Guide
Page 64
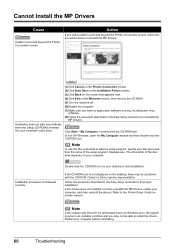
...Easy Setup Instructions to install the drivers. Restart your computer. Contact a Canon service representative. If the drivers were not installed correctly, uninstall the MP Drivers, restart your desktop to the Printer Driver Guide onscreen manual. Cannot Install the MP Drivers Cause Unable to... proceed beyond the Printer Connection screen, follow the procedure below to start the setup program, specify your ...
...Easy Setup Instructions to install the drivers. Restart your computer. Contact a Canon service representative. If the drivers were not installed correctly, uninstall the MP Drivers, restart your desktop to the Printer Driver Guide onscreen manual. Cannot Install the MP Drivers Cause Unable to... proceed beyond the Printer Connection screen, follow the procedure below to start the setup program, specify your ...
Quick Start Guide
Page 67
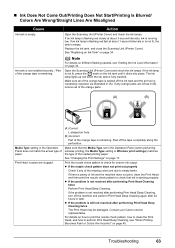
...to check that the Media Type set in the Operation Panel (when perfuming wireless printing, the Media Type setting in (A). Contact your Canon service representative. Action Open the Scanning Unit (Printer Cover) and check the ink lamps. See "Replacing an Ink Tank" on page 17. z If the problem is empty. ...ink lamp is not resolved after performing Print Head Deep Cleaning, turn off the tape completely along the perforation. Open the Scanning Unit (Printer Cover) and check the ink lamps. If there is plenty of the loaded printing paper. If the problem is ejecting properly.
...to check that the Media Type set in the Operation Panel (when perfuming wireless printing, the Media Type setting in (A). Contact your Canon service representative. Action Open the Scanning Unit (Printer Cover) and check the ink lamps. See "Replacing an Ink Tank" on page 17. z If the problem is empty. ...ink lamp is not resolved after performing Print Head Deep Cleaning, turn off the tape completely along the perforation. Open the Scanning Unit (Printer Cover) and check the ink lamps. If there is plenty of the loaded printing paper. If the problem is ejecting properly.


