
Network Setup Troubleshooting
Page 2
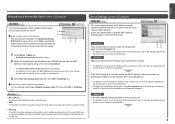
... Printers List Screen P.5 WPS WCN Additional Computers Setup Set Up New Printer Screen is Changed • Names of functions, etc. is Displayed P.2 Check Access Point to Perform Setup Again Connection Checklist The following symbols are based on your problem or if you cannot find a description for Windows users. If you encounter a problem after the Network Environment is Displayed P.6 Reference Information Configuring Wireless LAN Settings Manually Restoring the Machine's Default LAN Settings to Be Used Screen is Displayed P.3 Check Settings...
... Printers List Screen P.5 WPS WCN Additional Computers Setup Set Up New Printer Screen is Changed • Names of functions, etc. is Displayed P.2 Check Access Point to Perform Setup Again Connection Checklist The following symbols are based on your problem or if you cannot find a description for Windows users. If you encounter a problem after the Network Environment is Displayed P.6 Reference Information Configuring Wireless LAN Settings Manually Restoring the Machine's Default LAN Settings to Be Used Screen is Displayed P.3 Check Settings...

Network Setup Troubleshooting
Page 3
...'s periodic transmission of the access point from appearing on the machine. "WPA/WPA2 Enterprise" is not supported on other wireless devices. An access point could not be detected. To establish a connection without changing the access point settings, refer to and onward in the printed manual: Getting Started. Check 3 Is SSID broadcast (connection via "ANY" SSID, etc.) or disable the stealth mode, then click Refresh (A) to...
...'s periodic transmission of the access point from appearing on the machine. "WPA/WPA2 Enterprise" is not supported on other wireless devices. An access point could not be detected. To establish a connection without changing the access point settings, refer to and onward in the printed manual: Getting Started. Check 3 Is SSID broadcast (connection via "ANY" SSID, etc.) or disable the stealth mode, then click Refresh (A) to...
Network Setup Troubleshooting
Page 4
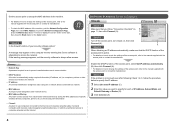
... address of the machine, click Set IP Address (B), then follow the procedure in Check 4 of "Set Printer IP Address Screen is Displayed" on how to check the settings of signals from the current one access point The access point selected in use roaming, select Use multiple access points (D), then click OK or Continue (C). Glossary • MAC address A unique number assigned to each network device. • SSID An identifier to identify the specific access...
... address of the machine, click Set IP Address (B), then follow the procedure in Check 4 of "Set Printer IP Address Screen is Displayed" on how to check the settings of signals from the current one access point The access point selected in use roaming, select Use multiple access points (D), then click OK or Continue (C). Glossary • MAC address A unique number assigned to each network device. • SSID An identifier to identify the specific access...
Network Setup Troubleshooting
Page 5
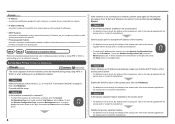
To print the Network Configuration Page, press the Maintenance button 11 times to display the screen shown to corporate networks and the Internet. Set Printer IP Address Screen is Displayed Check Check 1 Make sure that Canon software is attempting to access the network. It protects computers and corporate networks against unauthorized access, or restricts unauthorized access to the right, then press the Black button or the Color button. C D Check 2 Turn off the access point, turn it back on B page 11, then click Connect (A). A message may...
To print the Network Configuration Page, press the Maintenance button 11 times to display the screen shown to corporate networks and the Internet. Set Printer IP Address Screen is Displayed Check Check 1 Make sure that Canon software is attempting to access the network. It protects computers and corporate networks against unauthorized access, or restricts unauthorized access to the right, then press the Black button or the Color button. C D Check 2 Turn off the access point, turn it back on B page 11, then click Connect (A). A message may...

Network Setup Troubleshooting
Page 6
... machine connected to a network? • To check if the machine is connected to a network, print the Network Configuration Page, then make sure that Link Status is not connected to the manual supplied with the access point or contact its manufacturer. • To check the IP address of the machine, print the Network Configuration Page, then check IP Address. To print the Network Configuration Page, press the Maintenance button 11 times to display the screen shown to the right, then press the Black button or the Color button. Check...
... machine connected to a network? • To check if the machine is connected to a network, print the Network Configuration Page, then make sure that Link Status is not connected to the manual supplied with the access point or contact its manufacturer. • To check the IP address of the machine, print the Network Configuration Page, then check IP Address. To print the Network Configuration Page, press the Maintenance button 11 times to display the screen shown to the right, then press the Black button or the Color button. Check...
Network Setup Troubleshooting
Page 7
... traffic from "6 Set Up a Wireless Connection" in the printed manual: Getting Started. Check 2 Is the machine connected to a network? • To check if the machine is connected to a network, perform setup again by using WPS or WCN, or when setting up on how to change the settings of the access point, refer to the right, then press the Black button or the Color button. To print the Network Configuration Page, press the Maintenance button 11 times to display the screen shown...
... traffic from "6 Set Up a Wireless Connection" in the printed manual: Getting Started. Check 2 Is the machine connected to a network? • To check if the machine is connected to a network, perform setup again by using WPS or WCN, or when setting up on how to change the settings of the access point, refer to the right, then press the Black button or the Color button. To print the Network Configuration Page, press the Maintenance button 11 times to display the screen shown...

Network Setup Troubleshooting
Page 8
... the printed manual: Getting Started. • When using an access point that does not support WPS, configure the settings by referring to "6 Set Up a Wireless Connection" in another way. "E > 2 > 3" is Displayed Check The message appears when an error occurs. ENGLISH Problems during Network Setup Glossary • IP address A numerical identification assigned to each computer or network device connected to a network. • IP address filtering A function to allow or block traffic from the Operation Panel...
... the printed manual: Getting Started. • When using an access point that does not support WPS, configure the settings by referring to "6 Set Up a Wireless Connection" in another way. "E > 2 > 3" is Displayed Check The message appears when an error occurs. ENGLISH Problems during Network Setup Glossary • IP address A numerical identification assigned to each computer or network device connected to a network. • IP address filtering A function to allow or block traffic from the Operation Panel...
Network Setup Troubleshooting
Page 12
... If the machine is there a microwave oven, refrigerator, etc. Leave some space between the installation location and a microwave oven, refrigerator, etc. Check 6 Is the firewall function of the access point, refer to the network? so that Canon software is required for network settings when configuring wireless settings without using the WPS or WCN function. Check 5 Is the wireless LAN setup cable connected properly? • The wireless LAN setup cable is attempting to...
... If the machine is there a microwave oven, refrigerator, etc. Leave some space between the installation location and a microwave oven, refrigerator, etc. Check 6 Is the firewall function of the access point, refer to the network? so that Canon software is required for network settings when configuring wireless settings without using the WPS or WCN function. Check 5 Is the wireless LAN setup cable connected properly? • The wireless LAN setup cable is attempting to...

MP495 series Getting Started
Page 66
...) Copy Specifications Multiple copy 1-9, 20 pages Reduction/Enlargement Fit-to PC External dimensions Approx. 17.8 (W) X 13.2 (D) X 6.0 (H) inches Approx. 450 (W) X 335 (D) X 153 (H) mm * With the Paper Support and Paper Output Tray retracted. space may be changed without notice. For Windows use only. • You cannot use movie files with Hi-Speed USB standard is required to the operating system's requirements when higher than those given here. Specifications 10 General Specifications Printing...
...) Copy Specifications Multiple copy 1-9, 20 pages Reduction/Enlargement Fit-to PC External dimensions Approx. 17.8 (W) X 13.2 (D) X 6.0 (H) inches Approx. 450 (W) X 335 (D) X 153 (H) mm * With the Paper Support and Paper Output Tray retracted. space may be changed without notice. For Windows use only. • You cannot use movie files with Hi-Speed USB standard is required to the operating system's requirements when higher than those given here. Specifications 10 General Specifications Printing...
Network Guide
Page 4
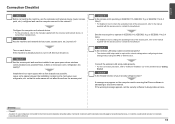
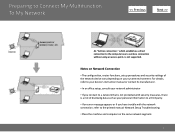
... not supported. Preparing to Connect My Multifunction To My Network > An "Ad-hoc connection," which establishes a direct connection to the computer over a wireless connection without using an access point, is a risk of the network device vary depending on your personal information to a third party. • If an error message appears or if you have trouble with the network connection, refer to the printed manual: Network Setup Troubleshooting. • Place the machine and...
... not supported. Preparing to Connect My Multifunction To My Network > An "Ad-hoc connection," which establishes a direct connection to the computer over a wireless connection without using an access point, is a risk of the network device vary depending on your personal information to a third party. • If an error message appears or if you have trouble with the network connection, refer to the printed manual: Network Setup Troubleshooting. • Place the machine and...
Network Guide
Page 5
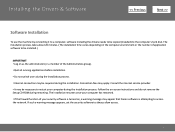
... the administrator (or a member of your computer during restarting. Consult the internet service provider. • It may apply. Connection fees may be copied (installed) to the computer's hard disk. Installing the Drivers & Software > Software Installation To use the machine by connecting it to a computer, software including the drivers needs to be necessary to restart your security software is attempting to access the network. If such a warning message appears, set the security software to...
... the administrator (or a member of your computer during restarting. Consult the internet service provider. • It may apply. Connection fees may be copied (installed) to the computer's hard disk. Installing the Drivers & Software > Software Installation To use the machine by connecting it to a computer, software including the drivers needs to be necessary to restart your security software is attempting to access the network. If such a warning message appears, set the security software to...
Network Guide
Page 6
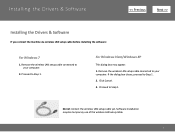
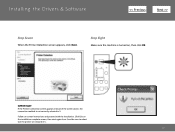
Installing the Drivers & Software > Installing the Drivers & Software If you connect the machine via wireless LAN setup cable before installing the software: For Windows 7 1. Proceed to Step 1. Do not connect the wireless LAN setup cable yet. For Windows Vista/Windows XP This dialog box may appear. 1. Click Cancel. 3. Proceed to Step 1. Remove the wireless LAN setup cable connected to your computer. 2. Remove the wireless LAN setup cable connected to your computer. Software installation requires temporary use of the wireless LAN setup cable. 6 If the dialog box closes...
Installing the Drivers & Software > Installing the Drivers & Software If you connect the machine via wireless LAN setup cable before installing the software: For Windows 7 1. Proceed to Step 1. Do not connect the wireless LAN setup cable yet. For Windows Vista/Windows XP This dialog box may appear. 1. Click Cancel. 3. Proceed to Step 1. Remove the wireless LAN setup cable connected to your computer. 2. Remove the wireless LAN setup cable connected to your computer. Software installation requires temporary use of the wireless LAN setup cable. 6 If the dialog box closes...
Network Guide
Page 10
Click Exit on the installation complete screen, then start again from 2 and be sure to select Use the printer on -screen instructions and proceed with the installation. Follow on network in 5. Installing the Drivers & Software > Step Seven When the Printer Detection screen appears, click Next. IMPORTANT If the Printer Connection screen appears instead of the screen above, the connection method is turned on, then click OK. Step Eight Make sure the machine is not correctly selected in 5. 10
Click Exit on the installation complete screen, then start again from 2 and be sure to select Use the printer on -screen instructions and proceed with the installation. Follow on network in 5. Installing the Drivers & Software > Step Seven When the Printer Detection screen appears, click Next. IMPORTANT If the Printer Connection screen appears instead of the screen above, the connection method is turned on, then click OK. Step Eight Make sure the machine is not correctly selected in 5. 10

Network Guide (MAC)
Page 5
... -screen instructions and do not remove the Setup CD-ROM during restarting. Follow the on the computer environment or the number of your computer during the installation process. The installation resumes once your computer has restarted. • If the firewall function of application software to access the network. Installing the Drivers & Software > Software Installation To use the machine by connecting it to a computer, software including the drivers needs to be...
... -screen instructions and do not remove the Setup CD-ROM during restarting. Follow the on the computer environment or the number of your computer during the installation process. The installation resumes once your computer has restarted. • If the firewall function of application software to access the network. Installing the Drivers & Software > Software Installation To use the machine by connecting it to a computer, software including the drivers needs to be...

Network Guide (MAC)
Page 8
Step Six When the Printer Detection screen appears, click Next. IMPORTANT If the Printer Connection screen appears instead of the screen above, the connection method is not correctly selected in 5. 8 Follow on network, then click Next. Click Exit on the installation complete screen, then start again from 2 and be sure to select Use the printer on -screen instructions to proceed with the installation. Installing the Drivers & Software > Step Five Select Use the printer on -screen instructions and proceed with the software installation. Follow any on network in 5.
Step Six When the Printer Detection screen appears, click Next. IMPORTANT If the Printer Connection screen appears instead of the screen above, the connection method is not correctly selected in 5. 8 Follow on network, then click Next. Click Exit on the installation complete screen, then start again from 2 and be sure to select Use the printer on -screen instructions to proceed with the installation. Installing the Drivers & Software > Step Five Select Use the printer on -screen instructions and proceed with the software installation. Follow any on network in 5.
Network Installation Guide
Page 12
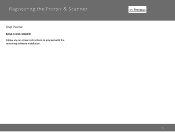
Registering the Printer & Scanner Step Twelve Setup is now complete Follow any on-screen instructions to proceed with the remaining software installation.
Registering the Printer & Scanner Step Twelve Setup is now complete Follow any on-screen instructions to proceed with the remaining software installation.

Obtaining Network Key
Page 4
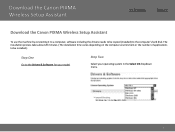
The installation process takes about 20 minutes. (The installation time varies depending on the computer environment or the number of applications to be copied (installed) to the Drivers & Software for your model Step Two Select your operating system in the Select OS dropdown menu. 4 Download the Canon PIXMA Wireless Setup Assistant > Download the Canon PIXMA Wireless Setup Assistant To use the machine by connecting it to a computer, software including the drivers needs to be installed.) Step One Go to the computer's hard disk.
The installation process takes about 20 minutes. (The installation time varies depending on the computer environment or the number of applications to be copied (installed) to the Drivers & Software for your model Step Two Select your operating system in the Select OS dropdown menu. 4 Download the Canon PIXMA Wireless Setup Assistant > Download the Canon PIXMA Wireless Setup Assistant To use the machine by connecting it to a computer, software including the drivers needs to be installed.) Step One Go to the computer's hard disk.
Obtaining Network Key
Page 6
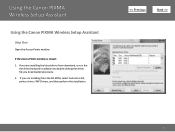
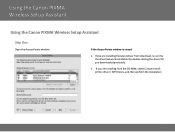
Using the Canon PIXMA Wireless Setup Assistant Using the Canon PIXMA Wireless Setup Assistant Step One Open the Access Points window. If you downloaded previously. 2. If the Access Points window is closed: 1. If you are installing from download, re-run the the driver/network installation by double-clicking the driver file you are installing the latest driver from the CD-ROM, select Custom Install, printer driver / MP Drivers, and then perform the installation. > 6
Using the Canon PIXMA Wireless Setup Assistant Using the Canon PIXMA Wireless Setup Assistant Step One Open the Access Points window. If you downloaded previously. 2. If the Access Points window is closed: 1. If you are installing from download, re-run the the driver/network installation by double-clicking the driver file you are installing the latest driver from the CD-ROM, select Custom Install, printer driver / MP Drivers, and then perform the installation. > 6
Obtaining Network Key (MAC)
Page 5
The installation process takes about 20 minutes. (The installation time varies depending on the computer environment or the number of applications to be copied (installed) to the Drivers & Software for your model Step Two Select your operating system in the Select OS dropdown menu. 5 Download the Canon PIXMA Wireless Setup Assistant > Download the Canon PIXMA Wireless Setup Assistant To use the machine by connecting it to a computer, software including the drivers needs to be installed.) Step One Go to the computer's hard disk.
The installation process takes about 20 minutes. (The installation time varies depending on the computer environment or the number of applications to be copied (installed) to the Drivers & Software for your model Step Two Select your operating system in the Select OS dropdown menu. 5 Download the Canon PIXMA Wireless Setup Assistant > Download the Canon PIXMA Wireless Setup Assistant To use the machine by connecting it to a computer, software including the drivers needs to be installed.) Step One Go to the computer's hard disk.
Obtaining Network Key (MAC)
Page 7
Using the Canon PIXMA Wireless Setup Assistant Using the Canon PIXMA Wireless Setup Assistant Step One Open the Access Points window. If you downloaded previously. 2. If the Access Points window is closed: 1. If you are installing the latest driver from download, re-run the the driver/network installation by double-clicking the driver file you are installing from the CD-ROM, select Custom Install, printer driver / MP Drivers, and then perform the installation. 7
Using the Canon PIXMA Wireless Setup Assistant Using the Canon PIXMA Wireless Setup Assistant Step One Open the Access Points window. If you downloaded previously. 2. If the Access Points window is closed: 1. If you are installing the latest driver from download, re-run the the driver/network installation by double-clicking the driver file you are installing from the CD-ROM, select Custom Install, printer driver / MP Drivers, and then perform the installation. 7


