MP150 Easy Setup Instructions
Page 1
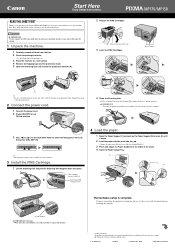
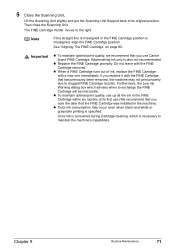
... use , see the reverse side for instructions on a flat surface. 4 Remove all items from the box. 2 Check the package contents. • See the flapped lid of the stack. 4 Open the Paper Output Tray. (1) (3) (A) (2) The hardware setup is complete; You will need this sheet for some countries. 3 Install the FINE Cartridge. 1 Lift the Scanning Unit and pull the Scanning Unit Support down the serial number. IMPORTANT Do not connect the USB cable until after the software...
... use , see the reverse side for instructions on a flat surface. 4 Remove all items from the box. 2 Check the package contents. • See the flapped lid of the stack. 4 Open the Paper Output Tray. (1) (3) (A) (2) The hardware setup is complete; You will need this sheet for some countries. 3 Install the FINE Cartridge. 1 Lift the Scanning Unit and pull the Scanning Unit Support down the serial number. IMPORTANT Do not connect the USB cable until after the software...

MP150 Easy Setup Instructions
Page 2
... following screen appears, the USB cable is located inside the machine. (See "3 Install the FINE Cartridge." Turn OFF the machine. 2. The serial number is connected. ROM and click [File] menu and then select [Open]. Select [Applications] from the pop-up menu. If the printer is installed. Disconnect the USB cable. 3. then click [Next]. Step 1: Turn ON the machine, and connect the USB cable. Click Click Step 5: Install the software. 1 Click [Easy Install], then click [Install]. • To read...
... following screen appears, the USB cable is located inside the machine. (See "3 Install the FINE Cartridge." Turn OFF the machine. 2. The serial number is connected. ROM and click [File] menu and then select [Open]. Select [Applications] from the pop-up menu. If the printer is installed. Disconnect the USB cable. 3. then click [Next]. Step 1: Turn ON the machine, and connect the USB cable. Click Click Step 5: Install the software. 1 Click [Easy Install], then click [Install]. • To read...
MP170 User's Guide
Page 4
... Lines Are Misaligned/ Cannot Print To End Of Job 90 Back Of Paper Is Smudged/ Paper Does Not Feed Properly/ Printed Surface Is Scratched 93 Paper Jams 95 Cannot Print Properly From A Photo Index Sheet (MP170 96 Cannot Print Properly From The Digital Camera 97 Cannot Install The MP Driver 99 Cannot Connect To PC Properly 100 Problems With Scanning 101 An Error Message Appears On The Screen 104 For Windows Users 107...
... Lines Are Misaligned/ Cannot Print To End Of Job 90 Back Of Paper Is Smudged/ Paper Does Not Feed Properly/ Printed Surface Is Scratched 93 Paper Jams 95 Cannot Print Properly From A Photo Index Sheet (MP170 96 Cannot Print Properly From The Digital Camera 97 Cannot Install The MP Driver 99 Cannot Connect To PC Properly 100 Problems With Scanning 101 An Error Message Appears On The Screen 104 For Windows Users 107...
MP170 User's Guide
Page 6
Incorrect maintenance procedures may result in a location with fluorescent lighting. If you pull the power plug out of the wall outlet while the Alarm Lamp is on, the FINE Cartridge is approximately 4 inches (10 cm) away from this guide. If you are high-voltage components inside the machine, it may result in direct sunlight, outdoors, or close to print later...
Incorrect maintenance procedures may result in a location with fluorescent lighting. If you pull the power plug out of the wall outlet while the Alarm Lamp is on, the FINE Cartridge is approximately 4 inches (10 cm) away from this guide. If you are high-voltage components inside the machine, it may result in direct sunlight, outdoors, or close to print later...
MP170 User's Guide
Page 12
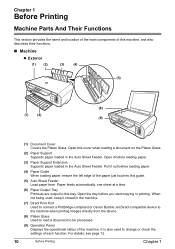
... cover when loading a document on the Platen Glass. (2) Paper Support Supports paper loaded in the Auto Sheet Feeder. Open it closed in the Auto Sheet Feeder. Open the tray before loading paper. (3) Paper Support Extension Supports paper loaded in the machine. (7) Direct Print Port Used to connect a PictBridge-compliant or Canon Bubble Jet Direct-compatible device to the machine when printing images directly from the device. (8) Platen Glass Used to load a document to change or check the settings of the machine. Open this tray. Pull it out before loading paper. (4) Paper Guide...
... cover when loading a document on the Platen Glass. (2) Paper Support Supports paper loaded in the Auto Sheet Feeder. Open it closed in the Auto Sheet Feeder. Open the tray before loading paper. (3) Paper Support Extension Supports paper loaded in the machine. (7) Direct Print Port Used to connect a PictBridge-compliant or Canon Bubble Jet Direct-compatible device to the machine when printing images directly from the device. (8) Platen Glass Used to load a document to change or check the settings of the machine. Open this tray. Pull it out before loading paper. (4) Paper Guide...
MP170 User's Guide
Page 13
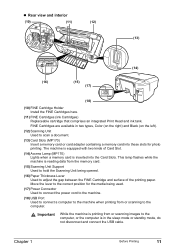
... the media being used. (17) Power Connector Used to connect the power cord to the machine. (18) USB Port Used to connect a computer to the machine when printing from the memory card. (15) Scanning Unit Support Used to hold the Scanning Unit being opened. (16) Paper Thickness Lever Used to adjust the gap between the FINE Cartridge and surface of Card Slot. (14) Access Lamp (MP170) Lights when a memory card is inserted into these slots for photo printing. Important While the machine is printing from or scanning images...
... the media being used. (17) Power Connector Used to connect the power cord to the machine. (18) USB Port Used to connect a computer to the machine when printing from the memory card. (15) Scanning Unit Support Used to hold the Scanning Unit being opened. (16) Paper Thickness Lever Used to adjust the gap between the FINE Cartridge and surface of Card Slot. (14) Access Lamp (MP170) Lights when a memory card is inserted into these slots for photo printing. Important While the machine is printing from or scanning images...
MP170 User's Guide
Page 14
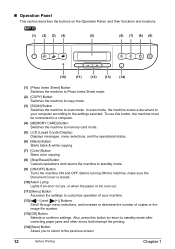
...computer. (4) [MEMORY CARD] Button Switches the machine to memory card mode. (5) LCD (Liquid Crystal Display) Displays messages, menu selections, and the operational status. (6) [Black] Button Starts black & white copying. (7) [Color] Button Starts color copying. (8) [Stop/Reset] Button Cancels operations and returns the machine to the settings selected. Before turning ON the machine, make sure the Document Cover is closed. (10) Alarm Lamp Lights if an error occurs, or when the paper or ink runs out. (11) [Menu] Button Accesses the settings to scan mode. „ Operation Panel This section...
...computer. (4) [MEMORY CARD] Button Switches the machine to memory card mode. (5) LCD (Liquid Crystal Display) Displays messages, menu selections, and the operational status. (6) [Black] Button Starts black & white copying. (7) [Color] Button Starts color copying. (8) [Stop/Reset] Button Cancels operations and returns the machine to the settings selected. Before turning ON the machine, make sure the Document Cover is closed. (10) Alarm Lamp Lights if an error occurs, or when the paper or ink runs out. (11) [Menu] Button Accesses the settings to scan mode. „ Operation Panel This section...
MP170 User's Guide
Page 35
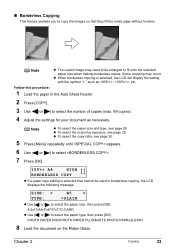
... Auto Sheet Feeder. 2 Press [COPY]. 3 Use [ ] or [ ] to select the number of copies (max. 99 copies). 4 Adjust the settings for your document as , , etc. Note z To select the paper size and type, see page 29. PHOTO PAPER PRO/PHOTO PAPER PLUS/MATTE PHOTO PAPR/GLOSSY 8 Load the document on the Platen Glass. „ Borderless Copying This feature enables you to copy the images so that cannot be enlarged to fit onto the selected paper size when making borderless copies. SIZE: < B5 > TYPE...
... Auto Sheet Feeder. 2 Press [COPY]. 3 Use [ ] or [ ] to select the number of copies (max. 99 copies). 4 Adjust the settings for your document as , , etc. Note z To select the paper size and type, see page 29. PHOTO PAPER PRO/PHOTO PAPER PLUS/MATTE PHOTO PAPR/GLOSSY 8 Load the document on the Platen Glass. „ Borderless Copying This feature enables you to copy the images so that cannot be enlarged to fit onto the selected paper size when making borderless copies. SIZE: < B5 > TYPE...
MP170 User's Guide
Page 40
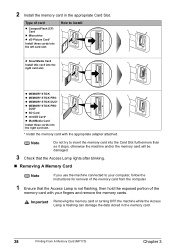
... Removing the memory card or turning OFF the machine while the Access Lamp is not flashing, then hold the exposed portion of the memory card with the appropriate adapter attached. How to your fingers and remove the memory cards. 2 Install the memory card in the memory card. 38 Printing From A Memory Card (MP170) Chapter 3 Type of the memory card from the computer. 1 Ensure that the Access Lamp lights after blinking. „ Removing A Memory Card Note If you use the machine connected to install z SmartMedia Card Install...
... Removing the memory card or turning OFF the machine while the Access Lamp is not flashing, then hold the exposed portion of the memory card with the appropriate adapter attached. How to your fingers and remove the memory cards. 2 Install the memory card in the memory card. 38 Printing From A Memory Card (MP170) Chapter 3 Type of the memory card from the computer. 1 Ensure that the Access Lamp lights after blinking. „ Removing A Memory Card Note If you use the machine connected to install z SmartMedia Card Install...
MP170 User's Guide
Page 59
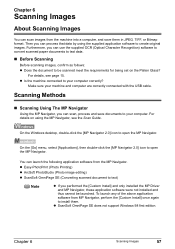
... being set on using the supplied application software to install them in JPEG, TIFF, or Bitmap format. z Is the machine connected to open the MP Navigator. On the [Go] menu, select [Applications], then double-click the [MP Navigator 2.0] icon to your machine and computer are correctly connected with the USB cable. For details on the Platen Glass? Chapter 6 Scanning Images 57 On the Windows desktop, double-click...
... being set on using the supplied application software to install them in JPEG, TIFF, or Bitmap format. z Is the machine connected to open the MP Navigator. On the [Go] menu, select [Applications], then double-click the [MP Navigator 2.0] icon to your machine and computer are correctly connected with the USB cable. For details on the Platen Glass? Chapter 6 Scanning Images 57 On the Windows desktop, double-click...
MP170 User's Guide
Page 60
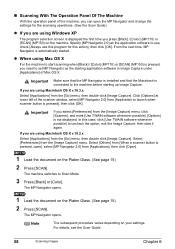
... a scanner button is pressed, open the MP Navigator and change the settings for this case, click [Use TWAIN software whenever possible] to start it again. For details, see the Scan Guide. 58 Scanning Images Chapter 6 From the next time, MP Navigator is not displayed. Important Make sure that the MP Navigator is installed and that the Macintosh is connected to Scan Mode. 3 Press [Black] or [Color]. If you are using Mac OS...
... a scanner button is pressed, open the MP Navigator and change the settings for this case, click [Use TWAIN software whenever possible] to start it again. For details, see the Scan Guide. 58 Scanning Images Chapter 6 From the next time, MP Navigator is not displayed. Important Make sure that the MP Navigator is installed and that the Macintosh is connected to Scan Mode. 3 Press [Black] or [Color]. If you are using Mac OS...
MP170 User's Guide
Page 63
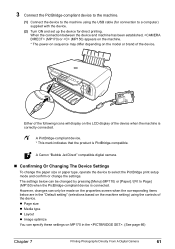
... that the product is connected. A Canon "Bubble Jet Direct" compatible digital camera. „ Confirming Or Changing The Device Settings To change the paper size or paper type, operate the device to a computer) supplied with the device. (2) Turn ON and set up the device for connection to select the PictBridge print setup mode and confirm or change the settings. However, changes can only be changed by pressing [Menu] (MP170) or [Paper] / [Fit to Page] (MP150) when the...
... that the product is connected. A Canon "Bubble Jet Direct" compatible digital camera. „ Confirming Or Changing The Device Settings To change the paper size or paper type, operate the device to a computer) supplied with the device. (2) Turn ON and set up the device for connection to select the PictBridge print setup mode and confirm or change the settings. However, changes can only be changed by pressing [Menu] (MP170) or [Paper] / [Fit to Page] (MP150) when the...
MP170 User's Guide
Page 73
... Cartridge will be inaccurate. If you replace it with the FINE Cartridge that you note the date that the FINE Cartridge was installed in the machine). Chapter 9 Routine Maintenance 71 Lift the Scanning Unit slightly and put the Scanning Unit Support back to the right. z Replace the FINE Cartridge promptly. z To maintain optimal print quality, use Canon brand FINE Cartridge. See "Aligning The FINE Cartridge" on page 80. Then close the Scanning Unit...
... Cartridge will be inaccurate. If you replace it with the FINE Cartridge that you note the date that the FINE Cartridge was installed in the machine). Chapter 9 Routine Maintenance 71 Lift the Scanning Unit slightly and put the Scanning Unit Support back to the right. z Replace the FINE Cartridge promptly. z To maintain optimal print quality, use Canon brand FINE Cartridge. See "Aligning The FINE Cartridge" on page 80. Then close the Scanning Unit...
MP170 User's Guide
Page 88
... Of Paper Is Smudged/Paper Does Not Feed Properly/Printed Surface Is Scratched (See page 93) Paper Jams (See page 95) Cannot Print Properly From A Photo Index Sheet (MP170) (See page 96) Cannot Print Properly From The Digital Camera (See page 97) Cannot Install The MP Driver (See page 99) Cannot Connect To PC Properly (See page 100) Problems With Scanning (See page 101) An Error Message Appears On The Screen (See page 104) For Windows Users (See page...
... Of Paper Is Smudged/Paper Does Not Feed Properly/Printed Surface Is Scratched (See page 93) Paper Jams (See page 95) Cannot Print Properly From A Photo Index Sheet (MP170) (See page 96) Cannot Print Properly From The Digital Camera (See page 97) Cannot Install The MP Driver (See page 99) Cannot Connect To PC Properly (See page 100) Problems With Scanning (See page 101) An Error Message Appears On The Screen (See page 104) For Windows Users (See page...
MP170 User's Guide
Page 89
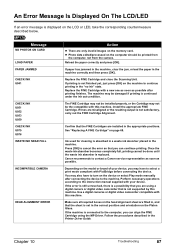
... "Replacing A FINE Cartridge" on the machine to the machine. Message NO PHOTOS ON CARD LOAD PAPER PAPER JAMMED CHECK INK U041 CHECK INK U051 U052 U053 U059 CHECK INK U075 U076 WASTE INK NEAR FULL INCOMPATIBLE CAMERA HEAD ALIGNMENT ERROR Action z There are misaligned or the resulting output is not satisfactory, carry out the FINE Cartridge Alignment. Press [OK] to contact a Canon service representative as soon as possible after connecting the device to continue printing in the Printer Driver Guide. If lines...
... "Replacing A FINE Cartridge" on the machine to the machine. Message NO PHOTOS ON CARD LOAD PAPER PAPER JAMMED CHECK INK U041 CHECK INK U051 U052 U053 U059 CHECK INK U075 U076 WASTE INK NEAR FULL INCOMPATIBLE CAMERA HEAD ALIGNMENT ERROR Action z There are misaligned or the resulting output is not satisfactory, carry out the FINE Cartridge Alignment. Press [OK] to contact a Canon service representative as soon as possible after connecting the device to continue printing in the Printer Driver Guide. If lines...
MP170 User's Guide
Page 91
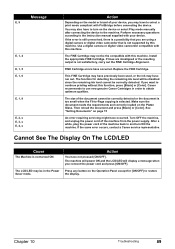
.... Canon recommends to use new genuine Canon Cartridges in and turn on page 15 An error requiring servicing might have to obtain optimum qualities. After a while, plug the power cord of the machine back in order to select a print mode compliant with this machine. Action You have occurred. The machine will power ON and the LCD/LED will be disabled since the remaining ink level cannot be the compatible with...
.... Canon recommends to use new genuine Canon Cartridges in and turn on page 15 An error requiring servicing might have to obtain optimum qualities. After a while, plug the power cord of the machine back in order to select a print mode compliant with this machine. Action You have occurred. The machine will power ON and the LCD/LED will be disabled since the remaining ink level cannot be the compatible with...
MP170 User's Guide
Page 99
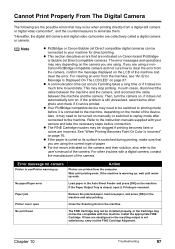
... too much time to the machine, depending on page 87. If the machine is connected to send data. Paper jam Remove the jammed paper, load new paper, and press [OK] on manually or switched to replay mode after connected to the user's manual of the camera. Error message on the camera and their solution, also refer to the machine. No print head The FINE Cartridge may not be installed properly, or the Cartridge may not be printed. Cannot Print Properly From...
... too much time to the machine, depending on page 87. If the machine is connected to send data. Paper jam Remove the jammed paper, load new paper, and press [OK] on manually or switched to replay mode after connected to the user's manual of the camera. Error message on the camera and their solution, also refer to the machine. No print head The FINE Cartridge may not be installed properly, or the Cartridge may not be printed. Cannot Print Properly From...
MP170 User's Guide
Page 100
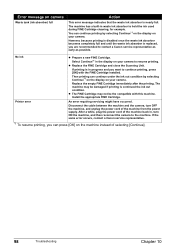
... progress and you want to continue printing, press [OK] with this machine. z Replace the FINE Cartridge and close the Scanning Unit. Error message on camera Waste tank (ink absorber) full Action This error message indicates that the waste ink absorber is replaced, you are recommended to contact a Canon service representative as early as possible. However, because printing is disabled once the waste ink absorber becomes completely full and...
... progress and you want to continue printing, press [OK] with this machine. z Replace the FINE Cartridge and close the Scanning Unit. Error message on camera Waste tank (ink absorber) full Action This error message indicates that the waste ink absorber is replaced, you are recommended to contact a Canon service representative as early as possible. However, because printing is disabled once the waste ink absorber becomes completely full and...
MP170 User's Guide
Page 106
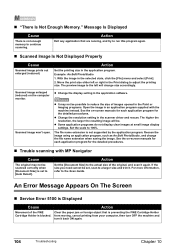
...; Trouble scanning with the machine instead. z Some application programs do not display clear images at small image display settings. Message Is Displayed Cause There is blocked. Scanned image won't open. from moving, cancel printing from your computer, then turn OFF the machine and turn it again. z It may not be scanned correctly when [Document Size] is not supported by the application program. „ "There Is Not Enough Memory." Action Set the printing size in the application software...
...; Trouble scanning with the machine instead. z Some application programs do not display clear images at small image display settings. Message Is Displayed Cause There is blocked. Scanned image won't open. from moving, cancel printing from your computer, then turn OFF the machine and turn it again. z It may not be scanned correctly when [Document Size] is not supported by the application program. „ "There Is Not Enough Memory." Action Set the printing size in the application software...
MP170 User's Guide
Page 107
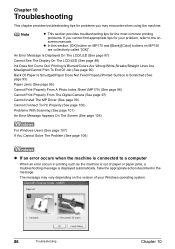
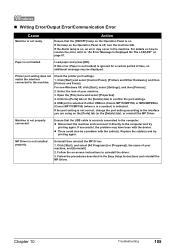
.../LED" on the Operation Panel is securely connected to the interface you are using on . Follow the on , an error may be a problem with the device. Action Ensure that the USB cable is off, turn the machine ON. „ Writing Error/Output Error/Communication Error Cause Machine is not correct, change the port setting according to the computer. Check the printer port settings. 1. If the port setting is not ready. Open the [File] menu and select [Properties...
.../LED" on the Operation Panel is securely connected to the interface you are using on . Follow the on , an error may be a problem with the device. Action Ensure that the USB cable is off, turn the machine ON. „ Writing Error/Output Error/Communication Error Cause Machine is not correct, change the port setting according to the computer. Check the printer port settings. 1. If the port setting is not ready. Open the [File] menu and select [Properties...


