User Manual
Page 9
Contents 1 Introduction Supplies and Accessories 1-2 Toner Cartridges 1-2 Customer Care Center 1-2 Servicing the MultiPASS L6000 1-3 Important Safety Instructions 1-3 Main Components of the MultiPASS L6000 1-5 Front View 1-5 Back View 1-6 Inside the MultiPASS 1-6 Using the Operator Panel 1-7 Loading Paper in the ...Pages to the Document 1-14 Setting the Document Feed Lever 1-14 Identifying Your Documents 1-15 2 Printing With the MultiPASS L6000 Paper Handling 2-1 Paper Guidelines 2-2 Installing a Printer Driver 2-2 Printing a Document 2-3 Printer Setup Within Windows 2-4 Opening...
Contents 1 Introduction Supplies and Accessories 1-2 Toner Cartridges 1-2 Customer Care Center 1-2 Servicing the MultiPASS L6000 1-3 Important Safety Instructions 1-3 Main Components of the MultiPASS L6000 1-5 Front View 1-5 Back View 1-6 Inside the MultiPASS 1-6 Using the Operator Panel 1-7 Loading Paper in the ...Pages to the Document 1-14 Setting the Document Feed Lever 1-14 Identifying Your Documents 1-15 2 Printing With the MultiPASS L6000 Paper Handling 2-1 Paper Guidelines 2-2 Installing a Printer Driver 2-2 Printing a Document 2-3 Printer Setup Within Windows 2-4 Opening...

User Manual
Page 12
... Restarting the MultiPASS Background 8-19 Adding MultiPASS Background to StartUp 8-19 Disconnecting the MultiPASS 8-20 Using MultiPASS Diagnostics 8-20 Uninstalling the Desktop Manager 8-21 9 Maintaining the MultiPASS L6000 MultiPASS L6000 Guidelines 9-1 Routine Maintenance 9-2 Cleaning Inside the MultiPASS 9-3 Cleaning the Scanner Components 9-6 Toner Cartridge Guidelines 9-8 FX-3 Toner Cartridge Warranty 9-10 Replacing the Toner Cartridge 9-11 Preparing the Toner Cartridge 9-11 Inserting the Cartridge 9-13 Transporting...
... Restarting the MultiPASS Background 8-19 Adding MultiPASS Background to StartUp 8-19 Disconnecting the MultiPASS 8-20 Using MultiPASS Diagnostics 8-20 Uninstalling the Desktop Manager 8-21 9 Maintaining the MultiPASS L6000 MultiPASS L6000 Guidelines 9-1 Routine Maintenance 9-2 Cleaning Inside the MultiPASS 9-3 Cleaning the Scanner Components 9-6 Toner Cartridge Guidelines 9-8 FX-3 Toner Cartridge Warranty 9-10 Replacing the Toner Cartridge 9-11 Preparing the Toner Cartridge 9-11 Inserting the Cartridge 9-13 Transporting...

User Manual
Page 13
...-27 If the Power Goes Out 10-27 Memory Clear Report 10-27 Appendix A Specifications Laser Printer ...A-1 Toner Cartridge A-3 Facsimile ...A-3 Copier ...A-5 Scanner ...A-5 MultiPASS Desktop Manager for Windows A-7 General Specifications A-8 Receiving Faxes and Phone Calls Automatically-FaxTel Mode A-10 Appendix B Using the MultiPASS L6000 as a Stand-alone Fax LCD Menu System B-1 Entering Information in the...
...-27 If the Power Goes Out 10-27 Memory Clear Report 10-27 Appendix A Specifications Laser Printer ...A-1 Toner Cartridge A-3 Facsimile ...A-3 Copier ...A-5 Scanner ...A-5 MultiPASS Desktop Manager for Windows A-7 General Specifications A-8 Receiving Faxes and Phone Calls Automatically-FaxTel Mode A-10 Appendix B Using the MultiPASS L6000 as a Stand-alone Fax LCD Menu System B-1 Entering Information in the...
User Manual
Page 16
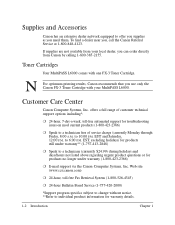
... are not available from Canon by calling 1-800-385-2155. Toner Cartridges Your MultiPASS L6000 comes with your local dealer, you can order directly from your MultiPASS L6000. to 6:00 P.M. N For optimum printing results, Canon recommends that you use only the Canon FX-3 Toner Cartridge with one FX-3 Toner Cartridge. to 10:00 P.M. Supplies and Accessories Canon has an extensive dealer...
... are not available from Canon by calling 1-800-385-2155. Toner Cartridges Your MultiPASS L6000 comes with your local dealer, you can order directly from your MultiPASS L6000. to 6:00 P.M. N For optimum printing results, Canon recommends that you use only the Canon FX-3 Toner Cartridge with one FX-3 Toner Cartridge. to 10:00 P.M. Supplies and Accessories Canon has an extensive dealer...
User Manual
Page 20
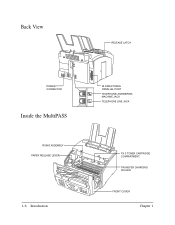
Back View RELEASE LATCH POWER CONNECTOR Inside the MultiPASS FIXING ASSEMBLY PAPER RELEASE LEVER 1-6 Introduction BI-DIRECTIONAL PARALLEL PORT TELEPHONE/ ANSWERING MACHINE JACK TELEPHONE LINE JACK FX-3 TONER CARTRIDGE COMPARTMENT TRANSFER CHARGING ROLLER FRONT COVER Chapter 1
Back View RELEASE LATCH POWER CONNECTOR Inside the MultiPASS FIXING ASSEMBLY PAPER RELEASE LEVER 1-6 Introduction BI-DIRECTIONAL PARALLEL PORT TELEPHONE/ ANSWERING MACHINE JACK TELEPHONE LINE JACK FX-3 TONER CARTRIDGE COMPARTMENT TRANSFER CHARGING ROLLER FRONT COVER Chapter 1
User Manual
Page 38
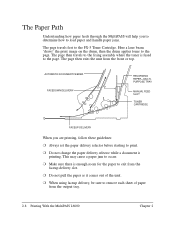
... using faceup delivery, be sure to exit from the faceup delivery slot. The page then exits the unit from the output tray. 2-8 Printing With the MultiPASS L6000 Chapter 2 r Do not pull the paper as it comes out of paper from the front or top. r Do not change the paper delivery selector ...enough room for the paper to remove each sheet of the unit. AUTOMATIC DOCUMENT FEEDER FACEDOWN DELIVERY RECORDING PAPER-MULTIPURPOSE TRAY MANUAL FEED SLOT TONER CARTRIDGE FACEUP DELIVERY When you to determine how to load paper and handle paper jams. The page travels first to the FX-3 Toner...
... using faceup delivery, be sure to exit from the faceup delivery slot. The page then exits the unit from the output tray. 2-8 Printing With the MultiPASS L6000 Chapter 2 r Do not pull the paper as it comes out of paper from the front or top. r Do not change the paper delivery selector ...enough room for the paper to remove each sheet of the unit. AUTOMATIC DOCUMENT FEEDER FACEDOWN DELIVERY RECORDING PAPER-MULTIPURPOSE TRAY MANUAL FEED SLOT TONER CARTRIDGE FACEUP DELIVERY When you to determine how to load paper and handle paper jams. The page travels first to the FX-3 Toner...
User Manual
Page 100
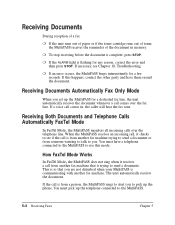
...If the unit runs out of paper or if the toner cartridge runs out of toner, the MultiPASS receives the remainder of the document in , the caller will hear the fax tone. If necessary, see if the call is from a person, the MultiPASS rings to alert you to pick up the phone. If...the error and then press STOP. The unit automatically receives the document. Receiving Both Documents and Telephone Calls Automatically FaxTel Mode In FaxTel Mode, the MultiPASS monitors all incoming calls over the fax line. r If the ALARM light is complete, press STOP. r To stop receiving before the document is...
...If the unit runs out of paper or if the toner cartridge runs out of toner, the MultiPASS receives the remainder of the document in , the caller will hear the fax tone. If necessary, see if the call is from a person, the MultiPASS rings to alert you to pick up the phone. If...the error and then press STOP. The unit automatically receives the document. Receiving Both Documents and Telephone Calls Automatically FaxTel Mode In FaxTel Mode, the MultiPASS monitors all incoming calls over the fax line. r If the ALARM light is complete, press STOP. r To stop receiving before the document is...
User Manual
Page 103
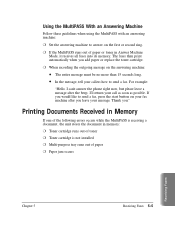
... after you leave your message. Thank you add paper or replace the toner cartridge. I 'll return your call as soon as possible. Using the MultiPASS With an Answering Machine Follow these guidelines when using the MultiPASS with an answering machine: r Set the answering machine to send a fax,... 5-5 Printing Documents Received in Memory If one of the following errors occurs while the MultiPASS is receiving a document, the unit stores the document in memory: r Toner cartridge runs out of toner r Toner cartridge is not installed r Multi-purpose tray runs out of paper or toner in Answer ...
... after you leave your message. Thank you add paper or replace the toner cartridge. I 'll return your call as soon as possible. Using the MultiPASS With an Answering Machine Follow these guidelines when using the MultiPASS with an answering machine: r Set the answering machine to send a fax,... 5-5 Printing Documents Received in Memory If one of the following errors occurs while the MultiPASS is receiving a document, the unit stores the document in memory: r Toner cartridge runs out of toner r Toner cartridge is not installed r Multi-purpose tray runs out of paper or toner in Answer ...
User Manual
Page 170
... in direct sunlight. r Do not subject the MultiPASS to your MultiPASS L6000. r To assure proper electrical contact, make sure the unit is free from operating properly. It includes: r MultiPASS L6000 guidelines r Routine maintenance r Cleaning inside the MultiPASS r Cleaning the scanner components r Toner cartridge guidelines r Replacing the toner cartridge r Transporting the MultiPASS MultiPASS L6000 Guidelines Follow these guidelines to avoid damage to...
... in direct sunlight. r Do not subject the MultiPASS to your MultiPASS L6000. r To assure proper electrical contact, make sure the unit is free from operating properly. It includes: r MultiPASS L6000 guidelines r Routine maintenance r Cleaning inside the MultiPASS r Cleaning the scanner components r Toner cartridge guidelines r Replacing the toner cartridge r Transporting the MultiPASS MultiPASS L6000 Guidelines Follow these guidelines to avoid damage to...
User Manual
Page 173
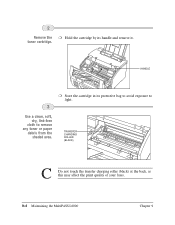
HANDLE r Store the cartridge in its handle and remove it. TRANSFER CHARGING ROLLER (BLACK) C Do not touch the transfer charging roller (black) at the back, as this may affect the print quality of your faxes. 9-4 Maintaining the MultiPASS L6000 Chapter 9 toner cartridge. 2 Remove the r Hold the cartridge by its protective bag to avoid exposure to light. 3 Use a clean, soft, dry, lint-free cloth to remove any toner or paper debris from the shaded area.
HANDLE r Store the cartridge in its handle and remove it. TRANSFER CHARGING ROLLER (BLACK) C Do not touch the transfer charging roller (black) at the back, as this may affect the print quality of your faxes. 9-4 Maintaining the MultiPASS L6000 Chapter 9 toner cartridge. 2 Remove the r Hold the cartridge by its protective bag to avoid exposure to light. 3 Use a clean, soft, dry, lint-free cloth to remove any toner or paper debris from the shaded area.
User Manual
Page 174
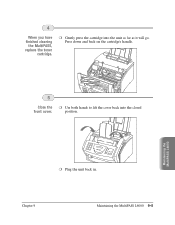
r Gently press the cartridge into the closed front cover. Press down and back on the cartridge's handle. 5 Close the r Use both hands to lift the cover back into the unit as far as it will go. Maintaining the MultiPASS L6000 r Plug the unit back in. Chapter 9 Maintaining the MultiPASS L6000 9-5 position. 4 When you have finished cleaning the MultiPASS, replace the toner cartridge.
r Gently press the cartridge into the closed front cover. Press down and back on the cartridge's handle. 5 Close the r Use both hands to lift the cover back into the unit as far as it will go. Maintaining the MultiPASS L6000 r Plug the unit back in. Chapter 9 Maintaining the MultiPASS L6000 9-5 position. 4 When you have finished cleaning the MultiPASS, replace the toner cartridge.
User Manual
Page 177
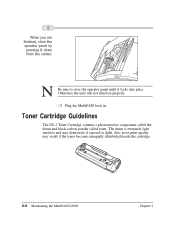
N Be sure to light. r Plug the MultiPASS back in. Toner Cartridge Guidelines The FX-3 Toner Cartridge contains a photosensitive component called the drum and black carbon powder called toner. Otherwise the unit will not function properly. 5 When you are finished, ...panel until it down from the center. The drum is extremely light sensitive and may result if the toner becomes unequally distributed inside the cartridge. 9-8 Maintaining the MultiPASS L6000 Chapter 9 Also, poor print quality may deteriorate if exposed to close the operator panel by pressing it locks into place.
N Be sure to light. r Plug the MultiPASS back in. Toner Cartridge Guidelines The FX-3 Toner Cartridge contains a photosensitive component called the drum and black carbon powder called toner. Otherwise the unit will not function properly. 5 When you are finished, ...panel until it down from the center. The drum is extremely light sensitive and may result if the toner becomes unequally distributed inside the cartridge. 9-8 Maintaining the MultiPASS L6000 Chapter 9 Also, poor print quality may deteriorate if exposed to close the operator panel by pressing it locks into place.
User Manual
Page 178
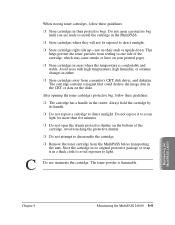
... either. The toner powder is comfortable and stable. Maintaining the MultiPASS L6000 Chapter 9 Maintaining the MultiPASS L6000 9-9 C When storing toner cartridges, follow these guidelines: r Store cartridges in their ends or upside down. r Store cartridges where they will not be exposed to disassemble the cartridge. r Store cartridges away from a monitor's CRT, disk drives, and diskettes. r Do not open a protective bag...
... either. The toner powder is comfortable and stable. Maintaining the MultiPASS L6000 Chapter 9 Maintaining the MultiPASS L6000 9-9 C When storing toner cartridges, follow these guidelines: r Store cartridges in their ends or upside down. r Store cartridges where they will not be exposed to disassemble the cartridge. r Store cartridges away from a monitor's CRT, disk drives, and diskettes. r Do not open a protective bag...

User Manual
Page 179
... defects in materials and workmanship for a full statement of your warranty rights. Refer to one of the problem 9-10 Maintaining the MultiPASS L6000 Chapter 9 For more information about the Canon Clean Earth Campaign, you can return the defective cartridge to Canon Computer Systems, Inc., or to the Limited Warranty for 90 days from the defective...
... defects in materials and workmanship for a full statement of your warranty rights. Refer to one of the problem 9-10 Maintaining the MultiPASS L6000 Chapter 9 For more information about the Canon Clean Earth Campaign, you can return the defective cartridge to Canon Computer Systems, Inc., or to the Limited Warranty for 90 days from the defective...
User Manual
Page 180
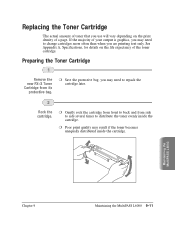
... depending on the life expectancy of a page. Maintaining the MultiPASS L6000 Chapter 9 Maintaining the MultiPASS L6000 9-11 r Gently rock the cartridge from front to back and from its protective bag. Preparing the Toner Cartridge 1 Remove the new FX-3 Toner Cartridge from side to side several times to change cartridges more often than when you are printing text only...
... depending on the life expectancy of a page. Maintaining the MultiPASS L6000 Chapter 9 Maintaining the MultiPASS L6000 9-11 r Gently rock the cartridge from front to back and from its protective bag. Preparing the Toner Cartridge 1 Remove the new FX-3 Toner Cartridge from side to side several times to change cartridges more often than when you are printing text only...

User Manual
Page 181
r Remove the seal by gently pulling on the plastic tab with one hand. r Use a firm even pull to remove the plastic seal. To avoid breaking the seal, do not jerk on it with your other hand. 3 r Place the cartridge on a flat, clean surface, and steady it unevenly. 9-12 Maintaining the MultiPASS L6000 Chapter 9
r Remove the seal by gently pulling on the plastic tab with one hand. r Use a firm even pull to remove the plastic seal. To avoid breaking the seal, do not jerk on it with your other hand. 3 r Place the cartridge on a flat, clean surface, and steady it unevenly. 9-12 Maintaining the MultiPASS L6000 Chapter 9

User Manual
Page 182
r Dispose of the unit. r Lift the cover forward to its open position. r Press the release latches on the sides of the toner cartridge properly. To recycle your used cartridge, follow the instructions included with your new FX-3 Toner Cartridge. Maintaining the MultiPASS L6000 2 Remove the old cartridge. Chapter 9 Maintaining the MultiPASS L6000 9-13 Inserting the Cartridge 1 Open the front cover.
r Dispose of the unit. r Lift the cover forward to its open position. r Press the release latches on the sides of the toner cartridge properly. To recycle your used cartridge, follow the instructions included with your new FX-3 Toner Cartridge. Maintaining the MultiPASS L6000 2 Remove the old cartridge. Chapter 9 Maintaining the MultiPASS L6000 9-13 Inserting the Cartridge 1 Open the front cover.

User Manual
Page 183
3 Insert the new toner cartridge into position. r Slide the unit into the unit. r Align the rails on the cartridge's handle. 9-14 Maintaining the MultiPASS L6000 Chapter 9 r Always hold the cartridge by its handle when inserting it in the unit. 4 Gently press the cartridge into the unit as far as it will go. r Press down and back on the left and right sides of the cartridge with the guides inside the unit.
3 Insert the new toner cartridge into position. r Slide the unit into the unit. r Align the rails on the cartridge's handle. 9-14 Maintaining the MultiPASS L6000 Chapter 9 r Always hold the cartridge by its handle when inserting it in the unit. 4 Gently press the cartridge into the unit as far as it will go. r Press down and back on the left and right sides of the cartridge with the guides inside the unit.

User Manual
Page 184
... tray or manual feed slot. r Open the front cover and remove the toner cartridge. r Remove any exposure to transport the MultiPASS, be very careful. 1 Disconnect all cables. Maintaining the MultiPASS C5000 Transporting the MultiPASS If you need to light. Remove the toner cartridge. Chapter 9 Maintaining the MultiPASS L6000 9-15 r Unplug the power cord. 5 Close the front cover.
... tray or manual feed slot. r Open the front cover and remove the toner cartridge. r Remove any exposure to transport the MultiPASS, be very careful. 1 Disconnect all cables. Maintaining the MultiPASS C5000 Transporting the MultiPASS If you need to light. Remove the toner cartridge. Chapter 9 Maintaining the MultiPASS L6000 9-15 r Unplug the power cord. 5 Close the front cover.

User Manual
Page 192
Chapter 10 Troubleshooting 10-7 Troubleshooting r Hold the cartridge by its handle and remove it from the unit. Now locate the jammed piece of the unit. r Cover the cartridge to protect it from the light. 3 Press the paper release lever toward the back of paper. 2 Remove the toner cartridge.
Chapter 10 Troubleshooting 10-7 Troubleshooting r Hold the cartridge by its handle and remove it from the unit. Now locate the jammed piece of the unit. r Cover the cartridge to protect it from the light. 3 Press the paper release lever toward the back of paper. 2 Remove the toner cartridge.


