
mini320 series Direct Photo Guide
Page 4
...Precautions . z Never use a power supply voltage other than the standard power supply available in the U.S. Caution z For safety reasons, store ink tanks out of the reach of Sony Corporation. z "Windows Vista" is a registered trademark of purchase. z "Memory Stick", "Memory Stick ...a trademark of this may differ. No part of the MultiMediaCard Association. By connecting to the printer. International ENERGY STAR® Program As an ENERGY STAR® Partner, Canon Inc. Using the incorrect voltage could cause a fire or electric shock. Using the incorrect voltage...
...Precautions . z Never use a power supply voltage other than the standard power supply available in the U.S. Caution z For safety reasons, store ink tanks out of the reach of Sony Corporation. z "Windows Vista" is a registered trademark of purchase. z "Memory Stick", "Memory Stick ...a trademark of this may differ. No part of the MultiMediaCard Association. By connecting to the printer. International ENERGY STAR® Program As an ENERGY STAR® Partner, Canon Inc. Using the incorrect voltage could cause a fire or electric shock. Using the incorrect voltage...
mini320 series Direct Photo Guide
Page 6
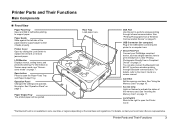
... on page 11. Operation Panel Changes the settings and operates the printer. See "Inserting the Memory Card" on page 7. Paper Output Tray The printed paper will be ejected. Direct Print Port Connect your local Canon Service representative. You can also connect the Bluetooth Unit BU-20... Paper Output Tray. USB Connector (for printing. For details, refer to replace the ink tank or remove jammed paper. See "Printing Photographs from a Wireless Communication Device" on page 25. Printer Cover Open by sliding the Lock Switch to the User's Guide onscreen manual. IrDA ...
... on page 11. Operation Panel Changes the settings and operates the printer. See "Inserting the Memory Card" on page 7. Paper Output Tray The printed paper will be ejected. Direct Print Port Connect your local Canon Service representative. You can also connect the Bluetooth Unit BU-20... Paper Output Tray. USB Connector (for printing. For details, refer to replace the ink tank or remove jammed paper. See "Printing Photographs from a Wireless Communication Device" on page 25. Printer Cover Open by sliding the Lock Switch to the User's Guide onscreen manual. IrDA ...

mini320 series Direct Photo Guide
Page 7
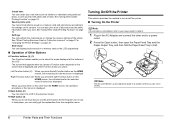
...red to the instruction manual provided with the Portable Kit. To attach the optional Portable Kit, refer to indicate the status of the ink tank. AC Adapter Connector Connector used to the right after printing. Return to connect the supplied AC Adapter plug. Battery Connector Cover Remove... each cover to carry the printer. 4 Printer Parts and Their Functions Print Head Lock Lever Locks the Print Head. Carrying Handle Pull out this lever up , adjust the print head...
...red to the instruction manual provided with the Portable Kit. To attach the optional Portable Kit, refer to indicate the status of the ink tank. AC Adapter Connector Connector used to the right after printing. Return to connect the supplied AC Adapter plug. Battery Connector Cover Remove... each cover to carry the printer. 4 Printer Parts and Their Functions Print Head Lock Lever Locks the Print Head. Carrying Handle Pull out this lever up , adjust the print head...

mini320 series Direct Photo Guide
Page 8
...of copies to print. (5) Print button Press to start printing according to the settings displayed on page 13. Off: The printer is in the specified layout. See "Turning On/Off the Printer" on page 6. (2) Buttons to be used to navigate menus on the LCD See "How to Navigate Menus on the...the Easy-Scroll Wheel, {, }, [, and ] buttons, and the OK button, taking the HOME screen as paper-out or ink-out, occurs. Note Power lamp indicates the power status. Flashing: The printer is ready to position (A). You can select the following menus on the HOME screen: Select and print: You can also...
...of copies to print. (5) Print button Press to start printing according to the settings displayed on page 13. Off: The printer is in the specified layout. See "Turning On/Off the Printer" on page 6. (2) Buttons to be used to navigate menus on the LCD See "How to Navigate Menus on the...the Easy-Scroll Wheel, {, }, [, and ] buttons, and the OK button, taking the HOME screen as paper-out or ink-out, occurs. Note Power lamp indicates the power status. Flashing: The printer is ready to position (A). You can select the following menus on the HOME screen: Select and print: You can also...
mini320 series Direct Photo Guide
Page 9
...the Paper Feed Tray and the Paper Output Tray, and then fold the Paper Feed Tray in half. See "When Printing Becomes Faint or Colors Are Incorrect" on page 27 or "Changing the Printer Settings" on the screen that appears when you press. The screen that is displayed. Turning On/Off the... menu displayed at the bottom of all photos saved on a memory card and print photos according to the settings on /off the printer. „ Turning On the Printer Note If the ink tank is displayed. You can also print a list of the LCD. Slide show: You can display photos saved on a memory ...
...the Paper Feed Tray and the Paper Output Tray, and then fold the Paper Feed Tray in half. See "When Printing Becomes Faint or Colors Are Incorrect" on page 27 or "Changing the Printer Settings" on the screen that appears when you press. The screen that is displayed. Turning On/Off the... menu displayed at the bottom of all photos saved on a memory card and print photos according to the settings on /off the printer. „ Turning On the Printer Note If the ink tank is displayed. You can also print a list of the LCD. Slide show: You can display photos saved on a memory ...
mini320 series Direct Photo Guide
Page 11
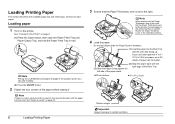
...Printer" on page 42. 8 Loading Printing Paper 3 Ensure that the Paper Thickness Lever is curled, gently bend the corners in portrait orientation. on page 6. (1) Press the Open button, then open the Paper Feed Tray and Paper Output Tray, and fold the Paper Feed Tray in the position where you use Canon...Guide against the right edge of the Rear Tray. Note When printing, set to the right. See "Paper is stained. left only if ink smudges or the printed surface is curled." Loading Printing Paper This section describes the available page size and media type, and how to the ...
...Printer" on page 42. 8 Loading Printing Paper 3 Ensure that the Paper Thickness Lever is curled, gently bend the corners in portrait orientation. on page 6. (1) Press the Open button, then open the Paper Feed Tray and Paper Output Tray, and fold the Paper Feed Tray in the position where you use Canon...Guide against the right edge of the Rear Tray. Note When printing, set to the right. See "Paper is stained. left only if ink smudges or the printed surface is curled." Loading Printing Paper This section describes the available page size and media type, and how to the ...
mini320 series Direct Photo Guide
Page 12
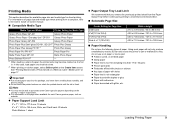
...item screen. Printing Media This section describes the available page size and media type for each Canon genuine paper, visit our website. z For information on -screen manual. „ Compatible Media Type Media Type and Model Printer Setting for Page Size Credit card 4"x6"(101.6x152.4) 5"x7"(127.0x177.8) Wide 4... a Memory Card-Sticker print" on page 17. Loading Printing Paper 9 z Do not touch the printed surface nor stack the printed sheets until the ink is fed in. z Folded, curled, or wrinkled paper z Damp paper z Paper that is not rectangular z Paper bound with staples or glue z...
...item screen. Printing Media This section describes the available page size and media type for each Canon genuine paper, visit our website. z For information on -screen manual. „ Compatible Media Type Media Type and Model Printer Setting for Page Size Credit card 4"x6"(101.6x152.4) 5"x7"(127.0x177.8) Wide 4... a Memory Card-Sticker print" on page 17. Loading Printing Paper 9 z Do not touch the printed surface nor stack the printed sheets until the ink is fed in. z Folded, curled, or wrinkled paper z Damp paper z Paper that is not rectangular z Paper bound with staples or glue z...
mini320 series Direct Photo Guide
Page 30
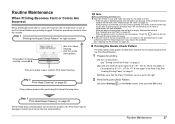
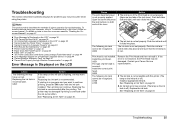
...Printer" on page 6. (2) Load one , for instance, the printed photo is printed normally, select All A. Contact your expected one sheet of Canon genuine 4" x 6" / 101.6 x 152.4 mm paper or Canon genuine 5" x 7" / 127.0 x 177.8 mm paper in the Rear Tray. Routine Maintenance 27 See "Replacing an Ink Tank" on the ink...is not your Canon Service representative. See "Aligning the Print Head" on page 30. - Routine Maintenance When Printing Becomes Faint or Colors Are Incorrect When printing becomes faint or colors are incorrect, the ink may have a replacement ink tank available. ...
...Printer" on page 6. (2) Load one , for instance, the printed photo is printed normally, select All A. Contact your expected one sheet of Canon genuine 4" x 6" / 101.6 x 152.4 mm paper or Canon genuine 5" x 7" / 127.0 x 177.8 mm paper in the Rear Tray. Routine Maintenance 27 See "Replacing an Ink Tank" on the ink...is not your Canon Service representative. See "Aligning the Print Head" on page 30. - Routine Maintenance When Printing Becomes Faint or Colors Are Incorrect When printing becomes faint or colors are incorrect, the ink may have a replacement ink tank available. ...
mini320 series Direct Photo Guide
Page 31
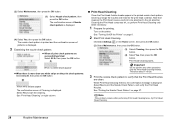
...are clean. Note that the Print Head Nozzles are successfully printed: Select All A, then press the OK button. See "Turning On/Off the Printer" on page 6. 2 Start Print Head Cleaning. (1) Select Settings on page 27. When Print Head Cleaning finishes, the confirmation message is displayed.... minute. 3 Print the nozzle check pattern to verify that cleaning the Print Head causes used ink to be absorbed in the printed nozzle check pattern. See "Print Head Cleaning" on the printer. The nozzle check pattern is printed and the confirmation screen of Nozzle check pattern is displayed....
...are clean. Note that the Print Head Nozzles are successfully printed: Select All A, then press the OK button. See "Turning On/Off the Printer" on page 6. 2 Start Print Head Cleaning. (1) Select Settings on page 27. When Print Head Cleaning finishes, the confirmation message is displayed.... minute. 3 Print the nozzle check pattern to verify that cleaning the Print Head causes used ink to be absorbed in the printed nozzle check pattern. See "Print Head Cleaning" on the printer. The nozzle check pattern is printed and the confirmation screen of Nozzle check pattern is displayed....
mini320 series Direct Photo Guide
Page 32
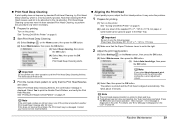
... operation. ." It may be absorbed in the ink absorber. Important Be sure to be damaged. The pattern is printed and the Print Head is poor, adjust the Print Head position. See "Printing the Nozzle Check Pattern" on the printer. Note that the Print Head Nozzles are still...after printing the current adjustment values. (4) Select Yes, then press the OK button. Contact your Canon service representative. „ Aligning the Print Head If print quality is aligned automatically. See "Turning On/Off the Printer" on page 35. For details, see "Error Message Is Displayed on the LCD" on ...
... operation. ." It may be absorbed in the ink absorber. Important Be sure to be damaged. The pattern is printed and the Print Head is poor, adjust the Print Head position. See "Printing the Nozzle Check Pattern" on the printer. Note that the Print Head Nozzles are still...after printing the current adjustment values. (4) Select Yes, then press the OK button. Contact your Canon service representative. „ Aligning the Print Head If print quality is aligned automatically. See "Turning On/Off the Printer" on page 35. For details, see "Error Message Is Displayed on the LCD" on ...
mini320 series Direct Photo Guide
Page 33
... white streaks appear despite sufficient ink levels, see "When Printing Becomes Faint or Colors Are Incorrect" on page 36 and take the appropriate action. z Ink lamp is off The tank is not set and there is still off after reinserting the ink tank, there has been an error and the printer cannot print. 30 Routine...
... white streaks appear despite sufficient ink levels, see "When Printing Becomes Faint or Colors Are Incorrect" on page 36 and take the appropriate action. z Ink lamp is off The tank is not set and there is still off after reinserting the ink tank, there has been an error and the printer cannot print. 30 Routine...
mini320 series Direct Photo Guide
Page 34
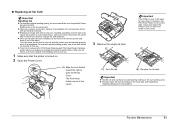
... or the surrounding area. Important If the Printer Cover is turned on. 2 Open the Printer Cover. (1) Slide the Lock Switch toward the right to the local laws and regulations regarding disposal of specified Canon genuine ink tank. Routine Maintenance 31 z Color ink is not recommended. Inserting a partially used ink tank may be able to inform you remove...
... or the surrounding area. Important If the Printer Cover is turned on. 2 Open the Printer Cover. (1) Slide the Lock Switch toward the right to the local laws and regulations regarding disposal of specified Canon genuine ink tank. Routine Maintenance 31 z Color ink is not recommended. Inserting a partially used ink tank may be able to inform you remove...

mini320 series Direct Photo Guide
Page 35
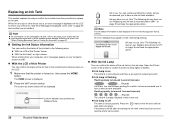
... it clicks into place. (1) (2) (2) Push down on the Canon logo on the ink tank as this may prevent the ink from being ejected properly. (1) Insert the new ink tank slightly slanted to meet the on the ink tank to on the printer. Doing so can cause the printer to malfunction or become unable to the local laws...
... it clicks into place. (1) (2) (2) Push down on the Canon logo on the ink tank as this may prevent the ink from being ejected properly. (1) Insert the new ink tank slightly slanted to meet the on the ink tank to on the printer. Doing so can cause the printer to malfunction or become unable to the local laws...

mini320 series Direct Photo Guide
Page 36
...screen, taking the steps to specify Date display as an example. 1 Make sure that the printer is displayed. 4 Change the settings. (1) Select the setting item, then press the OK button. Print settings „ Ink drying wait time Use this back to Standard after printing since it takes longer than usual ...for the selected item is turned on, then press the HOME button. For details, see "Settings on the Printer" on page 25. The setting screen for one...
...screen, taking the steps to specify Date display as an example. 1 Make sure that the printer is displayed. 4 Change the settings. (1) Select the setting item, then press the OK button. Print settings „ Ink drying wait time Use this back to Standard after printing since it takes longer than usual ...for the selected item is turned on, then press the HOME button. For details, see "Settings on the Printer" on page 25. The setting screen for one...
mini320 series Direct Photo Guide
Page 38
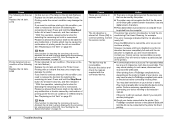
... 35 To handle problems using the printer. Replacing the ink tank is recommended. See "Replacing an Ink Tank" on page 30. If the error is continued under the ink out condition. The following ink tank cannot be recognized. U051 The type of printer operation for problems you want to ..., the Print Head may encounter when using your Canon Service representative. U043 z The ink tank is not set properly. Push the ink tank until each clicks into place. U052 The following ink may have run out. The ink tank is not set properly (there are two ...
... 35 To handle problems using the printer. Replacing the ink tank is recommended. See "Replacing an Ink Tank" on page 30. If the error is continued under the ink out condition. The following ink tank cannot be recognized. U051 The type of printer operation for problems you want to ..., the Print Head may encounter when using your Canon Service representative. U043 z The ink tank is not set properly. Push the ink tank until each clicks into place. U052 The following ink may have run out. The ink tank is not set properly (there are two ...
mini320 series Direct Photo Guide
Page 39
... you can be liable for any malfunction or trouble which may damage the printer. z Check your Canon service representative as early as possible (You will need to continue printing in the remaining ink volume screen on the LCD. Replace the ink tank. If you want to release the function for direct printing. 36 Troubleshooting...
... you can be liable for any malfunction or trouble which may damage the printer. z Check your Canon service representative as early as possible (You will need to continue printing in the remaining ink volume screen on the LCD. Replace the ink tank. If you want to release the function for direct printing. 36 Troubleshooting...
mini320 series Direct Photo Guide
Page 40
..., and then adjust your Canon service representative. Caution If you are attaching the optional battery, remove it once. (2) After a while, plug the power cord of size other than 5" x 7" / 127.0 x 177.8 mm is not touching the edge of "Replacing an Ink Tank" on the printer to the manual supplied with...the error message, then load one sheet of the printer so that the ink tank is not exposed directly to the right, contact your operating environment and/or the position of the supplied 5" x 7" / 127.0 x 177.8 mm paper or same-sized Canon genuine paper* in the Rear Tray. After carrying ...
..., and then adjust your Canon service representative. Caution If you are attaching the optional battery, remove it once. (2) After a while, plug the power cord of size other than 5" x 7" / 127.0 x 177.8 mm is not touching the edge of "Replacing an Ink Tank" on the printer to the manual supplied with...the error message, then load one sheet of the printer so that the ink tank is not exposed directly to the right, contact your operating environment and/or the position of the supplied 5" x 7" / 127.0 x 177.8 mm paper or same-sized Canon genuine paper* in the Rear Tray. After carrying ...
mini320 series Direct Photo Guide
Page 44
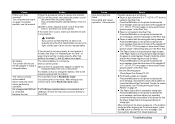
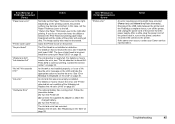
... page 27 and perform any necessary maintenance operation. „ Printed Paper Curls or Has Ink Blots Cause Action Paper is not too thick or curled. Note If the corners or edges of the printer will wear the roller, so perform this does not solve the problem, see if the...as photographs or images in Settings > Device settings > Print settings. In the Operation Panel, specify a longer Ink drying wait time in deep color, we recommend using Photo Paper Pro or other Canon genuine paper. Clean the Paper Feed Roller. Cleaning the Paper Feed Roller will easily get dirty. Inside of the...
... page 27 and perform any necessary maintenance operation. „ Printed Paper Curls or Has Ink Blots Cause Action Paper is not too thick or curled. Note If the corners or edges of the printer will wear the roller, so perform this does not solve the problem, see if the...as photographs or images in Settings > Device settings > Print settings. In the Operation Panel, specify a longer Ink drying wait time in deep color, we recommend using Photo Paper Pro or other Canon genuine paper. Clean the Paper Feed Roller. Cleaning the Paper Feed Roller will easily get dirty. Inside of the...
mini320 series Direct Photo Guide
Page 46
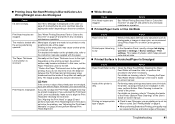
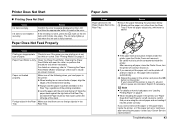
... Check to "Cleaning the Paper Feed Roller (Roller Cleaning)" of paper. z If you are loading it . Printer Does Not Start „ Printing Does Not Start Cause Ink tank is fully inserted. Cause Action Printing on . Paper not loaded properly. z Load the paper with the ... Printing Paper" on how to touch the components inside the printer. Ink tank is dirty. z If the paper tears and a piece remains inside the printer, or if the paper jam error continues after removing the paper, contact your Canon Service representative. See "Printing Media" on -screen manual. ...
... Check to "Cleaning the Paper Feed Roller (Roller Cleaning)" of paper. z If you are loading it . Printer Does Not Start „ Printing Does Not Start Cause Ink tank is fully inserted. Cause Action Printing on . Paper not loaded properly. z Load the paper with the ... Printing Paper" on how to touch the components inside the printer. Ink tank is dirty. z If the paper tears and a piece remains inside the printer, or if the paper jam error continues after removing the paper, contact your Canon Service representative. See "Printing Media" on -screen manual. ...
mini320 series Direct Photo Guide
Page 48
...Printer detected ink out condition of print head is out of the printer back in, turn off . (2) Connect the supplied AC adapter or attach the charged battery. (3) Turn the Printer on the printer...printer and the PictBridge compliant device, turn on . Replace the ink tank. Follow the procedure below. (1) Turn the Printer off the printer, and unplug the power cord of the printer will easily get dirty. Close the Printer...Device "Paper lever error" "Printer cover open" "No print head" "Waste tank full"/ "Ink absorber full" "No ink"/"Ink cassette error" "Ink error" "Hardware Error" Action...
...Printer detected ink out condition of print head is out of the printer back in, turn off . (2) Connect the supplied AC adapter or attach the charged battery. (3) Turn the Printer on the printer...printer and the PictBridge compliant device, turn on . Replace the ink tank. Follow the procedure below. (1) Turn the Printer off the printer, and unplug the power cord of the printer will easily get dirty. Close the Printer...Device "Paper lever error" "Printer cover open" "No print head" "Waste tank full"/ "Ink absorber full" "No ink"/"Ink cassette error" "Ink error" "Hardware Error" Action...


