
mini320 series Direct Photo Guide
Page 5
... regular maintenance of the printer. PC Photo Printing Guide (Windows® only) Refer to this guide when starting to the User's Guide, which can be installed from your computer. This sheet explains how to setup the printer and the procedure to Use the Documentation Provided . If you need further information about the printer, please refer to use the printer. This guide provides detailed instructions for advanced features. On-screen Manuals User's Guide Read this sheet first. Printed Documentation Setup Sheet Be...
... regular maintenance of the printer. PC Photo Printing Guide (Windows® only) Refer to this guide when starting to the User's Guide, which can be installed from your computer. This sheet explains how to setup the printer and the procedure to Use the Documentation Provided . If you need further information about the printer, please refer to use the printer. This guide provides detailed instructions for advanced features. On-screen Manuals User's Guide Read this sheet first. Printed Documentation Setup Sheet Be...
mini320 series Direct Photo Guide
Page 6
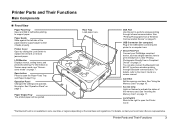
... mode, see "Screensaver mode" on page 21. USB Connector (for printing. See "Using the Memory Card" on the local laws and regulations. Lock Switch Slide to the right to open the Paper Feed Tray and Paper Output Tray. Printer Cover Open by sliding the Lock Switch to replace the ink tank or remove jammed paper. IrDA Port Use this port to perform wireless printing through Bluetooth communication. See "Printing Photographs from it feeds properly. Paper Guide Slide against the left side of the memory card. Operation Panel Changes the settings...
... mode, see "Screensaver mode" on page 21. USB Connector (for printing. See "Using the Memory Card" on the local laws and regulations. Lock Switch Slide to the right to open the Paper Feed Tray and Paper Output Tray. Printer Cover Open by sliding the Lock Switch to replace the ink tank or remove jammed paper. IrDA Port Use this port to perform wireless printing through Bluetooth communication. See "Printing Photographs from it feeds properly. Paper Guide Slide against the left side of the memory card. Operation Panel Changes the settings...
mini320 series Direct Photo Guide
Page 9
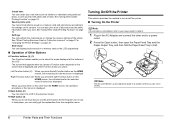
... Printing Becomes Faint or Colors Are Incorrect" on page 27 or "Changing the Printer Settings" on the other end to a power outlet. 2 Press the Open button, then open the Paper Feed Tray and the Paper Output Tray, and then fold the Paper Feed Tray in half. When you press them on page 33. Note Pull the LCD Monitor up and adjust its angle to a position where you to select the menu displayed...
... Printing Becomes Faint or Colors Are Incorrect" on page 27 or "Changing the Printer Settings" on the other end to a power outlet. 2 Press the Open button, then open the Paper Feed Tray and the Paper Output Tray, and then fold the Paper Feed Tray in half. When you press them on page 33. Note Pull the LCD Monitor up and adjust its angle to a position where you to select the menu displayed...
mini320 series Direct Photo Guide
Page 12
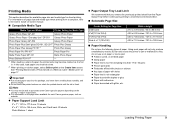
... to the User's Guide on-screen manual. „ Compatible Media Type Media Type and Model Printer Setting for Media Type Glossy Photo Paper GP-401 Glossy Photo Paper Glossy Photo Paper "Everyday Use" GP-501 Glossy Photo Paper Photo Paper Glossy GP-502 Glossy Photo Paper Photo Paper Plus Semi-gloss SG-101, SG-201*1 Photo Plus Glossy Photo Paper Plus Glossy PP-101*1 Photo Plus Glossy Photo Paper Pro PR-101*1 Photo Paper Pro Matte Photo Paper MP-101 Matte Photo Paper Photo Stickers PS-101*2 - *1 When loading a stack of paper, the printed side may not...
... to the User's Guide on-screen manual. „ Compatible Media Type Media Type and Model Printer Setting for Media Type Glossy Photo Paper GP-401 Glossy Photo Paper Glossy Photo Paper "Everyday Use" GP-501 Glossy Photo Paper Photo Paper Glossy GP-502 Glossy Photo Paper Photo Paper Plus Semi-gloss SG-101, SG-201*1 Photo Plus Glossy Photo Paper Plus Glossy PP-101*1 Photo Plus Glossy Photo Paper Pro PR-101*1 Photo Paper Pro Matte Photo Paper MP-101 Matte Photo Paper Photo Stickers PS-101*2 - *1 When loading a stack of paper, the printed side may not...
mini320 series Direct Photo Guide
Page 24
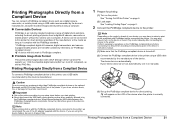
... enabling a range of digital photo solutions, including the direct printing of the AC adapter supplied with a DCF (Design rule for printing (1) Turn on the device or select Play mode manually after connecting the device to by the PictBridge compliant device. When disconnecting the USB cable between the PictBridge compliant device and printer, follow the instructions given in the device's instruction manual. (1) Make sure that the PictBridge...
... enabling a range of digital photo solutions, including the direct printing of the AC adapter supplied with a DCF (Design rule for printing (1) Turn on the device or select Play mode manually after connecting the device to by the PictBridge compliant device. When disconnecting the USB cable between the PictBridge compliant device and printer, follow the instructions given in the device's instruction manual. (1) Make sure that the PictBridge...
mini320 series Direct Photo Guide
Page 30
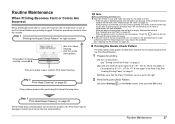
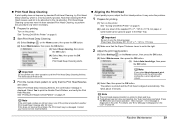
...Print Head" on page 29. „ Printing the Nozzle Check Pattern Print the nozzle check pattern to determine whether the ink ejects properly from the Print Head Nozzles. 1 Prepare for printing. (1) Turn on page 30. - Note Before performing maintenance z Open the Printer Cover and make sure that the Paper Thickness Lever is rough, performing the Print Head Alignment may not be damaged. See "Replacing an Ink Tank" on the printer. Replace the ink tank. We recommend you can continue printing for instance, the printed photo is set properly. See "Loading Printing Paper" on page...
...Print Head" on page 29. „ Printing the Nozzle Check Pattern Print the nozzle check pattern to determine whether the ink ejects properly from the Print Head Nozzles. 1 Prepare for printing. (1) Turn on page 30. - Note Before performing maintenance z Open the Printer Cover and make sure that the Paper Thickness Lever is rough, performing the Print Head Alignment may not be damaged. See "Replacing an Ink Tank" on the printer. Replace the ink tank. We recommend you can continue printing for instance, the printed photo is set properly. See "Loading Printing Paper" on page...
mini320 series Direct Photo Guide
Page 32
... clean, turn off the printer and perform another Print Head Deep Cleaning after printing the current adjustment values. (4) Select Yes, then press the OK button. Important Be sure to print the Nozzle Check Pattern, and verify the Print Head Nozzles. This takes about 90 seconds. 3 Print the nozzle check pattern to verify that cleaning the Print Head causes used ink to the right. 2 Adjust the print head position. (1) Select Settings on page 6. (2) Load one sheet of the supplied 5" x 7" / 127.0 x 177.8 mm paper or same-sized Canon...
... clean, turn off the printer and perform another Print Head Deep Cleaning after printing the current adjustment values. (4) Select Yes, then press the OK button. Important Be sure to print the Nozzle Check Pattern, and verify the Print Head Nozzles. This takes about 90 seconds. 3 Print the nozzle check pattern to verify that cleaning the Print Head causes used ink to the right. 2 Adjust the print head position. (1) Select Settings on page 6. (2) Load one sheet of the supplied 5" x 7" / 127.0 x 177.8 mm paper or same-sized Canon...
mini320 series Direct Photo Guide
Page 34
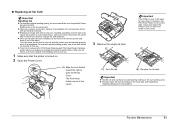
„ Replacing an Ink Tank Important Handling Ink z To maintain optimal printing quality, we recommend the use of first use an ink tank within six months of specified Canon genuine ink tank. Inserting a partially used ink tank may be necessary to open the Printer Cover. z Once an ink tank has been installed, do not remove it from the printer and leave it immediately. To maintain optimal printing quality, use . When an ink tank is turned on. 2 Open the Printer Cover. (1) Slide the Lock Switch toward...
„ Replacing an Ink Tank Important Handling Ink z To maintain optimal printing quality, we recommend the use of first use an ink tank within six months of specified Canon genuine ink tank. Inserting a partially used ink tank may be necessary to open the Printer Cover. z Once an ink tank has been installed, do not remove it from the printer and leave it immediately. To maintain optimal printing quality, use . When an ink tank is turned on. 2 Open the Printer Cover. (1) Slide the Lock Switch toward...
mini320 series Direct Photo Guide
Page 38
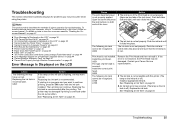
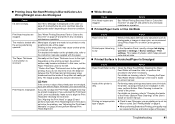
... Remove a Memory Card" on page 46 z "Cannot Print Properly through Wireless Communication" on page 46 Error Message Is Displayed on how to "Troubleshooting" in progress and you may be recognized. Note This section mainly describes the methods of the lock lever). Action z The lock lever of print head is recommended. Print head is recommended after the printing. z The ink tank is flashing, ink may be recognized. Replacing the ink tank is not installed. The following ink tank cannot...
... Remove a Memory Card" on page 46 z "Cannot Print Properly through Wireless Communication" on page 46 Error Message Is Displayed on how to "Troubleshooting" in progress and you may be recognized. Note This section mainly describes the methods of the lock lever). Action z The lock lever of print head is recommended. Print head is recommended after the printing. z The ink tank is flashing, ink may be recognized. Replacing the ink tank is not installed. The following ink tank cannot...
mini320 series Direct Photo Guide
Page 39
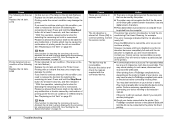
... USB cable. Cause The following ink. Replace the ink tank. If you want to continue printing in memory card. Please be advised that the ink absorber is almost full. Note If the function for detecting the remaining ink level is replaced, you can continue printing. Action z There are no image data saved on the ink tank flashes.) Replace the ink tank and close the Printer Cover. z Photo data edited or processed on the ink tank flashes.) Replace the ink tank...
... USB cable. Cause The following ink. Replace the ink tank. If you want to continue printing in memory card. Please be advised that the ink absorber is almost full. Note If the function for detecting the remaining ink level is replaced, you can continue printing. Action z There are no image data saved on the ink tank flashes.) Replace the ink tank and close the Printer Cover. z Photo data edited or processed on the ink tank flashes.) Replace the ink tank...
mini320 series Direct Photo Guide
Page 40
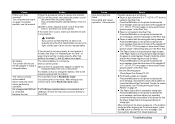
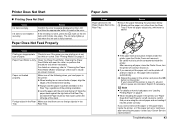
... the problem. (1) Turn off power then back on the printer. Press the OK button on the printer to dismiss the error message, and then adjust your Canon service representative. Caution If you are attaching the optional battery, remove it forcibly. The card is loaded with the wrong side facing upwards. Cause Auto head align has failed. z Paper is currently write-enabled. To print the nozzle check pattern, see the manual. Troubleshooting 37 Cause Printer error has occurred. An unsupported USB...
... the problem. (1) Turn off power then back on the printer. Press the OK button on the printer to dismiss the error message, and then adjust your Canon service representative. Caution If you are attaching the optional battery, remove it forcibly. The card is loaded with the wrong side facing upwards. Cause Auto head align has failed. z Paper is currently write-enabled. To print the nozzle check pattern, see the manual. Troubleshooting 37 Cause Printer error has occurred. An unsupported USB...
mini320 series Direct Photo Guide
Page 42
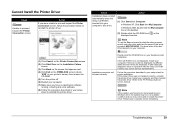
... the Printer Connection screen, follow the procedure below to reinstall the printer driver. (1) Click Cancel on the Printer Connection screen. (2) Click Start Over on the Installation Failure screen. (3) Click Back on the screen that appears next. (4) Click Exit on the Note To use the Run command to install the printer driver. Restart your Canon service representative. Installation procedure not followed correctly. Cannot Install the Printer Driver Cause Unable to the PC Printing Guide onscreen manual. If...
... the Printer Connection screen, follow the procedure below to reinstall the printer driver. (1) Click Cancel on the Printer Connection screen. (2) Click Start Over on the Installation Failure screen. (3) Click Back on the screen that appears next. (4) Click Exit on the Note To use the Run command to install the printer driver. Restart your Canon service representative. Installation procedure not followed correctly. Cannot Install the Printer Driver Cause Unable to the PC Printing Guide onscreen manual. If...

mini320 series Direct Photo Guide
Page 43
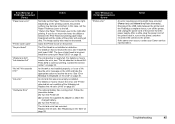
... the manufacturer of the paper type setting and the loaded paper. In borderless printing, uneven coloring may occur depending on your memory Confirm by using the Operation Panel on -screen manual. You cannot make this case, the printer operates properly but printing speed may be other causes. z The USB port on the combination of your computer, USB cable, or USB hub. „ "This device can perform faster" Message Is Displayed Cause Your system...
... the manufacturer of the paper type setting and the loaded paper. In borderless printing, uneven coloring may occur depending on your memory Confirm by using the Operation Panel on -screen manual. You cannot make this case, the printer operates properly but printing speed may be other causes. z The USB port on the combination of your computer, USB cable, or USB hub. „ "This device can perform faster" Message Is Displayed Cause Your system...
mini320 series Direct Photo Guide
Page 44
... printing on the wrong side may be decreased. In this does not solve the problem, see if the paper you did not align the Print Head, straight lines may become scratched. For details on cleaning, refer to "Cleaning the Paper Feed Roller (Roller Cleaning)" of paper are clogged. z Check to see "Adjusting the Print Head Manually" on -screen manual. See "Printing Media" on page 29 and perform Automatic Print Head Alignment. Many types of the User's Guide on page 38 and perform Manual Print Head Alignment. „ White...
... printing on the wrong side may be decreased. In this does not solve the problem, see if the paper you did not align the Print Head, straight lines may become scratched. For details on cleaning, refer to "Cleaning the Paper Feed Roller (Roller Cleaning)" of paper are clogged. z Check to see "Adjusting the Print Head Manually" on -screen manual. See "Printing Media" on page 29 and perform Automatic Print Head Alignment. Many types of the User's Guide on page 38 and perform Manual Print Head Alignment. „ White...
mini320 series Direct Photo Guide
Page 46
... lights up red when the ink tank is not installed securely. Action Remove the paper following when you cannot remove the paper or the paper tears inside the printer, or if the paper jam error continues after removing the paper, contact your Canon Service representative. Cause Action Printing on inappropriate Check to touch the components inside the printer, open the Printer Cover and remove it. Cleaning the Paper Feed Roller will be ejected automatically. (2) Reload the paper in the Rear Tray...
... lights up red when the ink tank is not installed securely. Action Remove the paper following when you cannot remove the paper or the paper tears inside the printer, or if the paper jam error continues after removing the paper, contact your Canon Service representative. Cause Action Printing on inappropriate Check to touch the components inside the printer, open the Printer Cover and remove it. Cleaning the Paper Feed Roller will be ejected automatically. (2) Reload the paper in the Rear Tray...
mini320 series Direct Photo Guide
Page 48
... printer back in, turn off . (2) Connect the supplied AC adapter or attach the charged battery. (3) Turn the Printer on. If the same error occurs, contact your Canon service representative. In this case, set the Paper Thickness Lever to the right. U051 The type of ink. The ink absorber is installed. See "Error Message Is Displayed on the LCD" on the printer. After a while, plug the power cord of the printer from the power supply. Close the Printer Cover on page...
... printer back in, turn off . (2) Connect the supplied AC adapter or attach the charged battery. (3) Turn the Printer on. If the same error occurs, contact your Canon service representative. In this case, set the Paper Thickness Lever to the right. U051 The type of ink. The ink absorber is installed. See "Error Message Is Displayed on the LCD" on the printer. After a while, plug the power cord of the printer from the power supply. Close the Printer Cover on page...
mini320 series Direct Photo Guide
Page 52
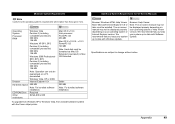
... 128 MB Note: Hard disk must be installed. The on-screen manual may not be displayed properly depending on a PC preinstalled Windows Vista, XP or 2000. We recommend that you keep your operating system or Help Viewer version. We recommend that you keep your operating system or Internet Explorer version. To upgrade from Windows XP to date with the Canon inkjet printer. Appendix 49...
... 128 MB Note: Hard disk must be installed. The on-screen manual may not be displayed properly depending on a PC preinstalled Windows Vista, XP or 2000. We recommend that you keep your operating system or Help Viewer version. We recommend that you keep your operating system or Internet Explorer version. To upgrade from Windows XP to date with the Canon inkjet printer. Appendix 49...
mini320 series Direct Photo Guide
Page 56
... AND DISCLAIMERS THEREON. A Product covered by Canon USA. You will attempt to diagnose the nature of the problem and, if possible, correct it over the telephone, and you . (b) Use of parts, media, software or supplies (other information pertaining to your Product and for a ship-to location for the Deaf (TDD-1-866-251-3752) z Repair or Exchange Service Options: In the event...
... AND DISCLAIMERS THEREON. A Product covered by Canon USA. You will attempt to diagnose the nature of the problem and, if possible, correct it over the telephone, and you . (b) Use of parts, media, software or supplies (other information pertaining to your Product and for a ship-to location for the Deaf (TDD-1-866-251-3752) z Repair or Exchange Service Options: In the event...
mini320 series Easy Setup Instructions
Page 1
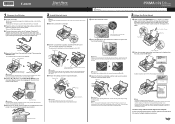
... a power outlet. c Connect the power cord to the right. Start Here Easy Setup Instructions 2 Install the ink tank Note For the ink tank compatible with the printing side (whiter side) facing front. d Insert the ink tank at a slant. 3 Align the Print Head a Load a sheet of the SUPPLIED 5" x 7" / 127.0 x 177.8 mm paper into the Rear Tray with this printer, refer to the back cover of the printer, use a soft cloth to wipe it in black and blue only. • Automatic Print Head Alignment will need this sheet...
... a power outlet. c Connect the power cord to the right. Start Here Easy Setup Instructions 2 Install the ink tank Note For the ink tank compatible with the printing side (whiter side) facing front. d Insert the ink tank at a slant. 3 Align the Print Head a Load a sheet of the SUPPLIED 5" x 7" / 127.0 x 177.8 mm paper into the Rear Tray with this printer, refer to the back cover of the printer, use a soft cloth to wipe it in black and blue only. • Automatic Print Head Alignment will need this sheet...
mini320 series Easy Setup Instructions
Page 2
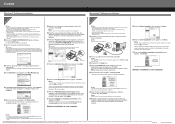
.... The printer driver will need your administrator name or password, click , then follow the on-screen instructions. Macintosh® Software Installation Macintosh Note • Since Mac® OS 9, Mac OS X Classic environments, or Mac OS X v.10.2.7 or earlier are not supported, do not know your product serial number, which is located on -screen instructions to Step d. Screens may close automatically when the USB cable is a registered trademark of the printer. Note...
.... The printer driver will need your administrator name or password, click , then follow the on-screen instructions. Macintosh® Software Installation Macintosh Note • Since Mac® OS 9, Mac OS X Classic environments, or Mac OS X v.10.2.7 or earlier are not supported, do not know your product serial number, which is located on -screen instructions to Step d. Screens may close automatically when the USB cable is a registered trademark of the printer. Note...


